| Oracle® Retail Predictive Application Server Administration Guide for the Classic Client Release 14.1 E59120-01 |
|

 Previous |
 Next |
| Oracle® Retail Predictive Application Server Administration Guide for the Classic Client Release 14.1 E59120-01 |
|
Previous |
Next |
This chapter describes how to build and upgrade domains. It contains the following sections:
After a fully defined configuration is created, an RPAS domain can be installed. Since building an RPAS domain is a manual process, it is expected that this process is supported by UNIX administration if the domain is installed on a UNIX platform. If the domain is being installed on Windows servers for prototyping and demonstration purposes, it can be built using the RPAS Configuration Tools GUI installer.
The following are the prerequisites for building a domain:
Installation of RPAS on the server that will store the domains.
Installation of the Configuration Tools on the server that will store the domains.
A configuration built using the Configuration Tools.
A collection of hierarchy input files that contain positions for the domain. A hierarchy data file (name.dat) is required for each defined hierarchy.
Cygwin installed (for prototyping and demonstration on a Windows server only).
The following client-side procedures must be completed to build a domain.
To begin the domain build process, a configuration project built using the Configuration Tools is required. This can be a packaged template or a configuration created with the customer's specific hierarchies, measures, and workbooks. If using a new configuration, be sure to note the path where the configuration is saved on the local disk.
|
Note: The remainder of this section assumes that the domains are being built on a different server than Windows while the configuration is created on the Windows platform. If the domain is being built on the same server as the configuration, the steps for adding the configuration to the zip file and transferring to a different server can be eliminated. |
Find the location where the configuration project is saved.
Using Windows Explorer, go to the path of the configuration project.
Right-click the Configuration folder and select Add to Zip. Package the entire contents of the project beginning with the configuration project root folder so that the zip file includes all solutions. It is important to zip the entire configuration project for the entire directory structure and not just the specific .xml files. Do not change the name of the configuration project folder or alter the contents of the folder in any way.
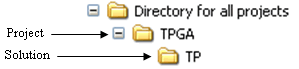
In Figure 2-1, TPGA is the configuration selected to create the TPGA.zip.
Using FTP, transfer the .zip file over to the server in binary mode. This can be placed in the home directory for now.
The following server-side procedures must be completed to build a domain.
|
Note: Though the RPAS Configuration Tools are supported only on the Windows platforms, the installation tools are supported on all platforms. However, they require Java 1.6. Ensure that the server being used for the domain installation has the correct version of Java. |
Find the location where you are going to save the configuration project file.
|
Note: Always put an updated configuration project in a new directory path. Do not overwrite an existing configuration project. |
Move the <Configuration Project>.zip file to this location.
Unzip the <Configuration Project>.zip file using the UNIX command:
unzip -a <Configuration Project>.zip
Do not change the directory name for the configuration project or alter the contents in any way.
Prior to this step, RPAS and the Configuration Tools must be installed on the server that will store the domains. During that process, the necessary environment variables for RPAS and the Configuration Tools must be defined. Refer to the "Appendix: Environment Variables" if the environment variables below have not been set up.
Log in to the server. Use the commands below to verify the environment settings:
echo $RPAS_HOME
echo $RIDE_HOME
echo $JAVA_HOME
echo $PATH
|
Note: The path for the RPAS_HOME variable may change with each new RPAS release. |
If any changes are made to the environment variable settings, remember to exit and restart the UNIX session in order to execute the corrected .profile. This step must be done before continuing with the remaining steps.
Designate a directory for the location of the input files and move the files into this directory.
|
Note: As a recommendation, use the directory name to_rpas as a standard for the location of input files. At a minimum, the hierarchy files (product, location, and calendar hierarchy files) are needed to build the domain. At this time, a calendar file must be loaded. |
If necessary, rename the hierarchy files to match the name of the configured hierarchies. The files must end in either .dat or .csv.dat. For example, a file for a configured product hierarchy named prod in the Configuration Tools should be either prod.dat or prod.csv.dat. When using the .dat extension, the format of the files must match the hierarchy configuration specified using the Configuration Tools. If using the .csv.dat extension, the files will contain fields that are comma separated. See "Loading Hierarchies Using loadHier" for more details.
Run the rpasInstall utility to build the domain. This executable is located in the path to $RIDE_HOME/bin.
This section provides the details required for the upgrade of rpasInstall.
rpasInstall <arguments>
Table 2-1 provides descriptions of the arguments used by the rpasInstall utility.
Table 2-1 Arguments Used by the rpasInstall Utility
| Argument | Description |
|---|---|
|
|
Indicates the type of installation to be performed, where:
Required. |
|
|
Indicates path to the directory containing the configuration file. Required. |
|
|
Indicates the name of the configuration. Required. |
|
-in input_home |
Indicates the path that includes the directory containing the input files for the domain to be created. If this directory includes a users.db file, then the users and groups within that file are added upon domain creation. For more information, see "Managing Users Using usermgr". Required. |
|
|
Indicates the path that includes the name of the log file to be created or updated. Required. |
|
- |
Indicates the path to the directory containing the xml files used by RPAS. This is a required argument if the user wants to supply globaldomainconfig.xml or calendar.xml. |
|
|
Indicates the path to directory in which the domain will be created. Use if and only if a globaldomainconfig.xml is not used. |
|
|
Indicates the partitioning dimension. Use if and only if the global domain is being implemented without the use of globaldomainconfig.xml. |
|
|
Indicates the filename of the function to be registered. This pairing may be repeated for multiple functions. This argument is not required if there are no functions to be registered. |
|
|
Imports configured style information into the domain. This option is automatically set in a full install. If you do not use this flag in a patch install, changes to configured styles will not be imported into the domain. |
|
Note: When you build a domain for the first time, an installation directory is created inside the domain. The installation directory is essential for the patch process and must not be removed, moved, or renamed.When submitting an issue to Oracle Retail Customer Support, if you are asked to provide a domain, be sure to provide the installs directory as well. The following information must be provided in order to help Customer Support better diagnose the issue:
|
After the domain build process is complete, the logfile should be reviewed to verify that the process executed successfully. Search for the words "ERROR," "FAILURE," and "exception" inside the logfile. The end of the logfile should look similar to the following output example:
Time: 58.451
COMPLETE
After you build the domain, it can be accessed by the RPAS Classic Client.
|
Note: Building a domain creates the shell of the domain. All measures, rules, and workbooks are created, but the measures are not populated. Measures are populated with the loadmeasure utility. For more information, see "Loading Measure Data Using loadmeasure". |
In order to connect to a domain, the domain information must be set with the RPAS EConfigure utility and the RPAS DomainDaemon must be running. See the RPAS Installation Guide for details on setting up the domain information. See "DomainDaemon" for information.
Before you can log into the new domain, you must create at least one user with the usermgr utility. After you have created one user, you can use the "Add User" workbook to create others. For more information about the usermgr utility and creating users, see the "User Maintenance" chapter.
After logging into the domain and creating the appropriate users, ensure that the appropriate permissions to workbooks and measures are set. See "Security Administration Workbook" for more information.
RPAS supports the upgrade of RPAS 11.0.x, 11.1.x, 12.x, and 13.x environments to RPAS 14.x.
|
Note: See the solution-specific Installation Guide, Implementation Guide, and Operations Guide for potential solution upgrade limitations. |
For details on upgrading to this release of RPAS from any release of RPAS prior to 13.3, see "Upgrading From Any Release of RPAS Prior to 13.3".
For details on upgrading to this release of RPAS from RPAS 13.3 or later, see "Upgrading From RPAS 13.3 or Later".
If you are upgrading to the current release of RPAS from any release prior to RPAS 13.3, complete the following steps.
You must first upgrade the domain to the latest 13.2.3 hotfix prior to starting this upgrade process.
|
Note: For information on upgrading to the latest RPAS 13.2.3 hot fix, see the 13.2.3 RPAS Administration Guide for the Classic Client, section "Upgrading and Patching Domains." Note that it is optional to perform Step 8 in that section. Step 8 states that you should run therpasInstall utility with the -patchinstall argument. This is not necessary if you are upgrading to this release because you will run that utility and argument at the end of this section. |
In RPAS 13.3, a new methodology called Integer Indexing was introduced to simplify the management of multidimensional data in an RPAS domain. Integer indexing aims at eliminating a lot of inefficiencies in the addition, removal, and reclassification of positions in a hierarchy and improving the performance of hierarchy operations.
Since integer indexing uses different internal data structures to manage the hierarchy, a pre-13.3 domain must be converted to the new format before it can be recognized by the newer version of RPAS. This conversion is accomplished by using the convertDomain utility.
Domain conversion is an elaborate and complex process that runs on the assumption that the source domain is in a good state free of system level inconsistencies. In reality, an existing domain may be in an undesirable state due to various reasons. This can cause the domain conversion process to fail.
The information in this chapter can help you when upgrading to RPAS 13.3 or later. It provides general guidelines for RPAS domain conversion. It covers the preparation of the domain, setting up the conversion parameters, and carrying out the conversion and post-conversion processing.
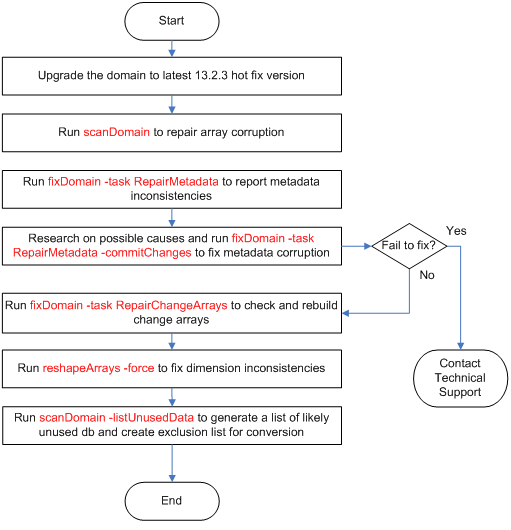
Figure 2-2 shows an overview of the domain preparation that is necessary before running domain conversion. All these utilities must be run under the RPAS 13.2.3 hotfix version 13.2.3.36 or later.
The procedure is as follows:
Upgrade the domain to the latest 13.2.3 hot fix.
RPAS supports the upgrade of RPAS 12.x environments to RPAS 13.x. If the domain is not currently on the latest 13.2.3 hot fix, it must be upgraded to that hot fix first before upgrading to 13.3.
To upgrade to the latest RPAS 13.2.3 hot fix, see the 13.2.3 version of the RPAS Administration Guide for the Classic Client, "Upgrading and Patching Domains". Note that it is optional to perform Step 8 in that section. Step 8 states that you should run the rpasInstall utility with the -patchinstall argument. This is not necessary if you are upgrading to 13.3 because you will run that utility and argument at the end of this section.
In addition, refer to the solution-specific Installation Guide, Implementation Guide, and Operations Guide, as appropriate, for potential solution upgrade limitations.
Run scanDomain to repair any array corruption.
The scanDomain utility can be used for repairing data corruption in an RPAS database. Data corruption can occur if an external program modifies the RPAS database files or an unforeseen defect occurs in the processes using the RPAS database.
To run the utility from the command line, do the following:
scanDomain -d domainPath -repairCorruption -processes N
For more information about scanDomain, see the 13.2.3 release of the RPAS Administration Guide for the Classic Client.
Run fixDomain to detect metadata errors.
The Fix Domain utility is a tool used to detect and fix data inconsistencies in a domain. It supports a few different types of "tasks" to analyze different areas of data in the domain. Task "RepairMetadata" is used to detect and repair metadata inconsistencies.
To run the utility from the command line, do the following:
fixDomain -d domainPath -task RepairMetadata
By default, this utility only reports errors without making changes to the domain. All errors are reported to standard output, which can be directed to a file.
Run fixDomain to fix metadata errors.
Run fixDomain again in the commit mode to actually fix the metadata errors in the domain.
To run the utility from the command line, do the following:
fixDomain -d domainPath -task RepairMetadata -commitChanges
Some metadata discrepancies can be too severe to fix. For example, discrepancies between the system arrays dim_hier and hierinfo cannot be fixed by the utility. It is recommended that you run fixDomain in report mode (without the -commitChanges flag) again to detect any remaining errors. Contact RPAS technical support if there are still errors.
|
Caution: Note that fixDomain may remove measures from the domain if the metadata for those measures are corrupted. This may prevent some workbooks from being built. If this happens, the missing measures should be re-registered in the domain. |
Run fixDomain to check and rebuild change arrays.
Change arrays are system arrays used by the reshapeArrays utility. They should be rebuilt in case they are out of sync with other domain data, which can cause the failure or partial failure of the reshapeArrays.
To run the utility from the command line, do the following:
fixDomain -d domainPath -task RepairChangeArrays -commitChanges
Run reshapeArrays to fix dimension inconsistencies.
This cleans up potential dimension inconsistencies between data arrays and dimension dictionaries.
To run the utility from the command line, do the following:
reshapeArrays -d domainPath -registered -force -processes N
Run scanDomain to generate a list of likely unused databases.
An existing RPAS domain can accumulate a lot of unused databases during the course of its history. If those databases are not excluded from the domain conversion process, at a minimum they can slow down the conversion considerably, and, worse yet, they can cause the conversion to fail if any of the data arrays in them is corrupt. The scanDomain utility has been enhanced to list all likely unused databases of the domain. Best efforts have been applied to generate a complete and accurate list. However, some databases may have been created by custom RPAS extension libraries or third party plug-ins and can be listed as unused by mistake. This list should be examined and corrected if necessary.
To run this utility from the command line, do the following:
scanDomain -d domainPath -listUnusedData outputFile
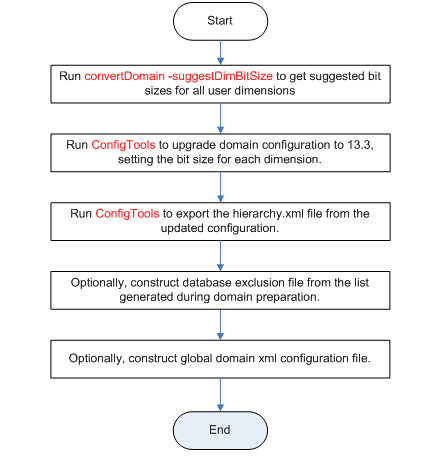
The convertDomain utility can take three configuration input files: a hierarchy configuration file, an optional global domain configuration file, and an optional database exclusion file. Figure 2-3 shows an overview of setting up these files. All utilities should be run under RPAS 13.3 hotfix version 13.3.0.17 or later, RPAS 13.3.1 hotfix version 13.3.1.5 or later, or RPAS 13.4 or later.
The procedure is as follows:
Run convertDomain to generate a suggested bit size for each user dimension.
To run the utility from the command line, do the following:
convertDomain -src domainPath -suggestDimBitSize outputFile
See "convertDomain" for more information on using the suggestDimBitSize option.
Run ConfigTools to upgrade the domain configuration and to set the bit sizes.
Use the RPAS Configuration Tools to upgrade the 13.2.3.x domain configuration to 13.3, setting the bit size for each dimension. (Bit size configuration has an impact on performance. See "Defining Dimension Properties" in the RPAS Configuration Tools User Guide for instructions on setting the bit size and reindex threshold.)
At this point, no additional changes should be made to the configuration; those changes must be processed separately at a later stage in the process. Solutions that include plug-ins that are normally run as part of the domain upgrade process will also be handled later.
Export the hierarchy.xml file from the updated configuration.
This file can be created by running the hierarchy.xml report from within the Report Generator of the RPAS Configuration Tools.
Construct the database exclusion file (optional).
An existing domain may contain a lot of stale or obsolete databases in it that can hinder the domain conversion progress. During the domain preparation, the scanDomain utility can be used to generate a list of likely unused databases. After confirmation, these databases can be put in an XML file that can be named exclusionList.xml.
See "convertDomain" for more information on the use of exclusion lists.
Construct the global domain XML configuration file (optional).
If you are converting a global domain, and not all local domains reside under the global domain path, then an XML configuration must be constructed to specify the source and destination path for each local domain.
See "convertDomain" for more information on domain.xml configuration files.
Once the domain has been prepared and all input parameters have been generated, the domain can be converted using the convertDomain utility. This utility will create a new integer indexing domain rather than updating the existing pre-integer indexing domain. This new domain can then be used to finish the upgrade process.
See "convertDomain" for more information on using the convertDomain utility.
After the domain has been successfully converted to integer indexing, some post-conversion processing steps, as shown in Figure 2-4, are required to bring the domain up to date.
To run post-conversion processing, do the following:
Run fixDomain to fix unlinked arrays.
If any arrays are listed in the unlinkListFile during the domain conversion, they must be fixed by running the fixDomain utility. The "FixArrays" task fixes unlinked arrays that contain one or more dimensions that are not linked to the dimension registry.
See "fixDomain" for more information on fixing unlinked arrays.
Upgrade the domain to the current RPAS version.
The upgradeDomain utility is used to upgrade only the RPAS version of the domain. It does not update the configuration or any other aspects of the domain itself. Refer to "upgradeDomain" for more information.
Upgrade the domain configuration.
Run the new version of the Configuration Tools to upgrade existing configurations to the latest version. Those changes should be made to the configuration modified in the Step 2 of "Setting up Domain Conversion Parameters". Refer to"Upgrade Configurations" for more information.
Patch the domain.
Running the patch installation through rpasInstall over the converted domain is required even if there are no configuration updates. Refer to "rpasInstall" for more information.
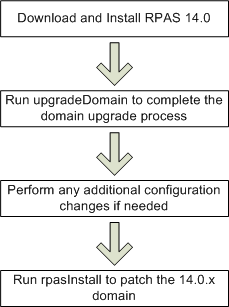
If you are upgrading to the current release of RPAS from RPAS 13.3 or later, complete the following steps.
Figure 2-5 shows an overview of the upgrade and patching process. The detailed steps are provided after the figure.
Acquire the latest 14.0.x RPAS release and install the following components:
RPAS Server
RPAS Client (Classic or Fusion)
RPAS Configuration Tools
|
Note: If you are usingrsp_manager to install an RPAS 14.0 patch, you should use the-no_domain option. |
Run the upgradeDomain utility to complete the conversion of the domain to the current release. See "upgradeDomain" for more information.
Make any additional configuration changes to the domain (such as the re-execution of plug-ins for applications that require the plug-ins to be run and applied through a patch install as part of an upgrade).
If any additional changes were made to the domain in step 3, those changes should now be applied to the upgraded domain. To apply these changes, run the rpasInstall utility with the -patchinstall argument. See "rpasInstall" for more information.
|
Note: After you run theupgradeDomain utility, the patch installation (through rpasInstall) must be run over the domain even if there are no configuration updates. This is done to ensure that configuration within the domain is synchronized with any changes made as the result of the RPAS and Configuration Tools upgrade.
When using the |
When moving to a new version of RPAS and RPAS solutions, you can also update the content of the domain. For example, the content of workbooks can be modified or the business logic represented by a rule group can be updated.
To update the domain content, make the desired changes in the configuration using the RPAS Configuration Tools. Then, when you run the -rpasInstall utility with the -patchinstall argument, the changes are applied to the domain.
The sections below specify the restrictions and special cases for updating hierarchies, measures, rule groups, and workbooks.
When patching a domain, you can add new hierarchies. A hierarchy file must be present in the input directory specified in the call to rpasInstall for that hierarchy to be added.
|
Note: Although a new hierarchy can be added, the order of existing hierarchies cannot be changed. Therefore, new hierarchies must be added after existing hierarchies when modifying an existing domain. |
Patching a domain upgrades some, but not all, hierarchy and dimension attributes. For existing hierarchies, only the security dimension is updated. For dimensions, the following attributes are updated: user-defined dimensions, labels, and the state of image support (enabled or disabled). In addition, a dimension can have DPM support and translation support enabled but not disabled. You can also change the bit size and reindex threshold of an existing dimension (see "Reindexing Domains Using reindexDomain") as well as add or rename dimensions (see "Adding New Dimensions").
Patching a domain does not patch changes to the hierarchy purge age, or change the multi-language setting for a domain.
|
Note: If updating the hierarchy purge age inside an existing domain, use theloadHier utility in batch mode to update the current settings. See the "Loading Hierarchies Using loadHier" section for more information. |
Certain measure properties cannot be modified without un-registering and re-registering the measures (which results in the loss of measure data). The measure properties that can be modified without being re-registered are listed in "Registering Measures Using regmeasure". If all of the measure properties that are changed are able to be modified without re-registration, the measure data will not be lost in the domain during the patch process.
If even one of the measure properties that change cannot be modified without re-registration, the patch process results in the un-registration and re-registration of the measure. Therefore, the data that was in the domain for that measure before the patch process will not be there after the patch process is complete. For more information, see "Registering Measures Using regmeasure".
As a part of the 14.0 release, RPAS incorporated a number of improvements to its cryptography functionality. These changes involved the ability to select a desired cipher suite and hash iteration count for the encryption of user credentials. As a result of these upgrades, the user dictionary of any domain will be automatically updated by the upgradeDomain utility when it converts a pre-14.x domain to version 14.x or later.
upgradeDomain can perform the conversion using a default cipher suite and iteration. However, it is possible to specify to upgradeDomain to use values other than the default when performing the upgrade. This is accomplished by setting two domain properties prior to running upgradeDomain. These properties are:
Table 2-2 Domain properties for Cryptography upgrade
| Domain Property | Description |
|---|---|
|
r_upgrade_hash_alg |
This property sets the value for r_crypt_hash_alg in the upgraded domain. Because the list of algorithms can change with each release, it is not feasible to provide a list here. To get the list of values that can be used here, go to the rpasHome of the version to which you are upgrading and run:usermgr -listHashAlgs |
|
r_upgrade_hash_iter |
This property sets the value for r_crypto_hash_iter in the upgrade process. It is the number of iterations of hashing to perform on the password. |
|
Note: The default cipher suite and hash iteration count will vary depending on the version of RPAS the domain us being upgraded to. In every release, RPAS will use the suite and iteration count deemed most secure at the time of that release. |
For details on setting domain properties, see "Setting Miscellaneous Domain Properties using domainprop"
After the RPAS Configuration Tools have been installed and the domains have been upgraded, you may need to upgrade existing configurations to version 13 or the latest version 13 patch.
|
Note: Configuration upgrade is not always required. When it is required, the Configuration Tools automatically notifies you that a configuration upgrade is needed. |
Launch the new version of the Configuration Tools.
Open the existing configuration by selecting Open from the File menu.
Select the configuration and click OK.
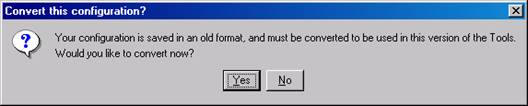
A message box appears prompting you to convert the configuration. Click Yes.
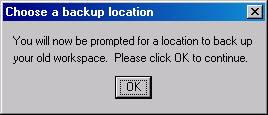
The Backup Location message box appears. Click OK to continue.
The administrator must now specify a location to store the backup of the current (non-upgraded) configuration. Use the browser to identify a location and enter the back-up configuration name. The backup may be stored in the same location as the configuration being upgraded only if the name of the backup is changed from its original name.
The Successful Conversion dialog box appears if the configuration was converted without any issues.
The upgraded configuration now opens in the Configuration Tools. Changes can now be made to the configuration. Note that, if changes are made, the domain must be updated through the normal patch install process.
|
Note: If upgrading RDF, Grade, or Curve, see "Upgrade Application Configurations" for additional steps to complete the application upgrade. |
The RPAS Configuration Tools also provides command-line support to upgrade configurations. The Configuration Converter is a standalone utility that converts a configuration that was originally created and saved in a prior release of the Configuration Tools. Only configurations created in a prior major release need to be converted. Configurations saved in previous versions of the same major release, but in different minor releases, do not need to be converted. See the RPAS Configuration Tools Guide for more information on using the Configuration Converter (RpasConverter.exe) through the command-line.
|
Note: If upgrading RDF, Grade, or Curve, see "Upgrade Application Configurations" for additional steps to complete the application upgrade. |
Applications such as RDF, Curve, and Grade are configured using a plug-in architecture in the RPAS Configuration Tools. This architecture allows for the automation of most configuration activities for the solution. The plug-in requests specific information from the configuration administrator and the solution auto-generation tool automatically generates the solution configuration. Prior to each patch or upgrade to a major release, the auto-generation tool should be executed to ensure the solution configuration is updated with the base configuration changes for the application.
Update the solution configuration for each application in the following order:
Curve
RDF
RDF Clone
Promote
Grade
See the RDF, Curve, or Grade Configuration Guides for more information on the auto-generation process for each application.
The convertDomain utility creates a new domain that has all the dimensions and measure arrays converted to integer-indexed arrays.
The conversion process creates a new domain based on the source domain provided. Since a new domain is created from the domain and does not replace the source domain, the source domain remains unaffected.
|
Note: Because you are creating a second domain, you must have enough space for the original source domain and the new converted domain. Since workbooks are not converted, you only need the amount of space the source domain uses, minus the space that the workbooks in the source domain use. |
The convertDomain utility copies all information specific to the domain at the time of conversion. It does not copy any custom information such as shell scripts, which exist under the domain root. Such information must be manually copied.
The convertDomain utility blindly copies the following:
config (to master domain only)
input
installs
output
repos
scripts
fusionClient
WizardPQD
The data directory is recreated base on the source domain. Only databases (.db) are converted, excluding the following:
changearray.db
shadow.db
styles.db
hmaint.db (completely rebuilt separately)
measdata.db (rebuilt separately)
master_staging.db (use only for loadhier)
alitemp*.db
You can also use an exclusion list to exclude more databases from the conversion.
If files exist in the data directory but are not a database, they are not copied.
The users directory is recreated without all workbooks. Therefore, for all users' directory structures only contain the <username>.db and <username>.db.lck files.
The styles directory is copied conditionally. Only style files listed in #workbook.xml are copied. Any arrays that exist in that directory are ignored.
If your domain contains files or directories that are not copied, you must manually copy those files and directories to the converted domain.
|
Note: The convertDomain utility can be run multiple times if needed. Data already converted will be skipped after the first run. |
convertDomain [-src srcDomain -dest destDomain | -xmlConfigFile XMLConfigFile] -xmlHierFile PathToHierarchy.xml [-exclude exclusionList.xml] -genUnlinkedList unlinkedListFile -maxProcesses count
To use the convertDomain utility, perform the following steps:
Provide a pair of source/destination domain paths using the -src and -dest arguments. Or, supply an XMLConfig file.
If you use -src and -dest arguments to specify the source and destination domain paths, the local domain path must be under the global domain path.
If converting a global domain, and not all local domains reside under the global domain path, then you must use the -xmlConfigFile argument to specify the source and destination path for each local domain.
The XMLConfigFile should follow this syntax:
<rpas>
    <globaldomain>
       <srcPath>/path/to/13.2.3/domain</srcPath>
       <dstPath>/path/to/13.3.0/destination</dstPath>
       <subdomain>
          <srcPath>/path/to/13.2.3/local/domain/0</srcPath>
          <dstPath>/path/to/13.3.0/destination/local/domain/0</dstPath>
       </subdomain>
       ...
    </globaldomain>
</rpas>
Use the -xmlHierFile to specify the path to the hierarchy.xml file that is exported from the upgraded configuration, including a new BitSize attribute for each dimension.
If it is desired, the -exclude argument may be used to specify databases that should be excluded from the conversion process. The databases specified in the exclusionList.xml document will not be recreated in the new integer indexing domain. The exclusionList.xml should use the following format. Note that if the path is an absolute path (starting with a slash "/"), it refers to only one directory. If it is a relative path, it applies to the master domain and all local domains in a global domain environment.
<rpas>
    <convertDomain option="exclude">
        <path>relative/path/to/database1.db</path>
        <path>relative/path/to/database2.db</path>
        <path>/absolute/path/to/database.db</path>
        …
    </convertDomain>
</rpas>
Under certain conditions, an array in a pre-integer indexing domain can become corrupted such that the embedded dimension information of the array does not match the dimension information contained in the dimension dictionary of the domain. These arrays are called unlinked arrays. When convertDomain is run with the -genUnlinkedList argument, it creates a file in the specified location containing any arrays that are corrupted. The fixDomain utility can then be used to bring these unlinked arrays into conformity with the domain. See "fixDomain" for more information on restoring unlinked arrays.
Use the -maxProcesses argument to specify the number of processes that can be used.
Table 2-3 provides descriptions of the arguments used by the convertDomain utility.
Table 2-3 Arguments Used by the convertdomain Utility
| Argument | Description |
|---|---|
|
|
Specifies the path to the source domain being converted. |
|
|
Specifies the path to the destination domain. |
|
|
If you are converting a global domain and not all local domains reside under the global domain path, use this argument to specify the source and destination paths for each local domain. |
|
|
Specifies the path to the hierarchy.xml file that is exported from the upgraded configuration. This file should include the new BitSize attribute for each dimension. |
|
-exclude exclusionList.xml |
Excludes the databases listed in the specified file from the conversion process. |
|
-genUnlinkedList unlinkedListFile |
Creates a file in the specified location containing the names of arrays whose embedded dimension information does not match the dimension dictionary of the domain. These arrays can then be corrected using the fixDomain utility. |
|
|
If specified, some parts of convertDomain will run in parallel. This means that it will use a maximum of the defined processes, which are specified by count. |
|
Note: The utilityupgradeDomain i s not called by this process. It must be called separately. This allows the user to specify additional parameters to upgradeDomain. Once the domain has been converted and upgraded, it is ready for use. |
The convertDomain utility can also be used to analyze a pre-integer indexing domain in order to suggest appropriate values for the bitSize attributes of the dimensions in that domain.
The convertDomain utility enumerates all non-system dimensions in the source domain, calculates a suitable bit size based on the current number of positions (including unused buffer positions) within the domain, and prints them out in a table format. It then calculates the key size for each of the data arrays for all measures, based on those dimension bit sizes. If the key size is above 64 bits for any measure, it will print out the measure with a warning message so that the user can consider a lower bit size for any of the dimensions in the array.
The algorithm for suggesting the bit size is to find the number of bits that can fit twice the number of positions currently in the dimension, starting with 2 bits. The results of the analysis are output to a file. Below is an example of this output:
| Hierarchy | Dimension | Size | BitSize | Capacity | DPM-Enabled |
|---|---|---|---|---|---|
| clnd | day | 3647 | 13 | 8192 | No |
| clnd | week | 522 | 11 | 2048 | No |
| loc | str | 22 | 6 | 64 | Yes |
| loc | dstr | 12 | 5 | 32 | No |
| prod | sku | 488 | 10 | 1024 | Yes |
| prod | stco | 258 | 10 | 1024 | Yes |
|
Note: The following measures have a key size greater than 64 bits. For better performance, it is recommended that you reduce the bit size of one or more dimensions in the base intersection of these measures so that the key size is within 64 bits. |
| Measure Name | Base Intersection | Key Size |
|---|---|---|
| ACT | www_xxx_yyy_zzzz | 67 |
convertDomain -src domainPath -suggestDimBitSize outputFile
Table 2-4 provides descriptions of the arguments used by the convertDomain utility with -suggestDimBitSize.
The upgradeDomain utility is used to upgrade only the RPAS version of the domain. It does not update the configuration or any other aspects of the domain itself.
upgradeDomain -d domainPath [OPTIONS]
Table 2-5 provides descriptions of the arguments used by the upgradeDomain utility.
Table 2-5 Arguments Used by the upgradedomain Utility
| Argument | Description |
|---|---|
|
|
Path to the domain being upgraded. |
|
|
Shows the detail about each change that is applied to the domain. |
|
|
Reports which changes are applied (without applying the changes). |
|
|
Purges all existing workbooks and clears the workbook batch queue. |
|
|
Allows upgrade even if dimensions and hierarchies share names. |
|
|
Indicates the application and version associated with this upgrade. Parameter must be APP:VERSION. |
|
Note: An administrator can also run thedomaininfo utility to verify the upgrade process, as shown below.
domaininfo -d pathtodomain -domainversion |
The fixDomain utility is used to repair many types of corruption that can occur within an RPAS domain. This utility can be used to perform a number of tasks, which are described below. In all cases, fixDomain can execute in two modes. The default mode is to perform an examination to detect problems. The second mode, which is performed if the -commitChanges argument is passed in the call to fixDomain, is to take action to correct problems that are detected.
Remove inconsistent measure attributes
It is possible for inconsistencies in measure attributes between the master and local domains of a global domain to interfere with operations performed by RPAS. By executing fixDomain with the CleanMeasureAttrs task, users can analyze a domain for such discrepancies and correct them by removing attributes that appear in only a subset of the domains.
Remove partially unregistered measures
It is possible for the process of measure un-registration to exit without completely removing the measure from all local domains of a global domain. By executing fixDomain with the CleanMeasure task, users can analyze a domain for partially unregistered measures and correct them by completing the un-registration process and completely removing these measures from the domain.
Repair discrepancies in hierarchy information
It is possible, in integer-indexing domains, for the hierarchy and dimension information of an array to become out of synch with the information of the domain. It is also possible for this information to become out of synch between the local domains of a global domain. By executing fixDomain with the RepairHiearchy task, users can analyze a domain for desynchronized dimension information and correct it when found by updating arrays or local domains with the dimension information of the master domain.
Repair unlinked arrays
In pre-integer indexing domains, there may be discrepancies between the dimension information in an array and the dimension information of the domain. When these corrupted domains are converted to integer indexing, these arrays are converted to rely on internal dimension information and cannot be resolved against the dimension information of the domain. By executing fixDomain with the FixArrays task, users can analyze a domain to detect these unlinked arrays and correct them by rebuilding the array using the dimension information of the domain.
Repair metadata inconsistencies
System dimensions and related metadata define the basic structure of a domain. Any discrepancies within them can cause serious problems during domain operations. By executing fixDomain with the RepairMetadata task, users can analyze a domain for any discrepancies in system dimensions. Depending on the type of information that contains a discrepancy, fixDomain may or may not be able to resolve the issue.
Hierarchy and Dimension Information: In general, this type of discrepancy is a result of a domain that did not build correctly. Due to the severity of this type of problem, fixDomain cannot resolve such issues.
Measure Information: It is possible for measure information to appear in some but not all the metadata arrays of a domain. Depending on which arrays do contain information about a measure, fixDomain may be able to correct the problem. Otherwise, the measures with incomplete information will be removed from the domain and must be re-registered.
Workbook Information: It is possible for information about workbooks, workbook templates, and workbook template groups to appear in some but not all of the metadata arrays of the domain. Depending on which arrays do contain information about the workbook, template or group, fixDomain may be able to correct the problem. Otherwise, the workbooks, templates or groups with incomplete information will be removed from the domain and must be re-registered.
User Information: It is possible for information about RPAS users and user groups to appear in some but not all of the metadata arrays of the domain. Depending on which arrays do contain information about the user or group, fixDomain may be able to correct the problem. Otherwise, the user or group will be removed and must be re-registered.
|
Note: The RepairMetadata task is only supported in versions of 13.2.3.x after 13.2.3.36. It cannot be used in RPAS version 13.3 and later. It is described here to support the upgrade and conversion process. See"Upgrading From Any Release of RPAS Prior to 13.3" for more information on the convertDomain process. |
Repair corrupted change arrays
In pre-integer indexing domains, change arrays can get out of synch with the measure metadata of a domain. By executing fixDomain with the RepairChangeArrays task, users can analyze a domain for any discrepancies between change arrays and measure metadata and repair them, based on the measure metadata of the domain.
|
Note: The RepairChangeArrays task is only supported in versions of 13.2.3.x after 13.2.3.36. It cannot be used in RPAS version 13.3 and later. It is described here to support the upgrade and conversion process. See "Upgrading From Any Release of RPAS Prior to 13.3" for more information on the convertDomain process. |
The following arguments are used with fixDomain:
fixDomain -d pathToDomain -task CleanMeasure [-commitChanges] [-loglevel level]
fixDomain -d pathToDomain -task RepairHierarchy -hier hierName [-commitChanges] [-loglevel level]
fixDomain -d pathToDomain -task FixArrays [-db dbName | -array arrayName] [-commitChanges] [-loglevel level]
fixDomain -d pathToDomain -task RepairMetadata [-dim dimName] [-commitChanges] [-loglevel level]
fixDomain -d pathToDomain -task RepairChangeArrays [-commitChanges] [-loglevel level]
The following table provides descriptions of the arguments used by the fixDomain utility.
Table 2-6 Arguments Used by the fixDomain Utility
| Argument | Description |
|---|---|
|
-d pathToDomain |
Indicates the location of the domain begin repaired. |
|
-d CleanMeasureAttrs |
Detects and removes measure attributes that do not exist in the master and all local domains of a global domain. |
|
-task CleanMeasure |
Detects partially unregistered measures and completes their un-registration. |
|
-task RepairHierarchy |
Detects and repairs inconsistencies in hierarchy information in arrays within the master and local domains of a global domain. |
|
-hier hierName |
Used in conjunction with the Repair Hierarchy task. Specifies the hierarchy to correct within arrays. |
|
-task FixArrays |
Detects and corrects unlinked arrays. |
|
-db dbName |
Used in conjunction with the FixArrays task. Specifies the database to examine or repair. The FixArrays task requires the use of either the -db or the -array argument, but not both. |
|
-array arrayName |
Used in conjunction with the FixArrays task. Specifies the array to examine or repair. The FixArrays task requires the use of either the -db or the -array argument, but not both. |
|
-task RepairMetadata |
Detects and repairs metadata discrepancies in system dimensions. Note: the RepairMetadata task is supported only in versions of 13.2.3.x after 13.2.3.36. It cannot be used in RPAS version 13.3 and later. |
|
-dim dimName |
Used in conjunction with the RepairMetadata task. Specifies the system dimension to examine or repair. This is an optional argument. If not supplied, fixDomain will examine all system dimensions. |
|
-task RepairChangeArrays |
Detects problems in change arrays within the domain and repairs them by relying on the measure metadata of the domain. Note: the RepairChangeArrays task is supported only in versions of 13.2.3.x after 13.2.3.36. It cannot be used in RPAS versions 13.3 and later. |
|
-commitChanges |
If the -commitChanges argument is not supplied to any call of fixDomain, it will only examine the domain and report detected problems. The fixDomain utility only modifies the domain to repair changes if the -commitChanges argument is specified. |
|
-loglevel level |
Sets the logging verbosity level. Supports use of all, profile, debug, audit, information, warning, error and none as values of level. |