| Oracle® Retail Predictive Application Server Administration Guide for the Classic Client Release 14.1 E59120-01 |
|

 Previous |
 Next |
| Oracle® Retail Predictive Application Server Administration Guide for the Classic Client Release 14.1 E59120-01 |
|
Previous |
Next |
User administration is the process by which administrators add or delete authorized system users, create or delete user groups, and edit user profiles. These tasks are performed through completion wizards on the User Administration tab.
The following user administration procedures are discussed in this chapter:
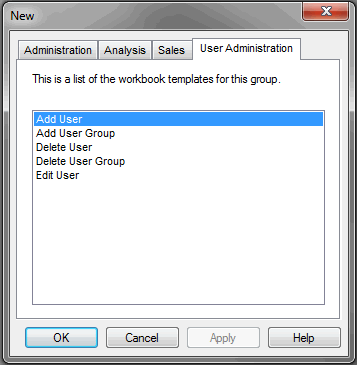
These procedures can be performed through the RPAS Classic Client by accessing the User Administration tab in the New Workbook window (Figure 5-1).
In addition, the usermgr utility is also described in this chapter. This utility allows you to manage users and users groups through a command line interface. For more information, see "Managing Users Using usermgr".
After users and user groups are set up, access permissions to workbook templates and measures within workbooks can be assigned through the Security Administration workbook. The Security Administration workbook also supports modification of the label, default workbook template, and admin status associated with individual users.
User administration workbooks are available only in a master domain of a global domain environment. To access the User Administration workbooks, do the following:
Select New from the File menu. The New dialog box appears.
Select the User Administration tab.
To add a user, perform the following steps:
From the File menu, select New.
Click the User Administration tab.
Select Add User and click OK.
The Add User Wizard appears.
Enter relevant information in the following fields:
User name: Type the user name to be used for login.
|
Note: Each user name must begin with a letter and contain only alphanumeric characters and underscores. It cannot have spaces. User names are case-sensitive. |
User label: Type a label that describes the user (for example, the user's full name). This identifying label appears in various locations throughout the application. For example, labels appear on the Open dialog box to identify the owner of a given workbook and on some worksheets to specify which user performed a task.
Default group: Select the user group to which the user belongs.
Other groups: If a user will belong to more than one group, select the additional groups from the list in the Other groups field.
Password: Type a password for the user.
Password Verification: Re-type the same password.
If the user requires Admin status, check the Administrator box.
|
Note: Admin status enables users to perform the Format menu option Save Format/Admin, which creates new system-wide default styles for workbook templates. You can modify a user's Admin status at any time on the Users worksheet of the User and Template Administration workbook. |
|
Note: Granting users Admin status gives them access to all workbook templates, but it does not automatically give them access to all workbooks. |
If the user must change his or her password when logging on for the first time, check the Force Password Change box.
Check the Lock User Account box to temporarily disable the user's account.
Click Finish to add the new user to the database.
Workbook template and measure access rights can now be assigned to the user. To do this, access the User and Template Administration workbook. For more information, see "Security Administration Workbook".
User groups provide an intermediate level of security to workbooks that were created and saved by specific users. When new users are assigned to the system, they must be assigned to existing user groups. User groups should consist of individuals with similar job functions or responsibilities. In the Oracle Retail Predictive Planning Suite, the user group corresponds to the user's planning role.
Select New from the File menu.
Click the User Administration tab.
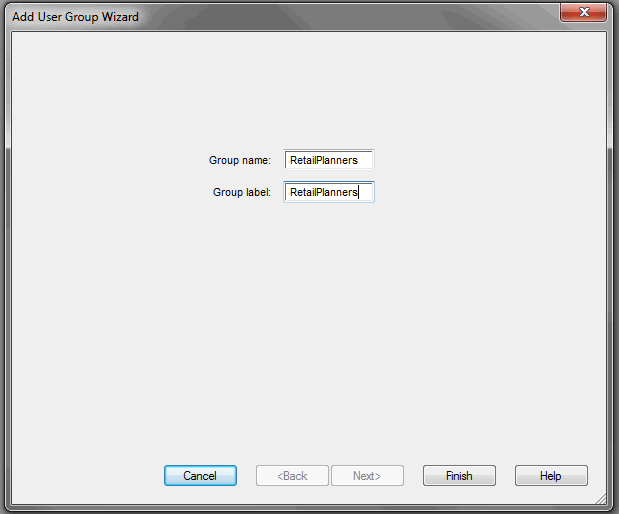
Select Add User Group and click OK.
The Add User Group Wizard appears.
Enter information in the following fields:
In the Group Name field, type a name for the group.
|
Note: Each group name must begin with a letter and contain only alphanumeric characters and underscores. It cannot have spaces. User group names are case-sensitive. |
In the Group Label field, type a descriptive label for the group. This label is displayed when referring to the group throughout RPAS.
Click Finish to add the user group to the database.
If a user profile is no longer needed, it should be deleted from the system in order to maintain system security.
From the File menu, select New.
Click the User Administration tab.
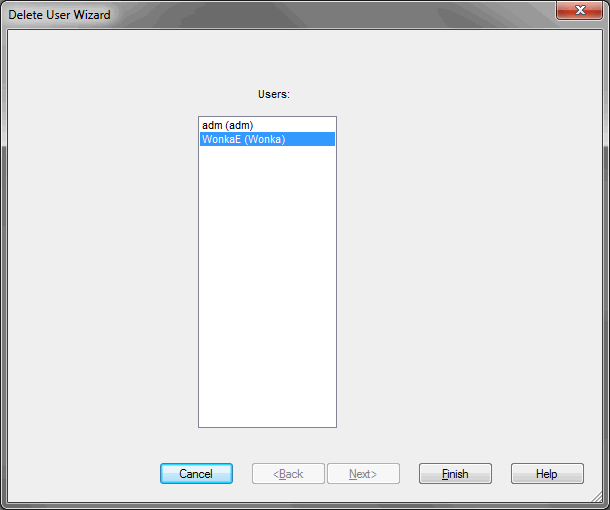
Select Delete User and click OK.
The Delete User Wizard appears. The user names and labels for all users appear. Select the name of the user to delete.
Click Finish to delete the user from the system.
If a user group no longer exists, the group should be deleted from the system as soon as possible to maintain system security.
|
Note: Before you can delete a user group, you must remove all users from the group. For each user in the group, you must either delete the user or change the default user group assignment for the user. |
From the File menu, select New.
Click the User Administration tab.
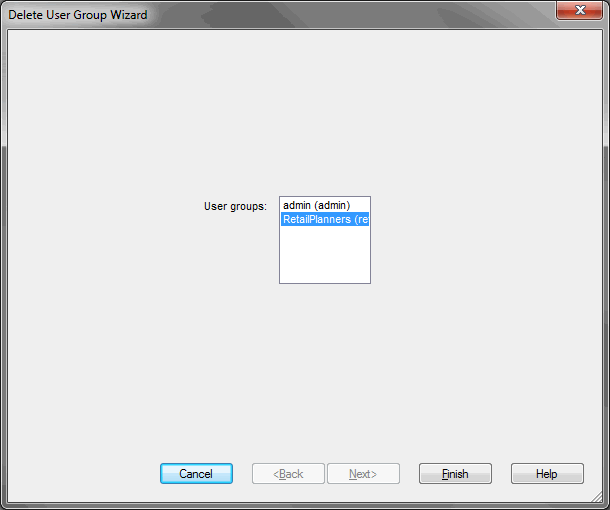
Select Delete User Group and click OK.
The Delete User Group Wizard appears. Select the user group to delete.
Click Finish to delete the user group from the system.
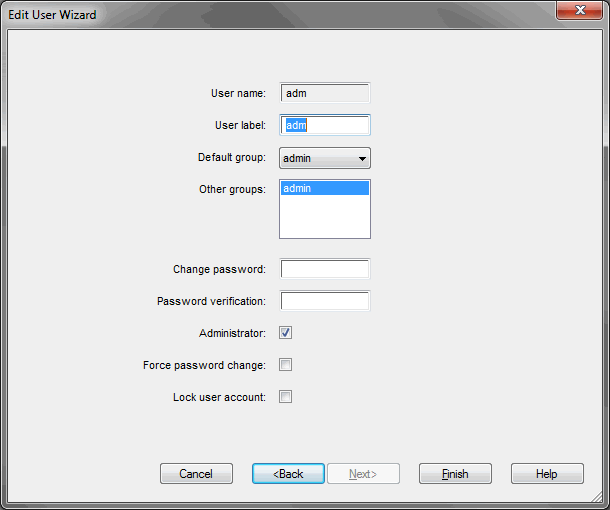
To edit a user's profile, perform the following steps:
From the File menu, select New.
Click the User Administration tab.
Select Edit User and click OK.
The Edit User Wizard appears. The User ID field displays the user names and labels for all users. Select the user to edit and click Next.
The Edit User Wizard appears. Make the necessary changes to the user's profile. You can change everything except the User Name. See "Add User" for details.
Click Finish to save the changes.
Use the usermgr utility to add and remove users and groups, copy user and group information to other domains, edit user and group information, and convert that information from XML files to database files and vice versa.
With the usermgr utility, you can create user and administrator accounts using the -addGroup command. This allows you to add many accounts at once. When you create accounts, you must supply a temporary password that is used for all user accounts and a temporary password that is used for all administrator accounts. These temporary passwords expire the first time the user or administrator logs in.
Note that you can only create temporary passwords; you cannot create real ones. This protects the security of the user and administrator accounts. For the same reasons, the default accounts adm and usr are no longer available.
To create users and groups, you must create a database file called users.db, which contains user and group information. After you have created and imported the users.db file into RPAS, that file contains all user, administrator, and group information, including the true passwords for each account. This file is an encrypted binary file that you cannot edit.
To edit any account information, you must convert the database file to an XML file using the -convertDbToXml command. This creates an editable XML file that contains all the information in the user.db file except for the true passwords of the accounts. Again, this is to ensure the security and safety of the account information. After you edit the XML file with the changes you need to make, you must convert it back to a database file in order to import it into RPAS. To convert it, use the -convertXmlToDb command.
After the users.db file is created, it can be shared across multiple domains. To automatically import the user, administrator, and group information every time a domain is created, place the users.db file in the rpasInstall input directory of the domain.
usermgr -d domainPath -add [userName] -label [label] -group [groupName] {-admin}
usermgr -d domainPath -addGroup [groupName] -label [label]
usermgr -d domainPath -remove [userName]
usermgr -d domainPath -removeLabel [label]
usermgr -d domainPath -removeGroup [groupName]
usermgr -d domainPath -list
usermgr -d domainPath -print -user [userName]
usermgr -d domainPath -print -group [groupName]
usermgr -d domainPath -importDb {-replace}
usermgr -d domainPath -exportXml [path]
usermgr -d domainPath -exportDb [path]
usermgr -d domainPath -lock [userName]
usermgr -d domainPath -unlock [userName]
usermgr -convertXmlToDb -src [pathToXml] -dest [pathToDb]
usermgr -convertDbToXml -src [pathToDb] -dest [pathToXml]
|
Note: -convertDbToXml, -convertXmlToDb, and -listHashAlgs do not require a domain. |
Table 5-1 provides descriptions of the arguments used by the usermgr utility.
Table 5-1 Arguments Used by the usermgr Utility
| Argument | Description |
|---|---|
|
-d domainPath |
Specifies the path to a domain to add, remove, or get information about a user. |
|
-add userName |
Adds a user with a specified name. Use the other arguments specified in the usage to add those attributes for that user. If -noPassword is specified, then this user can only be logged in via the Fusion Client. Otherwise, this command will prompt for a temporary password for use with the Classic Client only. |
|
-label label |
Specifies the label of the user or group to add to the domain. Use this argument with |
|
-group grp |
Specifies the user group of the user to add to the domain. |
|
-admin |
Specifies that the user to add to the domain has administrative rights. |
|
-addGroup groupName |
Adds a group with a specified name. Use -label to specify the label for the group. |
|
-remove userName |
Removes the user with the specified name from the domain. |
|
-removeLabel label |
Removes all users with this label. |
|
-removeGroup groupName |
Removes a group with this groupName. |
|
-list |
Lists all the users registered to the specified domain. |
|
-listHashAlgs |
Lists the different hashing algorithms supported in this release. The list will show an integer id, the details of the algorithm, and a status field indicating whether the algorithm has been deprecated 'X' or is the default '*'. |
|
-showHashSettings |
Shows the selected hashing algorithm and the selectednumber of hash iterations. |
|
-hashAlg |
The given algorithm id parameter defines the algorithm to use for new users or users whom update their password. Use the string 'default' to always chose the default algorithm. |
|
-hashIter |
The given iterations parameter is used to set the number of iterations the hash algorithm will used for new users or users whom update their password. |
|
-forcePasswordChange |
The given boolean parameter either 'true' or 'false' determine the setting of the password must change variable. If 'true' then the next login will request the password to be updated. If the optional -user parameter is provided the effect of this value will only affect that user. |
|
-changePassword |
For the given user application will prompt for the new password. |
|
|
Locks the specified user. This prevents the user from logging in the domain. |
|
|
Unlocks the specified user. This allows the user to log in the domain. |
|
-exportXml path |
Creates an XML file that contains all users and groups in the selected domain. Passwords and password histories are not exported. |
|
-exportDb path |
Creates a database that contains all users and groups in the selected domain. This prompts you for new temporary passwords for admin and user accounts. |
|
-convertDbToXml |
Converts a user database to a user XML file. Passwords are not included in the conversion. |
|
-convertXmlToDb |
Converts a user XML file to a user database. This prompts you for temporary passwords for admin and user accounts. |
|
-src path |
Specifies the source file that is used in -convertDbToXml and in -convertXmlToDb. |
|
-dest path |
Specifies the destination file that is used in -convertDbToXml and -convertXmlToDb. |
The XML schema contains information for all groups and users that are imported into the domain. Since this file can be edited, it does not contain any password information. Each group and user contains an XML attribute with the group or user name as well as the following inner tags:
Table 5-2 XML Schema
| Outer Tag | Inner Tag | Description |
|---|---|---|
|
GROUP |
LABEL |
The group's label. |
|
USER |
LABEL |
The user's label. |
|
USER |
DFLT_GRP |
The user's default group. |
|
USER |
OTHER_GRPS |
A comma-separated list that contains all other groups that the user is associated with. |
|
USER |
ADMIN |
If this value contains T, this user is an admin. |
|
USER |
LOCKED |
If this value contains T, the user is locked when the file is imported. |
|
Note: All XML tags must be in all caps. |
Here is a sample users.xml file.
<?xml version=”1.0” ?>
<VERSION>1.0</VERSION>
<USER_LIST version="2.0">
  <GROUPS>
     <GROUP NAME=”grp1”>
          <LABEL>Administrators</LABEL>
     </GROUP>
     <GROUP NAME=”grp1”>
          <LABEL>Group 1</LABEL>
     <?GROUP>
     <GROUP NAME=”grp2”>
          <LABEL>Group 2</LABEL>
     </GROUP>
     <GROUP NAME=”grp3”>
          <LABEL>Group 3</LABEL>
     </GROUP>
</GROUPS>
<USERS>
     <USER NAME=”adm1”>
          <LABEL>admin 1</LABEL>
          <DFLT_GRP>adms</DFLT_GRP>
          <ADMIN>T</ADMIN>
     </USER>
     <USER NAME>=”adm2”>
          <LABEL>admin 2</LABEL>
          <DFLT_GRP>adms</DFLT_GRP>
          <ADMIN>T</ADMIN>
          <LOCKED>T</LOCKED>
     </USER>
     <USER NAME=”usr1”>
          <LABEL>user_1</LABEL>
          <DFLT_GRP>grp1</DFLT_GRP>
          <OTHER_GRPS>grp2</OTHER_GRPS>
     </USER>
     <USER NAME=”usr2”>
          <LABEL>user_2</LABEL>
          <DFLT_GRP>grp2</DFLT_GRP>
          <OTHER_GRPS>grp1,grp3</OTHER_GRPS>
     </USER>
     <USER NAME=”usr3”>
          <LABEL>user_3</LABEL>
          <DFLT_GRP>grp1</DFLT_GRP>
          <OTHER_GRPS>grp1</OTHER_GRPS>
     </USER>
  </USERS>
</USER_LIST>
This section provides a discussion of common use cases for the XML and database files.
You can export from an existing domain using -exportDb or -exportXml. Exporting is useful for sharing users with another domain or for creating backups.
Use -exportXml if you need to edit the users or groups. This can be useful when you are making bulk updates that apply to many users or groups. After you have made changes to the file, you must convert it back to a database by using -convertXmlToDb and then import the updated file using -importDb -replace.
Use -exportDb if you do not need to edit the users or groups. This method produces a binary file that is ready for import.
You can import existing users.db by using -importDb. Importing is useful for bulk insertion or updates of users and groups.
By default, existing users and groups are skipped. However, if -replace is used, existing users are updated with the following information: user label, groups that the users belong to, admin status, and account lock status. Group labels are updated for existing groups.
Password information for existing users is not affected by the update. New users receive temporary passwords that are stored in users.db.
Note that new users may not be created if the following conditions exist:
A group already exists with the user name.
The user's default group does not exist.
New groups are skipped if the following conditions exist:
A user already exists with the group name.
|
Note: If a users.db is placed inside the rpasInstall input folder, the users within that file are automatically imported upon domain creation. |
Since only users.xml can be edited and only users.db can be imported, it is necessary to convert between the two formats when you need to edit and import users and groups. For example, if you are creating users for the first time, you must first create those users in an XML file. Then you must convert that XML file to a database file using -convertXmlToDb in order import the file. If you have an existing users.db that you need to edit, convert it to xml using -convertDbToXml.
When converting from an XML to a database file, follow these validation rules:
The file must be a properly formatted XML file, otherwise the operation fails.
Groups and users without a NAME attribute are skipped.
Duplicate groups and users are skipped. Duplicate groups and users are those that share the same NAME attribute of an existing group or user within the same XML file. For instance, a new group called Sales cannot be created if a user or group named Sales already exists.
Users without a DFLT_GRP field are skipped.
|
Note: If a user or group is skipped, a warning is logged. Since warnings are not included in the default log level, you should run this utility with warnings visible. |