| Oracle® Retail Predictive Application Server Administration Guide for the Classic Client Release 14.1 E59120-01 |
|

 Previous |
 Next |
| Oracle® Retail Predictive Application Server Administration Guide for the Classic Client Release 14.1 E59120-01 |
|
Previous |
Next |
This chapter describes the following system administration workbooks and wizards:
These workbooks and wizards are found in the Administration tab and Analysis tab of the New workbook window.
|
Note: The Alert Manager Wizard is described in the RPAS User Guide for the Classic Client. The Translation Administration workbook is described in the "Internationalization" chapter. |
In a global domain, some administration workbooks are available only in the master domain. These workbooks are the following:
Hierarchy Maintenance
Password Policy Administration
Security Administration
Translation Administration
Workbook Batch Category Management
All other administration workbooks are available in both the local and master domains.
The Workbook Auto Build feature allows users to have workbooks built by the wbmgr utility. Workbooks built in this way are added to the auto build queue. When workbooks are built in this manner, users are spared the processing time of making selections in the wizard and waiting for the workbook to build. The Workbook Auto Build feature works through the Auto Workbook Maintenance Wizard.
Workbooks in this queue are designated to be built automatically on a specified regular basis as part of the nightly batch run.
Select New from the File menu.
The New workbook window appears. Select the Administration tab.
Select Auto Workbook Maintenance and click OK.
The next wizard page appears. Select Add a Workbook and click Next.
Select a workbook template type, and click Next.
Select an owner for the workbook, and click Next.
The last page of the wizard appears.
Enter the following information:
Build Label: A relevant name for the auto workbook build.
Build frequency (in days): The frequency that the workbook should be build in days.
Next Build Date: The next date that the workbook should be built.
Category: Select the category of workbooks that this workbook should be assigned to. For more information about categories, see "Workbook Batch Category Management".
Saved Access: The level of access for this workbook. Choose User, Group, or World.
Group: Select the group that owns the workbook.
Click Next to initialize the wizard for the workbook template selected in step 5. The choices made are saved under the name specified for the Build Label.
To delete a workbook from the Auto Build Queue, perform the following steps:
Select New from the File menu.
The New workbook window appears. Select the Administration tab.
Select Auto Workbook Maintenance and click OK.
The next wizard page appears. Select Delete Workbooks and click Next.
Select the workbook or workbooks to delete from the auto build queue.
Click Finish to delete the workbooks from the Auto Workbook Build queue.
To edit the settings of an auto build workbook, perform the following steps:
Select New from the File menu.
The New workbook window appears. Select the Administration tab.
Select Auto Workbook Maintenance and click OK.
The next wizard page appears. Select Edit Workbook Settings and click Next.
Select OK and click Finish to build the Auto Workbook Maintenance workbook.
The Edit Auto Workbook Settings worksheet opens. Edit the settings as necessary. When finished, save and commit the workbook.
A category is defined as a group of related workbooks for batch processing purposes. As an administrator, you can create new categories that auto workbook queue entries and batch workbook refresh entries can be assigned to. Each entry can be assigned to only one category. By default, each entry is assigned to a master category called Default. If a category is deleted, the entries assigned to that category are reassigned to the Default category.
When setting up auto workbooks, users can assign a category to an auto workbook and then run the build of a category that a group of entries have been assigned to. This is useful because it allows users to build only the workbooks they need to work with. These categories can also be used when entering workbooks into the refresh queue with the wbbatch utility. Similar to building workbooks, users can refresh select workbooks based on the defined category. These categories are created with the Workbook Batch Category Management wizard or with the wbbatch utility. For more information about the assignment of categories, see "Auto Workbook Maintenance Wizard" and "Managing the Workbook Batch Queue Using wbbatch".
In a global domain, the workbook batch category collection is global and stored in the master domain. It is shared by all local domains.
The Workbook Batch Category Management wizard allows users to add and delete categories as well as edit the labels of the categories. To access this wizard, perform the following steps:
Click the New icon in the toolbar or the New option in the File menu. The New workbook window opens.
Select Workbook Batch Category Management and click OK.
The Workbook Batch Category Management Wizard opens.
To add a category, select Add Category and enter a name and label for the category.
Name: The category name is restricted to standard alphanumeric characters. It cannot contain spaces. This name is used when specifying the category in the wbbatch utility. After a category has been created, this name cannot be changed.
Label: The category label is displayed on the workbook template wizard pages. It can be in any language and can contain spaces. Category labels are case sensitive and must be unique.
After you have entered a name and label, click Finish. The category is created.
Oracle Retail Predictive Solutions provide the ability to set up and maintain user-named and user-defined dimensions within hierarchies. Hierarchy Maintenance is the means by which custom-created dimensions within a hierarchy can be established and maintained through the application interface to meet individual business needs.
When Oracle Retail Predictive Solutions are installed, implementation scripts define the dimensions and hierarchical structures specific to the customer's organization. For example, the system can be built to recognize that SKUs roll up into styles, styles roll up into product classes, and so on within the product hierarchy. Occasionally, you might want to group products according to some ad hoc personal design to suit a particular business need. You can group arbitrary items in a hierarchy to use in functions such as forecasting, replenishment, and measure analysis. These user-defined groupings act as normal dimensional levels. In other words, they allow the user to roll data up from lower levels of aggregation along the hierarchical paths that you define.
For example, suppose experience has shown that the accuracy of forecasts for your top 50 products (A products) reflects the relative accuracy of all forecasts. Therefore, you would like to group elements within a user-defined dimension as the top 50 products by designating them 'A Products.' Then, when you select products in a wizard or look at data in a worksheet, you can change the rollup to your user-defined dimension to see your top 50 products grouped together.
|
Note: Your collection of 50 products may comprise elements from a wide range of product classes or departments, and your grouping scheme may have little to do with the normal dimensional relationships of these items in the product hierarchy.The group of items you designate as 'A Products' may change over time as consumer preferences change. From this example, you see that user-defined dimensions can be used to create any ad hoc groupings to provide additional support in analyzing, selecting, or summarizing data in Demand Forecasting. The Hierarchy Maintenance interface allows you to change the nature of the groupings as required. The number and names of user-definable dimensions are set by your company when an RPAS-based solution is initially installed. The positions within each dimension and their associated labels can be altered and maintained through the hierarchy maintenance process. |
Remember that any hierarchy in RPAS can have user-defined dimensions within it as long as they are set by your company at the time of installation. The following examples refer to the product hierarchy, but other hierarchies can be maintained in the same way.
Suppose you want to designate SKUs in your product hierarchy as either A, B, or C products so that you can group these items together when you view information, such as forecasting, replenishment, or measure analysis reports.
To do this, you need to maintain a user-defined dimension that will allow you to map the SKUs to the various positions of your classification scheme (A, B, or C). The user-defined dimension used in the following example is named Product Status. To maintain this user-defined dimension, use the Hierarchy Maintenance Wizard.
The first step in maintaining hierarchies is to access the Hierarchy Maintenance Wizard. In this wizard, select the SKUs that will be mapped to the various positions of the user-defined dimension. Responses to prompts in the wizard are used to format a new Hierarchy Maintenance workbook.
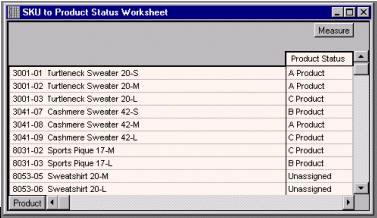
The Hierarchy Maintenance worksheet displays the position assignment fields for the selected custom dimension. Edit the cells associated with the custom dimension as required.
Returning to the example dimension Product Status, you want to classify each selected SKU in your workbook as an A Product, a B Product, or a C Product. This example provides only three positions, or values, in the Product Status dimension; however, you can enter any character string in an individual SKU's Product Status cell. This new string is treated as a separate user-defined grouping. If this is the first time a particular SKU has been mapped to the Product Status dimension, the label assigned to that SKU will not yet be defined. The Product Status field is automatically filled with 'Unassigned.'
Assign labels to each product with regard to the Product Status dimension. In Figure 6-8, products that were previously unassigned are now designated as A, B, or C products.
|
Note: The Oracle Retail Predictive Solutions system is case-sensitive when a new position name (label) is entered in the Hierarchy Maintenance workbook. After the workbook is committed, the typing of the group name is not case-sensitive. For example, "B Product" can later be entered as "b product" after the "B Product" group label has been committed. |
After making the A, B, or C Product designations for the selected SKUs, you must commit the workbook for any changes to take effect.
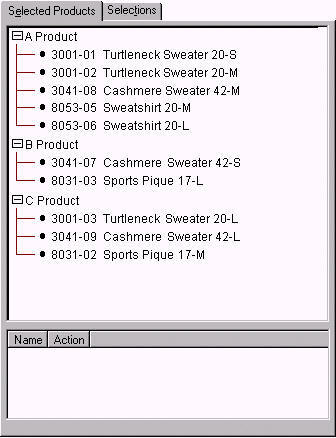
For this example, labels have now been assigned to the various positions within the Product Status dimension, and selected products in the product hierarchy have been classified with regard to the custom dimension. Demand Forecasting treats Product Status, a user-defined dimension, as a normal dimensional level within the product hierarchy.
Figure 6-9 displays the results when you access a quick menu in a wizard and change the rollup to the Product Status dimension. The products shown here are classified according to the position values (A Product, B Product, or C Product) that were assigned while maintaining the Product Status dimension.
Select Open from the File menu to bypass the Hierarchy Maintenance wizard, and open an existing Hierarchy Maintenance workbook, or select New from the File menu.
Select the Administration tab to display the list of Administration templates.
Select Hierarchy Maintenance and click OK.
Select the hierarchy to specify a user-defined dimension (for example, Product or Location). Only the hierarchies that have been set up to contain user-defined dimensions are represented here. Click Next.
Select the user-defined dimension to be updated. The number and names of available custom dimensions are set at installation. Click Next.
On the Available side of the selection wizard, choose the items to be mapped to positions within the custom dimension.
Click the right arrow button to move them to the Selected side.
After all items to appear in your workbook have been selected, click Finish.
Use this procedure to assign product or location items to custom-defined positions within a specialized dimension. Custom-created dimensions are distinct from those in the standard hierarchical roll-ups configured in the system implementation. You can use these dimensions as you would normal Demand Forecasting levels, aggregating data along these new hierarchical paths.
Select New from the File menu.
Select the Administration tab to display the list of Administration templates.
Select Hierarchy Maintenance. Click OK.
Select the hierarchy to specify a user-defined dimension (for example, Product or Location). Only the hierarchies that have been set up to contain user-defined dimensions are represented here. Click Next.
Select the user-defined dimension to be updated. The number and names of available custom dimensions are set at installation. Click Next.
On the Available side of the selection wizard, choose the items to be mapped to positions within the custom dimension.
After all items to appear in your workbook have been selected, click Finish.
The Hierarchy Maintenance workbook is displayed. In the position assignment field for the custom dimension, assign a value to each product or location position in the workbook. Enter any text string in a cell. Each unique string will be treated as a separate user-defined position within the custom dimension.
Select Commit Now from the File menu to commit the changes to the master database. You can also save the workbook by selecting Save from the File menu.
To close the workbook, select Close from the File menu.
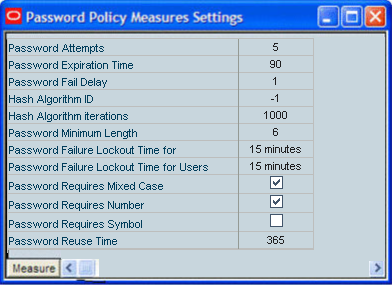
Using the Password Policy Measures Settings worksheet, administrators can configure password complexity and settings in order to ensure the account security of users and other administrators. With this worksheet, administrators can set the required password complexity, the number of allowable password attempts, the expiration time of a password, and the length of time a user is locked out of the system after failed password attempts. The measures used to control these settings are described in Figure 6-10 and Table 6-1.
|
Note: The requirements set in the workbook are automatically applied when the user logs in. If a user's password does not meet the requirements, the user is prompted to change it. |
Table 6-1 Password Policy Measures
| Measure | Description | Allowable Values | Default Value |
|---|---|---|---|
|
Password Attempts |
The number of consecutive failed login attempts (due to an invalid password) before the account is locked. Choose 0 if you do not want to lock the account. |
Choose from the set values in the pick list: 0, 1, 2, …, 10 |
5 |
|
Password Expiration Time |
The number of days that a password is valid for an account. After the time passes, the user can to log in, but is prompted to enter a new password. |
1 or greater |
90 (days) |
|
Password Fail Delay |
The number of seconds the server waits before replying to the client that a login failed (due to an invalid password). |
0 to 600 seconds |
1 second |
|
Hash Algorithm |
This is a drop-down list that contains all of the valid hash algorithms for this release. Additionally, the first field in the list will always be Default, which sets the measure to -1. Deprecated algorithms will be marked with a (X), and the default algorithm will be marked with a (*). |
The allowable algorithms will be the hash algorithms supported by that release of RPAS. The membership of this list may change between releases. |
The default value is the hash algorithm considered most secure at the time of the release of that version of RPAS. |
|
Hash Iterations |
This is an integer measure that stores how many iterations the hashing algorithm should be applied. |
The minimum setting is 1. There is no maximum. |
1000 |
|
Password Failure Lockout Time for Administrators |
The amount of time that an administrator account is locked after consecutive failed login attempts. After this time passes, the account is unlocked and the administrator can attempt to login again. |
Choose from the set values in the pick list: 15 min, 30 min, 1 hour, 1 day |
15 minutes |
|
Password Failure Lockout Time for Users |
The amount of time that a user account is locked after consecutive failed login attempts. After this time passes, the account is unlocked and the user can attempt to login again. |
Choose from the set values in the picklist: 0, 15 min, 30 min, 1 hour, 1 day Choose 0 if you do not want to unlock the account. |
15 minutes |
|
Password Minimum Length |
The minimum number of characters that a password can contain. (The maximum number of characters is 31.) |
1 to 31 |
6 |
|
Password Requires Mixed Case |
If this measure is set to true, then the password must contain both a lowercase and an uppercase letter. (Passwords must always contain a letter.) |
True, false |
True |
|
Password Requires Number |
If this measure is set to true, then the password must contain a numeric digit. |
True, false |
True |
|
Password Requires Symbol |
If this measure is set to true, then the password must contain a non-alphanumeric character. |
True, false |
False |
|
Password Reuse Time |
The number of days that must pass before a password can be reused for an account. |
0 to 10,000 days. Select 0 to place no restrictions on reusing passwords. |
365 days |
The security model in RPAS includes workbook templates, workbooks, measures, and positions. The levels of security are defined as measure level, position level, and workbook level.
This section provides the basic information on the security model in RPAS.
User accounts can be marked as locked by the domain administrator. This prevents the user from logging on with the RPAS Client. The account remains locked until the administrator re-enables the account. Account lockouts can be set or cleared by the domain administrator by using the User Management utility or the Edit User workbook.
Accounts may be configured to automatically lock out after a certain number of failed logon attempts. A domain administrator can configure the number of failed logon attempts and the duration of the lockout using the Password Policy Administration workbook.
Accounts may be marked as requiring the user to change the password. When this is set, users will be prompted to change their password the next time they logon. Users will not be able to proceed using the RPAS client unless they successfully change their password. This is useful for brand new accounts that are created with a stock password. The domain administrator can set or clear this setting using the User Management utility or the Edit User workbook.
Password expiration may be enabled for the domain. The domain administrator may set the number of days after which passwords expire. After this time passes, users will be prompted to change their password the next time the logon. Users will not be able to proceed using the RPAS client unless they successfully change their password.
A password reuse time can be set for the domain. This is often used in combination with password expiration to ensure users do not change their password to a recently used password after one expires. The domain administrator may set the minimum number of days that may pass before users can reuse a previous password using the Password Policy Administration workbook.
Measures have access rights; which are read-write, read-only, or denied. Measures that are read-write or read-only may be selected in the extra measures and insert measure dialogs. RPAS ensures that read-only measures are not editable by the user and the presence of read-only measures does not affect the ability to commit a workbook.
Measure security can be specified and changed through the Security Administration workbook. The Measure Rights worksheet allows Read Only, Deny, or Read/Write access to a measure to be specified for each user.
A workbook template can override the security of a measure, but it can only narrow the security of that measure. For example, a measure could have read-write access for a user and a template could specify that all users have read-only access to the measure when a workbook is built. However, if the measure security was read-only, the template could not expand the security of that measure to read-write. Measures that are explicitly made read-only by a workbook template will not be expanded to read-write access by RPAS.
|
Note: See the RPAS User Guide for the Classic Client for more information on the Measure Analysis workbook. |
Position Level Security allows access control for dimensions on a position-by-position basis. This capability is completely optional. If position level security is not explicitly defined and configured, all users in a domain have access to all positions in all hierarchies. After position level security is defined, access to a position can be granted or denied for individual users, users in a group, or for all users.
Position level security can be defined at levels (dimensions) at or above base (such as class in the product hierarchy) in any hierarchy other than calendar. As positions are added at a level/dimension lower in the hierarchy than where the position level security is maintained, access to those positions is automatically granted if a user has access to the parent position. In other words, if security is maintained at the subclass level, users are automatically granted access to all the SKUs in a given subclass if they have access to that subclass. This includes those added after security was established.
Exactly one dimension in each hierarchy can be defined as the security dimension for the hierarchy. If a security dimension is defined for the hierarchy, all dimensions in the hierarchy have position level security enabled, but position security is set at or above the designated dimension. For instance, if the class dimension is designated as the security dimension, an administrator can maintain access to positions in the class dimension or at any level above class. To specify the security dimension for a hierarchy, use the RPAS Configuration Tools or the hierarchyMgr utility.
After a security dimension is defined for a hierarchy, all users in the domain default to having access to all positions in any dimension in the hierarchy. Additionally, users automatically have access to newly added positions to a domain. Worksheets in the Security Administration workbook are used to control position access for individual users, user groups, or all users (referred to as world or default access). There are three worksheets in this workbook for each hierarchy with a defined security dimension. The default worksheet controls access to positions for all users (for instance, Prod Security Default); one worksheet controls access to positions by user group (for instance, Prod Security Group); and the last worksheet controls access to positions by individual users (for instance, Prod Security User).
Access must be granted at all levels for a user to have access to a position. This means that a position must have a value of true at the levels default/world, group, and user. Table 6-2 provides details about how access is granted or denied based on all combinations of settings:
In the table, security is set by Position. Denied = False and Granted = True. Based on the settings for User, User Group, and World, the user is either granted or denied access, as shown in the Resulting Access column.
Table 6-2 Grant or Denial of Access by a Combination of Settings
| User | User Group | World | Resulting Access |
|---|---|---|---|
|
Denied |
Denied |
Denied |
Denied |
|
Denied |
Denied |
Granted |
Denied |
|
Denied |
Granted |
Denied |
Denied |
|
Granted |
Denied |
Denied |
Denied |
|
Denied |
Granted |
Granted |
Denied |
|
Granted |
Denied |
Granted |
Denied |
|
Granted |
Granted |
Denied |
Denied |
|
Granted |
Granted |
Granted |
Granted |
Position level security is used when a user selects positions in the wizard process before building a workbook. Only positions to which a user has access are available for selection in the 2-tree, which are then included in the build of the workbook.
Currently, workbook access is either granted or denied. If users have been granted access to a workbook, they can open, modify, and commit the workbook. No distinction is made between read-write-commit, read-write, and read-only access. Workbook access is automatically granted to the user that built it, and it may be shared with multiple groups or the world.
|
Note: A user must have access to the workbook template in order to access the workbook, even if the workbook has world or group access rights. |
Users with administrator status automatically have access to all workbook templates. By default, administrators have access to all workbooks that are saved with world access. If a workbook is saved with group access, administrators can only access the workbook if they are members of the default user group of the user who saved the workbook.
Another aspect of workbook security is the ability to set limits for the number of workbooks that a user can have saved at any given time. Limits can be set for a user per template, for a user group per template, or for a template for all users. The limits are evaluated in the above order, which means that a limit defined at user-template overrides any values defined at group-template or template. If the above limits are not defined, the default value is one billion.
The limits are checked when the workbook build process is initiated. When the limit is reached, an error message displays informing the user that the workbook build process cannot complete because the limit has been reached. The message also lets the user know what that limit is. The wizard process then terminates.
Administrative users have full access to all workbook templates regardless of the access rights that other admin users may assign to them in the Security workbook. The administrative user can build the Security workbook to change the access right back, so the nominal assignment does not matter for administrative users.
Non-administrative users do not have access to Security template and User Administration template groups even if the administrator inadvertently assigns them access rights.
The Security Administration workbook is only available to system administrators. After users and user groups are created, the administrator may set up and maintain access permissions to workbook templates and measures within those workbook templates. This workbook allows the administrator to determine which templates individual users can access, as well as the measures that users can access while manipulating workbooks in the system. The user can also specify and restrict the measures that are available to be added to a given workbook template. Setting access permissions in this way provides a high degree of measure security, because users can be restricted to viewing and editing only certain relevant measures.
All administrative users have full access to all workbook templates regardless of the access rights that they were assigned in the Security workbook by other administrative users. The administrative user can build the Security workbook to change the access right back, so the nominal assignment does not matter for admin users.
The Security Administration workbook has the following worksheets:
Security Template Administration also allows the administrator to modify the label, Admin status, and default workbook template associated with each user. You also access this workbook template to modify the labels associated with user groups, workbook templates, and workbook template groups. Using this workbook, the administrator can:
Assign and modify access rights of each user to all workbook templates. User/template permissions are set in the Workbook Template Rights worksheet.
Determine which optional measures are to be accessible through individual workbook templates. Template/measure permissions are set in the Workbook Template Measure Rights worksheet.
Assign/restrict user access to individual measures. User/measure permissions are established in the Measure Rights worksheet.
The Workbook Template Rights worksheet is for setting and maintaining access permissions of each user to specific workbook templates.
The worksheet contains a drop-down list for each available workbook template and user combination. To grant a user access rights to a workbook template, select one of the following options from the drop-down list for that workbook template:
DeniedRead OnlyFull Access
After changing a user's profile, the changes must be committed to the database in order for them to take effect.
The Read Only permission on a template applies only to actual workbooks created by the template. For templates that do not generate a workbook, but only run through a wizard process for other purposes, the Read Only permission for a user on that template will not prevent them from running through the wizard. This applies to standard RPAS templates, such as Add User and Delete User, but it may also apply to various application-specific templates.
The Workbook Template Measure Rights worksheet allows administrators to determine which registered measures will be available for optional inclusion in newly built workbooks.
When a measure is initially registered as a public measure, all templates default to having access to that measure. This means that it is possible for this measure to be added to a workbook template, even if it is not one of the standard measures displayed when a workbook of that type is built. Some new workbook wizards include a dialog that prompts users to select any additional measures to be included in the workbook build. By default, all newly registered measures are included on this list of available additional measures. The other method of inserting new measures into a workbook is with the Insert Measure command.
The Workbook Template Measure Rights worksheet is used to modify template/measure permissions, which allows only certain templates to optionally include specified measures in new workbook builds.
This worksheet contains a check box for each available workbook template and registered measure combination.
The Measure Rights worksheet allows the administrator to restrict user access to individual measures on a user-by-measure basis. User/measure permissions are initially determined by the system by integrating the current user/template and template/measure settings and applying the following rule: "A user cannot have access to any measure that is not available in at least one template to which the user has access."
Permissions can be made even more restrictive on a user by measure basis by using the Measure Rights worksheet to deny users access to measures that they would normally be permitted to edit.
The worksheet contains a drop-down list for each available user and registered measure combination. Three security options are available: Denied, Read-only, Read/Write. Denied prevents the user from viewing data. Read-only allows the user to view the data. Read/Write allows the user to edit data values. However, a commit rule must be configured for a measure for data to be committed to the RPAS datastore.
A measure will have the security rights it had when it was inserted in the workbook. The change in measure security rights is only reflected in new workbooks when that measure is inserted.
|
Note:
|
The Dimension Modification Rights worksheet allows the administrator to determine which dimensions, if any, a user can modify. The worksheet contains a check box for each available user and dimension combination. A check mark in the cell indicates that the user is permitted to modify the specified dimension.
After changes are made to a user's dimension modification rights, they must be committed before they take effect.
The position-level security worksheets are used to grant or deny access to positions for individual users, user groups, or all users. Position-level security is set for a specific dimension of a hierarchy (other than calendar). See the RPAS Configuration Tools User Guide for more information on setting position-level security dimensions.
For each hierarchy/dimension that has position-level security enabled (normally just a single hierarchy/dimension), there are three worksheets: one each for user, user group, and world/all users.
After changes are made to position-level security, they must be committed before they take effect.
The Workbook Template Limits worksheets are used to limit the number of workbooks that the user can have saved. Limits can be set for a user per template, for a user group per template, or for a template for all users. The limits are evaluated in the above order, which means that a limit defined at user-template will override any values defined at group-template or template. If the above limits are not defined, the default value is 1 billion, but it is not displayed in the workbook.
The limits are checked when the user begins the workbook build process. If the limit has been reached, an error message appears that informs the user that the workbook build process cannot complete because the limit has been reached. The wizard process then terminates.
The Max Domain Session Limit worksheet is used to limit the number of user sessions that can be attached to a single domain by all users of that domain. The limit is set at the domain level. In a global domain environment, the same limit is applied individually to each local domain and the master domain.
This limit is checked during user login. If the limit has been reached, an error message appears to inform the user that the login has failed due to this limit being reached.
The Max User Session Limit worksheet is used to limit the number of concurrent user sessions that can be attached to a single domain by the same user at the same time. The limit is set per user so that admin can control the maximum number of concurrent sessions that are allowed for an individual user. In a global domain environment, the same limit is applied individually to each local domain and the master domain.
This limit is checked during user login. If the limit has been reached, an error message appears to inform the user that the login has failed due to this limit being reached.
|
Note: These tasks are performed through the Security Administration workbook. This workbook is available to only system administrators. |
From the main menu, select File - New. The New dialog box appears.
Select the Administration tab to display a list of workbook templates for Administration.
Select Security Administration and click OK.
From the File menu, select New.
Click the Administration tab.
Select Security Administration and click OK.
On the Workbook Template Rights worksheet, select each template for which a user's access rights require modification. Set to Denied, Read-only or Full Access.
Changes must be committed to the master database before they take effect. To commit the changes, select Commit Now from the File menu.
Save the workbook by selecting Save from the File menu, if desired.
To close the workbook, select Close from the File menu.
From the File menu, select New.
Click the Administration tab.
Select Security Administration and click OK.
On the Workbook Template Measure Rights worksheet, select each registered measure that should be available for inclusion in the associated workbook template. For measures that should not be included in the associated template, make sure there is no check mark.
Changes must be committed to the master database before they take effect. To commit the changes, select Commit Now from the File menu.
Save the workbook by selecting Save from the File menu, if desired.
To close the workbook, select Close from the File menu.
From the File menu, select New.
Click the Administration tab.
Select Security Administration and click OK.
On the Measure Rights worksheet, for each measure that a user should have access to, select either Read Only or Read/Write from the drop-down list. For measures to which the user should not have access, make sure Denied is selected.
Any changes made must be committed to the master database before they take effect. To commit the changes, select Commit Now from the File menu.
Save the workbook by selecting Save from the File menu, if desired.
To close the workbook, select Close from the File menu.
From the File menu, select New.
Click the Administration tab.
Select Security Administration and click OK.
On the Dimension Modification Rights worksheet, select each dimension for which the user needs modification rights. For dimensions that the user should not be able to modify, make sure there is no check mark.
Any changes made must be committed to the master database before they take effect. To commit the changes, select Commit Now from the File menu.
Save the workbook by selecting Save from the File menu, if desired.
To close the workbook, select Close from the File menu.
Use this procedure if position level security has been enabled.
From the File menu, select New.
Select the Administration tab.
Select Security Administration and click OK.
Select the worksheet for which security needs to be set or modified: User, User Group, or World.
By default, the dimension (level) at which position level security is enabled will be displayed. To manage security at a level above the designated level (only levels above are possible), right-click and Select Rollup to view the available dimensions.
To grant access to a position, click the check box of the cell.
|
Note: A user must have access at the User, User Group, and World levels to have access to a position. |
Changes must be committed to the domain before exiting in order for them to take effect.
From the File menu, select New.
Select the Administration tab.
Select Security Administration.
Click OK.
Select the worksheet for which the limit will be set: User/Template, Group/Template, or Template.
Set the values as necessary.
Commit the data to the domain before exiting.
From the File menu, select New.
Select the Administration tab.
Select Security Administration.
Click OK.
On the Max Domain Session Limit worksheet, modify the scalar measure Maximum Domain Session Limit value with a valid integer value.
Changes must be committed to the master database before they take effect. To commit the changes, select Commit Now from the File menu.
To save the workbook, select Save from the File menu.
To close the workbook, select Close from the File menu.
From the File menu, select New.
Select the Administration tab.
Select Security Administration.
Click OK.
On the Max User Session Limit worksheet, modify the Maximum User Session Limit measure per user.
Changes must be committed to the master database before they take effect. To commit the changes, select Commit Now from the File menu.
To save the workbook, select Save from the File menu.
To close the workbook, select Close from the File menu.
The Measure Analysis workbook allows the user to view data associated with any registered measure in the RPAS applications, such as actual sales data for specified product/location/calendar combinations. The user may also use the Measure Analysis workbook to edit values for writable measures, however commit capability is only allowed to administrative users.
Although a common use of the Measure Analysis workbook is to view actual sales data, the workbook is not restricted to presenting sales data alone. The user can view any data loaded into the RPAS master database, such as selling prices, shipments, and orders. The Measure Analysis Wizard provides a list of all stored measures that have an insertable measure property set to true. (See the RPAS Configuration Tools User Guide for more information on measure properties.) The user simply chooses the measures to be displayed in the new workbook.
|
Note: Formatting settings cannot be saved in the Measure Analysis workbook because of its dynamic nature. |
The Measure Analysis Wizard guides the user through the process of creating a new Measure Analysis workbook in which the user can view selected measure data.
Access the New Workbook window by clicking New in the menu.
Select the Analysis tab and then select Measure Analysis. Click OK.
The Measure Analysis Wizard opens. Select the measures you want to include in the workbook. Click Next.
The Available Location Positions step appears. Select the locations to be included and click Next.
The Available Product Positions step appears. Select the products to be included and click Finish.
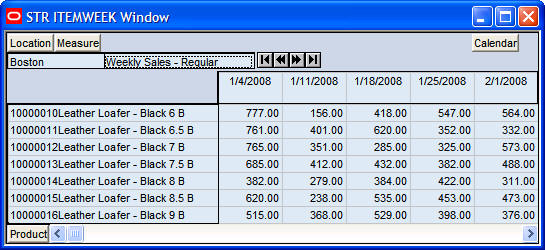
The Measure Analysis worksheet allows the user to view the chosen measure data for the positions selected from the measure's associated hierarchies. Each Measure Analysis worksheet is displayed at a different dimensional intersection, depending on the measure selections made in the wizard. This dimensional intersection is shown in the worksheet title bar.
Figure 6-12 shows a Measure Analysis worksheet that displays Weekly Sales data for several items in a particular store. The location/product/calendar dimensional intersection of this worksheet, as shown in the title bar, is STR (Store), ITEM, WEEK. The Weekly Sales measure, because it is registered as a read/write measure, can be edited in this worksheet. However, only an administrative user can commit overwrites to writable measures in this workbook.
To review and edit sales or other registered measure data, complete the following steps:
To open an existing Measure Analysis workbook: select Open from the File menu, double-click on the workbook to be opened, and go to step 9.
Or, to open a new workbook, select New from the File menu.
On the Analysis tab, select Measure Analysis and click OK.
The Measure Analysis Wizard opens and prompts the user to select the measures to be displayed in the new workbook. Use Ctrl-Click or Shift-Click to select multiple measures. Click Next.
For each hierarchy specified in the base intersection of the measures selected, use the hierarchy wizard to select positions to view. Repeat this step for each hierarchy wizard and click Next.
Click Finish to open the Measure Analysis workbook.
On the Measure Analysis Worksheets, view the stored data associated with the measures and hierarchy positions selected in the wizard. Make any changes as required. Administrative users may commit changes.