| Oracle® Retail Predictive Application Server Administration Guide for the Classic Client Release 14.1 E59120-01 |
|

 Previous |
 Next |
| Oracle® Retail Predictive Application Server Administration Guide for the Classic Client Release 14.1 E59120-01 |
|
Previous |
Next |
Secure Socket Layer (SSL), a protocol for securing network connections, is used by RPAS to provide secure communication between RPAS client and server processes. RPAS Classic Client supports one-way SSL and SSL without authentication.
This chapter contains the following:
In order to use SSL with RPAS, you must configure both the server and the client. For one-way and two-way SSL, this involves setting up key stores and trust stores used to manage certificates. The key store contains a private key and its corresponding public certificate chain. The trust store contains trusted public certificates and certificate chains. SSL without authentication does not require digital certificates on either the client side or the server side.
In order to enable the use of SSL on RPAS, you must use the Domain Daemon to set up the SSL type and the Oracle wallet location (which is optional for certain SSL types).
Oracle Wallet is managed by a command line utility called orapki, which is included in the RPAS installation.
A Certificate Authority (CA) certificate is the public certificate from the CA that issues the server certificate.
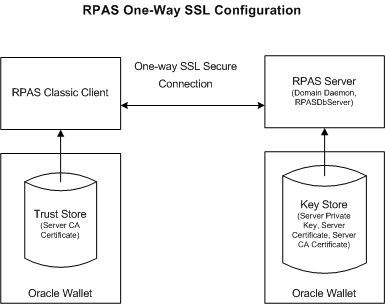
In one-way SSL, the client asks to verify the identity of the server. The server does not ask to identify the client, but does require application-level authentication.
One-way SSL only authenticates the server on the client side. Only the server needs to have a key store for its private key and digital certificate. RPAS server uses Oracle Wallet for this purpose. The trust store on the client side is an Oracle wallet for the Classic Client. The trust store needs to contain the server CA certificate so that the client can recognize and authenticate the server certificate.
A self-signed root certificate can be used instead of a third-party CA certificate (for example, for testing).The same root certificate can be used to generate both server and client certificates.
|
Note: Under a Cygwin environment on Windows, the path of the wallet must be in Windows format, not Cygwin format. For example, it must be C:/wallets/root, not /cygdrive/c/wallets/root. |
To create a self-signed root certificate, complete the following steps:
Create an Oracle wallet.
orapki wallet create -wallet {root_wallet_directory} -pwd {root_wallet_password}
Example:
orapki wallet create -wallet C:/wallets/root -pwd rootpass1
Generate a private key and a self-signed root certificate.
orapki wallet add -wallet {root_wallet_directory} -keysize {key_len} -dn {root_dn} -self_signed -validity {validity_days} -pwd {root_wallet_password}
Example:
orapki wallet add -wallet C:/wallets/root -keysize 2048 -dn "cn=rpas_qa_ca,dc=us,dc=oracle,dc=com" -self_signed -validity 3650 -pwd rootpass1
Export the root certificate chain to a file for later use.
orapki wallet export_trust_chain -wallet {root_wallet_directory} -certchain {root_cert_chain_file} -dn {root_dn} -pwd {root_wallet_password}.
Example:
orapki wallet export_trust_chain -wallet C:/wallets/root -certchain C:/wallets/root_chain.txt -dn "cn=rpas_qa_ca,dc=us,dc=oracle,dc=com" -pwd rootpass1
To configure the RPAS server for one-way SSL, you must set up a key store and then start the Domain Daemon.
To set up the key store, complete the following steps:
Create an Oracle wallet with auto login. This type of wallet can be read without a password. The default file permissions for the wall are 0300 (accessible by owner only).
orapki wallet create -wallet {server_wallet_directory} -auto_login -pwd {server_wallet_password}
Example:
orapki wallet create -wallet C:/wallets/server -auto_login -pwd serverpass1
Generate a private key.
orapki wallet add -wallet {server_wallet_directory} -keysize {key_len} -dn {server_dn} -pwd {server_wallet_password}
Example:
orapki wallet add -wallet C:/wallets/server -keysize 2048 -dn "cn=rpas_qa_server,dc=us,dc=oracle,dc=com" -pwd serverpass1
Export a certificate request.
orapki wallet export -wallet {server_wallet_directory} -dn {server_dn} -request {server_cert_req_file} -pwd {server_wallet_password}
Example:
orapki wallet export -wallet C:/wallets/server -dn "cn=rpas_qa_server,dc=us,dc=oracle,dc=com" -request C:/wallets/server_cert_req.txt -pwd serverpass1
The certificate request must be digitally signed before it can be used. If the deployment of the RPAS Fusion client and the RPAS server are both under the control of the customer, then a self-signed SSL certificate may be used as the signer. Otherwise, the certificate request must be sent out for signing by a well-known certificate authority.
A self-signed SSL certificate used in this manner may be referred to as a self-signed root certificate or as a private certificate authority.
This is the method for creating a self-signed root certificate:
Generate a private key for the root certificate:
orapki wallet add -wallet {root_wallet_directory} -keysize {key_len} -dn {root_dn} -self_signed -validity {validity_days} -pwd {root_wallet_password}
Example:
orapki wallet add -wallet C:/wallets/root -keysize 1024 -dn "cn=root,dc=us,dc=example,dc=com" -self_signed -validity 3650 -pwd rootpass1
Export the root certificate chain to a file:
orapki wallet export_trust_chain -wallet {root_wallet_directory} -certchain {root_cert_chain_file} -dn {root_dn} -pwd {root_wallet_password}
Example:
orapki wallet export_trust_chain -wallet C:/wallets/root -certchain C:/wallets/root_chain.txt -dn "cn=root,dc=us,dc=example,dc=com" -pwd rootpass1
In the above example, the file containing the root certificate chain is c:/wallets/root_chain.txt.
If using an external root certificate, create the server certificate signed by a third-party CA. (Alternatively, see step 6.) To do this, send the server certificate request file ({server_cert_req_file}) to the CA. The CA sends back a certificate ({server_certificate_file}) for the server, along with the public certificate ({root_cert_chain_file}) of the CA.
If using a self-signed root certificate, the server certificate file is signed as follows:
orapki cert create -wallet {root_wallet_directory} -request {server_cert_req_file} -cert {server_certificate_file} -validity {validity_days} -pwd {root_wallet_password}
Example:
orapki cert create -wallet C:/wallets/root -request C:/wallets/server_cert_req.txt -cert C:/wallets/server_cert.txt -validity 3650 -pwd rootpass1
The file c:/wallets/server_cert.txt is the signed server certificate, in the form of a file.
Import the CA into the server wallet. Note that the public certificate chain may contain more than one certificate. In such cases, the certificates must be imported one by one, starting at the top of the chain.
orapki wallet add -wallet {server_wallet_directory} -trusted_cert -cert {root_cert_chain_file} -pwd {server_wallet_password}
Example:
orapki wallet add -wallet C:/wallets/server -trusted_cert -cert C:/wallets/root_chain.txt -pwd serverpass1
Import the server certificate into the wallet.
orapki wallet add -wallet {server_wallet_directory} -user_cert -cert {server_certificate_file} -pwd {server_wallet_password}
Example:
orapki wallet add -wallet C:/wallets/server -user_cert -cert C:/wallets/server_cert.txt -pwd serverpass1
To configure the Classic Client for one-way SSL, you must set up a trust store. To do this, create an Oracle wallet on the client. Then, import the CA into the wallet. Since the trust store does not contain any private keys, it can be shared by all Classic Clients. It can either be copied to every client machine or placed in a shared network location that is accessible by the client machines.
Once you have set up the trust store, you must configure the Classic Client connection so that the wallet can be used by the client.
Create an Oracle wallet with auto login.
orapki wallet create -wallet {client_wallet_directory} -auto_login -pwd {client_wallet_password}
Example:
orapki wallet create -wallet C:/wallets/client -auto_login -pwd clientpass1
Import the CA from the server into the wallet. Note that the public certificate chain may contain more than one certificate. In such cases, the certificates must be imported one by one, starting at the top of the chain.
orapki wallet add -wallet {client_wallet_directory} -trusted_cert -cert {root_cert_chain_file} -pwd {client_wallet_password}
Example:
orapki wallet add -wallet C:/wallets/client -trusted_cert -cert C:/wallets/root_chain.txt -pwd clientpass1
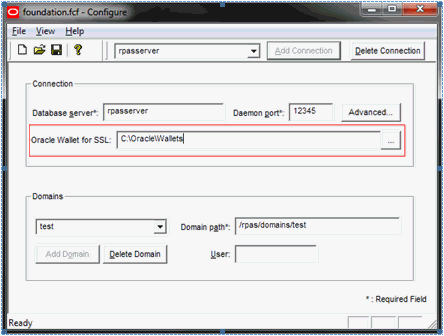
Configure the Classic Client connection by entering the path for the location of the wallet into the Oracle Wallet for SSL dialog box, which is part of the EConfigure configuration utility (shown in Figure 4-2).
The wallet can be a directory on a local drive or on a network computer.
Examples:
A wallet on the C drive: C:/wallets/client.
A wallet on a shared directory called "shared" of a server called "server123:: //server123/shared/wallets/clients.
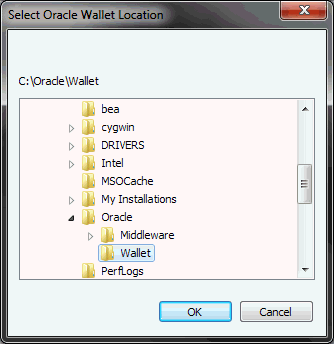
Use the dialog box shown in Figure 4-3 to browse for the wallet location.
Once this configuration is complete, you can start the Classic Client as usual. It automatically detects the SSL type and uses the wallet specified in the connection configuration (Step 3 above).
When you are using SSL, you see a secure lock icon on the status bar at the bottom of the client window.
The createSSLWallets.sh script is provided to automate the creation of Oracle wallets for self-signed certificates. The script creates both server and client wallets for RPAS server and classic client.
The createSSLWallets.sh script is an interactive one that prompts the user for inputs. It does not take any command line arguments. The shell to start the script must have access to the orapki utility that is deployed under the bin directory of RPAS home.
The script requires the following user input:
The directory for the wallets
This is the location for the wallets. A directory named "rpaswallets" is created to store all wallets under this given directory. If a directory "rpaswallets" already exists, the script will stop and ask the user to remove that directory. This is to ensure that some old stale wallets do not become mixed up with the new wallets.
By default, the current directory is used if not given.
Organization name
The user is asked to enter an organization name that is used as part of the DN (Distinguished Name) of the certificate identities.
By default, the organization name is "My Company, Inc.".
The passwords for root wallet, server wallet, and client wallet
Each password must be entered twice. Basic validation is done to ensure that the user has entered matched passwords and that the password is not empty.
The script displays every step it takes to create the wallets and certificates. There are a total of 17 steps. The orapki command line for each step is displayed with password masked out. The output of the orapki command is displayed to the user and thus any error message from orapki is also displayed.
If the script finishes successfully, it will display the locations of the root wallet, server wallet, and client wallet. Since RPAS Domain Daemon only takes absolute path for the wallet, these locations will show as absolute paths.
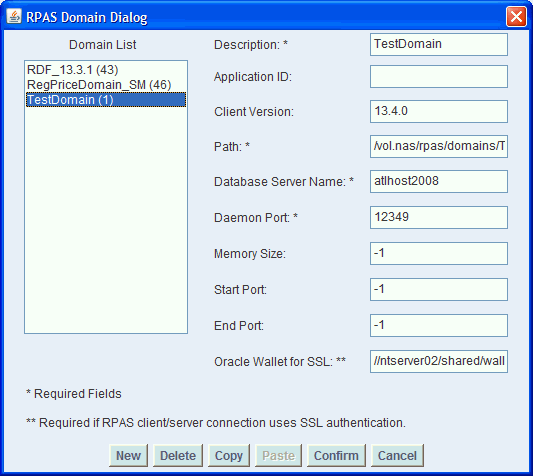
To use RPAS Web Launch with one-way SSL support, you must specify the location of the wallet in the field labeled Oracle Wallet for SSL. Since this domain configuration is shared by all users, a network location must be used for the wallet or the wallet must reside at the same location across all client PCs.
The wallet location can also be specified in the <Client> section of the XML file used for In-context Launch, in the setting called sslWalletLocation. For example:
<Client>
  <version>13.3.1</version>
  <sslWalletLocation>//ntserver02/shared/wallets/client</sslWalletLocation>
</Client>
SSL without authentication (also known as anonymous SSL) does not require a digital certificate on either the client side or the server side.
An anonymous Diffie-Hellman (DH) key exchange protocol is used to generate and exchange a secret session key for use in the encryption and decryption of the traffic to achieve confidentiality. No additional configuration is needed for RPAS Classic Client. It automatically recognizes the type of SSL and chooses the corresponding cipher suite.
SSL without authentication is considered to be a security risk. If you are using SSL without authentication, you will see the following warning message regarding this risk:
Warning: The client/server network communication is using SSL without authentication, which is prone to man-in-the-middle attacks.