| Oracle® Retail Predictive Application Server User Guide for the Fusion Client Release 14.1 E59121-01 |
|

 Previous |
 Next |
| Oracle® Retail Predictive Application Server User Guide for the Fusion Client Release 14.1 E59121-01 |
|
Previous |
Next |
The ability to view images associated with positions on a dimension is useful in many aspects of the retail world such as assortment planning, item planning, and story boarding.
|
Note: See Chapter 14, "View Details", for information about additional functionality for displaying images in the UI. |
For example, you can associate an item with a image of what it should look like displayed on the shelf. You can associate stores with images of the store front or interior. You can use images to storyboard themes by creating a collection of looks and colors for a particular buying period, floor set, or flow. Some retailers choose to associate multiple types images with multiple levels of the Product dimension. For instance, you could associate images for the following Product levels:
Department: Image of a generic sweater
Class: Image of a wool sweater
Subclass: Image of a L/S V-Neck Solid sweater
Style: Image of Chunky Shrunken Style, Washable Wool, L/S V-Neck Solid sweater
Style/Color: Image of Chunky Shrunken Style, Color Pumpkin, Washable Wool, L/S V-Neck Solid sweater
With the Fusion Client, you can associate an image for any dimension with a configured media attribute, including calendar levels. These images can be stored on a website or in a repository located in the same network as the application server.
After images are associated with a position, you can view and compare them within the Fusion Client.
Images can be included in a domain by configuring media dimension attributes and measures, loading them with media bundle values referring to images, and making them visible in worksheets. A number of images may be included in each bundle value; one of those is designated as the primary image that can be seen in the pivot table. All the images, not just the primary, can be seen via the detail pop-up.
Pivot table headers display images for visible media dimension attributes. Attributes can be made visible by selecting them for display in the worksheet view, as discussed in Select Attributes for Display, or as configured for the worksheet in Config Tools.
Pivot table cells display images for visible media measures. Measures can be made visible in the view using measure lists or measure profiles in the worksheet definitions.
In addition, these attribute and measure values can be viewed in a detail pop-up, as described in Chapter 14, "View Details", provided they have been configured appropriately using Config Tools.
A detail pop-up is a pop-up that has been configured to display a group of images and associated information. A detail pop-up differs from view image in that former is used to browse all the images associated with a position or cell and the latter is used to browse positions using images. A detail pop-up can also show non-media attribute and measure values for the position or cell.
Worksheet formats applied via the Format dialog box are also applied to format the styles for the content that appears in the Information section of the detail pop-up. See Chapter 5, "Formatting" for details.
Media measures and media attributes do not display as images outside of the detail pop-up and the pivot table. The use of media items in other contexts within the Fusion Client is subject to the following constraints:
Table 13-1 Measure and Dimension Behavior in the UI
| UI Element | Behavior |
|---|---|
|
Show/Hide |
The position label for the image is displayed in lieu of the media image. |
|
Level Split |
Media attributes are not available. |
|
Quick Fill |
Media values can be copied to other media cells in one or more measures but cannot be copied into string, text, or other non-media types. |
|
Fill |
For media measures, the fill dialog expects a media bundle value in it XML fragment string representation. This value is parsed and validated. Parsing errors or validation errors are reported and logged. |
|
Chart Legends |
Position labels are displayed if only media attributes are visible. |
|
Copy/Paste |
Media measure behave in the same way as other measures. Type checking occurs, so media cannot be pasted into a float or integer cell. Media can be pasted into a string measure cell. If a string measure contains a media XML fragment, it can be pasted into a media measure and the image will be displayed. |
|
Cut |
Removes media data from media measure. |
|
Copy External/Paste External |
Same as Fill behavior. |
|
Workbook Wizard Dimension Options |
Media measures are not available for selection. |
|
Print/Export |
The display of images is not supported. The export settings As Seen and Formatted display different content than the export setting Raw Data. In all cases, some fragment of text such as the label, the media url, or the media xml will be displayed. |
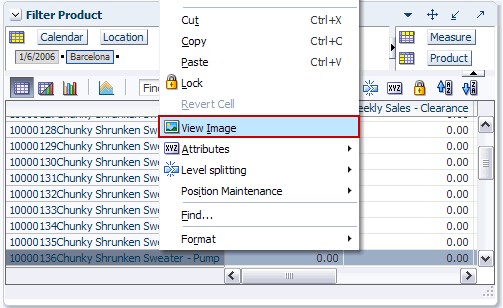
To view the image associated with a position, use one of the following methods. Note that the image you see is the primary image of the image attributes available for a given level. It is either the innermost visible image attribute (if present) or the first image attribute. If no image attributes are available but old-style single images are, then those images are used (via the Config Tools Enable Images check box on a Level).
To associate an image with a position, complete the following steps. Note that this is for associating a single image to a position on an ad-hoc basis. Populating multiple images for a position is a back-end process.
Click the Manage Images icon in the toolbar or select Manage Images from the View menu.
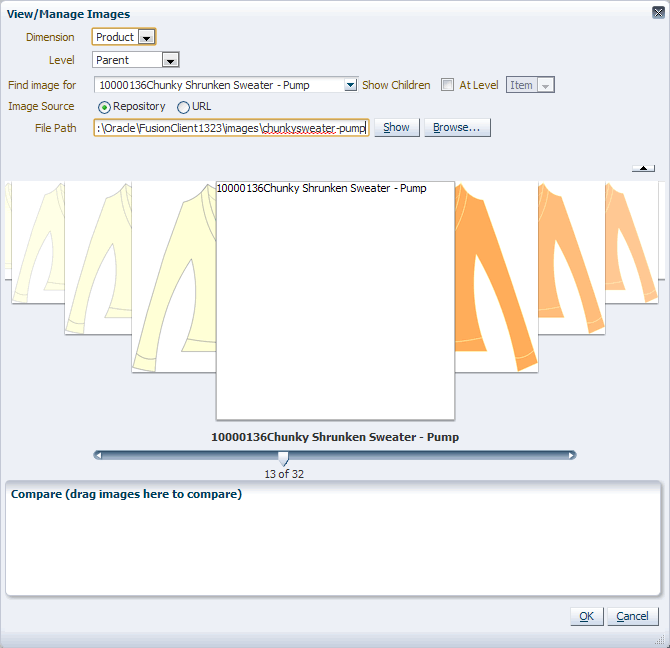
The View/Manage Images dialog box appears. Enter the following information:
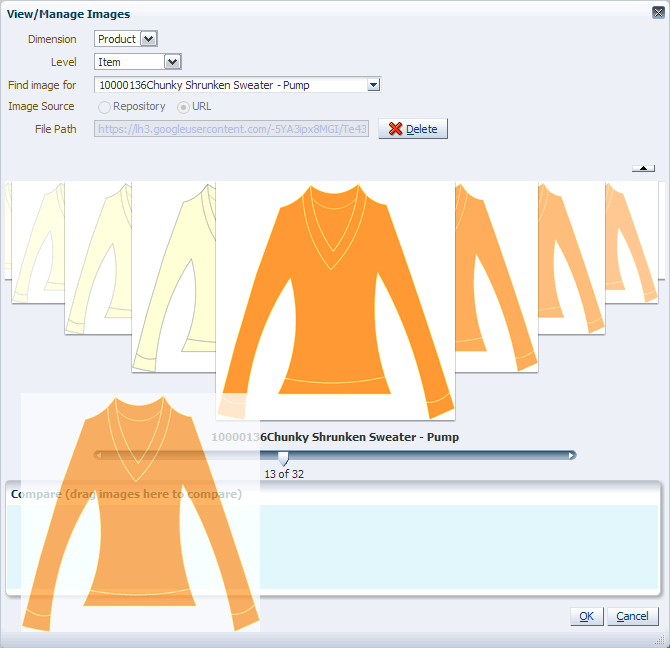
Dimension and Level: Select the dimension and level into which you want to load the image. In Figure 13-4, the Product dimension and Item level have been chosen.
Find image for: Select the position for which you want to load the image. You can select the position from the drop-down list, or you can scroll through the positions in the carousel view.
Show Children: This option appears when you have selected a dimension level other than the lowest dimension level. Select this option to display images of the children instead of the parent.
At Level: This option is enabled when the Show Children option is selected. Use this field to select which child level to display images for.
Image Source: Select either URL or Repository as the location of the image. Select URL if the image is located on the internet. Select Repository if the image has already been loaded into the repository on a shared network location.
|
Note: The repository is configured during the installation process. The levels having attributes that represent images are also configured. In addition, rules must be configured if the image attribute changes are to be committed to the domain. Contact your administrator for assistance. See the Oracle Retail Predictive Application Server Installation Guide for more information. |
File path: Enter the file path for the image. You can type or paste the file path for either a Repository or URL image source. For Repository images, you can also use Browse to locate the file within the repository. After you have entered the file path, click Go.
The image appears in the image carousel and is now associated with the position.
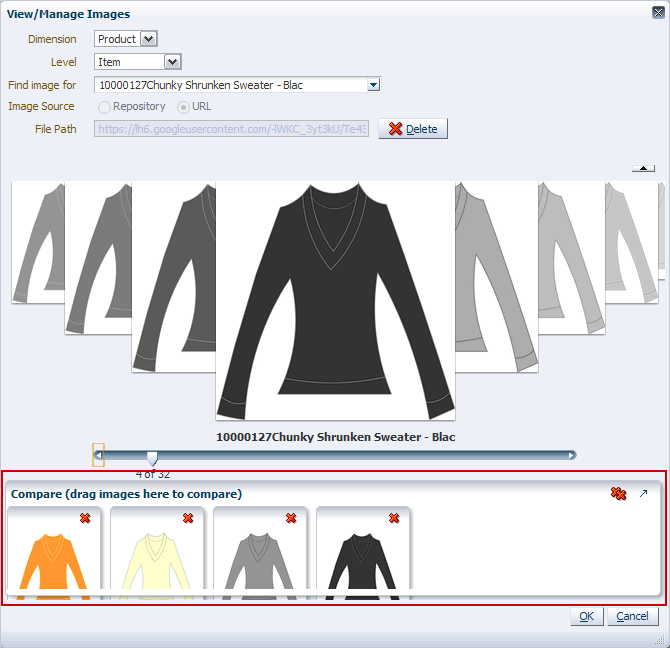
You can drag images from the images carousel to the Compare area of the View/Manage Images dialog box in order to compare images side by side.
To compare images, complete the following steps:
Click and drag an image from the image carousel to the Compare area. When the background of the Compare area changes to blue, release the image. The image appears in the Compare area.
Click and drag other images to the Compare area. The images appear as thumbnails.
To expand the Compare area in order to view the selected items as larger images, click the Expand icon in the top, right corner of the Compare area. To collapse the Compare area after expanded, click the Collapse icon in the top, right corner.
You can disassociate an image with a position by using Delete in the View/Manage Images dialog box. This clears out the images from the value for a position.
|
Note: Using the Delete function does not delete an image from the repository. It only disassociates the image with the position. |
To delete an image, complete the following steps:
Click the Manage Images icon in the toolbar or select Manage Images from the View menu.
Or, right-click the position within the view and select View Image from the right-click context menu.
The View/Manage Images dialog box appears. Select the position for which you want to delete the image. You can select the position from the Find image for drop-down box or from the image carousel.
After you have selected the position, click Delete located to the right of the File Path field.
The image disappears from the image carousel.