| Oracle® Retail Predictive Application Server User Guide for the Fusion Client Release 14.1 E59121-01 |
|

 Previous |
 Next |
| Oracle® Retail Predictive Application Server User Guide for the Fusion Client Release 14.1 E59121-01 |
|
Previous |
Next |
When you use an RPAS solution, you interact with the solution through a personal data repository called a workbook. A workbook contains the subset of the data (and metadata) from the domain, and its scope is constrained by the access rights available to a user. Workbooks are stored on the RPAS server and can be built using an online wizard process or via an automatic batch process.
This chapter describes the various tasks you can perform with the data in the workbooks. It includes the following sections:
When a workbook is opened, the pivot table loads with a block of data from the server. If, during workbook use, you scroll to a cell outside the limits of that block of data, a new block of data is loaded from the server. The size of the block of data loaded is controlled by settings in the rpasConfigure.properties file. (This file is only accessible to users with permissions to configure settings governing operation of the application). See the RPAS Administration Guide for the Fusion Client for more information.
The size of the block of data loaded affects the performance of the application.
If a large block of data is loaded, the workbook is slower to open but once loaded, you can scroll further before reaching cells where another block of data needs to be loaded.
If a smaller block of data is loaded, the workbook will open more quickly, but you will not be able to scroll as far before another block of data needs to be loaded.
This affects the performance of the RPAS solutions. The optimum settings depends on the amount of data that you need to access when completing workbook tasks. These settings can vary from retailer to retailer and should be discussed when the application is being configured. This will ensure the best day-to-day experience.
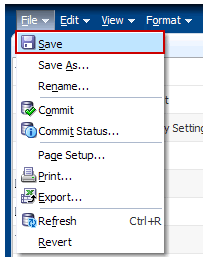
On the workbook screen, you can edit the cells in the pivot table, change the layout of views, and so on. The Save and Save As options enable you to save such workbook changes. The Save option is available in the File menu and also as an icon on the toolbar. The Save As option is available only in the File menu.
Each time you save the workbook, the workbook is first automatically calculated before the changes are saved. If the calculate or save operation fails, an error message appears.
To save a workbook:
After you complete the changes you want, click the Save icon on the toolbar.
or
From the File menu, click Save.
When saving a workbook (or saving a copy using the Save As command), there are restrictions on the length of the file name and the characters that can be used.
The file name can be a maximum of 32 characters.
The filename can contain the following standard characters:
a - z
A - Z
0 - 9
The filename can contain the following special characters:
.
|
_
-
/
$
&
spaces
Any file name not meeting these conditions results in an error message.
The File menu also includes a Save As option that enables you to save a copy of the workbook. It also enables you to set the access privileges for the workbook.
To save a copy of the workbook:
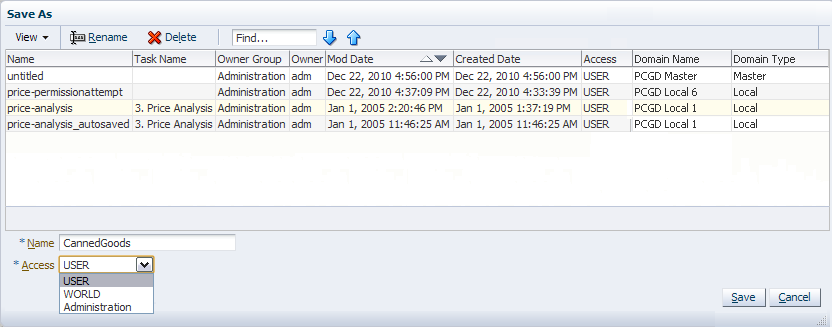
With the workbook open, click Save As in the File menu. The Save As dialog box appears.
In the Save As dialog box, enter appropriate details in the following fields:
Name – The name of the workbook.
Access – The access privilege to be set for the workbook. Select one of the following options:
User: This is the default option. Select this option if this workbook should only be accessible to you.
[Group Name]: Select a group if you want to allow access to all users in that group who have access to this workbook template.
These other users may have to use View/All or View/Other Domain to see the workbooks that they do not own and that may be in a domain the users do not normally work in.
World: Select this option if you want to allow access to all the users who use the application who have access to this workbook template.
Click Save.
By default, the Name and Access fields retain the values set for the workbook that were saved previously. You can also select a different workbook from the list and then update it to make it a unique name.
The RPAS Fusion Client has an Auto-Save workbook feature that saves a copy of an open workbook automatically. Auto-saved workbooks contain all the changes up to the last Calculate and Custom menu actions.
|
Note: Cell edits that have not been calculated and formatting changes made in the previous session are not saved in the auto-saved workbooks. |
The auto-save workbook feature enables you to quickly resume your work in case one of the following events occur:
The web browser window is closed before you log out from the RPAS Fusion Client.
The web browser window stops responding and closes abruptly.
The network is disconnected or the web server stops responding.
When one of these events occurs, an auto-save takes place and a copy of the existing workbook is made. This copy has the same name of the workbook with _autosaved appended.
After one of these events occurs, you should first notify your administrator. After the issue is fixed and the servers are restored, you can open a new web browser window, log onto your domain again, and start using the auto-saved workbook or your last saved revision of the workbook.
|
Note: If your implementation uses a clustered configuration and the web server stops responding, you will be redirected to the RPAS Fusion Client login page on another managed server that acts as a fail-over server. You can then log onto your domain and resume work using the auto-saved workbook. |
When you have a workbook open, you can rename it at any time without affecting the data within the workbook or the other workbook information, such as the created date, modified date, formatting information, and so on.
Note the following about renaming workbooks:
You can only rename workbooks to which you have write access.
Workbook names can be no longer than 32 characters.
Workbook names cannot contain double or single quotation marks.
Workbooks cannot be named ”Untitled.” This name is reserved.
To rename a workbook, complete the following steps:
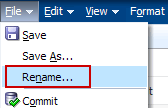
With the workbook open that you want to rename, select Rename in the File menu.
The Rename Workbook dialog box appears. Enter the new name and click OK.
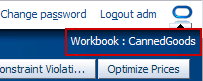
The workbook refreshes and the new name appears in the top right corner.
You can also rename a workbook from the Open Workbook window or the Save As window. For more information about this option, see Renaming a Workbook.
When you edit any cell value within a view, you must calculate the workbook to review the cells that are updated based on your action. The Calculate icon on the Quick Access toolbar and the Calculate option in the Edit menu enable you to calculate the workbook after you edit any cell value in a workbook.
The Calculate option may also affect the number of Real Time Alerts and their appearance. For example, some real time alerts may completely clear. Other real time alerts (where there are multiple alerts for a cell) may have one or more alerts cleared, leaving a different alert visible.
When you calculate a workbook, the updated cell value is sent to the server and the associated cells are recalculated based on the calculation rules already configured.
The formatting for edited cells are removed.
|
Note: The Calculate option is disabled on the Quick Access toolbar and Edit menu when there are no changes in the workbook. |
To calculate a workbook:
In the workbook, edit the cells you want. You can edit the unprotected cells only. There are some protected measures that you may not be able to edit. When you edit a cell, the formatting on the edited cell is removed.
Alternately, because of protection processing, some cells are protected while you are editing other cells.
Click the Calculate icon on the Quick Access toolbar.
or
In the Edit menu, click Calculate.
|
Note: You can also calculate the workbook using the keyboard shortcut Ctrl + T. |
All associated cells are calculated and the updated workbook appears. As a result of the calculate operation, protected cells may become unprotected if they were protected as a result of a previous cell edit.
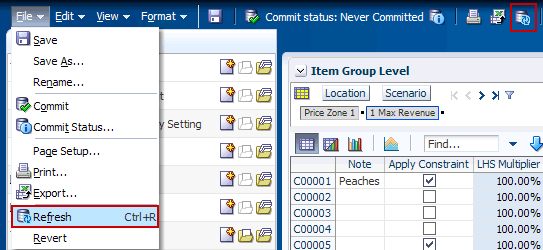
When you are working with a workbook, you can update it with the data that is currently stored in the domain. In this way, you can work with the most current data without having to rebuild the workbook. However, configured refresh rule expressions control which measures are updated during the refresh. See the Oracle Retail Predictive Application Server Configuration Tools User Guide for more information on setting up refresh rules.
Workbooks can be configured to have a single refresh rule group or multiple refresh rule groups.
|
Note: If a refresh rule group does not exist for a workbook, the Refresh option is disabled. |
Single refresh rule group – These contain refresh rules in a single rule group. This means that only one rule group is assigned as a refresh rule group in the configuration of the workbook.
Multiple refresh rule groups – Multiple refresh rule groups are set up and assigned to a workbook. When there are multiple refresh rule groups, the refresh options in the Edit menu and in the toolbar have a down arrow that shows a list of available refresh rule groups. You can choose the specific group to refresh the data in the workbook. Only one rule group can be selected or applied at a time.
The refresh rule groups available for use in the Fusion Client are set up in the RPAS Configuration Tools. To learn how to create these rule groups, see the Oracle Retail Predictive Application Server Configuration Tools User Guide.
When the refresh option is used, the following occurs:
When the refresh option is invoked, the Fusion Client runs the calculation before running the refresh operation.
The uncommitted data is lost for measures that are refreshed or calculated as a result of the refresh. If the measure is not affected by the refresh process, then the uncommitted data is not affected.
If a locked cell has updated data in the domain, the value in the cell changes to the domain value.
In general, all locks are ignored and the data is updated with new values from the domain.
It is possible that elapsed time is updated as part of the refresh. When you refresh, the elapsed setting can be updated; therefore, data for certain periods may become read-only.
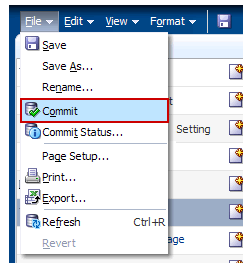
When you perform a save operation, the changes are saved to the workbook. Unless these changes are committed to the master domain, the updated information may be lost if the workbook is deleted or corrupted. You can use the Commit option to merge the changes you performed in the workbook to the master domain.
You can find the Commit option in the File menu and also as an icon on the toolbar. A Commit Status option is also available next to the Commit option. Use this to review the status of the commit requests.
To commit a workbook:
After you make the changes you want, click the Commit icon on the toolbar.
or
From the File menu, click Commit.
When you commit a workbook, a copy of the workbook is added to the commit queue and the commit status changes to Pending. This status is updated at a set time interval (which is configurable and defaults to 30 seconds) until the status changes to Committed. When the system resources are available, the changes are committed to the master domain. You can continue working on the workbook while the commit operation is in progress. If any changes made subsequent to the last commit operation need to be committed to the domain, then another commit operation is required.
|
Note: The Commit operation is similar to the Commit ASAP option in the RPAS Classic Client. |
The following Commit statuses are available:
Committed – Indicates that the changes have been committed successfully and no additional changes have been made.
Modified – Indicates that the changes have been made (saved or unsaved) since the last commit.
Pending – Indicates that the changes have been submitted to the queue and are waiting to be processed.
In Progress – Indicates that the changes in the workbook are in the process of being committed.
Failed – Indicates that the changes were not successfully committed. You may need to fix any errors in the workbook and try committing again.
|
Note: If you commit an untitled workbook that has never been saved, the data is committed; however, the commit status in the toolbar is not updated until the workbook is saved for the first time. |
An information icon is available to the right of the Commit Status. You must mouse over the Commit Status icon to view the current commit status.
Use the Commit Status dialog box to view the commit statuses for all the workbooks. In a combined taskflow, all the workbooks across all the domains to which you have access are displayed.
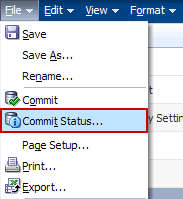
To view the commit statuses:
On the Quick Access toolbar, click the information icon located to the right of the current Commit Status.
Or, from the File menu, click Commit Status.
The Commit Status dialog box appears, as shown in Figure 3-14.
By default, the Commit Status dialog box lists the statuses of the current commit operations. It also enables you to filter the list by the users, solutions, tasks, or status.
To view the commit status based on specific criteria:
In the Commit Status dialog box, select the relevant values in the Submitter, Solution, Task, or Status drop-down lists.
After the specific criteria is selected, click the Refresh icon located to the right of the Status drop-down list.
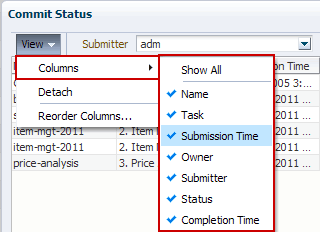
Showing or Hiding Columns
By default, the Commit Status dialog box displays all the columns. To show or hide the columns, complete the following steps:
On the Commit Status dialog box, click View.
On the View menu, select the column you want in the Columns submenu.
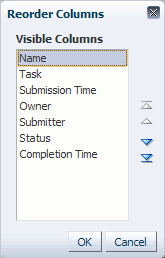
Reordering Columns
The Reorder Columns option in the View menu enables you to reorder the columns that appear in the Commit Status dialog box.
|
Note: You can also reorder the columns visible in the dialog box by dragging and dropping them to the position you want. |
To reorder the columns:
In the Commit Status dialog box, click View.
In the View menu, click Reorder Columns. The Reorder Columns window appears.
In the Reorder Columns window, select the columns you want and click the up or down arrows to reorder the columns. Click the top (first) and bottom (last) arrows to move your selection to the top or bottom of the list.
Click OK.
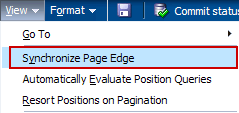
Synchronized page edge scrolling lets you simultaneously scroll through the page edge of multiple views. When synchronized page edge scrolling is enabled, all views that contain the same slice dimension scroll to the new slice position when one of those views is scrolled to a new position. When scrolling disabled, scrolling through slice positions in one view does not affect the slice position display of other views.
Synchronized page edge scrolling works for all views within a single workbook, and it remains enabled as you move through the tasks and steps within that workbook. Synchronized page edge scrolling is useful when you want to compare multiple views containing the same page or slice dimension.
To enable synchronized page edge scrolling, click Synchronize Page Edge in the View menu, as shown in Figure 3-17.
When synchronized page edge scrolling is enabled, a check mark appears by this option in the View menu. In addition, workbooks that are set at the same dimension levels are refreshed to show the same data within those levels.
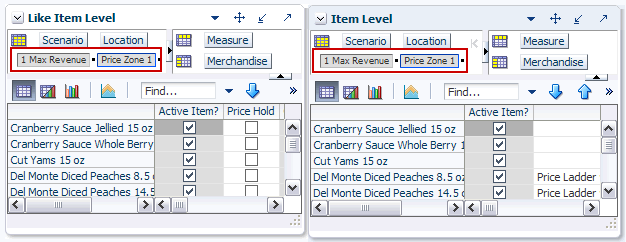
In Figure 3-18, the two views, Item Level and Like Item Level, have been synchronized to show the same data: 1 Max Revenue scenario and the Price Zone 1 location.
|
Note: The views in Figure 3-18 have been tiled vertically. For more about the tiling options, see View Menu Options. |
After you have enabled synchronized page edge scrolling, you can use the navigation arrows (Figure 3-19) to view other positions within that level. As you use the navigation arrows on one view to move to a different position, the other views that have the same level displayed move to the same position.
|
Note: When views do not share the same lowest level of a dimension, the views do not scroll together. |
If you save the workbook with the synchronized page edge option turned on, it is saved with the workbook. Therefore, when you open the workbook again, the synchronized option is still enabled.