| Oracle® Retail Predictive Application Server Installation Guide Release 14.1.2 E70811-01 |
|

 Previous |
 Next |
| Oracle® Retail Predictive Application Server Installation Guide Release 14.1.2 E70811-01 |
|
Previous |
Next |
This chapter describes how to patch the RPAS Server on UNIX or Windows. For instructions on patching the server on Windows, refer to Appendix C, "Appendix: rsp_manager Usage".
In order to upgrade RPAS, first verify the following criteria for the RPAS system:
Verify that RPAS is currently installed.
Verify that UNIX operating system is updated to the currently supported version, which can be found in the section, Hardware and Software Requirements.
Verify that the environment variables are correctly set; if they are not, follow these instructions to set them:
On Windows, update the environment variables using the instructions in the section, Creating the Required Environment Variables.
On UNIX, change directories to the original RPAS installation directory (such as the one created by the most recent installer), and run retaillogin.ksh to set all environment variables. For example:
$ cd /retail
$ . ./retaillogin.ksh
|
Note: Once you have run the script, verify that the environment variables all point to the correct locations on your environment.If you have updated Java since the last installation of RPAS, verify that the JAVA_HOME path is correct. If not, update your |
Before you upgrade to a post-13.3 release, ensure that you have upgraded and patched to RPAS Release 13.2.3.
Upgrade Process to RPAS Release 13.3
This list defines the upgrade process that is described in the following sections.
Upgrading your domain to a 13.3 or later RPAS domain requires that you first upgrade it to a 13.2.3 domain. For instructions, see the ”Upgrading and Patching Domains” section in the 13.2.3 release of either the Classic Client or Fusion Client version of the Oracle Retail Predictive Application Server Administration Guide. After upgrading, you must run a configuration patch over the domain to ensure compatibility with the RPAS version, regardless of whether there are any configuration changes.
Upgrading to a 13.3 or later RPAS domain requires the use of the convertDomain utility, which may not copy the entire contents of the source domain to the destination domain. For files that are not copied by convertDomain, you may need to copy them manually.
For information about what is and is not copied, see the ”convertDomain” section in the 13.3 release of either the Classic Client or Fusion Client version of the Oracle Retail Predictive Application Server Administration Guide.
For instructions, see the ”Upgrading and Patching Domains” section in the 14.1 release of either the Classic Client or Fusion Client version of the Oracle Retail Predictive Application Server Administration Guide. After upgrading, you must run a configuration patch over the domain to ensure compatibility with the RPAS version, regardless of whether there are any configuration changes.
Cygwin is required if the RPAS Server is to be installed on Windows operating systems. You can find more information about downloading this product at http://www.cygwin.com.
For installation guidance, refer to the following note on My Oracle Support (https://support.oracle.com):
Ensure that Java Development Kit (JDK) has been installed on the machine where RPAS will run and that the JAVA_HOME environment variable is properly set.
For detailed Java environment information, refer to the section, Java Environment, in the Installing on UNIX and Linux Environments chapter.
The RIDE_OPTIONS environmental variable has been defined to allow users to pass information into the rpasInstall process. Unlike the regular arguments passed on the command line to rpasInstall (such as -fullinstall and -updatestyles), arguments defined in RIDE_OPTIONS are passed to every rpasInstall instance that runs in the environment.
There the three supported properties for use with RIDE_OPTIONS:
| Property | Used for |
|---|---|
| Xmx | Java |
| HP 64-bit mode Java (-d64) | HP Itanium and Solaris |
| Drpas.maxProcesses | RPAS |
Xmx
By default, the Java Virtual Machine requests on the order of 268 MB of RAM from the OS to allocate for its heap. Large domains that are built from complex configurations can potentially exhaust this limited amount of memory. This is even more of an issue in patch installations than in builds since a patch installation requires two different versions of a configuration to be held in memory simultaneously.
By using the -Xmx option, you can instruct the Java Virtual Machine to request more memory from the OS to prevent situations when all allocated memory is exhausted. The syntax of the property is:
-Xmx###m, where ### is the amount, in megabytes, of memory the JVM is to request. Common values for this argument are -Xmx512m or -Xmx1024m.
HP 64-bit mode Java (-d64)
The HP distribution of Java does not consist of separate executables for 32-bit and 64-bit operating systems. Instead, there is a single distribution of Java that can run in either 32-bit or 64-bit mode. By default, the HP Java runs in 32-bit mode. Because RPAS is built as a 64-bit executable on the Itanium OS, the RPAS libraries are unable to link with Java if it is running in 32-bit mode.
By adding the -d64 property to RIDE_OPTIONS, the HP Java distribution is 64-bit mode enabled and the RPAS libraries link successfully.
It is often the case that users may want to use or more different properties in conjunction with RIDE_OPTIONS. When this is the case, all desired properties should be included within the environmental variable definition separated by white space with the entire definition enclosed in double quotes.
An example of this is shown as:
export RIDE_OPTIONS="-d64 -Xmx1024m -Drpas.maxProcesses=8"
Drpas.maxProcesses
Several RPAS server utilities are designed to take advantage of multi-processor hardware to improve their performance. These utilities attempt to perform operations in parallel, each process running on a distinct processor. The
The -Drpas.maxProcesses argument is used to instruct RPAS how many processors it should attempt to run in parallel when running one of the server utilities that has multi-processor support when that utility is run as a part of the rpasInstall process.
Note that the -Drpas.maxProcesses argument only affects those calls to server utilities made from within the rpasInstall process and does not affect calls to server utilities made from the command line or as part of a batch job.
The syntax of the property is:
-Drpas.maxProcesses=###
Where ### is the number of sub-processes the RPAS server utility should attempt to run in parallel. The number of processes to use should be determined by the administrator of the hardware system based on the physical number of processors available and the amount of load that is acceptable for the rpasInstall process to place on the system.
The following process outlines how to upgrade the RPAS server environment to the current version.
|
Note: The version number for RPAS may include a fifth decimal position that refers to a build number. |
In a command prompt, change to location of the base directory of this upgrade.
$ cd $PACKAGEDIR/ARPOPlatform/14.1.2
Run RSP Manager to upgrade your environment:
If the platform is Linux or Cygwin on Windows, use the following command:
$ ./rsp_manager.linux –install –sp linux –no_domain
For all other platforms, use the following command:
$ ./rsp_manager –install –sp [PLATFORM] –no_domain
|
Note: [PLATFORM] represents your current platform and should be replaced with the correct label, such as aix71.
If you want to upgrade a single domain, include |
For instructions on upgrading domains, refer to the ”Building and Upgrading Domains” chapter in either the Classic Client or Fusion Client version of the Oracle Retail Predictive Application Server Administration Guide.
Verify that none of the files failed during the upgrade; this can be determined based on the output of RSP Manager. For example, a successful output message would read:
Validation complete...
Files Checked: 106
Files Passed: 106
Files Failed: 0
The RPAS upgrade process is complete.
After you have upgraded/patched RPAS server, you should upgrade any individual domains to be synchronized with that version. For information about upgrading domains, refer to the Domain Administration chapter in either the Classic Client or Fusion Client version of the Oracle Retail Predictive Application Server Administration Guide.
This section describes how to save and migrate your existing ODBC/JDBC configurations to the new version. If you do not have any existing configurations to migrate, you can remove the old version and install the new one.
The following sections describe how to update your existing ODBC server to the new version.
On all platforms, the 13.0.x ODBC Server configurations are stored in openrda.ini and oadrd.ini.
Before upgrading $RPAS_HOME, save a copy of openrda.ini and oadrd.ini to a temporary location.
Remove the 13.0.x version of the ODBC Server. To do this on Windows, run setup.exe and choose the Remove option. On UNIX platforms, the ODBC directory should be automatically overlaid when you upgrade your $RPAS_HOME.
Install the new version (13.1.2 or later) of the ODBC Server. Use the following information to migrate the 13.0.x configuration to the new ODBC Server.
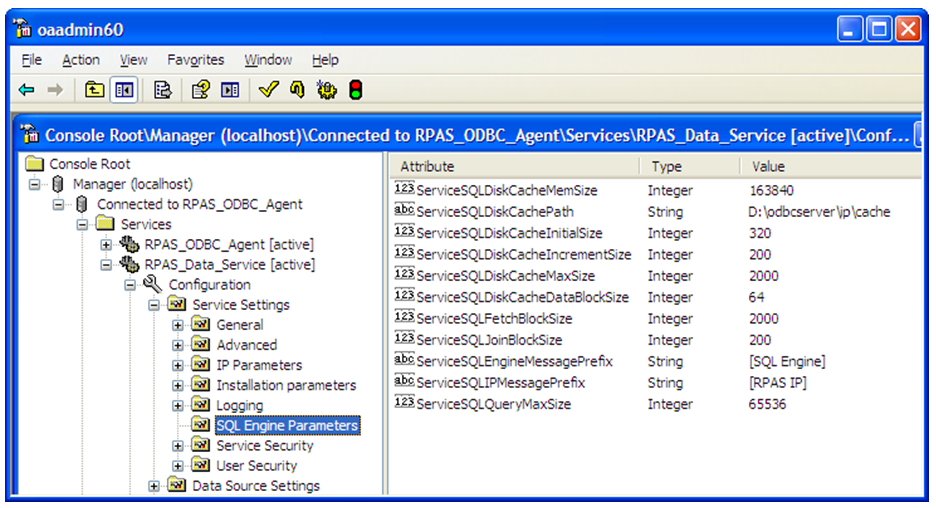
Table 10-1 shows the mapping of the configurations between 13.0.x and the new version (13.1.2 or later) of the ODBC Server
Table 10-1 Mapping Server Configuration
| 13.0.x Server Configurations | Corresponding Server Configurations (13.1.2 and Later) |
|---|---|
|
INITIAL_SIZE |
ServiceSQLDiskCacheInitialSize |
|
INCREMENT_SIZE |
ServiceSQLDiskCacheIncrementSize |
|
MAX_SIZE |
ServiceSQLDiskCacheMaxSize |
|
DATABLOCK_SIZE |
ServiceSQLDiskCacheDataBlockSize |
|
CacheMemSize |
ServiceSQLDiskCacheMemSize |
|
FETCHBLOCK_SIZE |
ServiceSQLFetchBlockSize |
|
JOINBLOCK_SIZE |
ServiceSQLJoinBlockSize |
|
QueryMaxSize |
ServiceSQLQueryMaxSize |
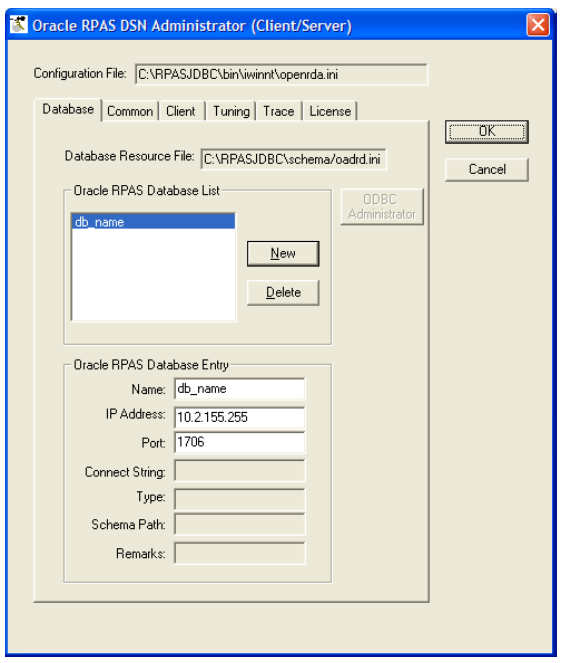
Figure 10-1 shows the new ODBC Manager with the configuration attributes that are listed in Table 10-1.
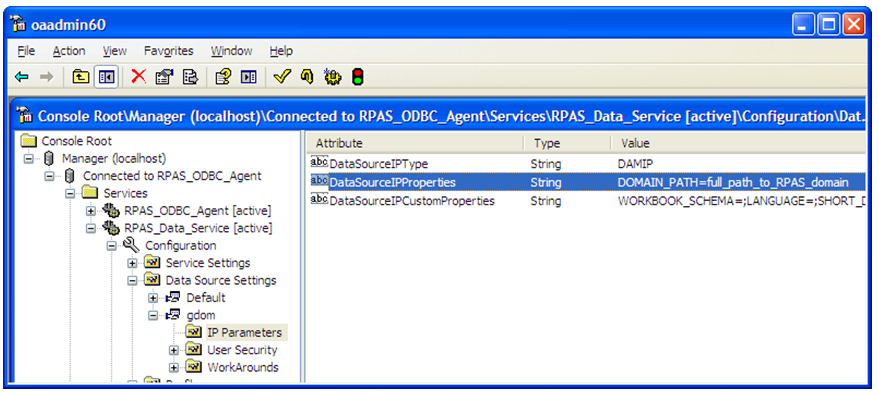
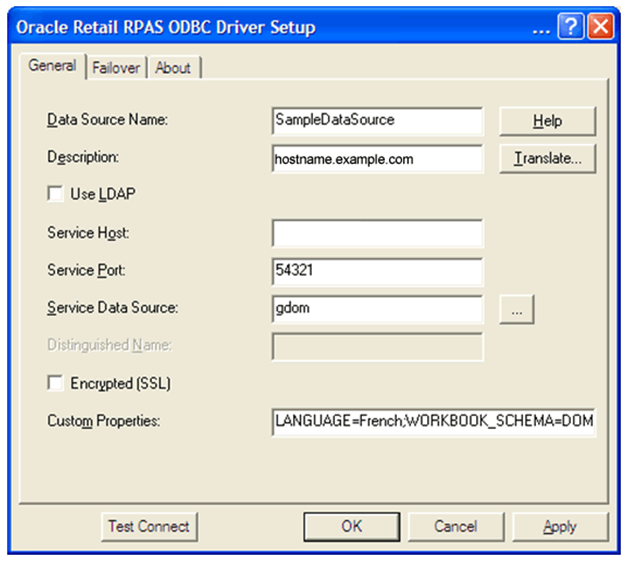
A data source in oadrd.ini looks like this sample:
ADDRESS=hostname.example.com
PORT=1710
CONNECT_STRING=/vol.nas/u08/Position_parent/croad_SR
TYPE=BTREE
SCHEMA_PATH=
REMARKS=
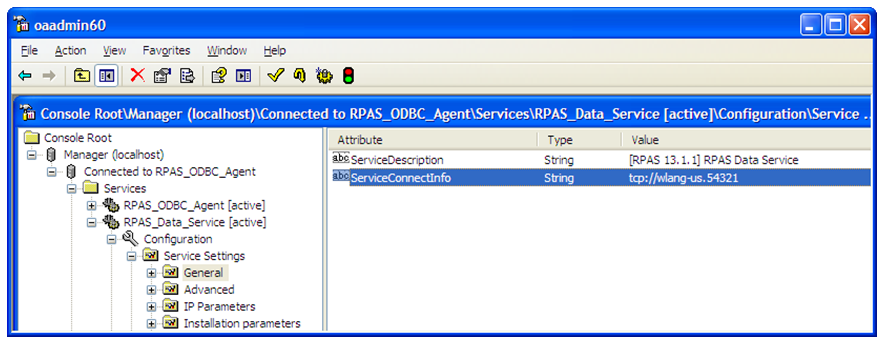
The attributes that you need to migrate are ADDRESS, PORT, and CONNECT_STRING. CONNECT_STRING in 13.0.x maps to DOMAIN_PATH in the new version. Figure 10-1 and Figure 10-2 show where they are in the new Server configuration.
Perform the following procedure when upgrading from 13.1.1.x.
Before removing 13.1.1.x, take screenshots of the server configuration and server address as shown in these previous figures:
Figure 10-1, "Server Configuration Attributes (Versions13.1.2 and Later)"
Figure 10-2, "Server Address and Port Number (Versions13.1.2 and Later)"
These figures show the server's connecting and configuration information as well as the data sources you have.
Remove 13.1.1.x ODBC Server. To do this on Windows platform, run setup.exe in the server installation package and select the Remove option. On UNIX platforms, delete the ODBC directory under $RPAS_HOME.
Install the new version (13.1.2 or later) ODBC Server. Use the information saved in the screenshots created in Step 1 to complete the server and data source configuration.
The following sections describe how to update your existing ODBC client to the new version.
In 13.0.x, the client configuration information to be migrated is stored in oadrd.ini and odbc.ini.
Note that odbc.ini is not required by the 13.0.x version of the RPAS ODBC Client, but it may be required by your ODBC application (such as OBIEE).
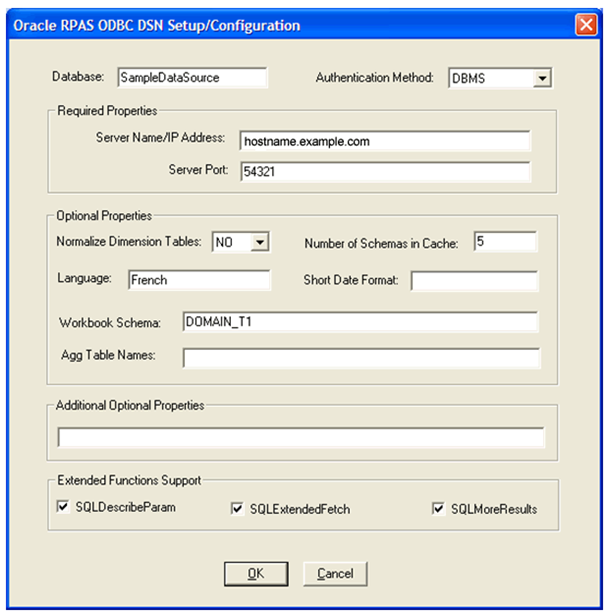
Example 10-1 Sample Data Source Definition in oadrd.ini
ADDRESS=hostname.example.com
PORT=54321
REMARKS=
To migrate SampleDataSource to the new version (13.1.2 or later) of the ODBC Client, create an entry for SampleDataSource in odbc.ini:
Example 10-2 Create an Entry for SampleDataSource in odbc.ini
[ODBC Data Sources]
SampleDataSource=Oracle Retail RPAS ODBC Driver

[SampleDataSource]
Driver=PATH_TO_ODBC_CLIENT/odbcclient32/lib/ivoa22.so
Description=Oracle Retail RPAS ODBC Driver
Host=hostname.example.com
Port=54321
ServerDataSource=gdom
UseLDAP=0
DistinguishedName=
Encrypted=0
LoadBalancing=0
AlternateServers=
ConnectionRetryCount=0
ConnectionRetryDelay=3
CustomProperties=
The customProperties entry in odbc.ini can be copied to the same entry in the new version of odbc.ini.
Figure 10-4 shows a sample data source in the 13.0.x version of the ODBC Client.
In 13.3 and later versions, the Microsoft ODBC Administrator is used for creating and configuration the ODBC data source.
All properties in Optional Properties and Additional Optional Properties in 13.0.x map to the Custom Properties in the new version (13.1.2 or later).
The properties are:.
NORMALIZE_DIM_TABLES
SCHEMA_IN_CACH
LANGUAGE
WORKBOOK_SCHEMA
AGG_TABLE_NAMES
SHORT_DATE_FORMAT
DEFAULT_SCHEMA
LOG_FILE
RPAS_LOG_LEVEL
The following sections describe how to update your existing JDBC client to the new version.
Perform the following procedure when upgrading from 13.0.x
Before removing the 13.0.x JDBC Client, record the data sources that you want to migrate to the new version (13.1.2 or later).
To do this on Windows platforms, open the Admin Tool (shown in Step 3), gather the name, IP address, and port (of the server).
On UNIX platforms, use the command line Admin utility rpasjdbcclientadmin to gather the same information.
You should also collect the optional custom connection properties that may exist in your JDBC URLs if you use URL in your JDBC applications.
Remove the 13.0.x JDBC Client.
To do this on Windows, run setup.exe and choose the Remove option.
On UNIX, delete the jdbcclient directory.
Install the new version (13.1.2 or later) of the JDBC Client. For instructions, refer to the RPAS ODBC/JDBC Driver chapter in either the Classic Client or Fusion Client version of the Oracle Retail Predictive Application Server Administration Guide. Then use the information gathered in Step 1 to construct the URLs for your JDBC applications.
Perform the following procedure when upgrading from 13.1.1.x.
Gather the information for the server's IP address, port number, data source name, and any custom connection properties in the 13.1.1.x JDBC URLs.
Remove the 13.1.1.x version of the JDBC Client.
Install the new version (13.1.2 or later) JDBC Client.
Use the information gathered in Step 1 to construct the JDBC URLs for the new JDBC Client.