| Oracle® Communication and Mobility Server Installation Guide 10g Release 3 (10.1.3) Part Number E12657-02 |
|
|
View PDF |
| Oracle® Communication and Mobility Server Installation Guide 10g Release 3 (10.1.3) Part Number E12657-02 |
|
|
View PDF |
This chapter describes how to install and configure Oracle Communication and Mobility Server 10.1.3.4 to work with a backend Oracle RAC database. This document assumes that an n-node RAC database is installed, configured, and available for Oracle Communication and Mobility Server. This document does not describe how to install and configure the Oracle RAC database. Topics include:
The instructions in this document apply to installing Oracle Communication and Mobility Server 10.1.3.4 to an existing instance of the Oracle Application Server. Oracle RAC database configuration is not supported for standalone (developer) installations of Oracle Communication and Mobility Server. Also, connection caching, fast connection failover, and such advanced configuration features for the Oracle RAC database are not covered in this document.
You must have the following information on hand regarding the Oracle RAC database:
Database name
Number of nodes in the RAC database
For each node you need the following information:
Host name
Port number
Oracle SID
ORACLE_HOME and ORACLE_CRS_HOME
Password for sys user
In addition to the hostnames, production deployments typically also have virtual IP addresses for each DB node. Those hostnames corresponding to the virtual IP addresses should be used during install and configuration instead of the hostnames.
Follow these steps to install Oracle Communication and Mobility Server and configure it to use a backend RAC:
Before installing Oracle Communication and Mobility Server, you must create a database service on the RAC database which will be used by Oracle Communication and Mobility Server to connect to the database. Create this database service so that it is available on all nodes in the Oracle RAC environment.
On any of the RAC nodes, run the following commands:
cd $ORA_CRS_HOME/bin
./srvctl add service -d <database name>
                     -s <service name>
                     -r <comma separated list of
                         ORACLE_SIDs for the RAC nodes>
To check the status of the service you just created, run:
./srvctl status database –d <database name> –s <service name>
You will receive this response:
Service <service name> is not running.
You will find that the new service is not running; you must explicitly start the new service by issuing the following command:
./srvctl start service –d <database name> –s <service name>
The following response will be returned:
Service <service name> is running on instance(s) (inst. 1, inst. 2, etc.)
You are now ready to start the installation of Oracle Communication and Mobility Server.
Oracle Universal Installer does not support configuring Oracle Communication and Mobility Server with a RAC database at install time. However, you can configure Oracle Communication and Mobility Server with a RAC database by using the following workaround:
Install Oracle Communication and Mobility Server by pointing to one of the nodes of the RAC database at install time.
Modify the data sources post-install to configure Oracle Communication and Mobility Server with the n-node RAC instance.
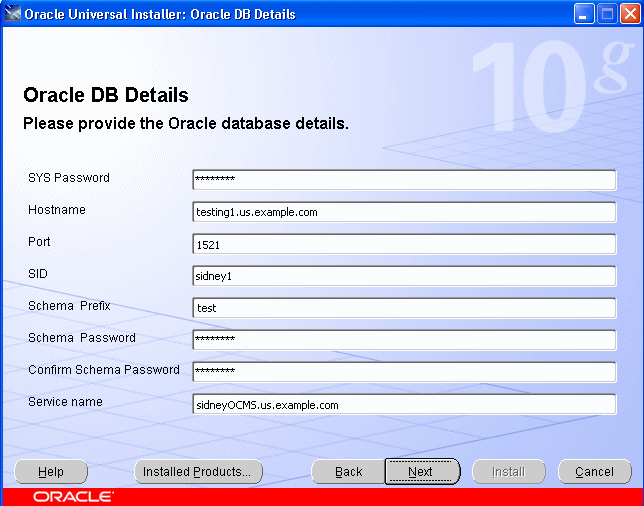
Start the installation of Oracle Communication and Mobility Server to an existing installation of Oracle Application Server (see Install Oracle Communication and Mobility Server for details) and proceed until you reach the database configuration screen. On this screen, enter information corresponding to any one database node that is part of the RAC database service you created.
For instance, the following DB configuration screen (Figure 4-1) shows information corresponding to the first DB node.
Figure 4-1 Database information for first DB node

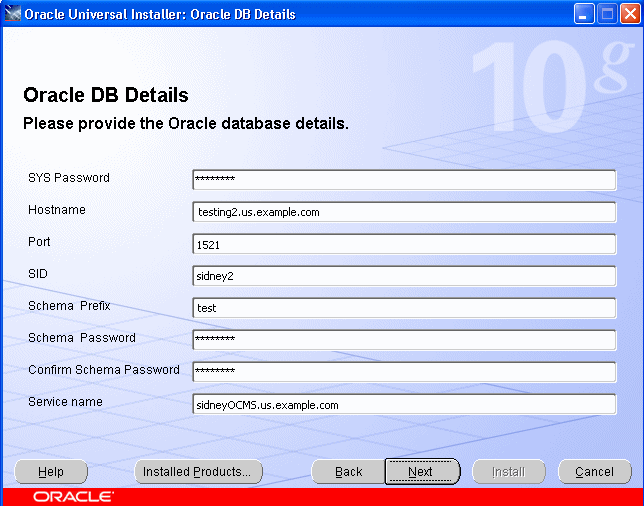
Alternatively, you can provide information corresponding to the second (or other) node in your database service as shown in Figure 4-2:
Figure 4-2 Database information for a subsequent DB node

When you click Next, you will see a screen prompting you to specify the location of the SDP datafiles. Choose No on this screen and let the SDP datafiles be created in the default datafile location (on the shared network drive) of the backend RAC database.
Click Next and complete the Oracle Communication and Mobility Server installation.
Your Oracle Communication and Mobility Server schemas are now accessible from any of the nodes in your database service. You can verify this by using SQLPLUS to connect to any of the nodes in the database service (in this case on the machine named testing1.us.example.com:
cd $ORACLE_HOME/bin
./sqlplus /nolog
SQL> conn userx_orasdpsds/myPassword1@testing1.us.example.com:1521/sidneyOCMS.us.example.com
SQL> select * from tab;
Verify that you can see your tables and exit out of SQLPLUS. Now connect to any other node from this machine, for instance, testing2.us.example.com:
./sqlplus /nolog
SQL> conn userx_orasdpsds/myPassword1@testing2.us.example.com:1521/sidneyOCMS.us.example.com
SQL> select * from tab;
Verify that you can see your tables over this connection as well.
If your Oracle Communication and Mobility Server installation was successful, you have a working Oracle Communication and Mobility Server environment. However, the database connections from Oracle Communication and Mobility Server are to only one configured database node of the RAC database. A post-install configuration step is required to modify the database connections to the RAC database.
On your Oracle Communication and Mobility Server server machine, do the following:
cd $ORACLE_HOME/j2ee/ocms/config
Edit data-sources.xml at this location.
Change the JDBC URL for the subscriber data services, location service, and XDMS from:
url="jdbc:oracle:thin:@//testing1.us.example.com:1521/sidneyOCMS.us.example.com"
to
url="jdbc:oracle:thin:@(DESCRIPTION=(ADDRESS_LIST=(LOAD_BALANCE=on)(ADDRESS=(PROTOCOL=tcp)(HOST=testing1.us.example.com)(PORT=1521))(ADDRESS=(PROTOCOL=tcp)(HOST=testing2.us.example.com)(PORT=1521))(ADDRESS=(PROTOCOL=tcp)(HOST=testing3.us.example.com)(PORT=1521))(ADDRESS=(PROTOCOL=tcp)(HOST=testing4.us.example.com)(PORT=1521)))(CONNECT_DATA=(SERVICE_NAME=sidneyOCMS.us.example.com)))"
Replace the hostnames, port numbers, database service name, and number of instances with values corresponding to your RAC database.
Save data-sources.xml and restart your server.
To verify that your Oracle Communication and Mobility Server database connections are going to all nodes of your RAC database, issue the following command:
netstat –a | grep 1521
and verify that TCP connections are established from your Oracle Communication and Mobility Server server to all the RAC nodes (on port 1521 in this example).
Instead of editing the data-sources.xml file, you can make changes to the Oracle Communication and Mobility Server JDBC resources using Oracle Enterprise Manager.