12 Advanced Administration
This chapter includes the following sections:
Registering Web Services
You can register a Web service so that you can later more conveniently reference the service from a selection list without having to specify a URL for a WSDL. For example, when testing a Web service, you can click the Locate icon and then select the WSDL from the registered services, as shown in Figure 12-1.
Figure 12-1 Selecting From a Registered Service

Description of "Figure 12-1 Selecting From a Registered Service"
Fusion Middleware Control provides support for registering Web services that are published in WS-Inspection (WSIL) documents. Any service that is available in a WSIL document can be registered.
When you register Web services, you do so by specifying any of the following:
-
URL to a WSIL document
-
File location of a WSIL document
WSIL Basics
A key feature of the Web services model is the ability to make Web services widely available and discoverable. UDDI is one approach to publishing and discovery of Web services that centralizes information about businesses and their services in registries. Another emerging alternative standard is the Web Services Inspection Language (WSIL) specification.
WSIL defines an Extensible Markup Language (XML) format for referencing Web service descriptions. These references are contained in a WSIL document, and refer to Web service descriptions (for example, WSDL files) and to other aggregations of Web services (for example, another WSIL document or a UDDI registry).
WSIL documents are typically distributed by the Web service provider. These documents describe how to inspect the provider's Web site for available Web services. Therefore, the WSIL standard also defines rules for how WSIL documents should be made available to consumers of Web services.
The WSIL model decentralizes Web service discovery. In contrast to UDDI registries, which centralize information on multiple business entities and services, WSIL makes it possible to provide Web service description information from any location. Unlike UDDI, WSIL is not concerned about business entity information, and does not require a specific service description format. It assumes that you know who the service provider is and relies on other standards for Web service description, such as WSDL.
Registering a Web Service
SOA, ADF, and JEE Web services are discovered by WSIL.
Follow the steps in this section to register a service.
-
In the navigator pane, expand WebLogic Domain to show the domain in which you want to register a Web service.
-
Select the domain.
-
Using Fusion Middleware Control, click WebLogic Domain and then Web Services and then Registered Services. The Registered Service page appears, as shown in Figure 12-2.
-
Click Register to register a service. The Register New Service page appears, as shown in Figure 12-3.
-
Select from WSIL import from URL and WSIL import from File.
-
Enable Basic Authentication and provide a username and password if required to access the WSIL.
-
Click Process to parse the file.
-
Click Register to register the service.
-
If the registration is successful, the page expands to show the registered services. You can click Edit to change the service name and description from this page, if desired.
-
If the current WSIL also references other Web services, expand References Available in WSIL to display them. You can register the referenced Web services as well.
Viewing and Editing a Registered Web Service
Follow the steps in this section to view and edit a registered Web service.
-
In the navigator pane, expand WebLogic Domain to show the domain in which you want to view the registered Web services.
-
Select the domain.
-
Using Fusion Middleware Control, click WebLogic Domain and then Web Services and then Registered Services. The Registered Service page appears, as shown in Figure 12-2.
-
The registered Web services are displayed. Select the Web service and click Edit to edit the registered service.
Unregistering a Web Service
Follow the steps in this section to unregister a Web service.
-
In the navigator pane, expand WebLogic Domain to show the domain in which you want to unregister a Web service.
-
Select the domain.
-
Using Fusion Middleware Control, click WebLogic Domain and then Web Services and then Registered Services. The Registered Service page appears, as shown in Figure 12-2.
-
The registered Web services are displayed. Select the Web service you want to unregister and click Unregister.
Auditing Web Services
Auditing describes the process of collecting and storing information about security events and the outcome of those events. An audit provides an electronic trail of selected system activity.
An audit policy defines the type and scope of events to be captured at runtime. Although a very large array of system and user events can occur during an operation, the events that are actually audited depend on the audit policies in effect at runtime. You can define component- or application-specific policies, or audit individual users.
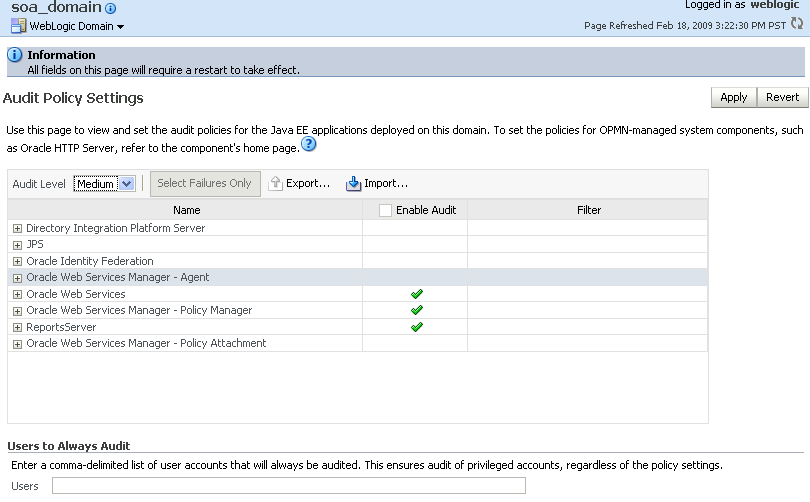
You configure auditing for system components, including Web services, and applications at the domain level using the Audit Policy Settings page. You can audit SOA, ADF, and WebCenter services.
The audit policies table, at the center of the page, displays the audits that are currently in effect. The table includes the following information:
-
Name—Name of the system components and applications that you can audit.
-
Enable Audit—Identifies the components and applications for which auditing is currently in effect.
-
Filter—Specifies any filters that are currently in effect.
The following table summarizes the events that you can audit for Web services and the relevant component.
Table 12-1 Auditing Events for Web Services
| Enable auditing for the following Web service events . . . | Using this system component . . . |
|---|---|
|
Oracle Web Services Manager—Agent |
|
Oracle Web Services |
|
Oracle Web Services Manager |
|
Oracle Web Services Manager— Policy Attachment |
You can also audit the events for a specific user, for example, you can audit all events by an administrator.
For more information about configuring audit policies, see "Configuring and Managing Auditing" in Oracle Fusion Middleware Security Guide.
The following sections describe how to define audit policies and view audit data:
Configuring Audit Policies
-
In the Navigator pane, expand WebLogic Domain.
-
Click the domain for which you want to manage assertion templates.
-
From the WebLogic Domain menu select Security > Audit Policy Settings.
The Audit Policy Settings page is displayed.
-
Select and audit level from the Audit Level menu.
Valid audit levels include:
-
None—Disables auditing.
-
Low—Audits a small scope of events. The subset of events is predefined individually for each component. For example, for a given component, Low may collect authentication and authorization events only.
-
Medium—Audits a medium scope of events (which is a superset of the events collected at the Low level). For example, for a given component, Medium may collect authentication, authorization, and policy authoring events.
-
Custom—Enables you to provide a custom auditing policy.
You can view the components and applications that are selected for audit at each level in the audit policies list. For all audit levels other than Custom, the information in the audit policies list is greyed out, as you cannot customize other audit level settings.
-
-
If you selected the Custom audit level, perform one of the following steps:
-
Select the information that you want to audit by clicking the associated checkbox in the Enable Audit column.
You can audit at the following levels of granularity: All events for a component, all events within a component event group, an individual event, or a specific outcome of an individual event (such as success or failure).
At the event outcome level, you can specify an edit filter. Filters are rules-based expressions that you can define to control the events that are returned. For example, you might specify an Initiator as a filter for policy management operations to track when policies were created, modified, or deleted by a specific user. To define a filter for an outcome level, click the Edit Filter icon in the appropriate column, specify the filter attributes, and click OK. The filter definition appears in the Filter column.
Deselect the checkbox for a component at a higher level to customize auditing for its subcomponents. You can select all components and applications by checking the checkbox adjacent to the column name.
-
To audit only failures for all system components and applications, Select Failures Only.
If selected, all checkboxes in the Enable Audit column are cleared.
-
-
If required, enter a comma-separated list of users in the Always Audit Users text box.
Specified users will always be audited, regardless of whether auditing is enabled or disabled, and at what level auditing is set.
-
Click Apply.
To revert all changes made during the current session, click Revert.
Managing Audit Data Collection and Storage
To manage the data collection and storage of audit information, you need to perform the following tasks:
-
Set up and manage an audit data repository.
You can store records using one of two repository modes: file and database. It is recommended that you use the database repository mode. The Oracle Business Intelligence Publisher-based audit reports only work in the database repository mode.
-
Set up audit event collection.
For more information, see "Managing Audit Data Collection and Storage" in Oracle Fusion Middleware Security Guide.
Viewing Audit Reports
For database repositories, data is exposed through pre-defined reports in Oracle Business Intelligence Publisher.
A number of predefined reports are available, such as: authentication and authorization history, Oracle WSM policy enforcement and management, and so on. For details about generating and viewing audit reports using Oracle Business Intelligence Publisher, see "Using Audit Analysis and Reporting" in Oracle Fusion Middleware Security Guide.
For file-based repositories, you can view the bus-stop files using a text editor and create your own custom queries.
Managing the WSDL
In some cases, you might not want the Web service WSDL to be accessible to the public. You can enable or disable public access to the WSDL from the Web Service Endpoint page.
Note:
In some cases, a Web service client needs to access a WSDL during invocation. If public access to the WSDL is disabled, the client will need to have a local copy of the WSDL.-
Navigate to the Web Service endpoint configuration page, as described in "Configuring the Web Service Port".
-
On the Configuration tab, set the WSDL Enabled field to True or False to enable of disable public access to your WSDL, respectively.
-
Click Apply.
Managing Policy Assertion Templates
The following sections describe how to create and manage policy assertion templates.
Navigating to the Web Services Assertion Templates Page
You can manage your assertion templates at the domain level from the Web Services Assertion Template page. From this page, you can copy, edit, and delete assertion templates.
To navigate to the Web Services Assertion Templates page:
-
In the Navigator pane, expand WebLogic Domain.
-
Click the domain for which you want to manage assertion templates.
-
From the WebLogic Domain menu select Web Services > Policies.
The Web Services Policies page is displayed.
-
Click Web Services Assertion Templates in the upper right corner of the page.
The Web Services Assertion Templates page is displayed, as shown in the following figure.
Figure 12-5 Web Services Assertion Templates Page
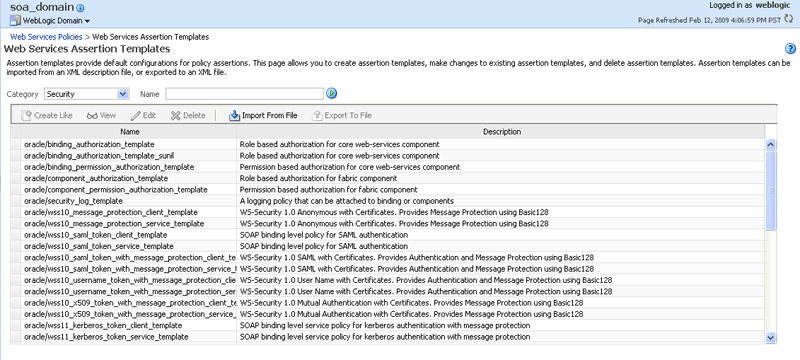
Description of "Figure 12-5 Web Services Assertion Templates Page"
Viewing an Assertion Template
To view an assertion template:
-
Navigate to the Web Services Assertion Templates page, as described in "Navigating to the Web Services Assertion Templates Page".
-
Select the assertion template from the Assertion Templates table that you want to view.
-
Click View.
-
In the View Template page, review the assertion.
-
When you are done, click Return to Web Services Assertion Templates.
Searching for an Assertion Template
You can search for a Web service assertion template by category, name, or both.
To search for an asserting template:
-
Navigate to the Web Services Assertion Templates page, as described in "Navigating to the Web Services Assertion Templates Page".
-
Perform one or more of the following steps:
-
To search for assertion templates in a specific category (or all categories), select a category from the Category dropdown list.
Valid categories include: All, Security, MTOM Attachments, Reliable Messaging, WS-Addressing, and Management.
-
To search for an assertion template that contains a specific string, enter a string in the Name field.
Specify any portion of the name of an assertion template to display all assertion templates that contain the string for the specified category.
-
-
Click Go.
The assertion templates list is refreshed to include only those assertion templates that match the specified search criteria.
Creating an Assertion Template
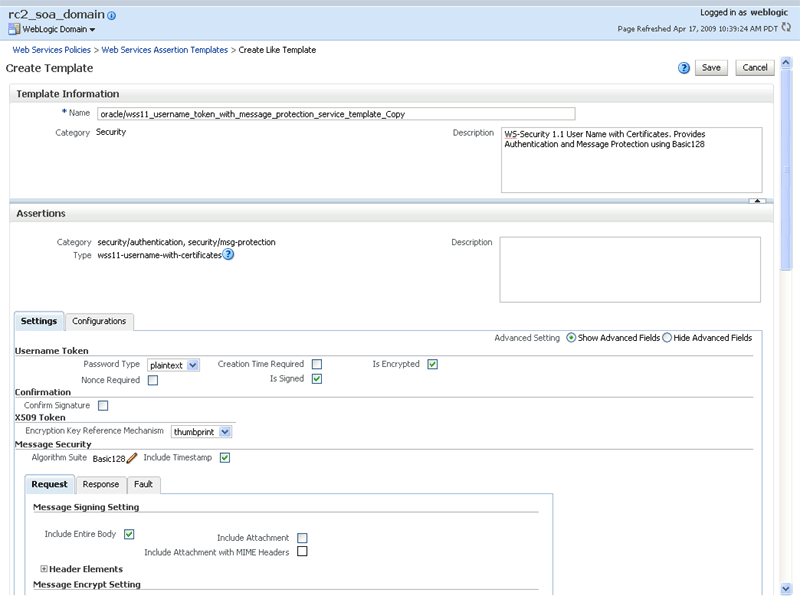
A new assertion template is created based on an existing assertion. Pick the assertion template that most closely matches the desired behavior, then make any changes required to get the desired behavior.
To create an assertion template:
-
Navigate to the Web Services Assertion Templates page, as described in "Navigating to the Web Services Assertion Templates Page".
-
Select the assertion template from the Assertion Templates table that you want to copy.
-
Click Create Like.
The following shows the Create Template page.
-
In the Copy Assertion Template box, edit the name of the assertion and enter a brief description.
The word Copy is appended to the name of the copied assertion template and, by default, this is the name assigned to the new assertion template. For example, if the assertion template being copied is named oracle/wss10_username_token_service_template, then the default name of the copy is oracle/wss10_username_token_service_template_Copy.
It is recommended that you change the name of this new assertion template to be more meaningful in your environment.
-
Click OK.
The assertion is added to the Assertion Templates table. You can now select the new assertion and click Edit to configure the assertion.
Exporting an Assertion Template
You can export individual assertion templates from Oracle Enterprise Manager Fusion Middleware Control. You can then copy the assertion template to a directory or import the assertion template to move it to another repository. Once moved, you can import the assertion template, as described in "Importing an Assertion Template".
To export an assertion template:
-
Navigate to the Web Services Assertions Templates page, as described in "Navigating to the Web Services Assertion Templates Page".
-
Select the assertion template from the Assertion Templates table that you want to export to a file.
-
Click Export to File.
You are prompted to open or save the file.
-
Select Save File.
-
Click Ok.
-
Navigate to the location on your local directory to which you want to save the file and update the filename as desired.
-
Click Save.
Importing an Assertion Template
To import an assertion template:
-
Navigate to the Web Services Assertions Templates page, as described in "Navigating to the Web Services Assertion Templates Page".
-
Click Import From File.
You are prompted to provide the assertion template file.
-
Click Browse to navigate to the directory where the assertion template file is located and select the assertion template to be imported.
-
Click OK.
The assertion template appears in the Assertion Templates table.
Editing an Assertion Template
To edit an assertion template:
-
Navigate to the Web Services Assertions Templates page, as described in "Navigating to the Web Services Assertion Templates Page".
-
Select the assertion template from the Assertion Templates table that you want to edit.
-
Click Edit.
-
Edit the assertion template as required.
-
Click Save.
Deleting an Assertion Template
To delete an assertion template:
-
Navigate to the Web Services Assertions Templates page, as described in "Navigating to the Web Services Assertion Templates Page".
-
Select the assertion template from the Assertion Templates table that you want to delete.
-
Click Delete.
You are prompted to confirm that you want to delete the assertion template.
-
Click OK.
About the Metadata Store Repository
When you install Oracle Fusion Middleware, you have the option of using a database-based Metadata Store (MDS). To register a MDS, expand Metadata Repositories in the Navigator pane, as shown in Figure 12-7.
Figure 12-7 Metadata Repository in Navigation Pane
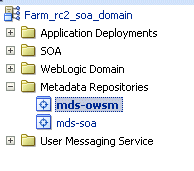
Description of "Figure 12-7 Metadata Repository in Navigation Pane"
Then, register a metadata repository, as shown in Figure 12-8.
Figure 12-8 Registering a Metadata Repository

Description of "Figure 12-8 Registering a Metadata Repository"
See Managing the Oracle Metadata Repository in the Oracle Fusion Middleware Administrator's Guide for information on managing the metadata repository.
Adding Security to a Running Client
Security policies can be attached to a running client using Oracle Enterprise Manager Fusion Middleware Control. You do not have to redeploy the client application in order to attach or detach policies from the client. See Chapter 8, "Attaching Policies to Web Services" for more information on how to attach policies using Fusion Middleware Control.
Managing Policy Accessor, Cache, and Interceptor Properties
You can manage properties for the following components from the Platform Policy Configuration page:
-
Policy Accessor
-
Policy Cache
-
Policy Interceptors
To manage policy accessor, cache, and interceptor properties:
-
In the navigator pane, expand WebLogic Domain to view the domains.
-
Select the domain for which you want to manage properties.
-
Select WebLogic Domain> Web Services > Platform Policy Configuration.
The Platform Policy Configuration page appears, as shown in Figure 12-9.
Figure 12-9 Platform Policy Configuration Page
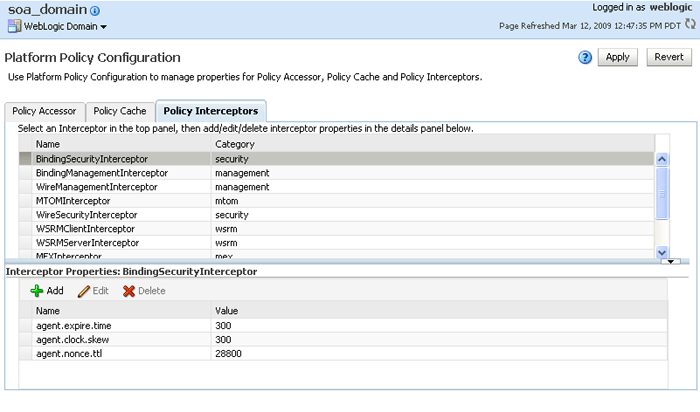
Description of "Figure 12-9 Platform Policy Configuration Page"
-
Select the tab corresponding to the component for which you want to define properties: Policy Accessor, Policy Cache, or Policy Interceptors.
-
If you selected the Policy Interceptors tab, select the interceptor for which you want to add properties in the list.
-
Perform one of the following tasks:
-
Click Add to define a new property.
Enter the name of the property and value and click OK.
-
Select a property and click Edit to modify an existing property.
-
Select a property and click Delete to delete an existing property.
-
-
Click Apply to apply the property updates.


