4 Adding WebCenter Web 2.0 Services to Your Application
Oracle WebCenter Framework enables you to enhance your application with WebCenter Web 2.0 features, such as secure information sharing and online collaboration. In this chapter, we will explore a few of the features you can use to add these capabilities to your application.
In this lesson, you will add a search toolbar, document library, and tagging capabilities to your application. With the document library, or the Documents service, you can enable your users to share content like Word documents or PDFs in an easy-to-navigate environment, right in the application. The Tags service enables you and your users to add keywords to documents, files, and other items in your application to make it easier to search and organize content. This service also includes a “tag cloud” task flow where you can visualize the mapping of the keywords to your application contents right on your page.
These services are just a few examples of the myriad services Oracle WebCenter Suite offers. You will see how easy it is to use services to make your application dynamic and provide frequently-used communication options to your users. To learn more about WebCenter Web 2.0 Services, refer to the Oracle Fusion Middleware Developer's Guide for Oracle WebCenter.
Figure 4-1 shows how your page will look at the end of this lesson.
Figure 4-1 MyPage.jspx at the End of this Lesson
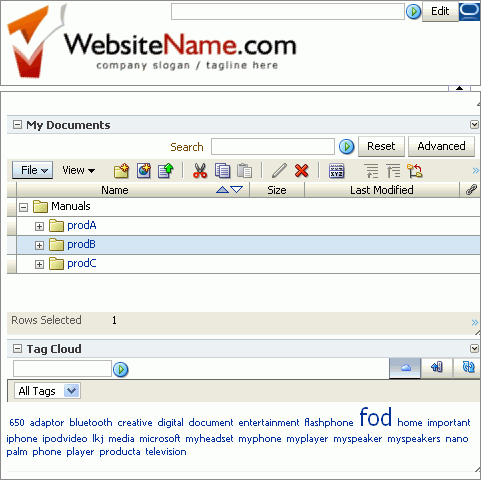
Description of "Figure 4-1 MyPage.jspx at the End of this Lesson"
Introduction
This lesson contains the following steps:
-
Step 3: Add the Document Library Task Flow to Your Application
-
Step 5: Create a Database Connection to the WebCenter Schema for the Tags Service
-
Step 7: Use, Add, and Search Tags in Your Application at Runtime
Before you begin the steps in this lesson, ensure you have followed the steps up to this point in the tutorial.
Step 1: Add the Search Toolbar Task Flow to the Application
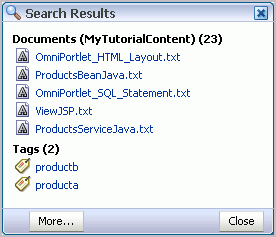
With Oracle WebCenter Framework, you can also allow your users to search through information within the services. For example, you may want to add a Search field so that users can search for a particular file in your document library. Figure 4-2 shows a sample of the search results you can retrieve in your application.
To add the Search service to your application:
-
Make sure your page,
MyPage.jspx, is open. -
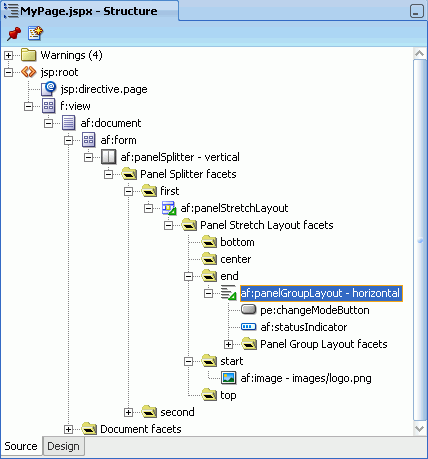
In the Structure window, locate the Panel Group Layout (in the
endfacet) that you added in Chapter 3, "Creating a WebCenter Application with a Customizable Page." Figure 4-3 shows the Panel Group Layout selected. You will add the Search task flow here. -
As we mentioned in Chapter 3, "Creating a WebCenter Application with a Customizable Page," you can use the pushpin in the Structure window to freeze the current view. For this step, you click MyPage in the Design view, then ensure the pushpin is in the “freeze” position (pressed). This way, when you click the Search toolbar task flow in the ensuing steps, the Structure window does not contextually refresh.
-
In the Resource Palette, in the WebCenter Services Catalog, open the Task Flows node. If you do not see the Resource Palette in Oracle JDeveloper (it usually displays as a tab next to the Component Palette), choose View > Resource Palette.
-
Under My Catalogs, open the WebCenter Services Catalog, then expand Task Flows.
-
Locate the Search Toolbar task flow (Figure 4-4).
Figure 4-4 Search Toolbar Task Flow in the WebCenter Services Catalog
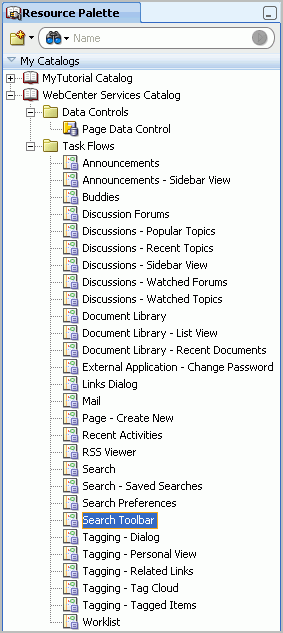
Description of "Figure 4-4 Search Toolbar Task Flow in the WebCenter Services Catalog"
Drag and drop this task flow onto the Panel Group Layout then choose Region from the context menu. If you are prompted to add the appropriate libraries, choose Add Libraries.
-
In the Structure window, move the Search Toolbar task flow (
af:region - #{bindings.sarchtoolbar1.regionModel}) above the Change Mode Button.Note:
As previously mentioned, you can use the pushpin in the Structure window to freeze the current view. For this step, you should click MyPage in the Design view, then ensure the pushpin is in the “freeze” position (pressed).Figure 4-5 Search Toolbar in the Structure Window

Description of "Figure 4-5 Search Toolbar in the Structure Window"
-
Run the page to your browser to see how it looks at runtime. Figure 4-6 shows the Search toolbar next to the Edit (Change Mode) button.
Figure 4-6 Search Toolbar on MyPage at Runtime

Description of "Figure 4-6 Search Toolbar on MyPage at Runtime"
-
Now that we've added a Search toolbar to our application, let's add the Documents service so that we have content to search.
Return to JDeveloper.
Step 2: Create a Connection for the Documents Service
With every service in the WebCenter Framework, we perform a few basic steps: configure the service with our application, add the service task flow to our page, then run the page and customize or use the service at runtime.
Before we can take advantage of the Documents service, which enables us to browse, manage, and create documents at runtime, we must first create a connection to our content repository. In this tutorial, our content repository will be the directory we created in Chapter 2, "Preparing for the Tutorial."
You can learn more about creating connections for the Documents service in the Oracle Fusion Middleware Developer's Guide for Oracle WebCenter.
To create a connection to our content repository:
-
In Oracle JDeveloper, in the Application Navigator, locate the Application Resources node and expand it. Notice the Connections folder here (Figure 4-7).
Figure 4-7 Connections Folder in the Application Resources Panel
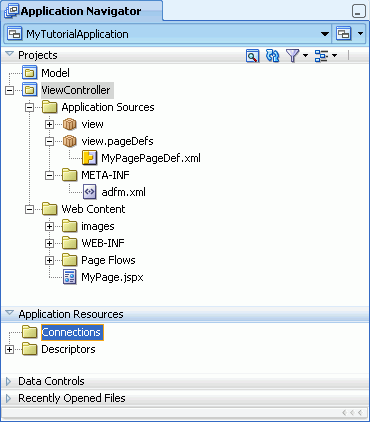
Description of "Figure 4-7 Connections Folder in the Application Resources Panel"
-
Ensure the ViewController project is highlighted.
-
Under Application Resources, right-click the Connections folder, then choose New Connection > Content Repository... (Figure 4-8).
Figure 4-8 Choosing the New Content Repository Connection Menu Option
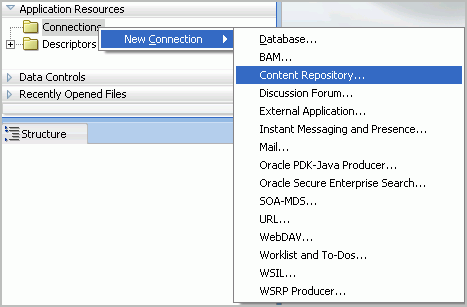
Description of "Figure 4-8 Choosing the New Content Repository Connection Menu Option"
-
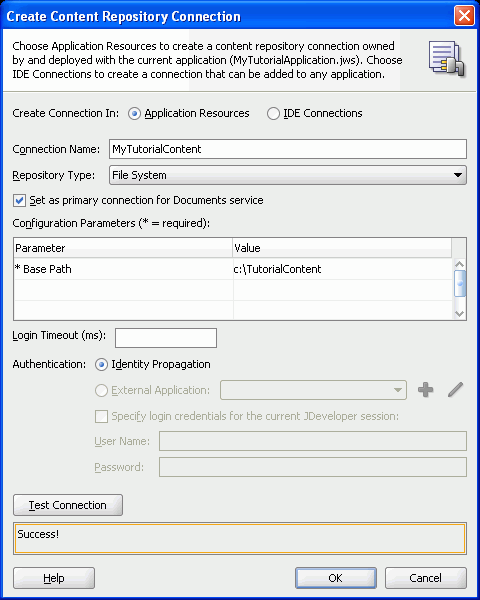
In the Create Content Repository Connection dialog box that displays, notice the first option: you can choose to either limit the usage of this connection to the current application by choosing Application Resources, or enable all applications created using your instance of Oracle JDeveloper to use this connection by choosing IDE Connections.
Select Application Resources.
Note:
Creating a connection here enables you to reuse the same connection throughout your application. If you chose IDE Connections, you could reuse the connection in any application you create using your instance of Oracle WebCenter Framework. The connection name would display in the Resource Palette under IDE Connections. -
In the Connection Name field, enter
MyTutorialContent. -
From the Repository Type list, choose File System.
-
Select Set as primary connection for Documents service to set this connection as the active connection any time you add the Documents service to your application.
If you did not choose this option and created a connection to another content repository, Oracle WebCenter Framework would automatically set the first connection you created as the active connection.
-
Under Configuration Parameters, let's set the Base Path to the location where you downloaded the tutorial sample files on your C drive (in Chapter 2, "Preparing for the Tutorial"), by entering
c:\TutorialContent. -
Click Test Connection. You should see a Success! message in the Status field, as shown in Figure 4-9.
Figure 4-9 Create Content Repository Connection
Description of "Figure 4-9 Create Content Repository Connection"
-
Click OK.
-
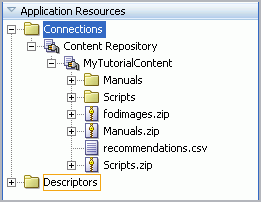
In the Application Navigator, in the Application Resources panel, you will see your new connection, as shown in Figure 4-10.
Figure 4-10 New Connection in the Application Resources Panel
Description of "Figure 4-10 New Connection in the Application Resources Panel"
Note:
To learn more about configuring and using WebCenter Services, refer to the Oracle Fusion Middleware Developer's Guide for Oracle WebCenter.Step 3: Add the Document Library Task Flow to Your Application
Oracle WebCenter Framework enables content integration by:
-
Content Repository data controls: enable read-only access to a content repository, and maintain tight control over the way the content displays in the application.
-
Documents service: enable users to view and manage documents in your organization's content repositories.
Both methods of integration use content repository connections, which you created in the previous step. In this tutorial, we'll use the Documents service to integrate content (the sample content on our file system that we downloaded in Chapter 2, "Preparing for the Tutorial") into our application.
Using the Documents service, users can view, upload, and collaborate around documents. In this tutorial, you will use a file system connection that will let you view documents and enable your application users to share them, but not upload them. Using a content repository such as Oracle Content Server or Oracle Content Database, you can take advantage of all the features of this service. To learn more about using different content repositories and more details about the various Documents service task flows, refer to Chapter 15, “Integrating the Documents Service” in the Oracle Fusion Middleware Developer's Guide for Oracle WebCenter.
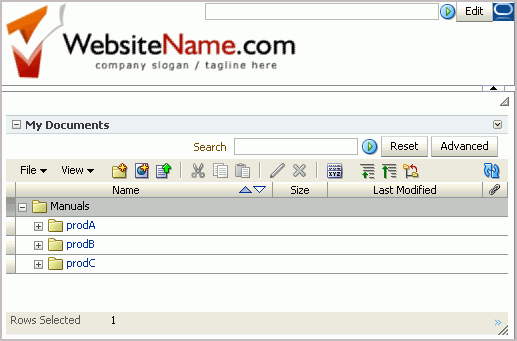
In this step, you will add the task flow provided by the service to your application. The Documents service provides several task flows, one of which is the Document Library. The Document Library task flow, when used with a file system content repository, enables your users to view folders and files within the application much as they would on their own file system in a read- and write-only format (Figure 4-11).
Figure 4-11 Document Library View of Sample Folders at Runtime
Description of "Figure 4-11 Document Library View of Sample Folders at Runtime"
To add the Document Library task flow to your application at design time in Oracle JDeveloper:
-
In Oracle JDeveloper, ensure MyTutorialApplication is open and that you have configured your application for services and set up a connection to the content repository, as described in Step 2: Create a Connection for the Documents Service.
-
Let's add the Document Library task flow to the page. Ensure that
MyPage.jspxis open. -
In the Structure window, locate where we are going to add the task flow (Figure 4-12). Under the second facet navigate to pe:pageCustomizable > pe:layoutCustomizable - twoColumnBottom. Here, you will see the Panel Customizable where we will add the task flow.
Note:
As previously mentioned, you can use the pushpin in the Structure window to freeze the current view. For this step, you should click MyPage in the Design view, then ensure the pushpin is in the “freeze” position (pressed).Figure 4-12 Location Where We Will Add the Document Library View
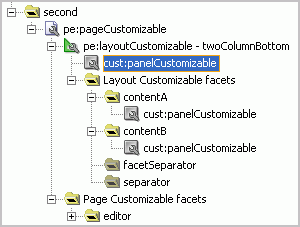
Description of "Figure 4-12 Location Where We Will Add the Document Library View"
-
Add a chrome around the Document Library, so that at runtime, the layout shows a frame around the list of documents.
In the Component Palette, choose Oracle Composer from the list.
-
Under Layout, drag and drop Show Detail Frame onto the cust:panelCustomizable that you selected (as shown in Figure 4-12).
-
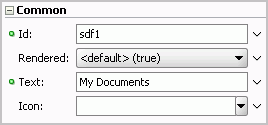
While the Show Detail Frame is selected, in the Property Inspector, under Common, change the Text property to
My Documents, as shown in Figure 4-13. Notice also that the frame is also selected in the Design view of your page.Figure 4-13 Changing the Title of the Show Detail Frame
Description of "Figure 4-13 Changing the Title of the Show Detail Frame"
-
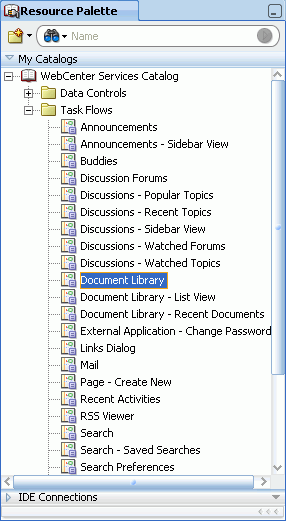
In the Resource Palette, under WebCenter Services Catalog, open the Task Flows folder and locate Document Library. Figure 4-14 shows the task flow in the WebCenter Services Catalog.
Figure 4-14 Document Library Task Flow in the Resource Palette
Description of "Figure 4-14 Document Library Task Flow in the Resource Palette"
-
Drag and drop the Document Library task flow onto the Show Detail Frame. You can do this either by dragging it onto the Show Detail Frame in the Structure window or in the Design view of the page.
-
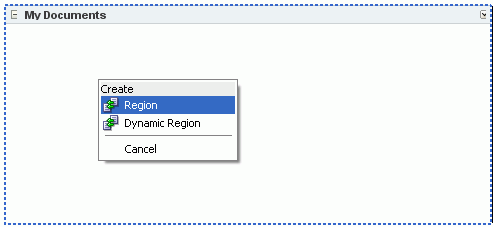
In the context menu that displays, click Create Region, as shown in Figure 4-15.
Figure 4-15 Dropping the Document LIbrary Task Flow onto the Page in the Design View
Description of "Figure 4-15 Dropping the Document LIbrary Task Flow onto the Page in the Design View"
-
If the Confirm Add ADF Library dialog box displays, click Add Library.
-
The Edit Task Flow Binding dialog box displays. In this dialog box, you can set up the connection parameter for the task flow.
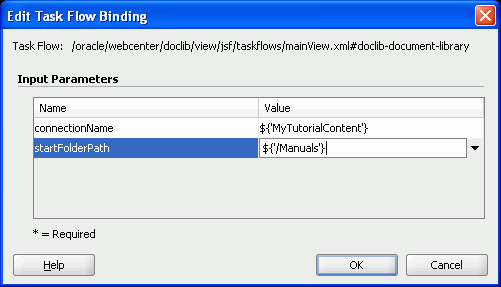
Click the connectionName parameter and enter
${'MyTutorialContent'}to tell the Document Library task flow to use this connection.Note:
If you do not enter a connection name here, the content repository connection where you selected Set as primary connection for Documents service is the active connection. -
Since the connection points to the root folder of our tutorial sample files, let's update the startFolderPath parameter to the folder containing the product manuals.
Click the startFolderPath parameter and enter
${'/Manuals'}next to it, then click OK. Figure 4-16 displays the Edit Task Flow Binding dialog box with the appropriate values.Figure 4-16 Edit Task Flow Binding Dialog Box
Description of "Figure 4-16 Edit Task Flow Binding Dialog Box"
The Structure window shows the new task flow with the
af:regiontag, as shown in Figure 4-17.Figure 4-17 Document Library View Task Flow in the Structure Window

Description of "Figure 4-17 Document Library View Task Flow in the Structure Window"
-
In the Application Navigator, right-click the MyPage.jspx page and select Run. In the next step, we'll examine the Document Library at runtime.
Step 4: Browse Documents at Runtime
Now that you've added the task flow to your application, you can see the documents in your content repository.
-
After you run your application to your browser, you'll see a list of your files display (Figure 4-18).
Figure 4-18 Documents in the Document Library View

Description of "Figure 4-18 Documents in the Document Library View"
Let's examine this view. As you can see, the service shows by default the names of the folders:
prodA,prodB,prodC. This information all comes from your file system and let's you quickly show your content without much coding.Also notice the Search field within the My Documents frame. This search feature is limited to just the files in the document library. The search toolbar you added in Step 1: Add the Search Toolbar Task Flow to the Application searches across any page and service you add to your application.
-
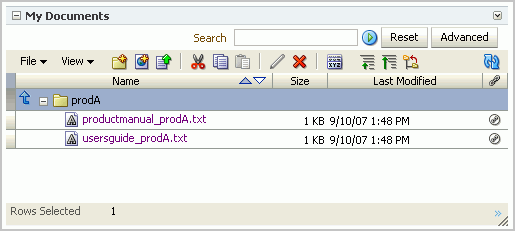
Click the folder prodA. Notice how the folder opens within the context of the view. You can use the breadcrumbs to navigate throughout your document library. You can also view the various attributes about the documents (for example, Size, Last Modified).
Figure 4-19 Document Library View Showing the Contents of a Folder
Description of "Figure 4-19 Document Library View Showing the Contents of a Folder"
-
Click the Create New Folder icon in the toolbar (Figure 4-20).
Figure 4-20 Create New Folder Icon in the Toolbar

Description of "Figure 4-20 Create New Folder Icon in the Toolbar"
-
In the Create Folder dialog box, enter a folder name, such as
prodA_details(Figure 4-21).Figure 4-21 Document Library View with the Create Folder Dialog Box
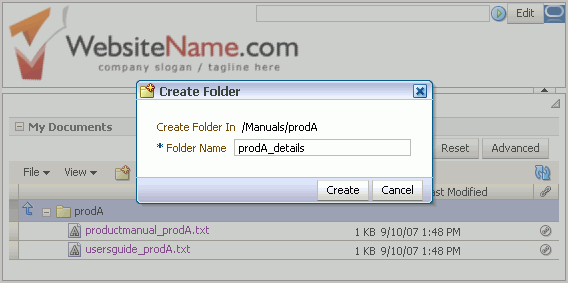
Description of "Figure 4-21 Document Library View with the Create Folder Dialog Box"
-
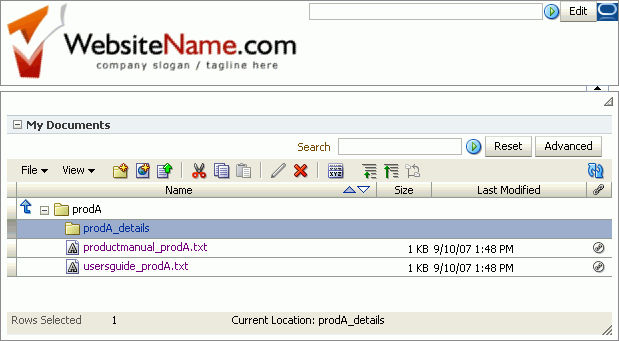
Click Create. Figure 4-22 shows the new folder in your browser.
Figure 4-22 prodA_details Folder in the Document Library at Runtime
Description of "Figure 4-22 prodA_details Folder in the Document Library at Runtime"
-
Since you are using your own file system as your content repository, any actions you perform at runtime also affect the content repository itself. Let's examine the content repository, in this case on your file system.
Notice the prodA_details folder also exists in your
C:\TutorialContent\Manuals\prodAdirectory (Figure 4-23).Figure 4-23 New Folder in the File System
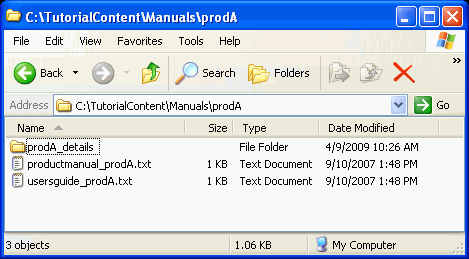
Description of "Figure 4-23 New Folder in the File System"
While we're able to do this on our file system, if you use a secure repository like Oracle Content Server, you'll need appropriate privileges to perform these actions.
-
Return to your browser to view the Document Library at runtime.
-
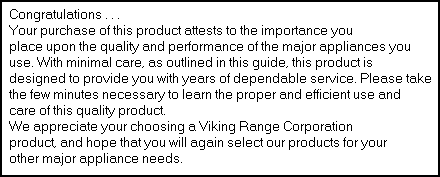
Click the file productmanual_prodA.txt. Notice that a new browser tab or window displays with the contents of the text file (Figure 4-24).
Figure 4-24 Text File in a Browser Window
Description of "Figure 4-24 Text File in a Browser Window"
You can easily navigate from the parent folder to the text file by switching your browser window. Document Library displays the content of text and image files in the browser. For more information on using the Document Library at runtime, refer to the Oracle Fusion Middleware User's Guide for Oracle WebCenter.
-
Return to Oracle JDeveloper.
As you can see, the Document Library view provides a quick and easy way for you to display content in a meaningful way and with functionality. You can learn more about this simple view and the more complex Document Library views in the Oracle Fusion Middleware Developer's Guide for Oracle WebCenter.
To exercise more direct control over the behavior, look, and feel of your content, you can use the JCR data control, which you can learn about in Chapter 6 “Integrating Content” in Oracle Fusion Middleware Developer's Guide for Oracle WebCenter.
Step 5: Create a Database Connection to the WebCenter Schema for the Tags Service
Next, we'll add the Tags service. To use the Tags service, you must have access to the WebCenter schema. You installed this schema in Chapter 2, "Preparing for the Tutorial." In this section, we'll create a connection to the database containing this schema, so that the Tags service we add can use this schema.
To learn more about setting up your application for consuming services, refer to the Oracle Fusion Middleware Developer's Guide for Oracle WebCenter.
To create the database connection:
-
In the Application Navigator, expand the Application Resources panel.
-
Right-click Connections, choose New Connection, then choose Database.
-
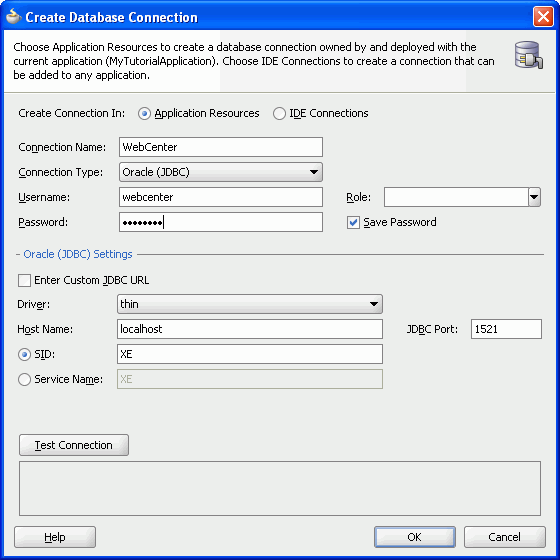
Enter the following information for your database connection (Figure 4-25). Note that the Connection Name must be
WebCenter.-
Connection Name:
WebCenter -
Connection Type:
Oracle (JDBC) -
User name:
username(for example,webcenter) -
Password:
password(for example, welcome1) -
Host:
<host where you installed the WebCenter schema>(for example,localhost) -
JDBC Port:
<port>(for example,1521) -
SID:
<system identifier for the database with the same JDBC port>(for example,ORCL)
-
-
Click Test Connection to test your database connection. If you do not see a Success! message, check to make sure you entered the correct information for the WebCenter schema (see Chapter 2, "Preparing for the Tutorial" if you're not sure what you entered when you install it).
-
Click OK. Now that we've created our database connection, we can add the Tags service to the application.
Step 6: Add the Tags Service to Your Application
Tags enable you and your application users to apply your own meaningful terms to items in your application, making those items more easily discoverable in search results. Because your application users can create tags for their own content or content they've searched for, the tags are much more powerful and usable than search keywords created by application developers who may not be as familiar with the user-created content. This user-powered keyword creation makes the content in your application highly searchable and discoverable.
A “tag cloud” is a visual illustration of all the tags for the application, making it easy for you and your users to identify the tags used in the application. You can then search for a tag in your application to locate any item that has been associated with that tag.
With every service in the Oracle WebCenter Framework, we perform a few basic steps: configure the service with our application, add the service task flow to our page, then run the page and customize or use the service at runtime.
In this section, we'll add the Tags service to our application and display it on our page. We will add a Tag Cloud so that we can visualize the tags and enable us to add new tags to our application.
To add the Tags service task flow:
-
In the Structure window for MyPage, navigate to the Panel Customizable containing the Show Detail Frame where you added the Document Library View (Figure 4-26).
Figure 4-26 Panel Customizable Containing the Show Detail Frame

Description of "Figure 4-26 Panel Customizable Containing the Show Detail Frame"
Note:
As previously mentioned, you can use the pushpin in the Structure window to freeze the current view. For this step, you should click MyPage in the Design view, then ensure the pushpin is in the “freeze” position (pressed). -
In the Component Palette, choose Oracle Composer from the list.
-
Under Layout, drag and drop a Show Detail Frame onto the Panel Customizable, so that it displays just below the first Show Detail Frame, as shown in Figure 4-27.
-
While the Show Detail Frame is selected, in the Property Inspector, under Common, change the Text property to
Tag Cloud. -
In the Resource Palette, under WebCenter Service Catalog, open the Task Flows folder and locate the Tagging - Tag Cloud task flow, then drag and drop it onto the Show Detail Frame you just added.
-
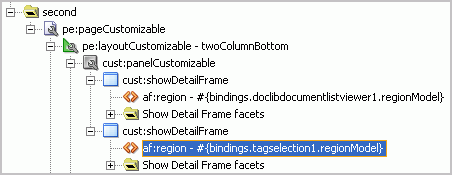
In the Create Region context menu, choose Create Region. The Tagging - Tag Cloud task flow displays in the Structure window, as shown in Figure 4-28.
Figure 4-28 Tagging - Tag Cloud Task Flow in the Second Show Detail Frame
Description of "Figure 4-28 Tagging - Tag Cloud Task Flow in the Second Show Detail Frame"
-
Right click MyPage in the Design view and choose Run. We'll examine the Tags service at runtime in the next step.
Step 7: Use, Add, and Search Tags in Your Application at Runtime
After you add the Tagging - Tag Cloud task flow to your page, the Tag Cloud automatically populates with the tags in the WebCenter schema. If you installed the WebCenter schema for the purposes of this tutorial, you will not see any tags in the Tag Cloud. In our example, we have a few tags that we populated to illustrate how the Tag Cloud can look at runtime.
To use the Tags service at runtime:
-
In your browser, you should now see the Tag Cloud displaying below the Document Library. In our example, we have a few sample tags that exist in our WebCenter schema. If a tag cloud exists in your WebCenter schema, the contents of your tag cloud may appear slightly different. If you do not have any tags, you will not see any tags in the Tag Cloud.
Figure 4-29 shows how MyPage looks at runtime with sample tags in the Tag Cloud.
-
Once you add the Tags service to your application, you can use it with the Document Library service. Let's see how we can add tags to a document in our document library.
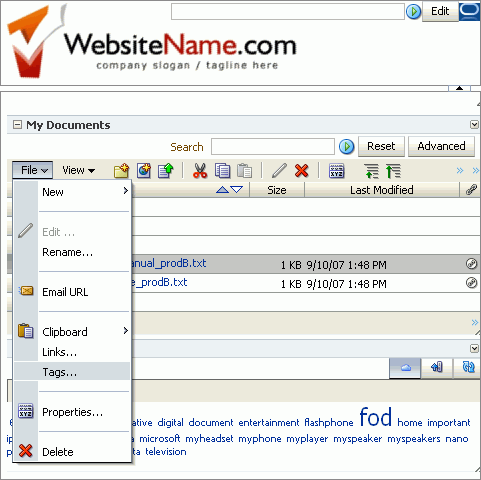
In the Document Library, open a folder, such as prodB, and select the row containing a document name, such as productmanual_prodB.txt. Be sure to click the row and not the link for the filename, otherwise you'll just display the text file in a new browser window as you did in Step 4: Browse Documents at Runtime.
-
In the Document Library menu, choose File > Tags... (Figure 4-30).
Figure 4-30 Choosing the Tags Menu Option in the Document Library
Description of "Figure 4-30 Choosing the Tags Menu Option in the Document Library"
-
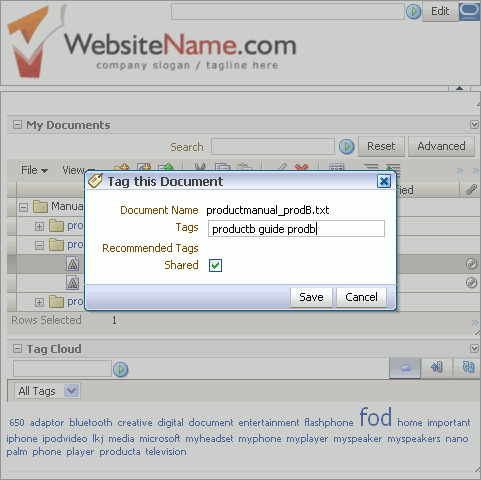
The Tag this Document dialog displays. Add a few tags, such as:
productb guide prodb
Figure 4-31 Adding New Tags to a Document
Description of "Figure 4-31 Adding New Tags to a Document"
-
Click Save, then create another tag on another document. For example, open the prodA folder, then add a few tags to productmanual_prodA.txt.
-
In the Tag this Document dialog box, enter a few tags, then save your changes:
producta guide proda
-
Click the Refresh icon to the right of the Tag Cloud title bar (Figure 4-32).
Notice that the Tag Cloud now displays your new tags, for example producta, productb, guide, and prodb as shown in Figure 4-33.
-
Let's see how tags help us locate items in our application. In the Search toolbar at the top of the page, enter
productb, then click the arrow icon. You'll see the Search Results return the tag forproductb(Figure 4-34).Figure 4-34 productb Tag in the Search Results
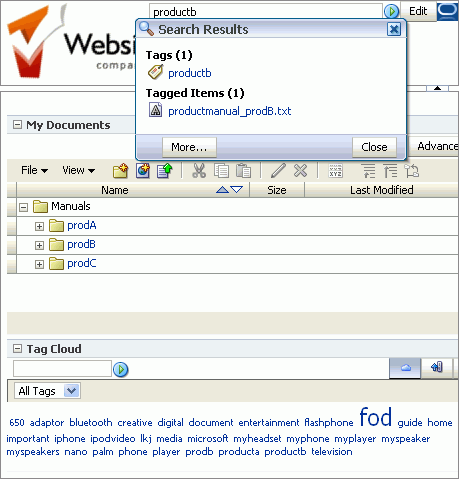
Description of "Figure 4-34 productb Tag in the Search Results"
-
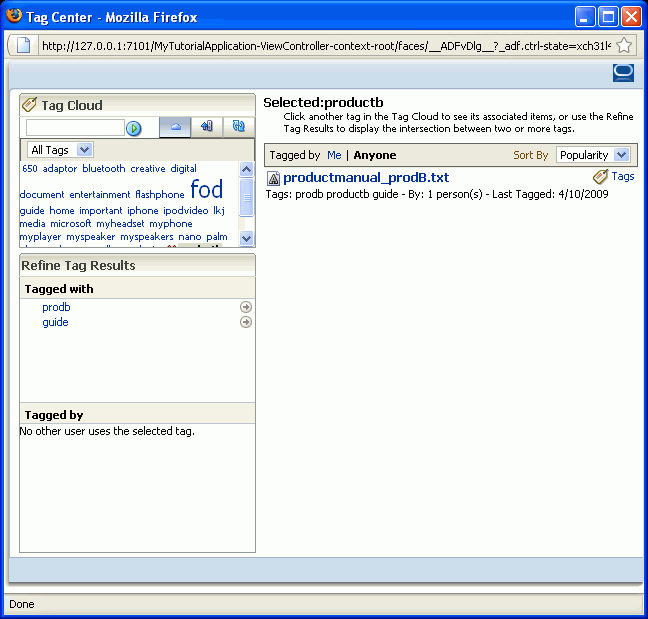
In the Search Results window, click the productb tag. The Tag Center displays in a pop-up window (Figure 4-35).
The Tag Center displays the Tag Cloud, all the results from your search that are associated with the tag
productb, including other advanced search options. You can close this window after you're done viewing the different options and return to your application. -
If you're interested, add a few more tags to see how the Tag Cloud changes. Otherwise, you can move on to the next step.
-
Let's examine the Search toolbar again. You can also search for any keyword to view items that contain the keyword. The keyword does not necessarily have to be a tag.
For example, in the Search toolbar, enter the keyword
product, then click the arrow. The search returns all documents and tags that contain the word “product,” as shown in Figure 4-36.Note that the search results in our example may not exactly reflect what you see in your application, as the results depend on the items you tagged.
-
When you search for a tag, the search returns a partial match -- that is, because we searched for
product, we saw in our Search Results tags and documents that contain the wordproduct. But, because no item was specifically tagged with “product,” the search did not return any tagged items.Let's search for a specific tag and see what happens. In the Search toolbar, enter
producta, then click the arrow icon.Figure 4-37 shows the search results. Notice that the tagged item,
usersguide_prodA.txtdisplays. Because the item was tagged with “producta,” our search returned the specific item.Figure 4-37 Search Results for “producta”
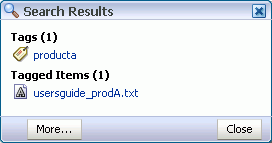
Description of "Figure 4-37 Search Results for “producta”"
You can learn more about adding the Search, Documents, and Tags services to a custom WebCenter application in Oracle Fusion Middleware Developer's Guide for Oracle WebCenter. You can learn more about using these services at runtime (in your browser) in the Oracle Fusion Middleware User's Guide for Oracle WebCenter.
Now that we have added a few services to our application, let's build a few portlets, add them to the application, then wire them in Chapter 5, "Building Portlets and Wiring Them in Your Application."
