19 Managing the Wiki and Blog Services
This chapter describes how to configure and manage the Wiki and Blog services for WebCenter Spaces and custom WebCenter applications deployed to Oracle WebLogic Server.
Always use Fusion Middleware Control or WLST command-line tool to review and configure back-end services for WebCenter applications. Any changes that you make to WebCenter applications, post deployment, are stored in the MDS metatdata store as customizations. For information, see Section 1.3.5, "Oracle WebCenter Configuration Considerations."
Note:
Changes that you make to WebCenter services configuration, through Fusion Middleware Control or using WLST, are not dynamic. So, for your changes to take effect you must restart the managed server to which your WebCenter application is deployed. For information, see Section 8.2, "Starting and Stopping Managed Servers for WebCenter Application Deployments."This chapter includes the following sections:
-
Section 19.1, "What You Should Know About the Wiki and Blog Server Connections"
-
Section 19.2, "Oracle WebCenter Wiki and Blog Server Prerequisites"
-
Section 19.3, "Registering Oracle WebCenter Wiki and Blog Server"
-
Section 19.4, "Choosing the Active Wiki and Blog Server Connection"
-
Section 19.5, "Modifying the Wiki and Blog Server Connection Details"
-
Section 19.8, "Monitoring Oracle WebCenter Wiki and Blog Server"
The content of this chapter is intended for Fusion Middleware administrators (users granted the Admin or Operator role through the Oracle WebLogic Server Administration Console). See also, Section 1.8, "Understanding Administrative Operations, Roles, and Tools."
19.1 What You Should Know About the Wiki and Blog Server Connections
A wiki is a collection of useful content or information that users can browse and can update and remove, sometimes without the need for registration. This ease of interaction and the variety of operations makes wiki an effective tool for collaborative authoring, where multiple people create written content together using the wiki markup language. Blogs provide a useful tool for discussing and/or evangelizing any type of idea, strategy, or point of view. Blogs may be projected out to a select group of people or to a wider audience. Typically, blogs invite readers to comment on the overall concepts.
The Wiki service enables integration of wikis into WebCenter applications. The Blog service provides the ability to expose blogs on application pages.
Both the Wiki service and the Blog service rely on Oracle WebCenter Wiki and Blog Server at the back end. The Wiki and Blog services require a connection to the server. Both the services use the same connection to connect to the server.
19.2 Oracle WebCenter Wiki and Blog Server Prerequisites
This section contains the following subsections:
-
Section 19.2.1, "Oracle WebCenter Wiki and Blog Server - Installation"
-
Section 19.2.2, "Oracle WebCenter Wiki and Blog Server - Configuration"
-
Section 19.2.3, "Oracle WebCenter Wiki and Blog Server - Security Considerations"
-
Section 19.2.4, "Oracle WebCenter Wiki and Blog Server - Limitations"
19.2.1 Oracle WebCenter Wiki and Blog Server - Installation
Oracle WebCenter Wiki and Blog Server is a component of Oracle WebCenter. You can install Oracle WebCenter Wiki and Blog Server while installing Oracle WebCenter, or you can install it later by extending your existing WebCenter domain. For information about installing Oracle WebCenter Wiki and Blog Server, see Oracle Fusion Middleware Installation Guide for Oracle WebCenter.
19.2.2 Oracle WebCenter Wiki and Blog Server - Configuration
This section describes the basic administration and configuration tasks you can perform on Oracle WebCenter Wiki and Blog Server.
Note:
Depending on your requirements, you may need to perform only some of the configuration tasks listed in this section.This section contains the following subsections:
-
Section 19.2.2.1, "What You Should Know About Oracle WebCenter Wiki and Blog Server"
-
Section 19.2.2.2, "Accessing the Oracle WebCenter Wiki and Blog Server"
-
Section 19.2.2.12, "Specifying Features Supported on Oracle WebCenter Wiki and Blog Server"
19.2.2.1 What You Should Know About Oracle WebCenter Wiki and Blog Server
When you log on to your Oracle WebCenter Wiki and Blog Server, the home page of the default wiki domain is displayed. The server displays a toolbar of useful links across the top of the page, a search feature, a domain-specific menu on the navigation panel on the left, and additional navigation under the General heading, as shown in Figure 19-1.
For administrators, Oracle WebCenter Wiki and Blog Server displays an extra Administration link on the top header.
Note:
The supported browsers for Oracle WebCenter Wiki and Blog Server are Internet Explorer 7.0 or later, Mozilla Firefox 2.0 or later, and Apple Safari 4.0 or later.Figure 19-1 Oracle WebCenter Wiki and Blog Server Interface
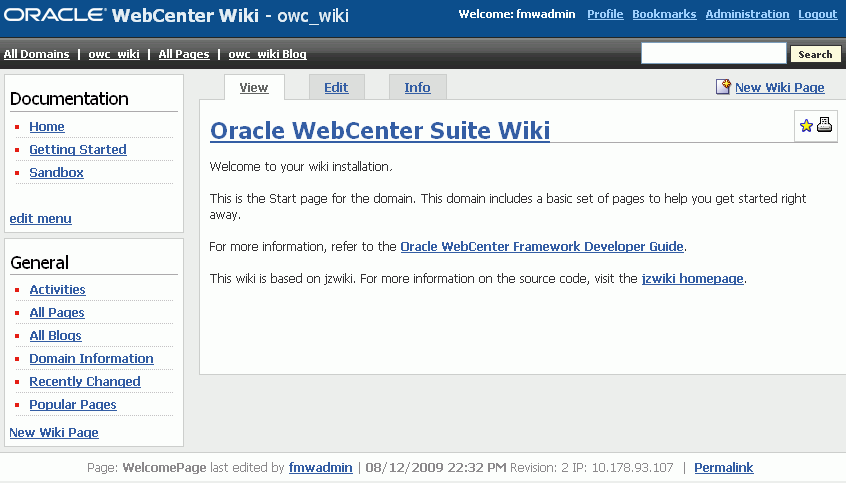
Description of "Figure 19-1 Oracle WebCenter Wiki and Blog Server Interface"
Note:
The wiki and blog server provides the logout link. The link can be customized to any URL based on the single sign-on scheme used. To customize the link, you can modify thelogout_url variable in the application_config.script file. Leaving logout_url blank renders the user session invalid and redirects to the login screen.
The application_config.script file is located in the WEB-INF/classes directory of your deployed Oracle WebCenter Wiki and Blog Server.
This section contains the following subsections:
19.2.2.1.1 About the General Menu
The General menu is a default menu and cannot be edited. You use the General menu to perform common operations on Oracle WebCenter Wiki and Blog Server.
Table 19-1 describes the links available in the General menu of a wiki domain.
Table 19-1 Links Available Under the General Menu
| Link | Description |
|---|---|
|
Activities |
Displays the Latest activities page that lists recent activities related to wiki pages and blog entries. The Latest activities page summarizes activities on domain pages, including the thing acted upon (such as blog entry), the action performed (such as Deleted), a link to the changed object, the user name of the person performing the action, and the date and time the action was performed. The page lists the following activities:
|
|
All Pages |
Displays a list of all wiki pages in the current domain. |
|
All Blogs |
Displays a list of all personal and domain blogs. You can access different blogs to add blog entries and manage blog authors. |
|
Domain Information |
Summarizes useful information about the current domain, such as details about popular pages and recently updated pages. |
|
Recently Changed |
Displays a list of recently updated wiki pages. |
|
Popular Pages |
Displays a list of wiki pages, in the current domain, with the most number of page views. |
|
New Wiki Page |
Enables you to create a new wiki page in the current domain. |
19.2.2.1.2 About Administration Mode
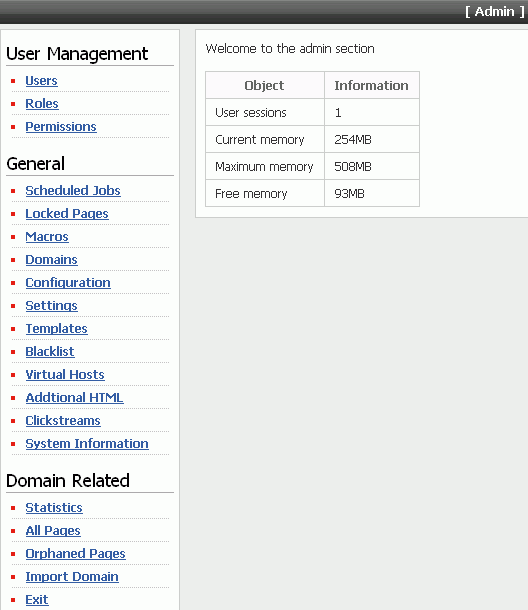
To configure Oracle WebCenter Wiki and Blog Server, you use Administration mode of the server. You access Administration mode by clicking the Administration link. (Figure 19-2)
Figure 19-3shows all the links available in Administration mode.
Administration mode contains various links that you can use to configure settings specific to the current domain or the entire wiki and blog server. Table 19-2 describes the links available in Administration mode.
Table 19-2 Links in Administration Mode of Oracle WebCenter Wiki and Blog Server
| Link | Description |
|---|---|
|
User Management |
|
|
Users |
Displays details, such as the name, e-mail address, status, and role of all wiki users. You can use this link to add new users, block or unblock users, reset their password, and edit their profile to assign them different roles. For more information, see Section 19.2.2.7.1, "Managing Users." Note: When you deploy Oracle WebCenter Wiki and Blog Server by leveraging single sign-on security, users are not initially imported from the security store. A user entry is created on Oracle WebCenter Wiki and Blog Server only upon first login by that user. |
|
Roles |
Enables you to add a new role and edit a role to manage permissions. For information about how to assign permissions to a role, see Section 19.2.2.7.2, "Managing Permissions for a Role." |
|
Permissions |
Displays a list of permissions that you can assign to various roles. |
|
General |
|
|
Scheduled Jobs |
Displays a list of administrative jobs that you can run. For example, you can run The The Scheduled Jobs link also shows the next time a job is scheduled to run. If you wish a job to run sooner, use the run now link. |
|
Locked Pages |
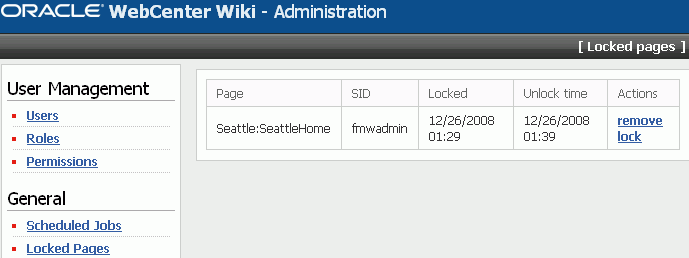
Displays details of pages that have been locked. Details include name of the user who locked the page, the time when the page was locked, and the time when the page will get unlocked automatically. To unlock a page, you can either wait for the time of the automatic unlock, or as an administrator, you can manually unlock a page by clicking the remove lock link. For information about how to unlock a page, see Section 19.2.2.6, "Unlocking a Page." |
|
Macros |
Enables you to execute complex or specialized functions on a wiki page. You can invoke a macro by using the Oracle WebCenter Wiki and Blog Server includes several sample macros, such as TaskMacro and Link. The Macro page provides a list and description of all sample macros. |
|
Domains |
Displays a list of all domains and domain details, such as page counts and the name of the domain home page. It also displays the total number of domains and pages on your wiki and blog server. The Domains link also enables you to add or delete a domain, edit details of a domain, and specify the members who can manage a domain. For information about how to manage domains, see Section 19.2.2.3, "Setting Up Domains and Menus." |
|
Configuration |
Enables you to configure your wiki and blog server by specifying details such as the default domain and wiki theme. For more information, see Section 19.2.2.10, "Specifying Configuration Parameters." |
|
Settings |
Enables you to specify your wiki and blog server settings. You can specify details such as whether attachments, page ratings, and trackbacks are supported. For more information, see Section 19.2.2.12, "Specifying Features Supported on Oracle WebCenter Wiki and Blog Server." |
|
Templates |
Enables you to add, view, edit, and delete templates used for creating wiki pages. For more information, see Section 19.2.2.5, "Creating a User Interface Template." |
|
Blacklist |
Enables you to block certain IP addresses from adding or editing pages on your Oracle WebCenter Wiki and Blog Server. However, a blocked IP address can access the server to view pages. For more information, see Section 19.2.2.8, "Blocking an IP Address." |
|
Virtual Hosts |
Enables you to create multiple sites within Oracle WebCenter Wiki and Blog Server, differentiated by their host names. |
|
Additional HTML |
Enables you to define the additional HTML header and footer information that appears on every wiki page. |
|
Clickstreams |
Enables you to monitor the pages or functions that your users have accessed or clicked. Users are identified by their IP addresses. This link shows the IP addresses of users and the URLs accessed. |
|
System Information |
Displays the version number of your Oracle WebCenter Wiki and Blog Server. The version is the open source version number. The Build option refers to the Oracle version and the build number. |
|
Domain Related |
|
|
Statistics |
Displays statistics of the current domain for the specified time period. Domain statistics include the names of wiki pages viewed, the page view count, and the dates on which pages were last viewed within the specified date range. |
|
All Pages |
Displays details of all the pages within the current domain. You can use this link to delete a wiki page or to reduce the versions of that wiki page available on the server. For more information, see Section 19.2.2.9, "Deleting Wiki Pages and Blog Entries." |
|
Orphaned Pages |
Displays the pages that are not linked to any other page. |
|
Export Domain |
Enables you to publish wiki pages in a domain as HTML files so that the pages can be placed on a web server and accessed directly. Note: By default, the Export Domain link is not available. To access this link, you must enable the ExportDomain permission for the ADMIN role. |
|
Import Domain |
Enables you to point to a directory containing wiki pages, like wiki pages of the 10.1.3.2 version of the wiki and blog server, and import the domain into the database-based repository. For information about importing domains, see the section, "Migrating the Wiki Data" in the Oracle Fusion Middleware Upgrade Guide for Oracle SOA Suite, WebCenter, and ADF. |
|
Exit |
Exits Administration mode. |
19.2.2.2 Accessing the Oracle WebCenter Wiki and Blog Server
You can access the Oracle WebCenter Wiki and Blog Server by using the following URL format:
http://host:port/owc_wiki
Where:
-
host:portrefer to the host and the port number of the server where you deployed Oracle WebCenter Wiki and Blog Server. -
owc_wikirefers to the deployment directory of your Oracle WebCenter Wiki and Blog Server.
For example, if the managed server where you deployed Oracle WebCenter Wiki and Blog Server is running on port 8001, you can access Oracle WebCenter Wiki and Blog Server by using the following path:
http://localhost:8001/owc_wiki
19.2.2.3 Setting Up Domains and Menus
Domains are an organizing model on Oracle WebCenter Wiki and Blog Server similar to folders on a file system. A wiki domain encompasses an identified group of wiki pages. It helps you organize wiki pages and secure them by role or specific users. Each wiki domain contains an associated blog, where blog authors can create blog entries and users can post comments.
As a wiki administrator, you can create, edit, or delete domains and manage domain members and blog authors. You can also create and edit domain menus to enable easy access to pages within each domain. This section discusses basic domain and menu administration tasks.
This section contains the following subsections:
19.2.2.3.1 Adding a Domain
-
Log on to Oracle WebCenter Wiki and Blog Server as an administrator and access Administration mode.
-
In the navigation panel on the left, under General, click Domains.
The Domains page lists all the wiki domains on the server.
-
On the Domains page, click add to create a new domain.
-
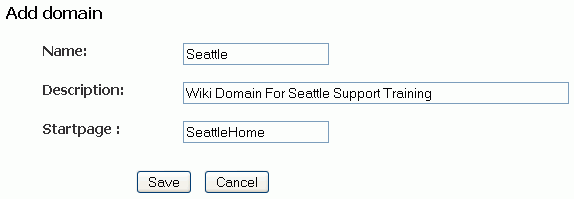
Enter a domain name, a description, and a name for the home page, also called the start page, of your domain, as shown in Figure 19-4.
-
Click Save.
The newly created domain is listed on the Domains page, as shown in Figure 19-5.
-
In the Startpage column, click the start page link of the new domain to navigate directly to the new domain.
To exit Administration mode, under General, click Exit. This displays the wiki page of the last domain that you accessed before entering Administration mode.
Note:
You can also create a domain by using thescope parameter in a wiki URL in any WebCenter application. If the specified domain does not exist, it is automatically created with the name specified in the scope parameter. The parameter also creates a start page named WelcomePage. For more information, see the "Integrating Oracle WebCenter Wiki and Blog Server" chapter in the Oracle Fusion Middleware Developer's Guide for Oracle WebCenter.After creating a new domain, you can create wiki pages and blog entries in the domain. For information, see the "Working with Wikis and Blogs" chapter in the Oracle Fusion Middleware User's Guide for Oracle WebCenter.
19.2.2.3.2 Editing a Domain Menu
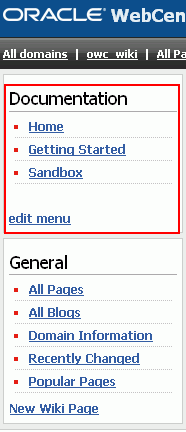
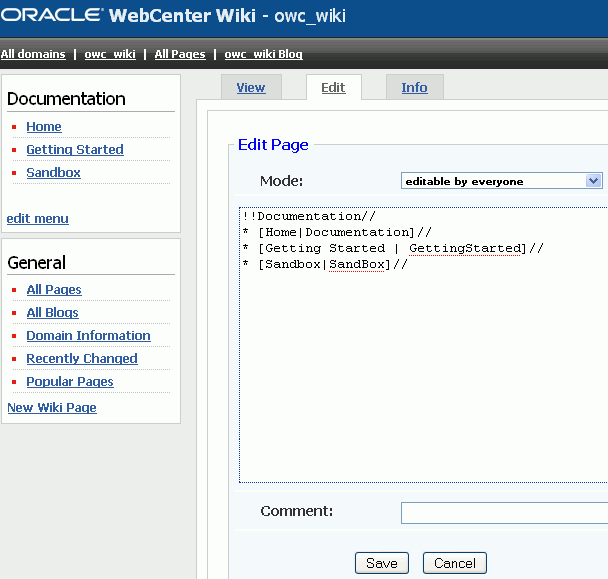
As an administrator, you can create or edit the menu of a domain. The domain-specific menu appears at the top in the navigation panel. Figure 19-6 shows the menu of the default domain, owc_wiki.
A menu comprises menu topics, which display as headers. Menu topics contain menu items. For example, in the owc_wiki domain, Documentation is a menu topic and Home is a menu item. Menu topics display on the navigational panel in the order in which you create them.
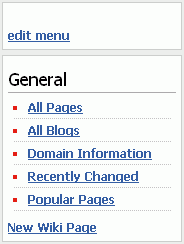
A newly created domain contains an empty wiki page named Menu. You use this page to create or edit the domain's menu. You can edit the Menu wiki page by using the edit menu link on the navigation panel.
Note:
You can configure Oracle WebCenter Wiki and Blog Server to display the required wiki management tools. You use the query string parameterinline to control how much wiki capability to render. The navigation panel on the left and the Menu wiki page appear when inline=0. The edit menu link appears only when inline=0 and the user is an administrator.
When using inline=1, the Menu wiki page does not appear. Instead a menu is auto-generated showing all wiki pages in the domain. For information about inline modes, see the "Integrating Oracle WebCenter Wiki and Blog Server" chapter in the Oracle Fusion Middleware Developer's Guide for Oracle WebCenter.
To modify the menu of a domain:
-
Log on to Oracle WebCenter Wiki and Blog Server as an administrator.
-
Click the All Domains link on the toolbar of links on the top-left corner of your wiki and blog server user interface. (Figure 19-7)
You do not need to access Administration mode to edit a domain menu.
-
Click the start page link of the domain for which you wish to edit the menu.
-
Click the edit menu link. Figure 19-8 shows the blank menu of a newly created domain.
Tip:
When you click the edit menu link, the Edit Page displays. You can also access the Edit Page by clicking All Pages under General on the navigation panel. This displays a list of all wiki pages of the current domain. You can click the Menu wiki page to view the menu, and then click the Edit tab to edit the menu. -
Specify the menu topic and menu items that you want to add or change. You edit the menu the same way you edit a wiki page. For information, see the "Editing a Wiki Page" section in the Oracle Fusion Middleware User's Guide for Oracle WebCenter.
Within each menu topic, you can define menu items and link them to the required wiki pages or to the targets that are external to your wiki and blog server. When you create a menu item, you must provide a name and specify either the name of a wiki page or a URL. The name that you specify displays in the menu on the navigation panel.
Tip:
When naming your page, ensure that you adhere to wiki markup standards, that is, you use the camel case notation for naming wiki pages. This notation uses an initial uppercase letter followed by lowercase letters, then another uppercase letter, and another series of lowercase letters, for example,MyWikiPage. To use an alternate name for your page, use the following convention:[ alternate name | wiki page name ]
For example:
[ My Page | MyPage ]
For information about wiki markup language to format page content, see "Using Wiki Mark-Up" in the Oracle Fusion Middleware User's Guide for Oracle WebCenter.
Tip:
After you edit a menu, it is good practice to change the mode to only admins are allowed to edit in the Mode dropdown list in the Edit tab. Although the Edit menu link is automatically removed from the menu, if the registered user is not an administrator, users may accidentally edit the menu page. -
Click Save.
19.2.2.3.3 Managing Domain Members
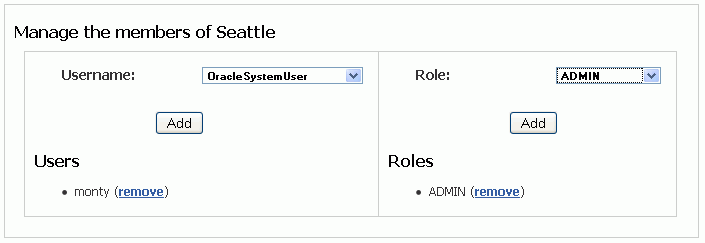
By default, all authorized wiki users can view and modify wiki pages in a wiki domain. However, you can restrict the permission to edit wiki pages in a domain by specifying domain members. You can add selected users and specific roles as domain members. Figure 19-10 shows that the user monty and the Admin role are defined as members of the Seattle wiki domain.
If members of a domain are defined, then while creating a wiki page in the domain, users can select the restricted to members of the domain option if they want only the domain members to be able to edit the wiki page. For example, for the Seattle wiki domain, the user monty and the ADMIN role are the members (Figure 19-10). While creating or editing a page in this domain, if the user selects the restricted to members of the domain option, then only monty and all users with the ADMIN role can edit that wiki page.
Figure 19-11 Restricting Access to Domain Members

Description of "Figure 19-11 Restricting Access to Domain Members"
To manage domain members:
-
In Administration mode, click Domains.
-
On the Domains page, click the manage members link of the domain for which you want to specify members.
-
From the Username list, select the user whom you want to add as a domain member.
-
Click Add.
The new user's name displays in the Users section, as shown in Figure 19-10.
-
From the Role list, select the role to which you want to grant domain membership.
-
Click Add.
The role assigned to the domain member displays in the Roles section, as shown in Figure 19-10.
Repeat step 3 through 6 if you want to add any other user or role as a domain member.
-
Click the remove link next to a member's name under Members if you do not want that member to be able to manage the domain.
19.2.2.3.4 Managing Blog Authors
By default, only a wiki administrator or the person who owns the blog can add blog entries. For a personal blog, the blog author is the person who owns that personal blog. In a domain (such as a blog associated with a WebCenter group space), the blog author is the domain creator, which is usually a wiki administrator.
A wiki administrator or the blog owner can specify additional users who can add blog entries. For information about enabling or disabling additional blog authors, see the section, "Adding and Removing Additional Blog Authors" in the Oracle Fusion Middleware User's Guide for Oracle WebCenter.
Note:
If a user creates a domain, the user does not automatically become the blog author for the domain blog. The user must be specifically added as a blog author.19.2.2.4 Changing the Theme
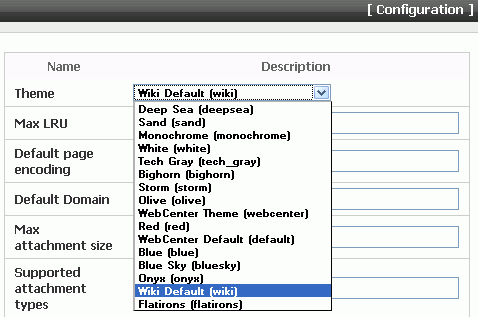
You can apply themes to change the look and feel of Oracle WebCenter Wiki and Blog Server.
To change the default theme:
-
In Administration mode, under General, click Configuration.
-
Select a theme from the Theme list.
-
Click Save.
-
Click Exit to exit Administration mode and see your changes take effect.
Note:
Users can change the theme for a login session if they use a wiki or blog URL that includes thetheme parameter.19.2.2.5 Creating a User Interface Template
Templates enable you to set up a framework for users for creating pages. You can create new user interface templates as well as edit or delete the existing ones.
To create a template:
-
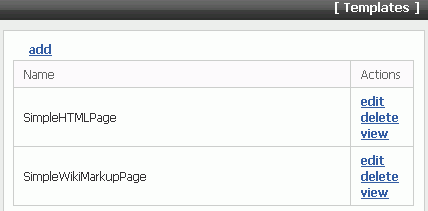
In Administration mode, under General, click Templates.
The Templates page displays a list of existing templates. You can edit, view, or delete templates by clicking the appropriate link displayed in the Actions column, as shown in Figure 19-13.
-
Click add at the top-right corner of the Templates page to create a new template.
-
In the Add template page, in the Name field, enter the name of the template.
While creating or editing a template, use the correct syntax. If the template is intended as a template for wiki markup, then use wiki markup. If it is intended to be a template for HTML pages, then use HTML. Template names should follow the same convention as wiki page names.
-
In the Template box, enter the content for the template.
-
Click Save.
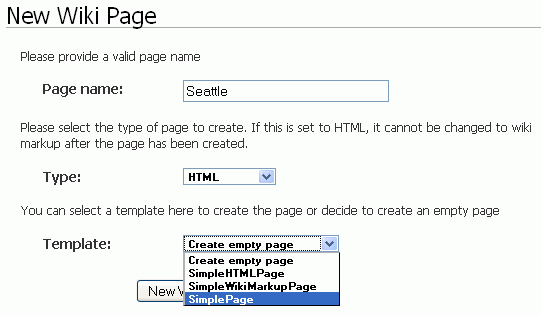
After you create a new template, users can choose to use this new template while creating a new page, as shown in Figure 19-14.
Figure 19-14 Creating a Page Based on a Template
Description of "Figure 19-14 Creating a Page Based on a Template"
19.2.2.6 Unlocking a Page
Every time a user edits a wiki page, the page gets locked for a specified time period for that user before other users can modify that page. Sometimes as an administrator, you may need to unlock a page. For example, if a user starts editing a wiki page and then clicks away from that page without clicking the Save or the Cancel button, then the page is still considered locked for editing. If another user tries to edit the same page, a warning message displays that the page is currently being edited by some other user, and any changes may be overwritten by a newer version. As an administrator, you can unlock the page manually to remove this warning.
To unlock a page:
-
In Administration mode, under General, click the Locked Pages link.
-
On the Locked pages page, click the remove lock link for the page you want to unlock. (Figure 19-15)
Tip:
Details of a locked page are no longer displayed in Locked pages as soon as the page is unlocked, whether manually or automatically.
19.2.2.7 Managing Users and Roles
You can add users on Oracle WebCenter Wiki and Blog Server and assign them required roles. You can also create new roles and assign permissions to those roles.
This section contains the following subsections:
19.2.2.7.1 Managing Users
To define the operations that a user can perform, you can assign specific roles to the user. To manage your users, you can edit user passwords, block users, add or delete the assigned roles, and add new users. This section describes the various tasks you can perform to manage your Oracle WebCenter Wiki and Blog users.
To assign a role to a user:
-
In Administration mode, under User Management, click Users.
The Users page displays a list of all the users and roles assigned to them.
-
On the Users page, click the edit link for the user whose role you want to modify.
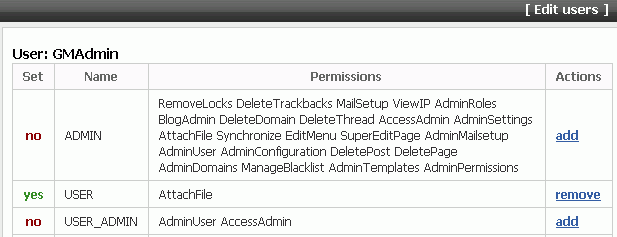
The Edit users page displays a list of all the roles assigned to the user, permissions included in the assigned roles, and the roles that can be assigned to the user, as shown in Figure 19-16.
-
To assign a role to the user, click the add link, in the Actions column, for the required role.
-
If you want to revoke a role from the user, click the remove link, in the Actions column, for the required role.
In Administration mode, you can block users and reset passwords. These features are useful only when the wiki and blog server is used as a standalone application. Changing user passwords through Administration mode changes passwords only in the local security store of Oracle WebCenter Wiki and Blog Server. If the server is integrated with another Oracle application through single sign-on or LDAP, then users are authenticated through single sign-on and passwords are stored in the external security store. In such a case, if a password needs to be changed, then you must change the password in the external security store.
When you deploy the wiki and blog server by leveraging single sign-on security, users are not initially imported from the external security store. Once a user is authenticated by the external security store, Oracle WebCenter Wiki and Blog Server checks whether the user exists in its local security store. If not, a user entry is created upon first login by that user and a default role, such as USER, is assigned to that user.
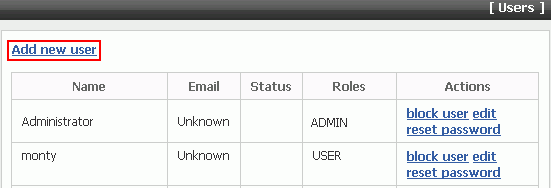
You can manually add a user by using the Add new user link on the Users page in Administration mode (Figure 19-17).
19.2.2.7.2 Managing Permissions for a Role
For different wiki operations, you can create specific roles and assign required permissions to those roles. You can also modify existing roles to add or remove permissions. You can then assign the required roles to different users to define the operations that those users can perform.
To edit the permissions granted to a role:
-
In Administration mode, under User Management, click Roles.
The Roles page displays various roles and the permissions assigned to each role.
-
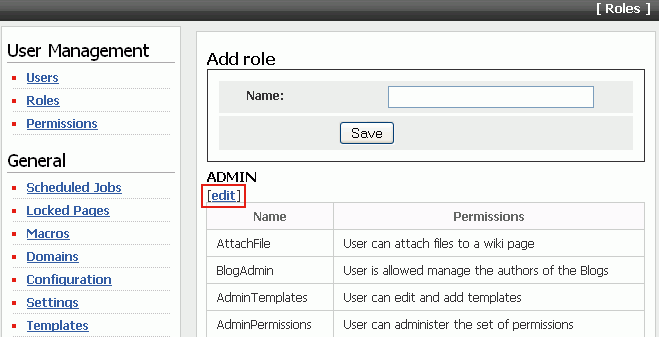
On the Roles page, click the edit link under the role that you want to modify. For example, to modify the ADMIN role, click edit under ADMIN (Figure 19-18).
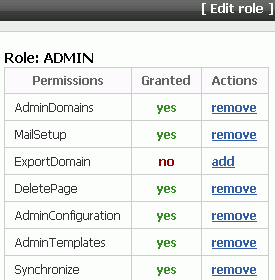
The Edit role page displays a list of all permissions that have been assigned or that can be assigned to the selected role (Figure 19-19).
Tip:
If you want to create a new role, then specify a role name in the Name field and then click Save on the Roles page (Figure 19-18). You can then click the edit link under the newly created role to add the required permissions. -
In the Actions column, click the add link of the required permission to add that permission to the selected role, or click the remove link corresponding to a permission to remove that permission from the selected role. (Figure 19-19)
Tip:
You can view the description of each permission by clicking Permissions under User Management on the navigation panel in Administration mode.Figure 19-19 Specifying Permissions for a Role
Description of "Figure 19-19 Specifying Permissions for a Role"
-
Click the Roles link at the bottom of the Edit role page to return to the Roles page.
19.2.2.8 Blocking an IP Address
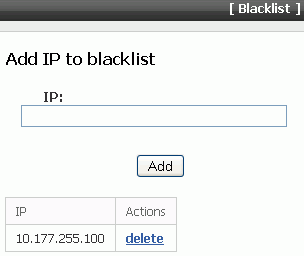
You can block selected IP addresses from creating or updating wiki pages on your Oracle WebCenter Wiki and Blog Server. However, a blocked IP address can still access the server to view wiki pages.
To block an IP address:
-
In Administration mode, under General, click Blacklist.
-
In the IP field, enter the IP address that you want to block.
-
Click Add.
The IP address displays in the list of blocked IP addresses (Figure 19-20).
19.2.2.9 Deleting Wiki Pages and Blog Entries
As a wiki administrator, you can delete wiki pages and blog entries that are no longer required.
This section contains the following subsections:
19.2.2.9.1 Deleting a Wiki Page
To delete a wiki page:
-
In the Administration mode, under Domain Related, click All Pages.
This displays a list of all pages in the current domain.
Note:
To delete wiki pages of a domain, you must first navigate to that domain and then access Administration mode. -
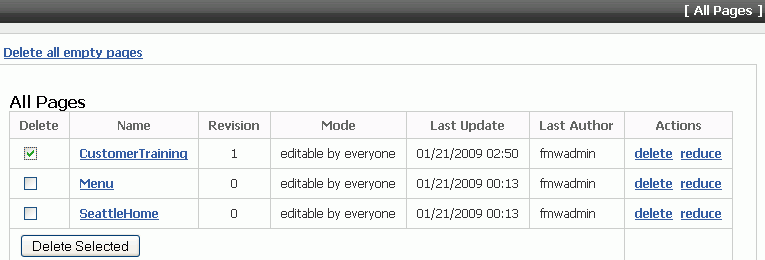
On the All Pages page, in the Actions column, click the delete link corresponding to the wiki page that you want to delete, as shown in Figure 19-21. If you want to delete multiple pages, then select the checkboxes for those pages in the Delete column, and then click the Delete Selected button.
-
Click the reduce link corresponding to a wiki page if you want to reduce the versions of that wiki page available on the server. It makes the current or the latest version of a wiki page the only version and deletes all previous versions.
-
Click the Delete all empty pages link at the top on the All Pages page if you want to delete wiki pages that do not contain any text.
Note:
Users can delete the wiki pages that they created only if you select true for the Allow users to delete pages they created option. You access this option by selecting Settings under General in Administration mode. If this option is enabled, then a Delete icon is displayed to a user for the wiki pages that the user created.If the option is set to false, then only wiki administrators can delete wiki pages.
19.2.2.9.2 Deleting a Blog Entry
A wiki administrator or users who have the permission to manage blogs can edit and delete blog entries. For information about how to delete blog entries, see the section, "Deleting a Blog Entry" in the Oracle Fusion Middleware User's Guide for Oracle WebCenter.
19.2.2.10 Specifying Configuration Parameters
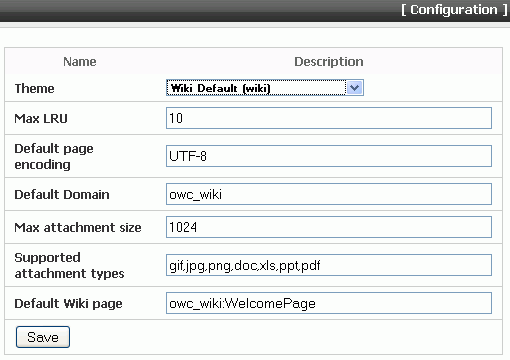
You can use Administration mode to configure various parameters for your Oracle WebCenter Wiki and Blog Server. These configuration parameters include specifying the:
-
Default server theme
-
Maximum number of Last Recent Updates (LRU) pages listed
-
Default page encoding format
-
Default domain of the server
-
Maximum attachment size in kilobytes (KB) supported on the server
-
Attachment types supported on the server
-
Default wiki page, that is the home page, of the server
To configure these settings, use the Configuration page, shown in Figure 19-22. You access this page by selecting Configuration under General in Administration mode.
19.2.2.11 Importing Templates and Attachments
Oracle WebCenter Wiki and Blog Server supports only a database repository; templates and attachments are also stored in the database repository. In previous versions of Oracle WebCenter Wiki and Blog Server, regardless of the repository type configured for the server, templates and attachments were stored in a file-based repository.
If you migrate from any previous version of Oracle WebCenter Wiki and Blog Server configured to use a database repository, then during migration templates and attachments are migrated to the database repository of your server. If you migrate from a previous version of Oracle WebCenter Wiki and Blog Server configured to use a file-based repository, then templates and attachments are migrated to a file-based repository and not to the database repository of your Oracle WebCenter Wiki and Blog Server. To make these templates and attachments available in your Oracle WebCenter Wiki and Blog Server, you must manually migrate them to the database repository.
To import attachments for a wiki page, the user who owns that wiki page or you as an administrator must reupload the attachments on the wiki page. When you reupload an attachment, the attachment gets stored in the database repository. Note that attachments must be reuploaded for each wiki page individually.
To migrate templates:
-
In Administration mode of your Oracle WebCenter Wiki and Blog Server 11.1.1.2.0, click Templates.
-
Click import.
-
On the Import Templates page, in the Folder field, enter the path to templates. For example,
$APPLICATIONS_DIRECTORY/owc_wiki/templates.Where,
$APPLICATIONS_DIRECTORYis the directory where you installed Oracle WebCenter Wiki and Blog Server 11.1.1.2.0. That is,APPLICATIONS_DIRECTORY=MW_HOME/user_projects/applications/WEBCENTER_DOMAIN_NAME. -
Click Import Templates. The existing file-based templates are individually re-created in the wiki database repository.
19.2.2.12 Specifying Features Supported on Oracle WebCenter Wiki and Blog Server
As an administrator, you can choose to enable or disable certain features on your Oracle WebCenter Wiki and Blog Server. For example, you can specify whether attachments, page menu, and remote synchronization are supported.
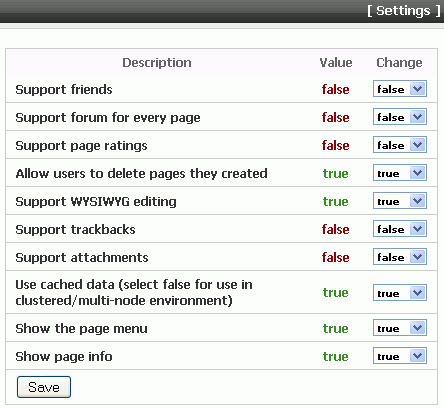
To set your wiki and blog server features, in Administration mode, click the Settings link, and then select the value for the specified features as true or false, as shown in Figure 19-23.
Figure 19-23 Wiki and Blog Server Settings
Description of "Figure 19-23 Wiki and Blog Server Settings"
Table 19-3 describes the settings that you can configure on Oracle WebCenter Wiki and Blog Server.
Table 19-3 Oracle WebCenter Wiki and Blog Server Settings
| Setting | Description |
|---|---|
|
Support friends |
Provides the ability to keep a set of bookmarked links to blogs of users whom you consider your friends. |
|
Support forum for every page |
Enables discussion forums associated with each wiki page. |
|
Allow users to delete pages they created |
Enables users to delete the wiki pages that they created. If this option is set to |
|
Support WYSIWYG editing |
Enables users to perform WYSIWYG editing, that is, view the result of their changes as they make the changes on wiki pages. |
|
Support trackbacks |
Enables a way for wiki authors to keep track of links to their pages. |
|
Support attachments |
Enables users to upload attachments to a wiki page. With this setting enabled, an Attachments tab appears on wiki pages. |
|
Use cached data (select false for use in clustered/multi-node environment) |
Enables use of cached data. You can enable this feature in a single-server environment to gain performance improvements from caching. Caches are not shared in a clustered environment. It is recommended that you disable this feature in a clustered or multi-node environment. |
|
Show the page menu |
Displays the domain-specific menu in the navigation panel on the wiki and blog server. |
|
Show page info |
Enables page information displayed in the footer of wiki pages. |
19.2.2.13 Configuring application_config_script
You can configure the application_config_script file to enable or disable various features on your Oracle WebCenter Wiki and Blog Server. The application_config_script file is located in the WEB-INF/classes directory of your deployed Oracle WebCenter Wiki and Blog Server.
Table 19-4 describes the entries that you can configure in application_config_script.
Table 19-4 application_config_script Configuration Settings
| Entry | Description |
|---|---|
|
|
Specifies the schedule for search indexing. Use the following format:
An asterisk in any of these parameters implies "all". For example, to run search indexing every day at 2:30 a.m., use the following entry: 0 30 2 * * ? |
|
|
Performs a full search indexing on server startup if Running this search ensures that the search index is properly synchronized with the wiki and blog server data when the server is running. |
|
|
Specifies the schedule for activity job publishing. Use the following format:
An asterisk in any of these parameters implies "all". For example, to run activity publish job every day at 2:30 a.m., use the following entry:
To disable the job, use the following value:
|
|
|
Specifies the fully qualified class name of the custom search analyzer to be used for tokenizing wiki content. For example, if you are using the Chinese Sandbox, then the entry should look like: custom_analyzer : org.apache.lucene.analysis.cn.ChineseAnalyzer |
Note:
Oracle WebCenter 11g Release 1 (11.1.1.2.0) does not provide the feature to publish the wiki activity data to Analytics. Therefore, in theapplication_config_script file, by default, the support_analytics entry is set to false.19.2.2.14 Generating the Passcode
Oracle WebCenter Wiki and Blog Server provides Web Services that enable interaction with WebCenter applications. All Web Services methods are protected to prevent unauthorized access. Every method contains a String key parameter to ensure authorized access. This key is generated as a function of a user's name and a preconfigured passcode. The passcode is an arbitrary string that you create in the credential store of the WebCenter domain in which Oracle WebCenter Wiki and Blog Server is deployed.
Note:
You may skip this section if you do not plan to use Oracle WebCenter Wiki and Blog Server Web Services.To create the passcode, you must create a password credential key named wsPasscode in the credential map named owc_wiki. In this key, you need to specify the user name as owc_wiki and the desired passcode. The passcode must be shared with trusted application developers wishing to use Web Services. For information about Oracle WebCenter Wiki and Blog Server Web Services, see the "Oracle Wiki Server Web Services Interface" section in the Oracle Fusion Middleware Developer's Guide for Oracle WebCenter.
Note:
In Oracle WebCenter Wiki and Blog Server 11g, Release 1 (11.1.1.1.0), the default value of passcode for Web Services configuration wasowCwIKi. The passcode was stored as cleartext in web.xml of the server. In Oracle WebCenter Wiki and Blog Server 11g, Release 1 (11.1.1.2.0), there is no default passcode and the passcode is stored in a credential store.You can create the password credential key by using the WLST command createCred or by using Oracle Enterprise Manager Fusion Middleware Control Console.
To generate the passcode by using the createCred WLST command:
createCred (map="mapname",key="keyname",user="username",password="password",desc="description")
For example:
createCred(map="owc_wiki",key="wsPasscode",user="owc_wiki",password="123456",desc="OWC Wiki Web Services passcode")
To create the passcode by using Fusion Middleware Control Console:
-
Start Fusion Middleware Control Console. For information, see Section 6.1, "Displaying Fusion Middleware Control Console."
-
Right-click the domain in which Oracle WebCenter Wiki and Blog Server is deployed. Next, select Security and then click Credentials.
-
On the Credentials page, click the Create Map button to create a credential map for your wiki and blog server.
-
In the Create Map dialog, in the Map Name field, enter
owc_wikias the credential map name. -
Click OK.
-
Select the newly created credential map,
owc_wiki. -
Click the Create Key button.
-
In the Create Key dialog, ensure that
owc_wikiis selected in the Select Map list, and Password is selected in the Type list. -
In the Key field, enter
wsPasscodeas the name of the key. -
In the User Name field, enter a user name.
-
In the Password field, enter the desired passcode.
-
Click OK.
-
Restart the server to which Oracle WebCenter Wiki and Blog Server is deployed.
19.2.2.15 Backing Up and Restoring Wiki Content
Oracle WebCenter Wiki and Blog Server uses a database repository. You can back up all your wiki content stored in the database by using SQL scripts or any database backup tool. You can also back up the wiki configuration file, application_config.script, which is located at the following path:
$APPLICATIONS_DIRECTORY/owc_wiki/WEB-INF/classes/application_config.script
19.2.3 Oracle WebCenter Wiki and Blog Server - Security Considerations
You can configure Oracle WebCenter Wiki and Blog Server to leverage single sign-on (SSO) using Oracle Access Manager (OAM), Oracle Single Sign-On (OSSO), or SAML-based single sign-on solution to secure Oracle WebCenter Wiki and Blog Server. For general information about configuring SSO, see Chapter 26, "Configuring WebCenter Applications and Components to Use SSO." For information specific to configuring the Wiki and Blog Server for OAM, see Section 26.1.7.3, "Configuring the Wiki Server."
You may also want to secure the browser connection to the Wiki and Blog Server using SSL to provide message encryption. For information about securing the browser connection to the Wiki and Blog Server, see Section 27.4, "Securing the Browser Connection to the Wiki Service with SSL."
When you integrate wikis and blogs into your WebCenter applications, users defined for your applications must match the users created on the Oracle WebCenter Wiki and Blog Server. Once a user is authenticated, if the user does not exist on Oracle WebCenter Wiki and Blog Server, the user is created and a default role is assigned to the user.
19.2.4 Oracle WebCenter Wiki and Blog Server - Limitations
Wiki pages on Oracle WebCenter Wiki and Blog Server do not support global preference settings and bi-directional languages.
19.3 Registering Oracle WebCenter Wiki and Blog Server
You can register multiple Oracle WebCenter Wiki and Blog Server connections with a WebCenter application, but only one of the connections is active at a time.
To start using a new (active) connection, you must restart the managed server on which the WebCenter application is deployed.
This section contains the following subsections:
-
Section 19.3.1, "Registering Oracle WebCenter Wiki and Blog Server Using Fusion Middleware Control"
-
Section 19.3.2, "Registering Oracle WebCenter Wiki and Blog Server Using WLST"
19.3.1 Registering Oracle WebCenter Wiki and Blog Server Using Fusion Middleware Control
To register a connection to Oracle WebCenter Wiki and Blog Server:
-
Log in to Fusion Middleware Control and navigate to the home page for WebCenter Spaces or the custom WebCenter application. For more information, see:
-
Do one of the following:
-
For WebCenter Spaces - From the WebCenter menu, choose Settings > Service Configuration.
-
For WebCenter applications - From the Application Deployment menu, choose WebCenter > Service Configuration.
-
-
From the list of services on the WebCenter Service Configuration page, select WikiServer.
-
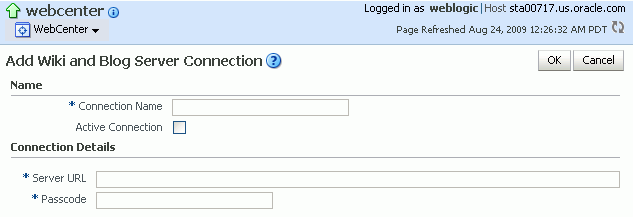
To register a connection to the wiki and blog server, click Add (Figure 19-24).
Figure 19-24 Registering a Wiki and Blog Server Connection
Description of "Figure 19-24 Registering a Wiki and Blog Server Connection"
-
On the Add Wiki and Blog Server Connection page, in the Name section, enter a unique name for the connection, and indicate whether the connection is the active (or default) connection for the application (Table 19-5).
Table 19-5 Wiki and Blog Connection - Name
Field Description Name
Enter a unique name for the connection. The name must be unique (across all connection types) within the WebCenter application.
Active Connection
Select the checkbox to use this connection in the WebCenter application for Wiki and Blog services.
While you can register multiple wiki and blog server connections, only one connection is used by the Wiki and Blog services— the default (or active) connection.
-
In the Connection Details section, enter connection details for your Oracle WebCenter Wiki and Blog Server. For details, see Table 19-6.
Table 19-6 Wiki and Blog Connection - Connection Details
Field Description Server URL
Enter the base URL of the server providing Wiki and Blog services. The server must be an Oracle WebCenter Wiki and Blog Server.
Use the format:
protocol://host:portFor example:
http://mywiki.com:8001Passcode
Enter the passcode that is required to call methods in Oracle WebCenter Wiki and Blog Server Web Services.
The passcode is an arbitrary string that the administrator sets up in Oracle WebCenter Wiki and Blog Server after installation to prevent unauthorized access. Contact the administrator to obtain the server's passcode.
-
Click OK to save this connection.
-
To start using the new (active) connection, you must restart the managed server to which the WebCenter application is deployed. For more information, see Section 8.2, "Starting and Stopping Managed Servers for WebCenter Application Deployments."
19.3.2 Registering Oracle WebCenter Wiki and Blog Server Using WLST
Use the createWikiserverConnection WLST command to create a wiki and blog server connection for a named WebCenter application. For command syntax and examples, see the section "createWikiserverConnection" in the Oracle Fusion Middleware WebLogic Scripting Tool Command Reference.
For information on how to run WLST commands, see Section 1.12.3.1, "Running Oracle WebLogic Scripting Tool (WLST) Commands."
Note:
To start using the new (active) connection, you must restart the managed server to which the WebCenter application is deployed. For more information, see the section, "Starting and Stopping WebLogic Managed Servers Using the Command Line" in the Oracle Fusion Middleware Administrator's Guide.19.4 Choosing the Active Wiki and Blog Server Connection
You can register multiple wiki and blog server connections with a WebCenter application but only one connection is active at a time.
For WebCenter Spaces and custom WebCenter applications, the active connection becomes the back-end wiki and blog server for:
-
Wiki and blog pages (created through page styles)
-
Wiki search adapter
-
Wiki Oracle SES crawl adapter
This section contains the following subsections:
19.4.1 Choosing the Active Wiki and Blog Server Connection Using Fusion Middleware Control
To change the active connection:
-
Log in to Fusion Middleware Control and navigate to the home page for WebCenter Spaces or the custom WebCenter application. For more information, see:
-
Do one of the following:
-
For WebCenter Spaces - From the WebCenter menu, choose Settings > Service Configuration.
-
For WebCenter applications - From the Application Deployment menu, choose WebCenter > Service Configuration.
-
-
From the list of services on the WebCenter Services Configuration page, choose WikiServer.
The Manage Wiki and Blog Server Connections table indicates the current active connection (if any).
-
Select the connection you want to make the active (or default) connection, and then click Edit.
-
Select the Active Connection checkbox.
-
Click OK to update the connection.
-
To start using the new (active) connection you must restart the managed server to which the WebCenter application is deployed. For more information, see Section 8.2, "Starting and Stopping Managed Servers for WebCenter Application Deployments."
19.4.2 Choosing the Active Wiki and Blog Server Connection Using WLST
Use the WLST command setWikiserverConnection with default=true to activate an existing wiki and blog server connection. Use the listDefaultWikiserverConnection command to find out the active or default connection used by the Wiki and Blog services. For command syntax and examples, see the sections, "setWikiserverConnection" and "listDefaultWikiserverConnection" in the Oracle Fusion Middleware WebLogic Scripting Tool Command Reference.
To start using the new (active) connection, you must restart the managed server to which the WebCenter application is deployed. For more information, see "Starting and Stopping WebLogic Managed Servers Using the Command Line" in the Oracle Fusion Middleware Administrator's Guide.
19.5 Modifying the Wiki and Blog Server Connection Details
You can modify the wiki and blog server connection details at any time.
To start using the modified (active) connection, you must restart the managed server to which the WebCenter application is deployed.
This section contains the following subsections:
-
Section 19.5.1, "Modifying Wiki and Blog Server Connection Details Using Fusion Middleware Control"
-
Section 19.5.2, "Modifying Wiki and Blog Server Connection Details Using WLST"
19.5.1 Modifying Wiki and Blog Server Connection Details Using Fusion Middleware Control
To update wiki and blog server connection details:
-
Log in to Fusion Middleware Control and navigate to the home page for WebCenter Spaces or the custom WebCenter application. For more information, see:
-
Do one of the following:
-
For WebCenter Spaces - From the WebCenter menu, choose Settings > Service Configuration.
-
For WebCenter applications - From the Application Deployment menu, choose WebCenter > Service Configuration.
-
-
From the list of services on the WebCenter Service Configuration page, choose WikiServer.
-
Select the connection name, and click Edit.
-
Edit the connection details, as required. For detailed parameter information, see Table 19-6.
-
Click OK to save your changes.
-
To start using the updated (active) connection, you must restart the managed server to which the WebCenter application is deployed. For information, see Section 8.2, "Starting and Stopping Managed Servers for WebCenter Application Deployments".
19.5.2 Modifying Wiki and Blog Server Connection Details Using WLST
Use the WLST command setWikiserverConnection to edit the wiki and blog server connection details. For command syntax and examples, see the section, "setWikiserverConnection" in the Oracle Fusion Middleware WebLogic Scripting Tool Command Reference.
For information on how to run WLST commands, see Section 1.12.3.1, "Running Oracle WebLogic Scripting Tool (WLST) Commands."
Note:
To start using the updated (active) connection, you must restart the managed server to which the WebCenter application is deployed. For more information, see the section, "Starting and Stopping WebLogic Managed Servers Using the Command Line" in the Oracle Fusion Middleware Administrator's Guide.19.6 Deleting Wiki and Blog Server Connections
You can delete wiki and blog server connections at any time, but be careful when deleting the active connection. If you delete the active connection, none of the wiki and blog server web services will work because they all require Oracle WebCenter Wiki and Blog Server at the back end.
This section contains the following subsections:
-
Section 19.6.1, "Deleting a Wiki and Blog Server Connection Using Fusion Middleware Control"
-
Section 19.6.2, "Deleting a Wiki and Blog Server Connection Using WLST"
19.6.1 Deleting a Wiki and Blog Server Connection Using Fusion Middleware Control
To delete a wiki and blog server connection:
-
Log in to Fusion Middleware Control and navigate to the home page for WebCenter Spaces or the custom WebCenter application. For more information, see:
-
Do one of the following:
-
For WebCenter Spaces - From the WebCenter menu, choose Settings > Service Configuration.
-
For WebCenter applications - From the Application Deployment menu, choose WebCenter > Service Configuration.
-
-
From the list of services on the WebCenter Services Configuration page, select WikiServer.
-
Select the connection name, and click Delete.
-
To effect this change, you must restart the managed server to which the WebCenter application is deployed. For more information, see Section 8.2, "Starting and Stopping Managed Servers for WebCenter Application Deployments."
Note:
Before restarting the managed server, mark another connection as active; otherwise the service will be disabled.
19.6.2 Deleting a Wiki and Blog Server Connection Using WLST
Use the WLST command deleteConnection to remove a connection. For command syntax and examples, see the section, "deleteConnection" in the Oracle Fusion Middleware WebLogic Scripting Tool Command Reference.
Ensure that another connection is marked active; otherwise, the service will be disabled.
For information about how to run WLST commands, see Section 1.12.3.1, "Running Oracle WebLogic Scripting Tool (WLST) Commands."
Note:
To effect this change, you must restart the managed server to which the WebCenter application is deployed. For more information, see the section, "Starting and Stopping WebLogic Managed Servers Using the Command Line" in the Oracle Fusion Middleware Administrator's Guide.19.7 Testing Wiki and Blog Server Connections
Try accessing your Oracle WebCenter Wiki and Blog Server with the following URL format:
http://host:port/owc_wiki
This should show the home page of the default wiki domain.
19.8 Monitoring Oracle WebCenter Wiki and Blog Server
You can monitor Oracle WebCenter Wiki and Blog Server by viewing the log file, owc_wiki.log. This file is located in the following directory:
$APPLICATIONS_DIRECTORY/owc_wiki
Where:
-
$APPLICATIONS_DIRECTORYis the directory where you installed Oracle WebCenter Wiki and Blog Server. That is,APPLICATIONS_DIRECTORY=MW_HOME/user_projects/applications/WEBCENTER_DOMAIN_NAME. -
owc_wikiis the directory where your Oracle WebCenter Wiki and Blog Server is deployed.
To change the log level, modify the jlo_logging.xml file located at the following path:
$APPLICATIONS_DIRECTORY/owc_wiki/WEB-INF/classes
You can change the targets of the loggers in this file. The following targets are supported: trace, info, debug, warn, error, and fatal. You can also use two special targets: off (to switch off all the targets) or all (to switch on all the targets). For more information about the jLo logger, see:
http://jlo.jzonic.org/GettingStarted.html
Note:
You can change the location of the log file by using the jLo handlers. For more information, see:19.9 Troubleshooting Issues with Wiki and Blogs
This section describes a possible issue that you may face after configuring OAM-SSO on Oracle WebCenter Wiki and Blog Server.
After configuring OAM-SSO on Oracle WebCenter Wiki and Blog Server, when you log out, the server does not redirect to the login page properly.
Ensure that the logout_url property is set accurately in the application_config.script file, which is located in the Web-INF/classes directory of your deployed Oracle WebCenter Wiki and Blog Server.
The link can be customized to any URL based on the single sign-on scheme used. Leaving logout_url blank renders the user session invalid and redirects to the login screen.

