In addition to providing links to other documents containing information about securing applications on WebLogic Servers, this chapter describes how to secure administrative access to WebLogic servers, how to run WebLogic server as a service, how to set up the WLS SSM to secure a WebLogic Server cluster.
All SSMs can be configured by manually defining the SSM’s configuration and the policies to enforce when securing an application. Detailed instructions are provided in a number of documents, particularly the Policy Manager’s Guide, Getting Started Tutorials, and the help systems for the Administration Console and Entitlements Administration Application.
Securing Administrative Access to WebLogic Server
This chapter describes how to integrate OES with WebLogic Server and define a policy to secure administrative access to the server and the WebLogic console.
Define the administrative policy as described in Policies.
Distribute the configuration and policy to the SSM.
WebLogic 8.1 Security Providers
This section provides information about the recommended security providers for securing administrative access to WebLogic 8.1. For step-by-step instructions using the Administration Console administration console, see the console’s help system.
Table 3-1 Portal Security Configuration
Security Provider
Configuration Settings
ASI Adjudication Provider
Clear the Require Unanimous Permit checkbox.
Log4j Auditor
Use the default settings
Database Authentication
Set the Control Flag to SUFFICIENT. On the Details tab, set Identity scope to myusers. For other settings, use the defaults.
WebLogic Authentication
Define this provider only after defining the Database Authenticator. Set the Control Flag to SUFFICIENT.
Note:
The WebLogic Authentication provider can be replaced with another authentication provider that supports write access to users and groups.
ASI Authorization
On the General tab, accept the default settings. On the Details tab, set the Identity Scope to myusers and the Application Deployment Parent to //app/policy/myrealm. On the Bindings tab, bind to //app/policy/myrealm.
WebLogic Authorization Provider
Clear the Policy Deployment Enabled checkbox.
WebLogic Credential Mapper
Clear the Credential Mapping Deployment Enabled checkbox.
ASI Role Mapping Provider
On the General tab, accept the default settings. On the Details tab, set the Identity Scope to myusers.
WebLogic Role Mapper Provider
Clear the Role Deployment Enabled checkbox.
WebLogic 9.x/10.0 Security Providers
Defining the security providers for securing administrative access to WebLogic Server 9.2/10.0 involves tasks in both the WebLogic and the OES consoles.
The security providers plugin is required to manage OES security providers from within the WebLogic administration console. For instructions, see the next section.
Security Providers Extension
To install the plugin:
Make a copy of ales_security_provider_ext.jar located in the following directory:
BEA_HOME/ales32-ssm/wls-ssm/lib
Move the file to BEA_HOME/WLS_HOME/domains/<domain_name>/console-ext, where <domain_name> is the domain name.
Using the WebLogic Console
This section describes how to define the security providers for using the WebLogic console. At a minimum an ASI Authorizer, ASI Role Mapper, and Log4J Auditor provider is needed.
Notes:
When using multiple ASI Authorizers, also define an ASI Adjudicator.
For WebLogic Portal, the security realm must also include XACML Authorizer and XACML Role Mapper providers.
To define OES security providers using the WebLogic Server 9.x/10.x administration console:
Make a backup copy of the config.xml file in the domain directory.
Start the WebLogic Server instance and log into the administration console.
The default URL for the console is http://localhost:7001/console.
In the Change Center, click Lock & Edit in the upper left part of the page.
In the left pane under Domain Structure, select Security Realms.
On the Summary of Security Realms page, click New and create a security realm using the same name as the configuration ID used by the WLS SSM instance. For the purposes of this procedure, the security realm name is mywls9ssm.
On the Summary of Security Realms page, select the mywls9ssm security realm.
On the Configuration: General page, set Security Model Default to Advanced and clear the Combined Role Mapping Enabled checkbox. Then click Save.
If Check Role and Policies is not visible, click Advanced and set Set Check Role and Policies to All Web applications and EJBs. Then click Save.
Select the Providers tab and define the following providers:
Provider Type
Settings
ASI Database Authenticator
Provide a name and set the type as Database Authenticator.
On the Configuration: Common page, set Control Flag to REQUIRED.
On the Configuration: Provider Specific page, set the database login, password, JDBC driver class name and JDBC Connection URL.
ASI Authorization
Provide a name and set the type as ASIAuthorizationProvider.
On the Configuration: Provider Specific page, set Identity Directory and Application Deployment Parent.
ASI Role Mapper
Provide a name and set the type as ASIRoleMapperProvider.
On the Configuration: Provider Specific page, set the Identity Directory and Application Deployment Parent.
Log4j Auditing\
Provide a name and set the type as Log4jAuditor.
This provider is required in order to support logging for OES providers.
ASI Adjudicator (If using multiple ASI Authorizers)
Provide a name and set the type as ASIAdjudicator.
On the Configuration: Provider Specific page, clear Require Unanimous Permit.
Note:
Because WLS and ASI adjudicators may return different results, the ASI Adjudicator is recommended in order to obtain appropriate adjudication results. For example, if unanimous permit is false and multiple authorization providers return abstain, the ASI Adjudicator returns false (denying access), while the WLS Adjudicator returns true (allowing access).
Credential Mapping
Provide a name and set the type as DefaultCredentialMapper.
Certification Path
Set the type as WebLogicCertPathProvider and use it to replace the existing builder.
XACML Authorizer
When securing WebLogic Portal, define a XACML Authorizer and make sure it is the first authorization provider in the list.
XACML Role Mapper (For WebLogic Portal)
When securing WebLogic Portal, define a XACML Role Mapper and make sure it is the first role mapping provider in the list.
Return to the console’s left pane and select the domain.
On the Settings page, expand Security > General and select mywls9ssm as the default security realm and click Save.
Click Activate Changes.
Using the OES Administration Console
After defining the providers in the WebLogic console, perform the following steps in the OES console:
Log into the Administration Console. The default URL for the console is https://<host_name>:7010/asi.
Create an Identity directory using the same name specified in the WebLogic console.
Create an SSM configuration using the same name as the WebLogic Server security realm and define the following providers in this configuration.
Provider Type
Settings
ASI Authorizer
Set the Identity Directory to the directory created in step 1.
Set the Application Deployment Parent to //app/policy/wlsserver
ASI Role Mapper
Set the Identity Directory to the directory created in step 1.
Set the Application Deployment Parent to //app/policy/wlsserver
WebLogic Administrative User
The WebLogic administrative user must be defined in OES in order to start the WebLogic Server instance. To create this user:
Launch the Administration Console.
In the left pane, select the Identity node and click New at the bottom of the right pane.
On the Create Directory dialog, enter alesusers as the name and click OK.
Under this directory, create a user with the same name and password as the WebLogic administrative user. For example, if you are using the WebLogic defaults, you would use weblogic for both the username and password.
Note:
The same username and password must be specified in the WebLogic domain’s boot.properties file.
WebLogic Server Resources
WebLogic Server components must be defined in OES as resources. To create these resources using the Administration Console:
In the left pane, select the Resources node and click New at the bottom of the right pane.
In the Name box, type wlsserver, select binding from the Type dropdown list and click OK.
Note:
This resource will serve as the parent resource for WebLogic Server components.
Select wlsserver and click Configure. Then select the Distribution Point checkbox and click OK.
Select wlsserver and click New. Then enter shared in the Name box and then click OK.
Select shared and click Configure. Then select the Allow Virtual Resources checkbox and click OK.
Select shared, and click New. Then enter svr in the Name box and click OK.
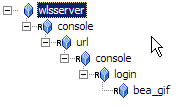
Select wlsserver and create the following resource tree under it. These resources are necessary for logging into the WebLogic console.
Return to the left pane, expand the SSM configuration containing the defined security providers and select the ASIAuthorizer. Then open the Bindings tab in the right pane.
Select //app/policy/wlsserver from the dropdown list and click Bind.
Policies
A number of Authorization and Role Mapping policies must be defined to give the administrative user the necessary rights to start and manage the WebLogic Server instance. After defining these policies, distribute them to the WLS 8.1 SSM.
Authorization Policies
This policy grants the Admin role access to the svr resource:
grant(any, //app/policy/wlsserver/shared/svr, //role/Admin) if true;
To create this policy:
Expand the Policy node in the left pane and click Authorization Policies.
On the Authorization Policies page, click New.
On the Create Authorization Policy dialog, select the Privileges tab. Then select the any privilege and click Add.
On the Resources tab, expand the wlsserver and shared nodes in the Child Resources list box, select svr, and then click Add.
On the Policy Subjects tab, select Admin from the Roles List list box and click Add.
To define access to the WebLogic console:, repeat these steps to create the following policies:
grant(any, //app/policy/wlsserver/console, //role/Admin) if true;
grant( //priv/GET, //app/policy/wlsserver/console/url/console/login/bea_logo.gif, //sgrp/alesusers/allusers/) if true;
Role Mapping Policies
This policy assigns the weblogic user to the Admin role.
grant(//role/Admin, //app/policy/wlsserver, //user/alesusers/weblogic/)
   if true;
Note:
When creating this policy, replace weblogic with the actual user name.
To create this policy:
Expand the Policy node in the left pane and click Role Mapping Policies.
On the Role Mapping Policies page, click New.
On the Create Role Mapping Policy dialog, select the Roles tab. Then select Admin from the Available Roles list and click Add.
On the Resources tab, select wlsserver in the Child Resources list and click Add.
On the Policy Subjects tab, select Users from the Select Policy Subjects From dropdown field and change the directory to alesusers. Then select weblogic from the list and click Add.
Distribute the Policies
To distribute information to the SSM:
To make sure the providers are bound to the Web Server resources, expand the SSM configuration in the left pane and select the ASIAuthorizationProvider. Then open the Bindings tab, select //app/policy/wlsserver from the dropdown field and click Bind.
Select Deployment in the left pane. Then use the Policy and Configuration tabs to distribute the policy and configuration information to the SSM.
Running WebLogic Server as a Service
The domain directory for a WebLogic Server normally contains a boot startWebLogic.cmd file that runs as part of a command or shell prompt. In order to make the server run as a service or daemon process, perform the following steps:
Using an editor, modify <WLS_SSM_INSTANCE_HOME>/config/WLESWebLogic.conf as described in Table 3-2.
The parameters to modify have comments that start and end with ***.
Table 3-2 Updates to WLESWebLogic.conf
Parameter
Description
wrapper.working.dir
Specify the WebLogic working directory, for example BEA_HOME/weblogic92.
weblogic.RootDirectory
Specify the WebLogic working directory, for example BEA_HOME/weblogic92.
wles.user.alias
The boot user specified when the domain was created.
Note: Make sure to use the asipassword.bat|sh tool to add the password for this alias to the password.xml file.
weblogic.Name
The WebLogic server that is part of the domain.
Depending on the operating system, edit <WLS_SSM_INSTANCE_HOME>/bin/WLESWebLogic.bat|sh as described in Table 3-3.
Table 3-3 Modifying WLESWebLogic.bat | sh
Operating System
Windows
In WLESWebLogic.bat, uncomment the @rem goto beenedited line, for example:
goto beenedited
UNIX
In WLESWebLogic.sh, comment out the exit 1 line, for example:
# exit 1
Open a command prompt or unix shell and go to the <WLS_SSM_INSTANCE_HOME>/bin directory.
Run WLESWebLogic.bat|sh register.
After this, the server can be started or stopped by executing WLESWebLogic.bat|sh start or WLESWebLogic.bat|sh stop.
Setting Up WLS SSM on a WebLogic Cluster
This document provides the high-level steps for setting up OES to protect a cluster of WebLogic Server 9.x/10.x domain instances.
This document assumes the following deployment of OES components:
The Administration Server is running on a separate machine.
Two WLS SSM instances running on WebLogic cluster server 1. One WLS SSM instance is used to secure the cluster’s administrative server; the other to secure application resources on managed server 1.
One WLS SSM instance running on WebLogic cluster server 2 to secure application resources on managed server 2.
Steps
Install Administration Server and verify the installation by logging in to the Administration Console.
Create a domain called cluster_admin on cluster server 1. Verify correct setup by starting the server and logging in to the WebLogic administration console. Then stop the server.
Install the WLS SSM on both cluster server 1 and cluster server 2 in the same BEA_HOME as the WebLogic server. When prompted for the SCM instance, use the same name on both machines (for example, cluster_scm).
Make a copy of BEA_HOME/ales32-ssm/wls-ssm/adm\myssm_config.properties and name it something like cluster_admin_config.properties.
Edit cluster_admin_config.properties so that it points to the WebLogic domain directory on cluster server 1. Then edit other properties as needed.
Note:
For the Config ID, use a name similar to cluster_ssm.
Run ConfigTool -check cluster_admin_config.properties to verify that all settings are correct. When there are no errors, run ConfigTool -process cluster_admin_config.properties.
This enables OES on the WebLogic domain.
Start the WebLogic server using startWebLogic.cmd located in the domain’s /bin directory.
Log in to the WebLogic console and create the cluster (ales_cluster) and managed servers (managed server 1 is also located on cluster server 1; managed server 2 is located on cluster server 2).
Run the WLS SSM instance wizard and create the SSM instance with the same Config ID used in step 6.
Make a copy of managed server 1’s startWebLogic.cmd named startWeblogicM1.cmd. Update the file so that the file references set-wls-env.cmd in the WLS SSM instance’s /bin directory.
Make a copy of startManagedServer.cmd named startM1Server.cmd so that it references startWebLogicM1.cmd and its arguments when calling that file are M1 http://<cluster_server1_IP>:<port>.
This allows you to start the managed server by running startM1Server.cmd.
On cluster server 2:
Run the WLS SSM instance wizard and create the WLS SSM instance using the same Config ID used in step 6 above (for example, cluster_ssm).
Make a copy of startWebLogic.cmd named startWeblogicM2.cmd. Update the file so that it references set-wls-env.cmd in the SSM instance’s /bin directory.
Note: Also update the CLASSPATH and JAVA_OPTIONS to be similar to those in startWebLogicM1.cmd.
Make a copy of startManagedServer.cmd named startM2Server.cmd so that it references startWebLogicM2.cmd and its arguments when calling that file are M1 http://<cluster_server1_IP>:<port>.
This allows you to start the managed server by running startM1Server.cmd.
Start the managed servers on both servers. They should be able to locate the cluster_admin instance, obtain the realm information, and boot up correctly.
Note:
The realm name will be the same Config ID name used in step 6 above (for example, cluster_ssm).