|
|
This section describes how to secure applications developed using Workshop for WebLogic and discusses how to use the Annotations Plugin and the Tag Library.
The Annotations Plugin can be used to annotate EJB objects in Workshop with security related metadata. The metadata can then help you to:
This section provides instructions for creating an EJB with OES annotations and then securing it with policy. The integration tasks provided here are based on those instructions.
The Annotations plugin is provided in two JAR files for use with Workshop 9.2 or 10.0:
com.bea.wlw.ales.annotations_9.2.0.jar
com.bea.wlw.ales.annotations_10.0.0.jarThis section contains the following topics:
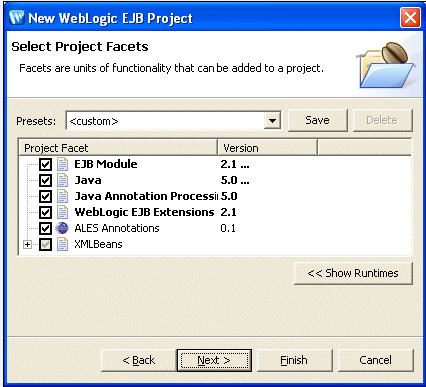
The first step in this example is to use Workshop to create a WebLogic Session Bean:
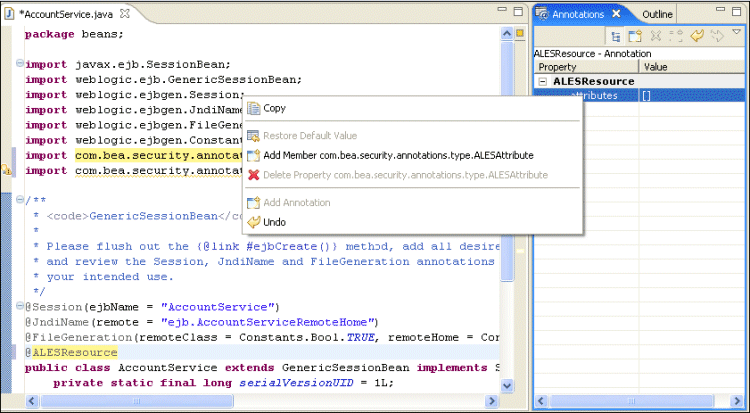
To add security annotations to the AccountService class:
AccountService.java, import the following two classes:
import com.bea.security.annotations.type.ALESResource;
import com.bea.security.annotations.type.ALESAttribute;
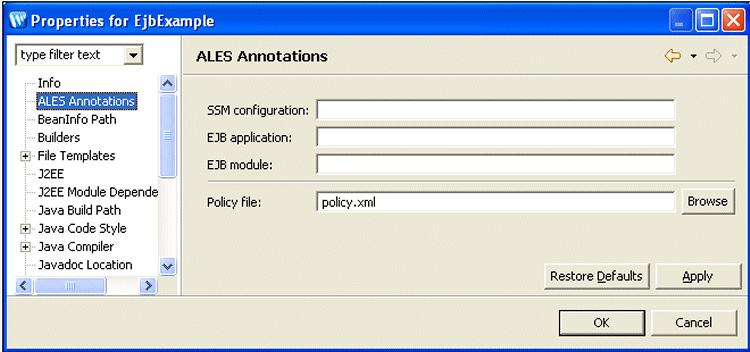
AccountService as an OES resource:beantype = account.ejbCreate() method to define it as an OES resource with the ALESAttribute operation = create. @ALESResource(attributes={@ALESAttribute(name = "operation", value = "create")})To define OES-specific properties for the project:
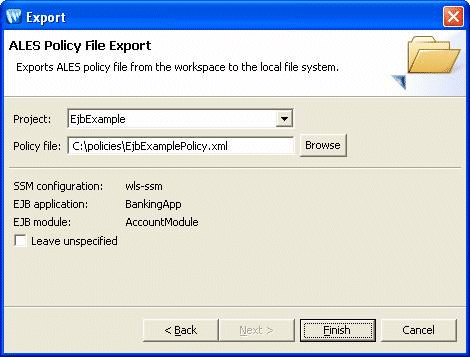
After annotating the project in the example, the security policy file can be exported from Workshop and then imported into OES:
EjbExamplePolicy.xml). If the Leave unspecified checkbox is checked, the policy file will includes tokens for SSM configuration, EJB application, and EJB module instead of the values you specified for them. Later, the EJB application deployer can replace these tokens. This functionality is useful when the developer does not know all the deployment parameters of the target machine, or the EJB application is going to be deployed on multiple machines with different configurations.
This section describes how to use the policyIX utility to load the Annotations policy file created in Export the Policy File from Workshop into OES.
install_ales_schema script.ales32-admin/config/annotation_config.properties, replace the tokens with the corresponding values:
ap.ssm.id—SSM configurationap.ejb.app—EJB applicationap.ejb.mod—EJB moduleexported.res.file—pathname of the policy file
After replacing the tokens, run BEA_HOME/ales32-admin/bin/annotation_transform to create the policy file using the actual values. The file will have the same name as the exported.res.file parameter with the extension .import appended.
<BEA_HOME>/ales32-admin/bin> policyIX -import config.xml EjbExamplePolicy.xml
For more information, see policyIX in the Administration Reference.
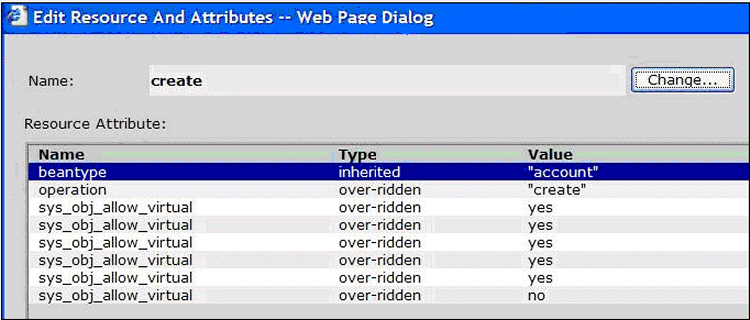
After importing the policy, use the Administration Console to view the resources and resource attributes. Under wls-ssm/BankingApp/ejb/AccountModule, you can see:
After importing the policy file, you may create policies that define access rules for the resources defined with OES annotations. For example, the following rule grants the execute privilege to the AccountManagerRole for all the resources under BankingApp if beantype=”account”:
grant( //priv/execute, //app/policy/wls-ssm/BankingApp, //role/AccountManagerRole) if beantype="account"
Since all methods inherit attributes of the bean class, the resource AccountService and all its methods satisfy the constraint, defining this rule enables the AccountManagerRole to execute all AccountService methods.
The following rule allows a user with the Customer role to execute any method in the banking application, but only if the method is annotated with the attribute accessLevel="customer". The rule also allows the user to create an instance of the EJB by calling create method of the corresponding EJB's home interface:
grant( //priv/execute, //app/policy/wls-ssm/BankingApp, //role/Customer) if accessLevel="customer" or operation="create"
The OES Tag Library for Workshop can be used to add security functionality to Java Server Pages (JSPs).
Tag libraries provide a way to abstract functionality used by a JSP page, which allows for less-complex JSP pages. A tag library packages functions into a tag handler class. A JSP does not have to directly invoke this tag handler. Instead, you place simple tags in your JSP pages. When the container executes a JSP at runtime and comes across a tag, the tag handler is invoked and provides the desired functionality.
The requirements for using the Tag Library are:
The following tags are available in the Tag Library for Workshop. See Tag Library Reference for additional information and attributes.
<setSecurityContext value=”/mybank/loanApplicationForm”/>. Later on the page, when a resource is specified for an isAccessAllowed call, it will be prepended with /mybank/loanApplicationForm.
Any attributes set within the tag are passed to every OES API call. For example if you set foo=1 in the security context and then use the isAccessAllowed tag, foo=1 would be available during policy evaluation as an application context variable.
This section provides instructions for adding OES tags to a JSP page. The integration tasks provided here are based on those instructions.
A file named alestags.jar contains the tag library and supporting classes. This file is packaged in one of the following WebLogic version-specific files located in the BEA_HOME\ales32-admin\lib\eclipsePlugins directory:
Follow these steps to integrate the tag library JAR file:
com.bea.wlw.ales.tags_9.2.0.jar or com.bea.wlw.ales.tags_10.0.0.jar from BEA_HOME\ales32-admin\lib\eclipsePlugins to the following directory:BEA_HOME\<workshop_version>\workshop4WP\eclipse\plugins
<workshop_version>—the Workshop directory for versions 9.x or 10.0
At the conclusion of these steps, alestags.jar should be located in the web-inf/lib directory and the JSP Design Palette should display the OES Tags.
The OES tags can wrap the JSP components and they will be rendered if allowed. There is also an else tag for the case where a component is denied.
Listing 4-1 shows an example of using OES tags in a JSP page.
<%@ taglib prefix="ales" uri="http://www.bea.com/ales/tags"%>
<%@ taglib  prefix="c" uri="http://java.sun.com/jsp/jstl/core"%>
<%@ page language="java" contentType="text/html; charset=ISO-8859-1"
pageEncoding="ISO-8859-1"%>
<!DOCTYPE html PUBLIC "-//W3C//DTD HTML 4.01 Transitional//EN" "http://www.w3.org/TR/html4/loose.dtd">
<html>
<head>
<meta http-equiv="Content-Type" content="text/html; charset=ISO-8859-1">
<title>IsAccessAllowedSample</title>
</head>
<ales:setSecurityContext value="/testtagapp">
<ales:attribute name="foo" value="1"/>
</ales:setSecurityContext>

<body>
<ales:isAccessAllowed resource="/isAllowed" action="view">
<ales:then>You are allowed to see the secret text</ales:then>
<ales:else>DenyReason: <c:out value='${responses["denyreason"]}'/> </ales:else>
</ales:isAccessAllowed>
</body>
</html>
In Listing 4-1 the <@taglib prefix=”ales” uri=http://www.bea.com/ales/tags%> line signifies that all tags prefixed with ales: will call the OES tag library.
The ales:isAccessAllowed tag takes a resource and an action.
Resources on the JSP page are relative to the WLS SSM’s binding node. In addition, one of the parameters you pass in to the (optional) setSecurityContext tag is a resource URI. This URI is relative and pre-pended to the SSM binding node at runtime. In the example, the resource URI is testtagapp.
Therefore, after adding the binding node and resource URI, the fully qualified resource name at runtime is //app/policy/<binding_node>/testtagapp/isAllowed.
Use the Entitlements Administration Application to create policies for the resources on the JSP page.
Based on the example, we would create a resource //app/policy/<binding_node>/testtagapp/isAllowed where <binding_node> would be the SSM’s binding node from Step 1. We could then write policies based on that resource to determine what users are allowed to see the secret text.
The parameter passed in to the (optional) setSecurityContext tag is a resource URI, which is a value to be used as a prefix for all other resources on the page. For example: <setSecurityContext value=”/mybank/loanApplicationForm”/>.
This URI is relative and prepended with the SSM binding node at runtime. This resource URI uniquely identifies the resources.
Any attributes set within setSecurityContext are passed to every API call. For example, if you set foo=1 in the security context and then use the isAccessAllowed tag, foo=1 would be available to policies as an application context variable.
Use the resources and actions specified in the tags when creating the policy definitions. Be aware that the fully qualified name of the resource is:
//app/policy/<binding node>/<SecurityContext-Value>/resource
There is nothing unique about policies that protect a resource referenced in a JSP file by a tag library (beyond the general requirement that the resource names and actions you specify in tags must correlate with the policy). However, by using result and response attributes such as isAccessAllowed.resultVar, the policy can be used to return and then test those response attributes.
As described in
Using Response Attributes, response attributes are typically specified using built-in evaluation functions that report name/value pairs. There are two functions for returning attributes: report() and report_as(). These functions always return TRUE (if there are no errors), and the information is passed to the application as response attributes.
The JSP Standard Tag Library (JSTL) provides a set of core functionality common to most web applications, including generic iterators and Boolean checks. As such, the tag library does not implement its own set of iterators. The data returned by the tags to the JSP can be processed using the JSTL.
Therefore, a JSP file can contain a JSTL tag used in the following way:
<ales:isAccessAllowed resource=”/creditScore” action=”view” resultVar=”canViewCreditScore”>
:
:
<c:if test=”${canViewCreditScore == true}”>
  Show customer credit score
</c:if>
When the WebLogic Server container on the local system executes a JSP at runtime and encounters an OES tag, the tag handler is invoked and interacts with the WLS 9.x SSM to determine if access is allowed to the resource, get the user roles, and so forth.
You do not need to supply an authenticated subject to the OES tags for Workshop. This is because WebLogic Server determines and authenticates the subject and then makes the authenticated subject available for authorization decisions. No special action in the JSP page is required.
JSP pages contain OES tags can be tested even if the SSM is not deployed. OES tags will allow both ‘allow’ and ‘deny’ cases to display on the page and data retrieval methods return empty results.
This section describes reference and usage information for the tag library.
The isAccessAllowed tag calls the OES runtime to determine if the user is allowed to perform the requested action on the requested resource. If true is returned, it allows the container to continue processing the body of the tag.
For convenience, the result of calling isAccessAllowed can be placed within the resultVar for later use.
isAccessAllowed looks for the ARME configuration file in the system properties. If not found, all elements in the body tag are displayed.
Listing 4-2 shows the concepts of using isAccessAllowed in a JSP.
<%-- set up the global context for this jsp page --%>
<ales:setSecurityContext value=”/mybank/loanApplicationForm”>
 	<attribute name=”loanAppId” value=”<%= request.getParameter(\”appId\”)%>”/>
</ales:setSecurityContext>

<ales:isAccessAllowed resource=”/creditScore” action=”view” resultVar=”canViewCreditScore”>
	<attribute name=”customerId” value=”<%=request.getParameter(\”customerId\”)%>

<ales:then>
       <bankapp:displayCreditScore>
</ales:then>
<ales:else>
 	<B>You are not authorized to view the customer’s credit score</B>
</ales:else>
</ales:isAccessAllowed>
Alternatively, after the isAccessAllowed tag with the resultVar canViewCreditScore attribute, you could use a JSTL tag in the following way:
<c:if test=”${canViewCreditScore == true}”>
  Show customer credit score
</c:if>
The isAccessNotAllowed tag calls the OES runtime to determine if the user is allowed to perform the requested action on the requested resource. If true is returned, it allows the container to continue processing the body of the tag.
For convenience, the result of calling isAccessAllowed can be placed within the resultVar for later use.
isAccessNotAllowed looks for the authorization and role mapping engine (ARME) configuration file in the system properties. If not found, all elements in the body tag are displayed.
Listing 4-3 shows the concepts of using isAccessNotAllowed in a JSP.
<%-- set up the global context for this jsp page --%>
<ales:setSecurityContext value=”/mybank/loanApplicationForm”>
 	<attribute name=”loanAppId” value=”<%= request.getParameter(\”appId\”)%>”/>
</ales:setSecurityContext>

<ales:isAccessNotAllowed resource=”/creditScore” action=”view” resultVar=”canNotViewCreditScore”>
<ales:then>
<B>You are not authorized to view the customer’s credit score</B>
</ales:then>
<ales:else>
 	<attribute name=”customerId” value=”<%= request.getParameter(\”customerId\”)%>

 	<bankapp:displayCreditScore>
</ales:else>
</ales:isAccessNotAllowed>
Alternatively, after the isAccessNotAllowed tag using the resultVar canNotViewCreditScore attribute, you could use a JSTL tag in the following way:
<c:if test=”${canNotViewCreditScore == false}”>
  Show customer credit score
</c:if>
The isAccessAllowedQueryResources tag calls the OES runtime using the query resource extra attribute. This tag does not have a body associated with it. Instead, it returns a set of data that can be consumed by the JSP.
The grantedVar attribute sets a variable containing the granted response set from the ARME. The deniedVar attribute sets a variable containing the denied response set from the ARME.
If the ARME configuration file is not found, this tag does not set any data for the JSP to consume.
Listing 4-4 shows the concepts of using isAccessAllowedQueryResources in a JSP.
<%-- Get a list of currencies that a trader can exchange to put inside a dropdown list --%>
<ales:isAccessAllowedQueryResources resource=” /mybank/currencyTrader/availableCurrencies” grantedVar=”grantedCurrencies”>
	<attribute name=”currencyToTradeFrom” value=”USD”/>
</ales:isAccessAllowedQueryResources>
<%--This fake sample tag takes in a collection of strings and lists them in a drop down--%>
<myuitag:dropdownlist values=”${%grantedCurrencies%}”/>
The getUserRoles tag queries the OES system for the set of roles that a user currently has in the system for the requested action and requested resource. It will return the collection of role names as a variable defined by the resultVar attribute.
Listing 4-5 shows the concepts of using getUserRoles in a JSP.
<%-- Get the list of roles the user has for a particular resource --%>
<ales:getUserRoles resource=”/mybank/loanApprovalForm” resultVar=”userRoles”>
 	<attribute name=”customerId” value=”${currentCustomerId}”/>
</ales:getUserRoles>
<%--iterate over each role and print it out--%>
<c:forEach var=”userRole” items=”${userRoles}”>
	<c:out value=”${userRole}”/>
</c:forEach>
The isUserInRole tag is a conditional and cooperative tag. If the user is in the role specified, the body of the tag will be processed. If the user has the role passed into the tag Attribute, the body of the tag will be processed. In addition. the resultVar can be used for later processing.
Listing 4-6 shows the concepts of using getUserRoles in a JSP.
<%-- Check if the user is in the appropriate role before showing the buttons on the page --%>
<isUserInRole role=”Administrator” Resource=”/myBankingApp/loanApproval/submit”>
	<fake:submitButton …/>
</isUserInRole>
The setSecurityContext tag is used to set the base resource for all elements on a JSP page. If you use setSecurityContext, the value of this tag will be prepended to all other resource attributes on the page. In addition, variables that should be set globally for the application context can be set in the body of this tag.
Any attributes set within the tag are passed to every OES API call. For example if you set foo=1 in the security context and then use the isAccessAllowed tag, foo=1 would be available to policies as an application context variable.
Listing 4-7 shows the concepts of using setSecurityContext in a JSP.
<%-- Set the security context for this page --%>
<ales:setSecurityContext value=”/mybank/loanApplicationForm”/>
 	<ales:attribute name=”customer_name”
 		value=”<%=request.getParameter(\”customerId\”)%=>”
</ales:setSecurityContext>
The recordEvent tag is an input tag that causes an audit message to be written to the audit log of OES. The body of this tag can also take an attribute tag, as described in Attribute. All attributes are added to the audit context as additional information for the audit event.
Listing 4-8 shows the concepts of using recordEvent in a JSP.
<c:if test=${trade_submitted == true}>
 	<%--record that the trade has been successfully committed to the system—%>
	<ales:recordEvent message=”Trade successfully submitted to the system”>
 		<%--include the person who submitted this trade in the audit log--%>
		<attribute name=”traderId” value=”<%traderId%>”/>
 		<%--Include the trading confirmation number in the audit log--%>
		<attribute name=”trade_confirmation” value=”<%trade_confirmation%>
	</ales:recordEvent>
</c:if>
The attribute tag can be used by any of the other OES tags to pass extra attributes down in the application context. Any of these variables can then be used to write constraints against in OES policies.
Listing 4-9 shows the concepts of using attribute in a JSP.
<%-- set up the global context for this jsp page --%>
<ales:setSecurityContext value=”/mybank/loanApplicationForm”>
	<%--An attribute to pass to the application context for all calls on this page--%>
 	<attribute name=”loanAppId” value=”<%= request.getParameter(\”appId\”)%>”/>
</ales:setSecurityContext>
<ales:isAccessAllowed resource=”/creditScore” action=”view” resultVar=”canViewCreditScore”>
	<attribute name=”customerId” value=”<%=request.getParameter(\”customerId\”)%>
	<bankapp:displayCreditScore>
<else>
 	<B>You are not authorized to view the customer’s credit score</B>
</ales:isAccessAllowed>


|