 Understanding PeopleSoft EPM Foundation Setups
This chapter provides overviews of PeopleSoft EPM Foundation setups and multiple currency management, and discusses how to:
Review installed products.
View charts and print results.
Specify your EPM sources.
Set up country and state information.
Set up time zones.
Define account calendars.
Set up the Gregorian calendar for the Performance Management Warehouse.
Define operator defaults.
Define units of measure.
Set up ledger-based nVision reporting for EPM.
Set up EPM currency tables.
Set up market rates for EPM currency conversion.
Define currency quotations for EPM currency conversion.
Establish market rates for EPM currency conversion.
Calculate currency rates for EPM currency conversion.
Configure currency precision for EPM currency conversion.
Note. Please be aware that the order in which the setup tasks are presented in this chapter do not indicate the actual order in which they should be performed during implementation. It is highly recommended that you use Setup Manager to determine the implementation tasks that are required for your organization and the related implementation sequence.
Understanding PeopleSoft EPM Foundation Setups
After installing your EPM product, you must set up the infrastructure, key business rules, and processing variables for the product. These rules provide the foundation on which EPM operates and can include country and state, unit of measure, language, and currency information. Because these rules act as a foundation and span the entire EPM product suite, you must perform these setup tasks prior to beginning other EPM implementation tasks documented in this guide.
The business rules and processing variables that you define for EPM are stored in EPM database tables. You define these rules and populate the EPM tables using the PeopleSoft Pure Internet Architecture pages in the EPM Setup menu. These pages are built over EPM tables that are shared among many PeopleSoft applications.
Understanding EPM Multiple Currency Management
This section discusses:
Multiple currency management.
Currency and calculation types.
Revaluation.
Currency precision.
Currency as a ChartField.
Currency Conversion application engine (PF_MULT_CURR) for Analytical Applications.
 Multiple Currency Management
PeopleSoft enables you to manage financial information in multiple currencies. PeopleSoft provides specific input, processing, and reporting features that support the European Common Currency (euro), currency conversions, remeasurement, revaluation, translation, and a complete audit trail of all multicurrency processing.
You can define and maintain tables that describe currency codes, exchange rates, market rates, and currency rate types. All PeopleSoft applications use the same market rate and currency pages and tables, which enables you to administer centralized currency controls throughout the integrated product lines.
Before you begin to process multiple currencies, you must understand how foreign currency processing works in EPM and how to set up your system for multiple currencies.
Note. The MDW and OWE each have their own currency conversion process. The following sections contain common setup information for both currency conversion processes.
See Implementing Currency Conversion in the Multidimensional Warehouse.
See Setting Up and Running Currency Conversion for the OWE.
Currency and Calculation Types PeopleSoft software uses terminology associated with currency that is consistent with generally accepted accounting principles and the Financial Accounting Standards Board (FASB) accounting standards.
Currency refers to the denomination of a monetary transaction. PeopleSoft applications use a currency code (CURRENCY_CD) to identify and track individual currencies. Although the system does not require it, you should use International Standards Organization (ISO) currency codes. PeopleSoft applications have no limit on the number of currencies that you can use.
Important currency terms are:
Important currency calculation types are:
Revaluation When you adjust the base currency value of balance sheet accounts that are maintained in a foreign currency, this is called revaluation. You generally perform revaluations at the end of each accounting period to reflect the actual base currency value of assets and liabilities as exchange rates fluctuate between the base and foreign currencies. You make adjusting entries to the accounts that are being revalued with an offsetting entry to a revaluation gain or loss account. The gain or loss account is sometimes referred to as an unrealized exchanged gain or loss.
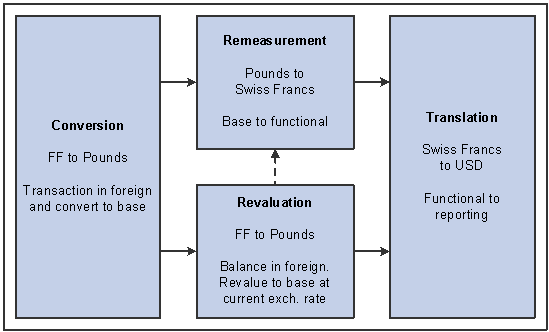
Multicurrency calculations
In this example, a London-based subsidiary of a Swiss company records a purchase made in Mexican pesos. The Swiss company is owned by a United States corporation. The following table correlates the terminology and the currencies:
|
Foreign currency |
MXN (Mexican Peso) |
|
Base currency |
GBP (British pounds) |
|
Functional currency |
CHF (Swiss francs) |
|
Reporting currency |
USD (United States dollars) |
Currency PrecisionCurrency dictates the precision of monetary amounts. For example, United States dollar amounts have two digits to the right of the decimal and Japanese yen have none. The system addresses currency precision as follows:
PeopleSoft software provides currency-sensitive amount fields with a standard length of 23.3, or 23 digits to the left of the decimal point and 3 digits to the right of the decimal point.
By default, the system rounds all currency-sensitive amount fields to the currency precision of the associated currency. This action is a PeopleSoft PeopleTools option that you can deactivate.
All numbers on SQR reports are currency-sensitive. For reporting with Crystal and PS/nVision, the display is equal to the field precision, but you can increase the number of decimal places.
Currency as a ChartField You get the best results when you record multicurrency transactions with a currency ChartField. This approach enables you to record multiple currencies in the same ledger and reinforces the concept of a ledger's role as a record for an entire category of information (such as actuals, budgets, forecasts, or commitments).
Reviewing Installed ProductsBefore you can begin working with any PeopleSoft EPM application, you must specify installation options to indicate how you plan to use the system and which applications you will be using. Installation options are defined for your entire database—they are not specific to a business unit or setID.
This section discusses how to:
Review installed PeopleSoft EPM products.
Review installed PeopleSoft Enterprise Resource Planning (ERP) products.
Set Web Services options.
Pages Used to Set Installation Options
|
Page Name |
Object Name |
Navigation |
Usage |
|
EPM Products |
INSTALLATION_PF1 |
EPM Foundation, EPM Setup, Installation Analysis & Options, Installation Options, EPM Products |
Review installed PeopleSoft Enterprise Performance Management products. |
|
ERP Products |
INSTALLATION_PF2 |
EPM Foundation, EPM Setup, Installation Analysis & Options, Installation Options, ERP Products |
Review installed PeopleSoft ERP products. |
|
Web Services |
INSTALLATION_PF3 |
EPM Foundation, EPM Setup, Installation Analysis & Options, Installation Options, Web Services |
Set web services options. |
Reviewing Installed PeopleSoft EPM Products Access the EPM Products page.
|
EPM - Warehouses |
The warehousing products that have been installed in your database are automatically selected. |
|
EPM - EnterpriseOne and World Analytics |
The PeopleSoft EnterpriseOne analytics and World Analytics products that have been installed in your database are automatically selected. |
|
Enterprise Performance Management |
The PeopleSoft EPM products that have been installed in your database are automatically selected. |
|
Financial Services Performance Management |
The financials services industry (FSI) products that have been installed in your database are automatically selected. |
|
Other |
Any other products that relate to your EPM implementation are automatically selected. |
|
Default Information |
Select the default country, which determines the address format for pages that use address fields. You define the address formats on the Country Table - Address Format page described later in this chapter. |
Reviewing Installed PeopleSoft ERP Products Access the ERP Products page.
|
Other PeopleSoft Products |
Any other PeopleSoft ERP products that have been installed in your database are automatically selected. |
|
Portal Products |
Any PeopleSoft Portal products that have been installed in your database are automatically selected. |
Setting Web Services Options Access the Web Services page.
|
Enter the number of concurrent merges allowed in your installation. The default is 3, which matches the number of record suites that are delivered with your system. |
|
|
Process wait time (Seconds) |
Enter the process wait time. The default is 60 seconds. Waiting improves performance of processes by eliminating repeated database requests. |
Warning! Because each merge job in a jobstream reads in the number of concurrent updates, changing its value while merge processes are running can have unexpected results. Changes to the process wait time affect only subsequent runs of the engine.
|
Select if you are using applets with PeopleSoft Activity-Based Management or Enterprise Scorecard. See the application-specific PeopleBooks for more information on using the chart server and enabling applets. |
|
|
Select if you are using the chart server to create charts through PeopleSoft Activity-Based Management, Enterprise Scorecard, or the financial services industry applications (PeopleSoft Risk-Weighted Capital, Asset Liability Management, or Funds Transfer Pricing). |
|
|
If you use PeopleSoft Customer Behavior Modeling and you use Angoss for data mining, ensure that the Angoss model vendor option is selected. |
See Also
Streamlining Processing with Jobstreams
Viewing Charts and Printing Results Some PeopleSoft Enterprise Performance Management applications use charts. To view these charts, the AVS charting tool must be installed. In addition, complete the following procedure to set up required options:
Navigate to EPM Foundation, EPM Setup, Installation Analysis & Options, Installation Options, Web Services.
Select the Chart Server check box.
This enables you to use the basic charting features.
To enable applets, select the Applets check box.
Note that applets download code to the client workstation.
You can also print any of the pages that display results. To produce an optimal printout, set your internet browser to print background colors and images.
In Internet Explorer, follow these steps to set this option:
Select Tools, Internet Options.
Select the Advanced tab.
Scroll through the list of settings to view the Printing options.
Select the Print background colors and images check box, and click OK.
Specifying Your EPM SourcesThis section provides an overview of the relationship between source system data and EPM, and discusses how to define warehouse sources.
Understanding Source System Data and EPM Foundation
EPM Foundation enables you to extract, transform, and consolidate data from multiple source transaction systems into a series of target warehouse tables in the EPM database. This means that the EPM database can contain data from several Enterprise, Enterprise One, and third-party sources. Although the data is commingled in the EPM database, certain EPM processes require the ability to trace the data in target warehouse tables to its original source (original source transaction system). Other EPM processes use specific attributes associated with the source transaction system to process data. For example, the language swap utility uses the source system's base language for multiple language processing.
Because source system information is required, you must define the source in EPM and specify the attributes associated with that source using the Define Warehouse Sources page. Information specified on this page include source system ID (SRC_SYS_ID), base currency, and base language, and is used in several different EPM processes. Most notably, the source system ID is used in the ETL process and helps to maintain source data history as well as data uniqueness. Currency and rate type are used in multiple currency processing. The source system ID and default setID are used later to define warehouse business units.
Single Signon and Your GL Source Database
The Global Consolidations analytical application has a feature that enables you to drill down to your source GL database from the consolidation audit using the PeopleTools single signon feature. The single signon feature enables you to access additional PeopleSoft FSCM databases without entering an ID or a password after you have already been authenticated in another PeopleSoft database.
In order to use the Global Consolidations GL drill-down feature you must set up the single signon feature for each GL source in PeopleTools. You must also use the Define Warehouse Sources page to associate the GL source system ID with its corresponding single signon portal information. This information is used to build the URL to transfer to a GL instance.
See PeopleSoft Enterprise Global Consolidations 9.0 PeopleBook
See PeopleSoft Enterprise PeopleTools PeopleBook: Security Administration
See Also
Importing Source Business Units into EPM to Create Warehouse Business Units
Page Used to Specify EPM Sources
|
Page Name |
Object Name |
Navigation |
Usage |
|
Define Warehouse Sources |
PF_WAREHOUSE_SRC |
EPM Foundation, EPM Setup, Warehouse Sources & Bus Units, Define Warehouse Sources |
Specify a source ID for a source transaction system and define its basic attributes, such as base language and currency. |
Defining Warehouse Sources
Access the Define Warehouse Sources page.
|
Warehouse Source ID |
Displays the unique source ID for the source transaction system from which you are extracting data. This code can be up to five characters long, unique, and is defined when you add a new source system. The source ID is primarily used for ETL processing. |
|
Source DB Base Language Code (source database base language code) |
Select the base language used by the specified source transaction system. This code is used for multiple language processing. See Running Cross-Product Setup and Multilanguage Support Jobs. |
|
Source Type |
Specify whether the source transaction system is an Enterprise, Enterprise One, or Other source. |
|
Default Set ID |
Enter a default setID for the tableset associated with the selected source system. |
Defaults for WBU Creation (Defaults for Warehouse Business Unit Creation)
|
Base Currency |
Select the base currency used by the selected source system. Base currency is used in multiple currency processing and the creation of warehouse business units. |
|
Rate Type |
Select the rate type used by the selected source system. Rate type is used in multiple currency processing and the creation of warehouse business units. |
Single Signon Portal Details (Optional)
Use this section to associate a GL source system ID with its corresponding single signon portal information. Completing this section is optional if you are not implementing the GL drill down feature of the Global Consolidations analytical application.
|
Portal Name |
Enter the single signon portal name where the source database transaction data can be found. |
|
Hosted by this Node |
Enter the name of the node hosting the portal. |
|
Content Provider Name |
Enter the name of the local default node for the source database. |
Setting Up Country and State Information This section discusses how to:
Review country descriptions.
Select an address format by country.
Validate addresses.
Define countries for reporting.
Specify state information.
Pages Used to Set up Country and State Information
|
Page Name |
Object Name |
Navigation |
Usage |
|
Country Table - Country Description |
COUNTRY_DEFN |
EPM Foundation, EPM Setup, Common Definitions, Country and State Info, Country Table, Country Description |
Review country descriptions. |
|
Country Table - Address Format |
ADDR_FORMAT_TABLE |
EPM Foundation, EPM Setup, Common Definitions, Country and State Info, Country Table, Address Format |
Select an address format by country. You do so by configuring address fields and field descriptions so that addresses conform to the customary address format of the specified country. After the address format is set, it appears everywhere that the system uses the address subrecord. |
|
Country Table - Valid Address |
EO_ADDR_VALIDAT |
EPM Foundation, EPM Setup, Common Definitions, Country and State Info, Country Table, Valid Address |
Validate addresses by adding valid combinations of address fields. |
|
Country Statistics |
COUNTRY_STAT_PNL |
EPM Foundation, EPM Setup, Common Definitions, Country and State Info, Country Statistics |
Specify countries for reporting. |
|
State |
STATE_DEFN |
EPM Foundation, EPM Setup, Common Definitions, Country and State Info, State Table, State |
Specify state, province, or other geopolitical region information. |
Reviewing Country DescriptionsAccess the Country Table - Country Description page.
The system displays the country code, description, and a short description for the country.
PeopleSoft delivers a fully populated country code table, which is updated as national boundaries and designations change.
|
2-Char Country Code (two-character country code) |
Enter a country code. Country codes are informational indicators that record the value-added tax (VAT) registration ID for each country where your company does business. |
|
EU Member State (European Union member state) |
Select to specify that the country is a member of the European Union. |
Selecting an Address Format by Country Access the Country Table - Address Format page.
Use this page to set up three aspects of the address: editing, displaying, and printing.
The address format that you specify on this page appears everywhere that the address subrecord is used in the system.
|
Address Edit Page |
Displays the secondary page used for editing the address. You can create a new secondary page by using PeopleSoft Application Designer. On the new address secondary page that you create, use page fields from the DERIVED_ADDRESS record definition. You then need to add a secondary page control to ADDRESS_SBP that points to your new secondary page. After you complete these steps, the secondary page is accessible in this field. PeopleSoft delivers default address edit pages that contain the address definitions. |
|
Enable Address Search |
Select to enable users to search for a valid value. Selecting this check box enables the Used in Search column and the Valid Address page. |
|
Enable Address Validation |
Available only when Enable Address Search is selected. Select to ensure validation of all values that are selected. When you select this check box, users must select a value from the search list. If this check box is cleared, users can select from the search list or enter a new value. |
|
Address Fields |
The system lists nine available address fields. The settings of these fields are controlled by the selected address edit page. |
|
Field Name |
Displays the field options available for the address page. |
|
Edit Label Override |
(Optional) Enter an alternative label for the field. The new label is used when prompting for the field. You can customize address formats so that they conform to the address requirements of each location. For example, for a U.S. address, you might change the Postal field label to ZIP Code. Keep in mind the distinctions between county and state:
|
|
Used in Search? |
Available only when you select the Enable Address Search check box. Select the fields over which you want users to be able to search. |
|
Include in Display? |
Select to activate the corresponding address field as part of the standard address format for the selected country. To remove a field, clear the check box. When entering addresses, users enter a country code, after which the system updates the page to display the fields appropriate for that country. |
|
Include in Print? |
Select to include the field when printing reports. |
|
Line Number and Position Number |
Enter the physical location of the fields for displaying and printing. |
|
Use Description |
Select to display the description for the field value. For example, for addresses in Japan, select this option to display the description of the state rather than the state code, because the code is numeric. |
|
Pre Separator and Post Separator |
Enter characters to be used surrounding the address field. For example, in the United States, a comma generally follows the city name, such as in San Francisco, CA. In India, there are parentheses around the postal code, for example (123). |
Validating Addresses Access the Valid Address page.
To enable this page, select the Enable Address Search check box on the Address Format page, which enables the Used in Search column. The fields that you select to be used in a search appear on the Valid Address page as columns. Enter the valid address combinations that the user can search for and select.
Defining Countries for ReportingAccess the Country Statistics page.
|
Country |
Select the country on which you want to report. |
|
Use for Statistics |
If this check box is selected, the country recognized by the International Standards Organization (ISO) is also recognized by the European statistical offices. If the check box is not selected, the country is recognized only by the ISO. In this case, European statistical offices assume that the country is a part of another country when producing statistical data such as the gross national product (GNP). For example, for the ISO, the principality of Monaco has its own country code, but for statistical purposes, Monaco is assumed to be part of France, and therefore has the same statistical country code as France. |
|
2-Char Intrastat Country Cd (two-character intrastat country code) |
The country identifier for the European statistical offices. This code often appears on intrastat layout forms. |
|
2-Char ESL Country Cd (two-character ESL country code) |
Used for countries that are members of the European Union. It usually appears as part of the VAT registration information on the European Sales List (ESL). |
|
3-Dig Stat Country Cd (three-digit statistical country code) |
Used as a country identifier for the European statistical offices. It usually appears on the intrastat report to identify source or destination countries to which or from which goods are shipped. |
|
7-Char Country Descr (seven-character country description) |
Used for the German international Electronic Funds Transfer (EFT) layout. It identifies countries into which or from which electronic funds are sent or received. |
|
Sales/Use Tax Code |
Informational only. This field can be set to None, Sales, or Use. |
Note. PeopleSoft EPM only uses this page to establish the countries for statistical purposes. So most of the following information is for informational purposes only, because the reports mentioned are not available through the PeopleSoft EPM database. For more information on the reports mentioned in the following section, refer to the appropriate PeopleSoft Financials application documentation.
Specifying State InformationAccess the State page.
PeopleSoft delivers a fully populated state code table. PeopleSoft updates the state table as changes occur. This table provides states, provinces, and equivalent geopolitical entities (for example, Dutch communities and French departments) for all supported countries. The codes are based on standard postal codes.
|
Numeric Code |
Assign a number to a state or province for statistics and reporting purposes. |
Setting Up Time ZonesEPM extract, transform, and load (ETL) jobs use the date time stamp in conjunction with source records to perform incremental loads. However, data can be extracted from multiple source transaction systems, each of which might reside in different database servers that use different time zones and different date and time stamps. This can lead to mismatched dates and times between the source and the EPM database. However, EPM target warehouse tables may include a source time zone field for records that have a date-time or time value depending upon the design and requirement.
When a target warehouse table contains a time zone field, prepackaged ETL jobs populate it with your source time zone values. Not all target warehouse tables contain a time zone field.
Note. Only one source time zone value can be populated in the target warehouse table.
Populating warehouse target tables with source time zone values is the first step in ensuring the synchronicity of source and EPM time zones. However, you are responsible for converting the source time zone value to the EPM database time zone.
Defining Accounting Calendars This section provides an overview of accounting calendar setup, lists common elements, and discusses how to:
Define a base calendar.
Modify or add detail calendars.
Define summary calendars.
(Optional) Define business calendars.
(Optional) Define daily calendars.
(Optional) Define budget calendars.
Define calendar frequencies.
Define frequency details.
Define timespans.
Understanding Accounting Calendar SetupIn PeopleSoft systems, you can establish an accounting period configuration based on the beginning and ending period dates that you normally use and combine these periods to create accounting calendars. These calendars define the time periods to which you post transactions or create reports for different ledger group and business unit combinations. You select the calendar that defines the periods for a business unit and ledger group combination.
You can maintain an unlimited number of accounting periods over any span of years. You can maintain traditional monthly periods, including an additional adjustment period, or you can define your own periods.
Note. In the PeopleSoft EPM product line, calendars are used mostly for reporting. However, for the system to properly handle data (for example, general ledger data) from your transaction database, you must be sure that the detail calendars match those in your transaction accounting system. You can move calendars from your PeopleSoft transaction database into your PeopleSoft EPM database using PeopleTools such as Data Mover.
The PeopleSoft system supports multiple calendars, so you can keep one calendar for actuals, another for budget and forecast activity, and still others for special reporting needs. Because you store calendars in tables, you can share them across business units, helping to provide consistency in period dates and easing the process of acquisition and consolidation.
PeopleSoft uses the following calendar definition options:
|
Calendar Builder |
Use to create a base calendar from which to create other calendars such as the detail calendar. |
|
Detail Calendar |
Define detail calendars that include the number and duration of accounting periods in your fiscal year and the beginning and ending dates for each period. These calendars also identify the adjustment periods for the calendar. |
|
Summary Calendar |
Use summary calendars to group detail calendar periods for inquiries and reporting, such as for quarterly reports and semiannual reviews. In this way, your financial information is always ready to be summarized into the timespans that you use most frequently. |
|
(Optional) Business Calendar |
Use to create the business or working calendar that identifies holidays and non work days. |
|
(Optional) Daily Calendar |
Use for reporting purposes. |
|
(Optional) Budget Period Calendar |
Use to manually define fiscal and non fiscal detail budget period calendars. |
|
Calendar Frequencies |
Use to define frequency relationships among multiple calendars. You can use frequencies to create multiple relationships among calendars or assign a frequency designation to a calendar. For example, you might have a calendar with a quarterly frequency. This quarterly frequency might be based on the monthly detail calendar. |
|
Timespans control the number of periods for which data can be extracted from the ledger table. They enable you to easily select and retrieve information for use in allocations and inquiries. Many timespans are expressed relative to the current period, so that they automatically adapt the content of a report to the date it is produced. Others are defined for specific periods. While many commonly used timespans are included in your PeopleSoft system, you can define additional timespans on the TimeSpan page as necessary. |
Common Elements Used in This Section
|
Periods Per FY (periods per fiscal year) |
Enter the number of periods in an accounting year for a calendar. |
|
Description |
Enter a description. The description appears on prompt lists, inquiries, and reports. |
|
Descr (description) |
Enter a detailed description of the calendar. |
Pages Used to Define Accounting Calendars
|
Page Name |
Object Name |
Navigation |
Usage |
|
Calendar Builder |
CALENDAR_BUILDER |
EPM Foundation, EPM Setup, Common Definitions, Calendars, Calendar Builder |
Define a base calendar to be used by other calendars that you create. The calendar that you create is by default a detail calendar. |
|
Detail Calendar |
DETAIL_CALENDAR1 |
EPM Foundation, EPM Setup, Common Definitions, Calendars, Detail Calendar |
Modify or add detail accounting calendars that match or differ from your general ledger calendars. |
|
Summary Calendar |
SUMMARY_CALENDAR |
EPM Foundation, EPM Setup, Common Definitions, Calendars, Summary Calendar, Summary Calendar |
Define a summary calendar to group or combine periods from detail calendars. |
|
Summary Budget Period Calendar |
SUMMARY_BP_CAL |
EPM Foundation, EPM Setup, Common Definitions, Calendars, Summary BP Calendar, Summary Budget Period Calendar |
Define a summary budget period calendar to group or combine periods from detail calendars. |
|
Business Day Calendar |
BUS_CALENDAR |
EPM Foundation, EPM Setup, Common Definitions, Calendars, Business Day Calendar |
Define a business calendar to specify your normal business week and the holidays observed by your banks. |
|
Daily Calendar |
DAILY_CALENDAR |
EPM Foundation, EPM Setup, Common Definitions, Calendars, Daily Calendar |
Define a daily calendar for reporting purposes. |
|
Budget Calendar |
CAL_BP_TBL |
EPM Foundation, EPM Setup, Common Definitions, Calendars, Budget Calendar |
Define a budget calendar for controlled budget processing. |
|
Frequency Definition |
PF_FREQUENCY_DEFN |
EPM Foundation, EPM Setup, Common Definitions, Calendars, Frequency, Frequency Definition |
Define calendar frequencies. Add and modify frequency definitions. |
|
Frequency Details |
PF_FREQUENCY_DTL |
EPM Foundation, EPM Setup, Common Definitions, Calendars, Frequency Details |
Define frequency details by assigning the frequencies to calendars. |
|
TimeSpan |
TIME_SPAN |
EPM Foundation, EPM Setup, Common Definitions, Calendars, TimeSpan |
Define timespans. |
Defining a Base Calendar Access the Calendar Builder page.
|
Begin Date |
Enter the beginning date for the calendar. The system uses this date and the end date to create the range of periods for the calendar. |
|
End Date |
Enter the end date for the calendar. The system uses this date with the begin date to create the range of periods for the calendar. |
|
Start Fiscal Year |
The system enters a default year for this field based on the year that you enter in the begin date field. |
|
Calendar Method |
Select one of the following options to determine the number of periods in the calendar: daily, weekly, bi-weekly, monthly, bi-monthly, quarterly, semi-annual, or yearly. For example, a daily calendar has 365 periods and a quarterly will have 4 periods. The system updates to display the number of periods in the Periods Per FY (periods per fiscal year) field. |
|
Monthly Allocation Type |
Use to select the appropriate period allocations for a monthly calendar. Select from the following: 12 period Calendar, 13 period Calendar, 445 Calendar (4 weeks, 4 weeks, 5 weeks), 454 Calendar (4 weeks, 5 weeks, 4 weeks), or 544 Calendar (5 weeks, 4 weeks, 4 weeks). |
|
Generate |
Click this option to have the system generate the calendar. The generated calendar periods display begin and end dates in the grid at the bottom of the page. |
|
Period Name and Abbreviation |
Use these fields to change the generated calendar period name and abbreviation if applicable. |
Note. As you define calendars, keep in mind that in all instances in which a PeopleSoft EPM warehouse business unit is related to a general ledger business unit, the calendars for the business units should be the same. Warehouse business units are described elsewhere in this chapter.
After you have saved a calendar using the calendar builder, you can only modify the calendar description or long description on the Calendar Builder page. If you need to modify the saved calendar further, use the other calendar pages, (for example the Detail Calendar page).
By default, a calendar that you create with the Calendar Builder is a detail calendar.
Adding or Modifying Detail Calendars Access the Detail Calendar page.
You create detail calendars using the Calendar Builder. Use this page to modify calendars after they have been created.
|
Periods per FY (periods per fiscal year) |
Displays the appropriate number of periods for the calendar. For example, 4 indicates a quarterly calendar. |
|
End Date Default |
This setting specifies which periodic intervals the system creates. Values are: month, bimonth (bi-monthly), quarter, semi-annual, year, and days. If you select days, enter the number of days to include in the calendar. The system uses the end date default setting to populate the subsequent begin and end date values in the grid at the bottom of the page. |
|
Detail Periods |
Displays the detail periods for the calendar, including the begin and end dates, period name, and abbreviation. |
|
Adjustment Periods |
Displays any adjustment periods defined for the calendar, including the period name and abbreviation. |
When you enter period dates, you can define monthly calendar periods or any fiscal period that matches your accounting calendar (such as weekly or bimonthly) as long as the beginning and ending dates of successive periods don't overlap. Every day of the year must be included in a period; you cannot leave gaps between period dates. Make sure that your detail calendar includes a period for the oldest transaction that you want to enter. After installing your PeopleSoft system, you might want to make this earliest date more restrictive.
You will need to return to this page to enter ensuing years manually. You can enter several years at a time or treat the task as part of your end-of-year system maintenance.
After you define your detail calendar, you can use it to manage open periods for the generation of journals. You can also use it to define the periods that store summarized results in a summary ledger.
Note. The MODEL calendar delivered with your system contains data from 1957 to 2025. You can use the MODEL calendar rather than entering your own data; if you do so, make a copy of MODEL first, and make changes to the copy.
Defining Summary Calendars Access the Summary Calendar page.
Consider the following when setting up summary calendars. A quarterly summary calendar, for example, might have four periods, each consisting of three periods from a monthly detail calendar. A summary calendar can also combine cumulative detail calendar accounting periods to create year-to-date balances. Summary calendars are especially useful for determining how your models will roll up for reporting purposes. As with detail calendars, you can include as many fiscal years as you need in one summary calendar.
Enter a description and periods per fiscal year to specify the number of periods in the accounting year for this calendar.
|
Detail Calendar |
Select the ID of the detail calendar on which this calendar is based. Every summary calendar must be based on a detail calendar. |
Supply the fiscal year, period, period name, and abbreviation.
|
From Budget Period and To Budget Period |
Enter the detail calendar periods to be summarized in each summary period. |
Note. You can define as many years on a calendar as necessary. Be sure to include any years that you use to store historical information.
Defining Summary Budget Period CalendarsAccess the Summary Budget Period Calendar page.
Summary calendars are especially useful for determining how your models will roll up for reporting purposes. Enter a description, budget period, and from/to periods to specify the number of budget periods in the accounting year for this calendar.
Defining Business Calendars (Optional) Access the Business Day Calendar page.
|
Normal Business Days |
Select the business days of the week to include. |
|
Notes |
Enter any notes to further describe this calendar. |
In the grid at the bottom of the page enter a row for each holiday on which you know businesses won't operate.
|
Year and Date |
Specify the year and date for any holidays that you include. |
|
Holiday Name |
Enter the name of the holiday on which your business does not operate. |
In multinational corporations, you accommodate the various locations and different holidays observed by defining as many business calendars as you need for each setID.
Note. Business calendars determine the number of workdays in each month, for reporting purposes only.
Note. If you use PeopleSoft Asset Liability Management, Funds Transfer Pricing, or Risk-Weighted Capital, you must create a business day calendar to define your holidays.
Defining Daily Calendars (Optional) Access the Daily Calendar page.
|
Create |
Click to access the Create Detail Periods secondary page, on which you can enter the fiscal year and start date for creating daily periods. |
|
Update |
Click to access the Create Detail Periods secondary page, on which you can enter a new fiscal year. |
Remember to set up a calendar for each fiscal year. To display the detail periods for existing calendars, click the Update button.
Note. For leap years, you must change the periods per fiscal year value from 365 to 366 to create the last period for the leap year (for example, December 31, 2004).
Defining Budget Calendars (Optional) Access the Budget Calendar page.
For budget calendars, you might want to enter a descriptive calendar ID such as AN for an annual calendar budget.
Enter the budget periods, begin and end dates, and period names.
Defining Calendar Frequencies Access the Frequency Definition page.
Define frequencies by adding a row with a description or by updating an existing description.
Note. The frequencies you define on this page will comprise the list of valid values in the Frequency Details page.
Defining Frequency DetailsAccess the Frequency Details page.
|
Calendar ID |
Select a calendar. The calendar ID that you select represents the calendar that you want to associate with the frequency. You can have more than one frequency defined for a single calendar. The system updates to display calendar detail. You can also specify all frequencies that are associated with any other frequency definition for this frequency group. You can define frequency relationships across multiple calendars. |
|
Process |
Select for any of the accounting periods that you want to process. |
Defining Timespans Access the TimeSpan page.
|
Start Year and Start Period |
Enter the appropriate value. The value that you enter depends on the type that you select. |
|
End Year and End Period |
Enter the appropriate value. The value that you enter depends on the type that you select. |
|
Type |
Select from the following: Absolute Period or Absolute Year: You can enter any year or period that has been defined in the timespans calendar. Relative to Current Period or Relative to Current Year: Enter 0 as the period or year to select the current year or period, -1 to indicate the previous year or period, 1 to indicate the next, and so forth. |
|
Use Scenario Calendar |
Select this check box to use the specified scenario calendar with this timespan. This enables you to have a scenario-based timespan. |
|
Include Balance Forward |
Select this check box if you use nVision for the consolidation ledger or any ledger with balance forward accounts. If you select this check box, nVision will compute ledger balance. |
|
Calendar ID |
Select the calendar that you want to use with this timespan. |
Note. Balance forward accounts store balance forward amounts. For example, in your regular accounting system you might want to specify asset, liability, and equity accounts as balance forward accounts, but not revenue or expense accounts. The account balance forward function rolls forward the accounts on any date specified for flexible year-end processing.
See Also
PeopleSoft Enterprise Global Consolidations 9.0 PeopleBook
Setting Up the Gregorian Calendar for the MDW The Calendar dimension represents calendars that fall into two broad functional categories. The Gregorian calendar (the calendar that is commonly used) has one row for each day. The business calendar represents the functionality the PeopleSoft provides to define various types of business calendars, such as detail calendars, summary calendars, budget calendars, and so on.
Gregorian calendar setup is a onetime setup as part of the MDW setup. You can generate the Gregorian calendar for a range of years. For each day in the year range, the Gregorian calendar has one row. (You do not define business calendars in the MDW; their definitions are imported from source systems and the OWE).
To set up the Gregorian calendar, use the Day Dimension (D_DAY) component and the Time Dimension (D_TIME) component.
This section discusses how to set up the Gregorian Calendar for the Performance Management Warehouse.
Pages Used to Set Up the Gregorian Calendar
|
Page Name |
Object Name |
Navigation |
Usage |
|
D_DAY |
EPM Foundation, EPM Setup, Common Definitions, Calendars, Gregorian Calendar, Gregorian Calendar Dimension, Day Dimension |
Populate the Day dimension. |
|
|
D_TIME |
EPM Foundation, EPM Setup, Common Definitions, Calendars, Gregorian Calendar, Time Dimension, Time Dimension |
Populate the Time dimension. |
Populating the Day Dimension
Access the Day Dimension page.
|
Start Date |
Enter the beginning date for this calendar. |
|
End Date |
Enter the ending date for this calendar. |
|
Jobstream ID |
Enter D_DAY. |
|
Weekend Flag |
Check the days that represent weekend days. |
|
Retry Enabled |
This field will be available for future use. |
Save the page and click Run.
Click the Process Monitor link to check the status of application engine program. After a period of time, it should display the status as Success.
Populating the Time Dimension
Access the Time Dimension page.
|
Time Format |
Select either 12 Hour Format or 24 Hour Format. |
Save the page and click Run.
Click the Process Monitor link to check the status of application engine program. After a period of time, it should display the status as Success.
Defining Operator DefaultsOperator defaults enable you to assign a default business unit and setID for each user per country. You specify operator defaults on the Operator Defaults page.
Page Used to Specify Operator Defaults
|
Page Name |
Object Name |
Navigation |
Usage |
|
Operator Defaults |
OPR_DEF_TABLE_FS1 |
EPM Foundation, EPM Setup, Installation Analysis & Options, Personal Defaults, Operator Defaults |
Specify default user preferences for PeopleSoft users. |
Specifying Default User PreferencesAccess the Operator Defaults page.
|
Business Unit and SetID |
The values that you select become the user's default values in the business unit and setID search fields. |
|
Localization Country |
Enter the default country for this user ID. |
Note. You can control the business unit, setID, and address format default values by using the Operator Defaults page.
Defining Units of Measure Units of measure (UOM) determine how resources are quantified. Each resource must be associated with a standard unit of measure. Standardization helps you to control the units that appear in reports and enables you to use the PeopleSoft automatic conversion features.
This section discusses how to:
Import UOM values from a source.
Display and modify UOMs.
Page Used to Define UOMs
|
Page Name |
Object Name |
Navigation |
Usage |
|
Unit of Measure |
UNITS_TBL1 |
EPM Foundation, EPM Setup, Common Definitions, Unit of Measure |
Display and modify units of measure to determine how resources are quantified. |
Importing Unit of Measure Values from Your Source
EPM enables you to extract and consolidate source data from various source transaction systems. As such, certain source systems might contain UOM values that are different from those offered in EPM. This causes mismatched UOM values between the source and the EPM database. However, EPM target warehouse tables include source UOM definitions and conversion rate fields for all records that store UOM data. Prepackaged ETL jobs populate these fields with your source UOM definitions and conversion rate values.
PeopleSoft-delivered ETL jobs populate the following target warehouse tables with UOM values:
UNITS_TBL
UNITS_CVT_TBL
INV_ITEM (for Supply Chain Management only)
UOM_TYPE_INV (for Supply Chain Management only)
Populating warehouse target tables with source UOM values is the first step in ensuring the synchronicity of source and EPM UOM values. However, you are responsible for converting the source UOM value to the EPM database UOM.
Displaying and Modifying UOMsAccess the Unit of Measure page.
|
Convert To, Conversion Rate, and Inverse Conversion Rate |
Specify the conversion rules of a particular UOM. For example, by specifying a conversion from cubic feet to cubic yards and an appropriate conversion rate, when you enter a resource amount in cubic feet, the system automatically converts the amount to cubic yards. Automatic conversion is a key feature of PeopleSoft statistical accounting. It enables you to enter resource amounts in whatever unit is readily available or convenient at the time, and converts the units to the required standard. The system also automatically calculates the inverse conversion rate. |
Setting Up Ledger-Based nVision Reporting for EPM
This section discusses how to set up ledger-based nVision reporting over EPM ledger tables.
Understanding Ledger-Based Reporting and Setup in EPM
nVision is a reporting tool that can retrieve information from a PeopleSoft database and place that data into a Microsoft Excel spreadsheet for further analysis. nVision selects data from a PeopleSoft database using a query or a ledger. nVision query-based reporting uses PS query to extract information and can be used with the EPM database. However, nVision ledger-based reporting must be modified to extract data from the EPM database. This is due to the manner in which ledger-based reporting extracts data and the unique structure of EPM ledger tables.
nVision ledger-based reporting uses the LEDGER key to distinguish sets of ledger data and identify which rows should be extracted from ledger tables. However, the LEDGER key does not exist in the EPM ledger tables (such as PF_LEDGER_F00). Instead, EPM ledger tables use the key, PF_SCENARIO_ID, to distinguish sets of data. Consequently, the ledger-based reporting process must be modified to accommodate the PF_SCENARIO_ID used by EPM ledger tables.
To incorporate the PF_SCENARIO_ID key into the nVision ledger-based reporting process, you must create a view of your EPM ledger tables and map the PF_SCENARIO_ID column to the LEDGER column in the view. EPM delivers a view of the PF_LEDGER_F00 table called PF_LEDGER_VW, so you do not need to create one. You only need to create additional ledger views for those ledger tables associated with the PeopleSoft EPM Analytic Applications (for example, GC_LEDGER_F00 for Global Consolidations). For more information about application ledger tables that require a view, see your Analytic Applications PeopleBooks.
In addition to mapping keys with a ledger view, you must also set up related nVision ledger pages in PIA. The EPM nVision PIA pages populate tables that are used during the ledger-based reporting process (for example, PF_LED_DEFN). When nVision processes a request, it looks for the SET_ID and LEDGER keys located in the PF_LED_DEFN table. The PF_LED_DEFN table is tied to the PF_LED_TEMPLATE table via the LEDGER key, and that connection is used to determine the related data associated with a particular ledger view and PF_SCENARIO_ID. Most of this information is defined in the EPM nVision PIA pages, which are described in the subsequent sections.
See Enterprise PeopleTools PeopleBook: PS/nVision
See Enterprise PeopleTools PeopleBook: PeopleSoft Application Designer
Ledger-Based Reporting Setup
The following steps are required to implement ledger-based nVision reporting for EPM:
Create a ledger template for each ledger view in your database.
The Ledger Template page populates the PF_LED_TEMPLATE table, which stores the ledger view information, used to tie the LEDGER key to the PF_SCENARIO_ID key.
Create a detail ledger definition for each scenario.
The Detail Ledger page populates the PF_LED_DEFN table, which stores the LEDGER and SET_ID keys, used for lookup by nVision reporting.
Create a ledger group for each detail ledger.
The Group Definition page enables you to create a ledger group for one or more detail ledgers and specify base currency for those ledgers.
Create a ledger group for each detail ledger.
The Ledgers for a Unit Definition page enables you to associate a calendar ID with a ledger group.
Pages Used to Set Up nVision Ledger-Based Reporting in EPM
|
Page Name |
Object Name |
Navigation |
Usage |
|
Ledger Template |
NVS_LED_TMPLT |
EPM Foundation, EPM Setup, Ledger Setup, nVision Ledgers, Ledger Template, Ledger Template |
Set up ledger templates for your views. |
|
Detail Ledger |
NVS_LEDGER_DETAIL |
EPM Foundation, EPM Setup, Ledger Setup, nVision Ledgers, Detail Ledger, Detail Ledger |
Create detail ledgers for your scenarios. |
|
Group Definition |
NVS_LEDGER_GROUP |
EPM Foundation, EPM Setup, Ledger Setup, nVision Ledgers, Ledger Group, Definition |
Create a ledger group for one or more detail ledgers and specify base currency for those ledgers. |
|
Ledgers for a Unit Definition |
NVS_BU_LED1 |
EPM Foundation, EPM Setup, Ledger Setup, nVision Ledgers, Ledgers for a Unit, Definition |
Associate a calendar ID with a ledger group |
Defining a Ledger Template
Access the Ledger Template page.
|
Record (Table) Name |
Select a view to associate with this template. Note. The record name you select must match the view defined for the EPM ledger record. |
|
Posted Total Amount |
Select the name of the record column that holds your posted total amount value. |
|
Secured Rept VW (Secured Report View) |
Enter the name of an alternate secured reporting view for the template. This field enables you to use an alternate view for reporting and overrides the view specified in the Record (Table) Name field. You can create a ledger template using a specific record, but allow the reporting of that record be accomplished through a different view. |
Defining a Detail Ledger
Access the Detail Ledger page.
|
Ledger |
Displays the ledger record associated with the specified setID. |
|
Ledger Template |
Select the ledger template to associate with the specified ledger record. |
|
Ledger Type |
Displays the ledger record type |
Defining a Ledger Group for Detail Ledgers
Access the Ledger Group Definition page.
|
Ledger Template |
Select a ledger template to associate with the ledger group. |
Ledger Details
|
Ledger |
Select a ledger scenario to associate with the ledger group. |
|
Primary |
Select this check box to indicate the ledger scenario is the primary ledger for this ledger group. Note. You must specify at least one primary ledger record. |
|
Base Currency |
Select the base currency for the selected ledger record. |
Defining a Calendar for a Ledger Group
Access the Ledgers for a Unit Definition page.
The Ledgers for a Unit Definition page enables you to associate a calendar ID with a ledger group.
Note. The calendar ID should match the calendar ID that is specified on the Warehouse Business Unit Scenario Definition page.
Setting Up EPM Currency Tables Currency code pages define each currency that you use. To meet your multicurrency requirements, PeopleSoft supports the euro and delivers the Currency Code table with many common ISO standard currencies. The table also supports the ISO standard of zero, two, and three decimal positions.
This section discusses how to:
Maintain currency codes.
Update the status of a euro currency code.
Pages Used to Maintain Currency Tables
|
Page Name |
Object Name |
Navigation |
Usage |
|
Currency Code |
CURRENCY_CD_TABLE |
EPM Foundation, EPM Setup, Common Definitions, Currencies and Rates, Currency Code |
Maintain currency codes and the currency precision by currency. |
|
Currency Codes (Euro) |
CURRENCY_EURO |
EPM Foundation, EPM Setup, Common Definitions, Currencies and Rates, Currency Code (Euro) |
Update the status of a euro currency code. |
Maintaining Currency CodesAccess the Currency Code page.
|
Currency Symbol |
PeopleSoft delivers many currencies with a currency symbol such as $ for Australian dollar (AUD) or ? for British pound (GBP). You can enter new symbols for delivered currencies or for currencies that you might add. |
|
Country |
Displays the code for the country from which the currency originates. |
|
Decimal Positions |
Enter the number of decimal positions that should appear in the notation for the currency. For example, use two decimal positions for Australian dollars (5.00 AUD), but no decimal positions for Japanese yen (500 JPY). |
|
Scale Positions |
Enter the scale positions that you want to round for this currency. Scale positions control how many numbers appear to the left of the decimal when displayed. The data is stored with full precision in the database. For example, if you want all dollar amounts in the millions displayed as the number of millions without the zeros, enter 6 as your scale position. In this case, 24,000,000 is displayed as 24, but is stored in the database as 24,000,000. |
Note. The data on this page is stored in the Currency Code table. The values on this table are effective-dated. The software is shipped with the Currency Code table in compliance with ISO standards for decimal positions. You can increase the number of decimals to a maximum of three.
Note. PeopleSoft updates the Currency Code table and the fully populated country, state, and province code tables as national boundaries and designations change.
Updating the Status of a Euro Currency CodeAccess the Currency Code (Euro) page.
|
Status |
Displays whether a currency is an active participant in the euro. |
Note. Do not attempt to modify the currency quotation methods for currencies that are linked to the euro.
Mapping Enterprise One Currency Codes to EPM Currency Codes (for Enterprise One Sources)
Enterprise One currency codes are user defined so they do not conform to standard EPM currency codes. Mismatched currency codes can create unexpected results with your EPM data. Therefore, you must map the Enterprise One currency code to the standard EPM currency code. The mapping information is used during the ETL process to reconcile the conflicting currency codes. Use the E1 Currency Code Mapping page to map Enterprise One currency codes to Enterprise currency codes.
Page Used to Map Enterprise One Currency Codes
|
Page Name |
Object Name |
Navigation |
Usage |
|
E1 Currency Code Mapping |
E1CURR_MAP |
EPM Foundation, EPM Setup, Common Definitions, Currencies and Rates, E1 Currency Mapping, E1 Currency Code Mapping |
Map Enterprise One currency codes to EPM currency codes. |
Mapping Enterprise One Currency Codes
Access the E1 Currency Code Mapping page.
|
Source System Identification |
Select the Enterprise One source system that contains the currency code you are mapping. |
|
E1 Currency Code |
Enter the Enterprise One currency code that you are mapping. |
|
Currency Code |
Select the currency that the selected code represents. |
Setting Up Market Rates for EPM Currency Conversion The PeopleSoft approach to market rates and currency conversion is driven by the need to accommodate business practices related to the European Common Currency (euro). In addition to currency exchange rates, PeopleSoft supports the many different types of global market rates, such as interest rates, stock exchange indexes, and economic indicators.
This section discusses how to:
Define market rate indexes.
Define market rate types.
Define market rate tolerances.
Pages Used to Define Market Rates
|
Page Name |
Object Name |
Navigation |
Usage |
|
Market Rate Index |
RT_INDEX_TBL |
EPM Foundation, EPM Setup, Common Definitions, Currencies and Rates, Market Rate Index |
Describe the indices for which you track rates. Typical market rate indexes include LIBOR, Bloomberg foreign exchange, and Reuters foreign exchange. An index categorizes the various market rates that you track. |
|
Market Rate Type |
RT_TYPE_TBL |
EPM Foundation, EPM Setup, Common Definitions, Currencies and Rates, Market Rate Type |
Define market rate types. Rate types include commercial, floating, average, and historical. |
|
Market Rate Definition |
RT_RATE_DEF_TBL |
EPM Foundation, EPM Setup, Common Definitions, Currencies and Rates, Market Rate Definition, |
Define tolerance limits for rates and determine what action should occur if a new rate occurs outside of the tolerance limit. The fields on this page differ according to the rate category of the market rate index. |
Defining Market Rate IndexesAccess the Market Rate Index page.
|
Rate Category |
Select a Rate Category from the list: Options include: Commodity Price, Economic Indicator, Exchange Rate, Futures Price, Interest Rate, Other, Stock Exchange, Index, or Stock Price. |
|
Default Exchange Rate Index |
If you are entering exchange rate indexes, select this check box to indicate which index should be used to retrieve currency exchange rates. You can specify only one index code as the default. |
Defining Market Rate Types Access the Market Rate Type page.
Enter a description and short description for each market rate type that you use.
Defining Market Rate Tolerances Access the Market Rate Definition page.
The information that appears on this page depends on the type of index that you select. For example, if you select an index with interest rates, interest rates appear on this page.
Market rate definitions specify the valid term, currency, and other appropriate field combinations for market rates. For example, if you have a market rate definition for an exchange rate with a term of 30, a from currency of EUR, and a to currency of USD, you can enter a rate using this combination in the market rate table. If you do not have a market rate definition, the system creates one for you using the default values.
|
From Currency Code |
Enter the from currency code. |
|
Refresh |
Click the Refresh button to limit the display to the specified from currency code. |
|
Term |
Enter the desired term (expressed in days). A zero term indicates a spot rate. |
|
From Currency |
Enter the appropriate from currency. This value is used with the to currency value as part of an exchange rate pair. When you use triangulation, include a definition for each of the currency pairs involved in the triangulation. |
|
To Currency |
Enter the appropriate to currency. This value is used with the from currency value as part of an exchange rate pair. |
|
Maximum Variance |
Indicate the percentage of variance that is allowed when the user maintains the market rate. The system generates an error message if the change exceeds the tolerance. The default value is 2.50 (2.5 percent). |
|
Error Type |
Enter the type of error processing that should occur if the maximum variance is exceeded. Values are: None: No error processing occurs, and the new rate is used even though it exceeds the limit. Stop: Processing halts, and the system prevents you from saving the new rate. Warning: Default value. A warning appears; you can ignore it and save the new rate. |
Defining Currency Quotations for EPM Currency Conversion
This section provides an overview of currency quotations and discusses how to maintain currency quotation methods.
Understanding Currency Quotations PeopleSoft supports direct and indirect rate quotation, quote units, and triangulation. These are flexible and accurate tools that enable you to convert and manage multicurrency operations.
The currency quotation method controls how a stored rate is displayed and how an entered rate is interpreted and stored in the database. You set up and maintain a currency quotation method for each from currency and to currency pair.
You do not typically maintain rates online for currency pairs that triangulate. Instead, the Cross rate/Triangulation Generation SQR determines the cross rate by using the rates between the from currency and the reference currency, and between the reference currency and the to currency.
Currency quotation methods must be set up correctly to yield the desired triangulation results.
Note. Define currency quotation options before you enter the rates and before you calculate the rates.
Page Used to Define and Maintain Currency Quotations
|
Page Name |
Object Name |
Navigation |
Usage |
|
Currency Quotation Method |
CURR_QUOTE_PNL |
EPM Foundation, EPM Setup, Common Definitions, Currencies and Rates, Currency Quotation Method |
Maintain a currency quotation method for each from currency and to currency pair. |
Maintaining Currency Quotation Methods Access the Currency Quotation Method page.
Rate Quotation Basis
|
Direct |
Determine whether you want the rates for a currency pair quoted directly. For example, in converting United States dollars (USD) to euro (EUR), a direct quote would indicate that USD 1 = EUR x.xxxx. In this case, euros are quoted directly against the United States dollar. |
|
Indirect |
Determine whether you want the rates for a currency pair quoted indirectly. For example, in converting United States dollars (USD) to euros (EUR), an indirect quote would indicate that USD x.xxxx = EUR 1. |
|
Quote Units |
Sometimes called "scaling factors," these preserve decimal position. You can enter any value in this field, although quote units generally are on a scale of 10 (such as 10, 100, 1000). The default value for this field is 1. |
|
Auto Reciprocate |
Select this check box to create or update the rate for the reciprocal currency pair automatically whenever an exchange rate is added or updated. For example, when you enter a new USD to GBP rate, the GBP to USD rate will be updated automatically. You can only apply this feature to currency pairs for which quotation methods have been established. |
Note. Currency pairs that triangulate must be classified as either direct or indirect to use in displaying the calculated cross rate. Two fields store the rate conversion factor: RATE_DIV and RATE_MULT. The currency conversion formula is always: (From currency ÷ RATE_DIV) ? (RATE_MULT) = To currency
Select the Triangulate check box to have the system convert two currencies through a third currency (the reference currency). Triangulation is used in hyperinflationary environments in which all conversions to the local currency are done through a more stable currency such as USD.
Note. Triangulation was initially used for European countries participating in the euro. However, since 1999 all countries participating
in the euro are quoted directly against the foreign currency.
Any countries newly participating in the euro might be initially subject to triangulation, however. The triangulation example
below and any other examples in this chapter that show triangulation, use a fictional country, with a currency code of NEW,
that has just joined the euro. This country is subject to triangulation.
The following are examples of indirect quotation, direct quotation with quote units, and triangulation:
USD 100 to GBP (indirect) = (USD 100 x 1.6) x 1 = GBP 62.50.
CHF 1000 to German marks (DEM) (direct with units) = (CHF 1000 / 100) x 119.335 = DEM 1193.35.
USD 100 to NEW (triangulate) = (USD 100 / 1.25) x 6.8 = NEW 544.
For example, to convert from USD to NEW with triangulation, you perform two conversions:
Convert the USD amount to the reference currency using the appropriate triangulated rate.
The triangulated rate uses the USD to EUR component of the USD to NEW triangulated rate that is stored in RATE_DIV.
Convert the reference currency to NEW using the fixed exchange rate.
The exchange rate uses the EUR to NEW component of the USD to NEW triangulated rate that is stored in RATE_MULT.
Typically, you do not maintain triangulation rates directly. Instead, you process these and all rates through the Cross/Reciprocal Rate Calculator.
Select a reference currency through which the from currency will be converted.
You must consider three exchange rates for triangulated currency pairs:
The rate between the from currency code and reference currencies.
The rate between the reference and the to currency code currencies.
The cross rate between the from currency code and to currency code currencies.
Select one of the three conversion rates as the primary rate that appears on primary pages and reports.
Select the Allow Override check box to enable users to override the cross rate for a triangulated currency pair. If this option is cleared, you can change the components of only the triangulated rate.
Recalculate
If you select the Allow Override check box, you must maintain triangulation accuracy by specifying which currency pair the system should use to recalculate if the cross rate is overridden.
Automatic Reciprocation of Quote Methods
The Currency Quotation Method page automatically provides reciprocal methods. For example, if you define the conversion of USD to NEW as indirect, this record is automatically created to indicate a quote method of direct. If you change the quote method on the NEW to USD record, the USD to NEW record is updated automatically.
Note. This example uses a hypothetical currency NEW that has just begun participating in the euro and is still subject to triangulation for an initial period.
Using the conversion of USD to NEW as an example, this table shows each possible field value and its corresponding reciprocal value.
|
Field |
Value (for USD to NEW) |
Reciprocal Value (for NEW to USD) |
|
Quotation Basis |
Direct Indirect |
Indirect Direct |
|
Quote Units |
Any valid value |
Same value |
|
Rate Decimal Positions |
4 (default value) |
Same value |
|
Auto Reciprocate |
Yes No |
Yes No |
|
Triangulate |
Yes No |
Yes No |
|
Reference Currency |
Any valid value |
Same value |
|
Primary Visual Rate |
From - To (USD - NEW) From - Ref (USD - EUR) Ref - To (EUR - NEW) |
From - To (NEW - USD) Ref - To (EUR - USD) From - Ref (NEW - EUR) |
|
Cross rate Allow Override |
Yes No |
Yes No |
|
Cross rate Recalculate |
From - Ref (USD - EUR) Ref - To (EUR - NEW) |
Ref - To (EUR - USD) From - Ref (NEW - EUR) |
Establishing Market Rates for EPM Currency Conversion This section discusses how to:
Define market rates.
Establish rate definitions.
Maintain exchange rates.
Load market rates.
Pages Used to Establish Market Rates
|
Page Name |
Object Name |
Navigation |
Usage |
|
Market Rate |
RT_RATE_PNL |
EPM Foundation, EPM Setup, Common Definitions, Currencies and Rates, Market Rates, Market Rate |
Define market rates. |
|
Rate Definition |
RT_RATE_DEF_SEC |
Click the Rate Definition link on the Market Rates page. |
Establish rate definitions. |
|
Exchange Rate Detail |
EXCH_RT_DTL |
Click the Exchange Rate Detail button on the Market Rates page. This page can also be accessed from other pages in the system. |
Maintain exchange rates. |
Defining Market RatesAccess the Market Rates page.
You can edit the rate for non triangulated rates and for triangulated rates if a quotation method has been defined for the currency pair and the Cross rate Allow Overridecheck box is selected on the Currency Quotation Method page. If an override is not allowed, you can update the exchange rate values to and from the reference currency on the Exchange Rate Detail page.
Changing a Triangulated Cross Rate
If you change a triangulated cross rate, the system recalculates one of the component rates. This can result in the cross rate being recalculated in a manner that is slightly different from the one that you entered. For example, you start with a triangulated rate of RM=6.80000000 and RD=1.25000000 for a cross rate of 5.44000000. If you change the cross rate to 5.43550000:
The system first recalculates RD to 1.25103486.
The system then recalculates the cross rate to 5.43550001 based on the first recalculation.
In rate maintenance, you must accept the recalculation. However, in a situation such as journal entry, a warning message enables you to override triangulation and to use the exact rate that you entered, which results in the rate being stored as RM equal to 5.43550000 and RD equal to 1.
You can edit the Rate field except when all of these conditions are true:
The rate is triangulated.
The primary visual rate is the cross rate.
The Allow Override check box on the Currency Quotation Method page is cleared for the exchange rate's quotation method.
Note. Typically, you do not maintain triangulated exchange rates online. Instead, maintain the rates of the from currency to the reference currency and the reference currency to the to currency, and then run the Cross rate Reciprocal SQR (EO9030.SQR) to define the triangulated exchange rates.
If a quotation method has been defined for the currency pair and if the Auto Reciprocate check box is selected, creating or maintaining a rate for a currency pair automatically creates or updates the rate of the reciprocal currency pair. For example, if you change the USD to GBP rate, the GBP to USD rate automatically is automatically updated. You can only automatically reciprocate currency pairs for which quotation methods have been defined.
If a rate definition does not already exist for the currency pair, one will be automatically created with the default values of 2.5 percent maximum variance and warning message processing.
Establishing Rate Definitions Access the Market Rate - Rate Definition page.
|
Maximum Variance |
You can modify the maximum variance—that is, the percentage of variance allowed when you maintain the market rate. If the change exceeds the tolerance, an error results. The default value is 2.50 (2.5 percent). |
|
Error Type |
You can modify the type of error that results when the tolerance defined in the Maximum Variance field is exceeded during data entry. Error type values are: None: No error processing occurs. The new rate is used even though it exceeds the limit. Stop : Processing halts. The system prevents you from saving the new rate. Warning: A warning appears. You can ignore it and save the new rate. |
Note. The results of changing the rate definition do not take effect until you save the Market Rates page.
Click OK to return to the Market Rates page.
Maintaining Exchange Rates Access the Market Rate - Exchange Rate Detail page.
The read-only fields include:
|
Rate Quotation Basis |
Displays the quotation basis for the exchange rate as it is defined on the Currency Quotation Method page. If no quotation method is defined, the quotation basis is Direct. |
|
Quote Units |
Displays the quote units for the exchange rate as defined on the Currency Quotation Method page. If no quotation method is defined, the quote unit is 1. |
|
Triangulate |
Displays the triangulated setting for the exchange rate as it is defined on the Currency Quotation Method page. If no quotation method is defined, the triangulated setting is N. |
|
Reference Currency |
Displays triangulated exchange rates only, and shows the reference currency used in the triangulated exchange. |
|
Current Quote |
Displays the current exchange rate used to convert the from currency to the to currency. A direct, nontriangulated rate shows quote units (or 1) on the left side of the equal sign and the visual rate on the right. For example: 1 USD = 1.40000000 CAD. A triangulated rate displays two component rates of the triangle: the rate for converting the from currency to the reference currency, and the rate for converting the reference currency to the to currency. |
|
Historic Quote |
Displays a quote to indicate the quotation method originally used by a historic exchange rate if the system determines that the original quotation method of the historic rate differs from the current quotation method. This field displays the following information:
|
|
Exchange Rate |
Displays a single visual rate for nontriangulated exchange rates or displays all three component visual rates for triangulated exchange rates. The cross rate for triangulated exchange rates is editable only if the Allow Override check box is selected in the exchange rate's quotation method definition. |
Loading Market RatesMarket rates can be loaded to the RT_RATE_TBL from any external source using the DataStage ETL tool.
Note. Use the Market Rates page to verify that the market rates were loaded correctly.
Calculating Currency Rates for EPM Currency ConversionThis section provide an overview of currency calculations and discusses how to:
Calculate cross rates and reciprocal rates.
Run the Currency Exchange Calculator tool.
Understanding Currency CalculationsPeopleSoft calculates currency rates for cross rates, triangulated rates, and reciprocal rates.
EPM utilizes two tools for currency calculations:
The Currency Exchange Calculator tool quickly performs ad hoc currency conversion using the exchange rates that are stored on the market rates table.
The Cross/Reciprocal Rate Calculator calculates exchange rates and updates the market rates table.
It performs three functions by generating the rates shown in this table:
|
Cross rates for nontriangulated currency pairs |
For example, an organization subscribes to a rate service that provides all rates respective to the USD. Starting with a USD to Canadian dollar rate and a USD to Mexican peso rate, the system can calculate a new Canadian dollar to Mexican peso cross rate. |
|
Triangulated rates for triangulated currency pairs |
For example, the euro to NEW (a fictitious country that has just joined the euro and is subject to triangulation) fixed rate has been established on the market rate table and a new euro to USD rate has just been entered. Using this information, the process can create a new USD to NEW triangulated rate. The difference between triangulated rates and cross rates affects how the data is stored in the database. When calculating a cross rate, you actually create a new rate. When calculating a triangulated rate, the individual components of the source rates are stored on the target. |
|
Reciprocal rates for those currency pairs that are not automatically reciprocated |
For example, using a USD to CAD rate as the source, the process calculates the CAD to USD reciprocal. If quote methods are in place, the visual rate remains the same and a difference exists in how the data is stored in the database (RATE_MULT and RATE_DIV are inverse). If quote methods are not used, the process calculates an inverse rate, meaning that the visual rates differ. |
Pages Used to Calculate Currency Rates
|
Page Name |
Object Name |
Navigation |
Usage |
|
Cross/Reciprocal Rate Calc (calculator) |
RUN_FIN9030 |
EPM Foundation, EPM Setup, Common Definitions, Currencies and Rates, Cross/Reciprocal Rate Calc, Cross/Reciprocal Rate Calculator |
Calculate cross rates and reciprocal rates by defining parameters to run the FIN9030 SQR report. |
|
Currency Exchange Calculator |
CURRENCY_EXCHNG_PN |
EPM Foundation, EPM Setup, Common Definitions, Currencies and Rates, Currency Exchange Calculator |
Run the Currency Exchange Calculator to calculate the currency exchange between currencies. |
Calculating Cross Rates and Reciprocal Rates Access the Cross/Reciprocal Rate Calculator page.
|
Language Code |
Select the language for translation. |
|
Market Rate Index |
Select a market rate index. |
|
Term |
The system displays this value by default from the value entered on the Market Rate Definition page. |
|
From Common Currency |
Select a currency code from which to calculate a reciprocal rate. |
|
Exchange Rate Type |
Select the type of exchange rate to use for this calculation. |
|
As of Date |
Determines the effective date of newly created exchange rates (the output of the process) and rates that are used as the basis for calculations (the input to the process). The report uses the most current currency quotation method for the currency pair as input for the process. If the as of date is the current effective rate as of the specified date, it can affect triangulation. |
|
Generate Report |
Select to specify that the system generate a report that displays exchange rates and reciprocal and cross rate calculations. |
|
Override Existing Rates |
Select to direct the calculated rate to override rates for the exchange rate type, regardless of the as of date. |
Generating Reciprocal Rates
You can select the Generate Reciprocal Rate check box by itself or in combination with the Rate Triangulate and Generate Cross Rate check boxes. When this option is selected, the system automatically calculates reciprocal rates for currency pairs for which the autoreciprocate option on the currency method is disabled.
The system does not directly manipulate the exchange rates. The system uses numerator and denominator values such that:
(From currency / RATE_DIV) x RATE_MULT = To currency
Generating Cross Rates
When you select the Generate Cross Rates check box, the system automatically generate cross rates. For example, to generate cross-currency rates for USD, (CAD), and (MXP), you enter USD to CAD = 1.473 and USD to MXP = 9.8793. The system automatically generates CAD to MXP = 9.8793 / 1.473 = 6.7069246.
If you generate cross rates, you must select a from currency and a to currency. You can enter a wild card of % in either field or both fields to indicatefrom all orto all currencies.
Generating Triangulation Rates
When you select the Rate Triangulate check box, the system converts two currencies through a third currency. If you select rate triangulation, you must select a from currency and a to currency. You can enter a wild card of % in either field or both fields to indicate from all or to all currencies.
Running the Currency Exchange Calculator ToolAccess the Currency Exchange Calculator page.
This tool enables you to enter a rate or an amount in a currency other than the base currency, or to compute an exchange using an alternative rate type.
|
From Amount |
Enter a from amount. The currency exchange is based on the from amount that you enter and the current exchange rate set up on the Market Rates page. |
|
From Currency Code |
Select the currency code from which to calculate the exchange amount. |
|
To Currency Code |
Select the currency code to which to calculate the exchange amount. |
|
Exchange Rate Type |
Select the type of exchange rate to use for this calculation. |
|
Converted Amount |
Displays the converted amount. The system automatically calculates this amount when you save the page. |
Note. Do not decrease the number of decimals after you have created transactions for that currency; the system will not properly round the previous rounded amount fields with the new precision.
Configuring Currency Precision for EPM Currency ConversionThis section provides an overview of currency precision and discusses how to:
Activate currency precision.
Maintain currency precision by currency.
Report with currency precision.
Understanding Currency PrecisionAccording to the ISO standard, currency precision can range from zero decimals to three decimals. For example, USD amounts have two digits to the right of the decimal, and JPY have none. To support this dynamic currency precision, the system delivers all of its currency-sensitive amount fields with a standard length of 23.3, or 23 digits to the left of the decimal and three digits to the right. A control currency on the same record exists to control the display and processing of such amount fields.
PeopleSoft applications round all currency-sensitive amount fields to the currency precision of the controlled currency during all online or background processes. For example, in a database that contains amount fields with a length of 23.3, JPY are rounded to 123.000 and USD are rounded to 123.230. The system does not place a nonzero after the decimal for a JPY amount or after the second digit to the right of the decimal for a USD amount.
Although amount fields are stored in the database with decimal placeholders, the system displays amount fields with the precision that is appropriate for the currency. For example, it displays JPY as 123 and USD as 123.23. When you enter an amount, you cannot enter more than the defined precision. If you attempt to do so, the system treats the entry as an online error.
PeopleCode programs and background processes round all currency-sensitive amount fields to the currency precision of the controlled currency.
See Also
Configuring Currency Precision for EPM Currency Conversion
Activating Currency PrecisionCurrency precision is a PeopleSoft PeopleTools option. When it is selected using the PeopleTools Options page, all features of currency precision are activated. When the option is cleared, all amount fields behave as if no controlled currency exists. The system displays amount fields as defined in the PeopleSoft Application Designer and rounds them to the number of decimals defined in the Application Designer.
Note. If you clear the multicurrency check box, the system only supports the default amount field size of 15.3—it does not support the larger amount field size of 23.3. After you clear this check box, selecting it again does not automatically round existing transaction amounts.
Maintaining Currency Precision by Currency
Use the Currency Code page to access the currency code table, in which you define the decimal position by currency. The values in this table are effective dated. The software is shipped with the currency code table in compliance with ISO standards for decimal positions. You can increase the number of decimals to a maximum of three.
Warning! Do not decrease the number of decimals after transactions are entered in that currency; the system does not properly round the previously rounded amount fields with the new precision.
See Also
Reporting with Currency Precision
Most PeopleSoft SQR reports display currency-controlled amounts with the number of decimal places that are defined by the associated currency. For example, a JPY amount appears as 123 on a report, and a United USD amount appears as 123.23.
Amounts on Crystal and PS/nVision (Microsoft Excel) reports appear as two-decimal-place numbers. If you want to show three decimal places on these reports, you must configure the reports to do so.
Third-party reporting tools used by PeopleSoft do not fully support numeric fields greater than 15 digits. Microsoft Excel uses an eight-byte float for numeric fields, which causes values to be truncated after the fifteenth digit.
Crystal displays up to 15 digits correctly. When a value exceeds 15 digits, Crystal inserts invalid numbers into the decimal positions. This is an issue for only very large currency amounts. For any of these reporting tools, the accuracy of the results is:
Hundreds of trillions of yen (precision = 0).
Trillions of dollars (precision = 2).
Hundreds of billions of dinar (precision = 3).
For example, if you populate a 23.3 numeric database amount field with the number 2, the following table illustrates the number that is displayed in each type of report.
|
Number of Digits |
Crystal |
Excel |
SQR |
|
16 |
2,222,222,222,222.222 |
2,222,222,222,222.220 |
2,222,222,222,222.222 |
|
17 |
22,222,222,222,222.219 |
22,222,222,222,222.200 |
22,222,222,222,222.220 |
|
18 |
222,222,222,222,222.188 |
222,222,222,222,222.000 |
222,222,222,222,222.200 |