This chapter describes how to use the GroupSpace Community portlets. A portlet is a Web-based component that processes requests and generates dynamic content. GroupSpace portlets can communicate with each other. You can customize the content and appearance of a portlet to meet your specific business needs.
GroupSpace contains 13 Community-enabled portlets that work inside the GroupSpace Community. The portlets that do not begin with GS (such as Tasks) can be used outside of a GroupSpace Community.
Tip:
The portlet preferences for the portlets that can be used outside of a GroupSpace Community (Tasks, Mail, Calendar, Contacts, and Discussion Forum) are ignored inside a GroupSpace Community.
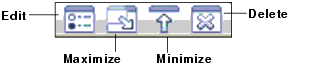
Each portlet contains icons that allow you to edit the portlet’s properties, delete it, enlarge it, or reduce it, as shown in Figure 7-1.
Figure 7-1 Portlet Icons
Editing the portlet’s preferences lets you change the language, time zone, and other portal-specific settings.
Using the GS Issues Portlet
Use the GS Issues portlet to create lists of topics that are related to a project. For example, project managers can maintain a list of open issues that are migrated to closed issues as they are resolved. Any Community member in a contributor or owner role can create an Issue.
You can create Issues that are Private, Personal, or visible to the Community. See Controlling Who Can View Portlet Data to learn more about who can view portlet data.
You can also filter the list of Issues by status (for example, to show all Open Issues).
Tip:
Issues are different than Tasks because Issues do not have a due date. Users could create a Task based on an Issue, to track the work required to resolve the Issue.
Adding an Issue
Perform the following steps to add a new Issue:
Select the Collaborate tab and the Issues tab.
In the Browse tab, select the Community tab to create a Community Issue that all members of the Community can view. Select the Personal tab to create a Personal Issue that the user can view across all the Communities to which the user belongs. (You can also create a Private Issue by creating a Community Issue and marking it as Private. See
step 5 for instructions.)
You can create an Issue and place it in the top-level Issues folder, or you can put the Issue in a subfolder. Select the location in the tree where you want the folder and click Create Folder. Enter the name in the Folder Name field and click Create Issue Folder.
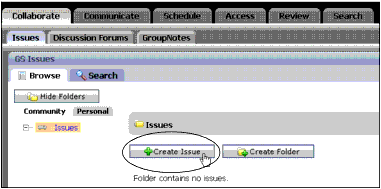
Select the folder where you want to place the Issue and click Create Issue, as shown in Figure 7-2.
Figure 7-2 Create a New Issue to Track Comments and Progress
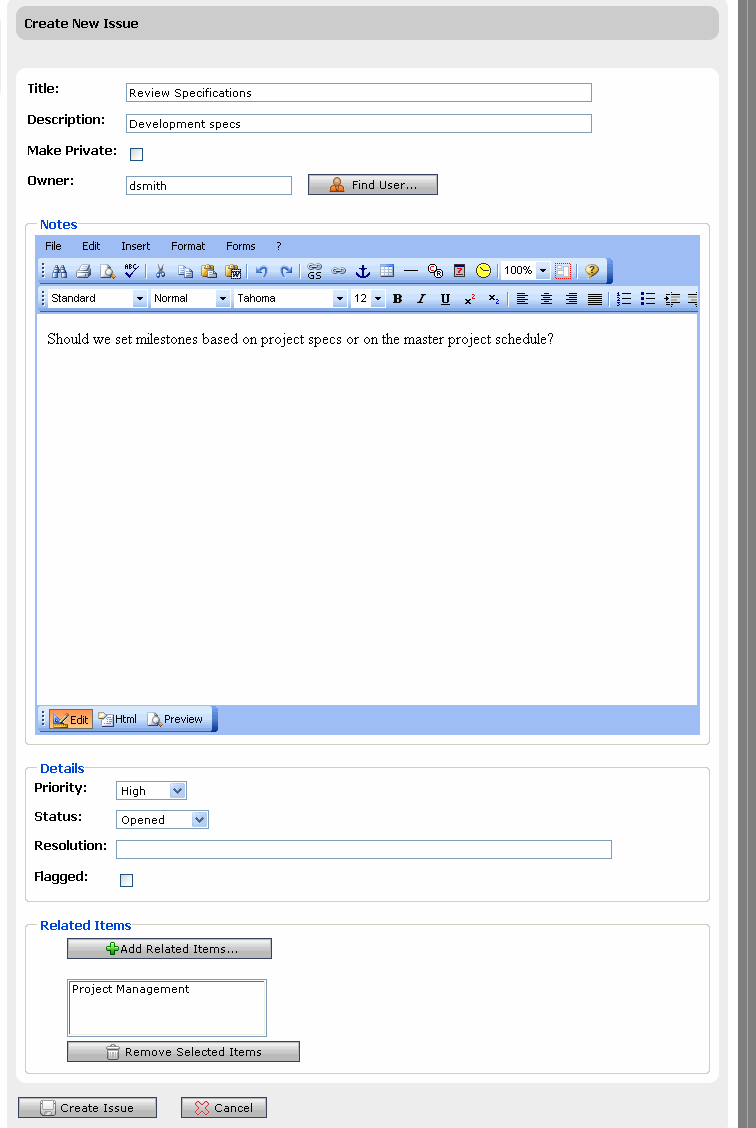
The text fields for an Issue are limited to 256 characters. In the Create New Issue area, enter the following information:
Title – Enter a brief title that describes the Issue. The field is limited to 254 characters.
Description – Enter more detail about the Issue. The field is limited to 254 characters.
Make Private – Select this check box to ensure that only you can view this Issue in this GroupSpace Community. If you do not select the Make Private check box, all Community members can view the Issue. Community issues are stored in the database at \GroupSpace\collaborationApp\collaborationWebApp\community\ publicCommunity\Issues hierarchy, while Private Issues are stored in your personal folder in the database at \users\<a>\<andrew>\<ProjectStatusIssue> hierarchy. In the example, the <a> directory reflects the first letter of the user name and the <ProjectStatusIssue> represents the name of the Issue.
Owner – Enter the Community member you are assigning to the Issue, or click Find User to locate the user. In the Member Picker window, you can click Show All Members to view all Community members, or select a letter to view member names that begin with that letter. Select the radio button next to the member’s name and click OK.
Notes – Enter more information about the Issue, or report progress on resolving the Issue. If your System Administrator and Portal Administrator enabled the rich text editing formatting toolbar and the bottom toolbar for this portlet, you can use the formatting toolbar (see Figure 4-5 in Chapter 4) to format your text. Clicking the bottom toolbar’s HTML button lets you view the body with the HTML tags inserted, and clicking the Preview button allows you to view the Issue before you save it.
Tip:
If you do not see the formatting toolbar or the bottom toolbar, rich text editing and the bottom toolbar are not enabled for this portlet. For instructions on enabling rich text editing, see Setting Up the Rich Text Editor.
Priority – Select the drop-down list and choose High, Medium, or Low. This field is internationalized so you can change the displayed language if you want.
Status – Select the drop-down list and choose Opened, InProgress, or Closed. This field is internationalized so you can change the displayed language if you want.
Resolution – Enter comments after the issue is resolved by editing the Issue and completing this field. For example, you could use these Resolution summaries to review all Issues with a Closed status.
Flagged – Select this check box to set the Flagged field to true. Use the Flagged field to monitor Issues that are important to you. Select the Search tab in the Issues tab to search for issues you have flagged.
Related Items – Click Add Related Items to insert a relationship to certain content or artifacts, or a QuickLink item to include information that pertains to this issue. The Add Related Items window lets you search for content by choosing a QuickLink item or entering a search query. You can select a Full Text Search (to search all available text) or Field Search (to search specific fields), enter a search query or keyword, and click Search. You can also narrow your search by selecting a type of resource from the Resource Type drop-down list. When you locate a content item, select the check box next to it and click Add. A reference to the document appears in the Related Items field.
Figure 7-3 shows the fields to complete to create an Issue.
Figure 7-3 Create a New Issue
Click Create Issue.
Click Done, and the Issue appears in the GS Issues portlet, as shown in Figure 7-4.
Figure 7-4 New Issue
Note:
An Issue can reside in only one folder You can move (or drag and drop) an Issue to a folder in the tree where the Issue was created. For example, you can move a Community Issue from one folder to another folder in the Community tree, but you cannot move a Community Issue to the Personal tree. Personal data is stored in a different folder than the Community data.
After you create an Issue, you can create Tasks to do to resolve the Issue. See Using the Tasks Portlet.
Managing Issues
You can also perform the following tasks with Issues:
Edit an Issue – Modify the Issue by clicking the Issue’s name in the Title column and clicking Edit. Click Update Issue when you are done.
Sort the Issue Columns – Click the column’s heading to re-sort the list.
Delete an Issue – Hover the mouse over the Issue, hover over the arrow that appears, and choose Delete Issue. Deleting an Issue removes it from the database.
Copy an Issue to QuickLinks – Hover the mouse over the Issue, hover over the arrow that appears, and choose Copy to QuickLinks.
Searching Issues
See Using the Search Portlets for instructions on searching the GS Issues portlet, performing a GroupSpace search, and searching outside GroupSpace.
Using the GS Links Portlet
The GS Links portlet helps you create and manage Links to URLs, as well as to content that is internal to the Community. For example, you might use the GS Links portlet to manage a development project, providing links to schedules, progress reports, and software defects.
Links can be created and edited by Community owners, creators, and contributors.
You can use categories to organize your links. Each category appears as a tab in the GS Links portlet. You can add a Link that is visible only to the Community, just to you in this Community (Private), or just by you in all the Communities to which you belong (Personal).
Creating a New Category
The GroupSpace application contains a default Category called Favorite Links. When you create a new category, a new tab appears in the GS Links portlet.
Perform the following steps to create a new category in the GS Links portlet:
Select the Access tab and the Sites tab.
In the GS Linksportlet, click Edit Categories.
Click Add New Category.
Enter a name for the new category and click OK. The field is limited to 50 characters.
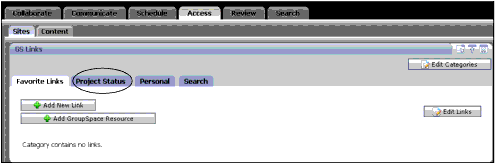
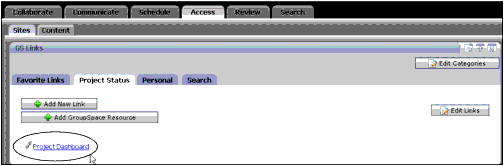
Click Done. The new Category (for example, Project Status) appears as a tab, as shown in Figure 7-5.
Figure 7-5 Create a New Category
You can rename a category by selecting the category tab, clicking Edit Categories, and clicking Rename. Enter the new name and click Update Category Name.
Managing Your Categories
You can re-order the category tabs in the GS Links portlet, and you can also delete categories. When you delete a category from the GS Links portlet, all links associated with the category are also deleted from the portlet.
Perform the following steps to change the tab order in the GS Links portlet:
In the GS Links portlet, click Edit Categories.
In the Reorder column for the category you want to change, click the up or down arrow to change its order.
Note:
To delete a category, select the check box next to the category and click Delete Selected Categories.
Click Done.
Adding a New Link
A Link can reside in only one folder.
Perform the following steps to add a new link:
Select the Access tab and the Sites tab.
In the GS Links portlet, select a category tab and click Add New Link.
Enter the following information.
Title – Enter text that describes the link. The field is limited to 254 characters.
Description – Enter more detail about the link. The field is limited to 254 characters.
URL – Enter the URL you want to use as a link. The field is limited to 254 characters.
Make Private – Select this check box to be the only user who can view the data in this Community.
Click Add New Link. The new link appears in the GS Links portlet, as shown in Figure 7-6. Clicking a Link opens the link in a browser.
Figure 7-6 New Link
Adding a GroupSpace Resource
You can add a new GroupSpace Resource, which is a link to another GroupSpace artifact.
Perform the following steps to add a GroupSpace Resource:
Select the Access tab and the Sites tab.
In the GS Links portlet, select a category tab and click Add GroupSpace Resource.
You can insert a relationship to certain content or artifacts, or a QuickLink item. The Add Related Items window lets you search for content by choosing a QuickLink item or entering a search query. You can select a Full Text Search (to search all available text) or Field Search (to search specific fields), enter a search query or keyword, and click Search. You can also narrow your search by choosing the type of resource from the Resource Type drop-down list. When you locate a content item, select the check box next to it and click Add. The link appears in the category tab.
Managing Your Links
You can also perform the following tasks:
Edit a Link – Modify the link by hovering your mouse over the Link, hovering over the arrow that appears, and choosing Edit Link. Enter your changes and click Update Link.
Re-order the Links – Re-order how the Links appear by clicking Edit Links. Click the up or down arrow to reorder the link and then click Done.
Move a Link – Movea Link to another category by dragging the Link to the category’s tab.
Delete a Link – Remove a link from the GS Links portlet by hovering your mouse over the Link and choosing Delete Link.
The GS RSS Reader portlet connects to external sites that provide Rich Site Summary (RSS) or Atom information and displays the channels as clickable links. RSS is a format used to syndicate news and other web content. RSS channels can include web sites and weblogs. Examples of RSS channels include NewsGator, Safari, and newyorktimes.com.
An RSS channel can be plain text, HTML, or XML. You can set up an RSS channel to be visible to everyone in the Community, just to you in this Community, or just to you in all the Communities to which you belong.
The GS RSS Reader portlet stores the URLs, title, header, and author in the Content Management System, but not the body of the article. An archive feature stores the body of the article.
WebLogic Portal supports the following versions of RSS and Atom feeds:
RSS 0.90
RSS 0.91 Netscape
RSS 0.91 Userland
RSS 0.92
RSS 0.93
RSS 0.94
RSS 1.0
RSS 2.0
Atom 0.3
Atom 1.0
Subscribing to an RSS Channel
Perform the following steps to subscribe to an RSS channel:
Select the Access tab and the Sites tab.
In the GS RSS Reader portlet’s Browse tab, select the Community tab or the Personal tab. Selecting the Community tab allows other Community members to see the new RSS information and places the item in the RSS Channels folder. If you select the Personal tab, only you can see the new RSS information (in all the Communities to which you belong) and the channel is placed in the RSS Feeds folder.
Click Create New RSS Channel.
Enter the URL to the RSS channel. For example, http://rss.news.yahoo.com/rss/oddlyenough.
If you are in the Community tab, you can select the Make Private check box to be the only user who can view the data in this Community.
Click Create RSS Channel.
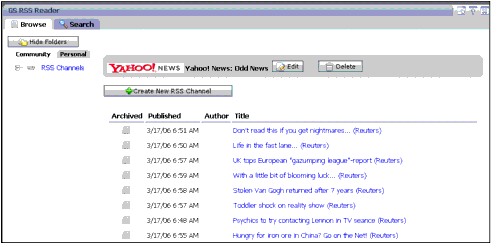
Click the RSS channel to select it and see its entries, as shown in Figure 7-7.
Figure 7-7 New RSS Channel
Managing RSS Channels
You can also perform the following tasks in the GS RSS Reader portlet:
Edit an RSS Channel – You can change an RSS channel from a personal channel to a Community channel. Hover your mouse over the channel and when the arrow appears, choose Edit Channel. Change the visibility to Community and click Update RSS Channel. You cannot change the visibility of a Community-scoped channel.
Delete the RSS Feed – Remove the RSS feed by hovering your mouse over the channel, clicking the arrow that appears, and choosing Delete Channel.
View a Channel Entry – Click the channel to view all of its entries. Click a specific entry to view a summary of the article. Click Read more to see the full article.
Archive an RSS Channel – Click the channel to view its entries. Hover your mouse over a specific feed entry, click the arrow that appears, and choose Toggle Archival for this Article or click the file cabinet icon. The Archive icon becomes active. An archived feed is saved to the database.
Searching RSS Feeds
You can use the GS Search portlet (in the Search tab) or the GS RSS Reader’s Search tab to search RSS channels. Both types of search let you do a Full Text Search or a Field Search. A Full Text Search is performed against the channel summaries, rather than the feed itself. A Field Search is performed on the properties of individual feed entries (title, visibility, and so on).
The GS Announcements portlets displays important notices to the Community. Two GroupSpace portlets let you create and view Announcements:
GS Announcements – View Announcements
GS Announcements Manager – Create, edit, and delete an Announcement
An Announcement contains a Title, Description, Body, Effective Date and Expiration Date, Severity, and an Address To recipient.
Any Community member with create capabilities can create an Announcement. All Community members can view the Announcement (based on the Address To field). An Announcement is sent only once. When an Announcement expires, it automatically disappears from the GS Announcements portlet and the GS Announcements Manager portlet.
Creating an Announcement
Perform the following steps to create a new Announcement:
Select the Communicate tab and the Announcements tab.
In the GS Announcements Manager portlet, click Create Announcement.
In the New Announcement area, enter the following information:
Title – Enter text that briefly describes the Announcement.
Description – Enter additional text about the Announcement.
Severity – Select one of the following items from the drop-down list:
Normal – The Notification is sent based on the normal timer sequence.
Critical – One Notification alert is sent per session according to the time you set in the Effective Date field. The GroupSpace application checks every five minutes for Critical Announcements and it sends the Critical Alert, which appears as a pop-up window.
Low – The Notification is sent based on the normal timer sequence.
Address To – Choose All or a subset of the Community that will receive the Announcement:
Effective Date – Click the calendar icon to choose the date and time you want to send the Announcement. The effective date must be later than the current date.
Expiration Date – Click the calendar icon to choose the date and time you want the Announcement to expire. The Expiration Date must be later than the Effective Date; the default is one week later. The Announcement must be effective for at least 24 hours.
Body – In the text area, enter the body of the Announcement. If your System Administrator and Portal Administrator enabled the rich text editing formatting toolbar and the bottom toolbar for this portlet, you can use the formatting toolbar (see Figure 4-5 in Chapter 4) to format your text. Clicking the bottom toolbar’s HTML button lets you view the body with the HTML tags inserted, and clicking the Preview button allows you to view the Announcement before you save it.
Tip:
If you do not see the formatting toolbar or the bottom toolbar, rich text editing and the bottom toolbar are not enabled for this portlet. Rich text editing and the bottom toolbar are disabled by default. For instructions on enabling rich text editing, see Setting Up the Rich Text Editor.
Click Add. Based on the Address To field, some or all Community members receive a Notification when the Announcement is created. A Notification also appears in your Notifications Center.
Managing Announcements
Owners and contributors can also perform the following tasks in the GS Announcements Manager portlet:
Edit an Announcement – Modify the Announcement by clicking it and clicking Edit. You cannot modify an Announcement that has already been sent.
Delete an Announcement – Remove the Announcement that you created by selecting the check box next to it and clicking Delete. Deleting an Announcement removes it from the database. If you do not manually delete an Announcement, it is deleted after it expires.
Editing or deleting an Announcement affects its status in the Notifications Center.
Viewing Announcements
All users can view the GS Announcements portlet.
You can perform the following actions in the GS Announcements portlet:
View more details about the Announcement by clicking its title in the GS Announcements portlet.
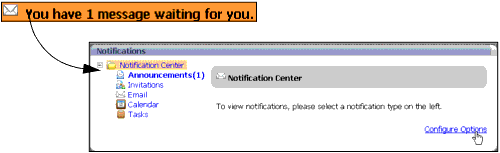
Click the Notifications Center link to view the Announcement, as shown in Figure 7-9.
Figure 7-9 Notifications Center
After you click Announcements(1) (see Figure 7-9), you can remove the notification for the Announcement by selecting the Delete check box and clicking Delete Selected.
The Announcement disappears from the GroupSpace application when it expires.
Using the GS Document Library Portlet
The GS Document Library portlet provides access to a collection of documents and other content for GroupSpace Community members. This document library lets you create, group, and share documents with other Community members. The GS Document Library portlet lets you place items in folders and subfolders. Content is saved to the WLP Virtual Content Repository.
GroupSpace creators, owners, and contributors can create documents and content items. The GS Document Library portlet also allows users to browse the directory where they have access privileges. If the user belongs to more than one Community, all personal content that the user is allowed to see is displayed.
Documents can be any type of file; for example, MS Word files, text files, or binary files.
Tip:
You might want to create a folder before you create a document; so that you can place the document directly in the folder. Click Create Folder, enter a name, and click Create Document Folder. You can create folders for Community documents, but not for Personal documents.
Perform the following steps to add a new document or file to the GS Document Library:
Select the Access tab and the Content tab.
In the Browse tab of the GS Document Library portlet, select the Community tab to add a document that is visible to all Community members. In the Community tab, you can choose to make the document Private (visible only to you in this Community). You can select the Personal tab to add a document that is visible to you in all the Communities to which you belong.
Select the folder where you want to place the document and click Create Document. (You cannot create folders for Personal documents.)
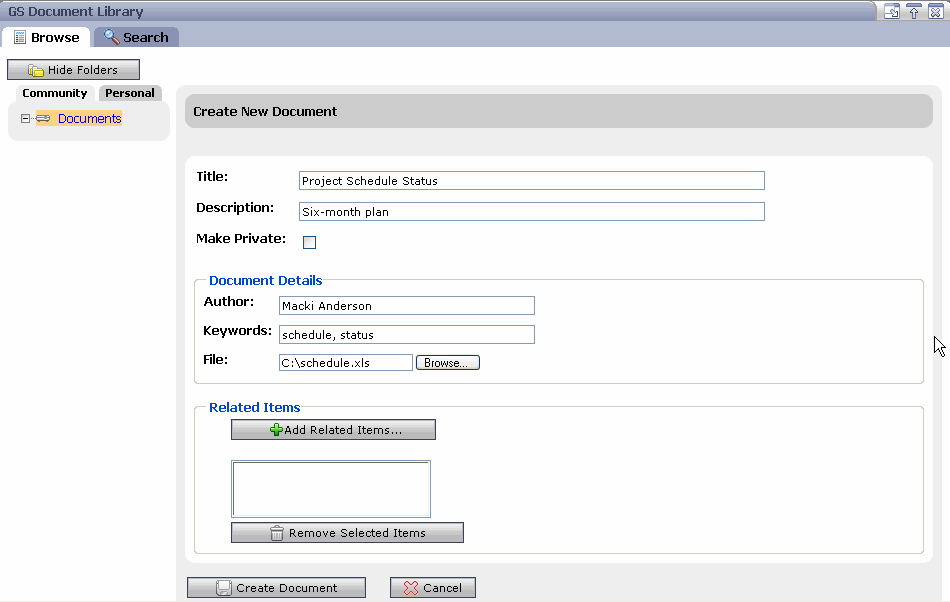
Enter the following information:
Title – Enter a unique name for this document.
Description – Enter text that describes the document.
Make Private – Select the check box to make this document visible only to you in this Community. If you do not select the check box, the document is visible to all Community members.
Author – Enter the Community member who created this document.
Keywords – Enter searchable words that are contained in this document. This field allows you to quickly retrieve the document when you perform a property search.
File – Attach a file. Click Browse, locate the file, and click Open. The file can be any type of file, including an MS Word file, text file, or a binary file.
Related Items – Click Add Related Items insert a relationship to certain content or artifacts, or a QuickLink item to include information that pertains to this document. The Add Related Items window lets you search for content by choosing a QuickLink item or entering a search query. You can select a Full TextSearch (to search content or metadata) or Field Search (to search specific fields), enter a search query or keyword, and click Search. You can also narrow your search by selecting a type of resource from the Resource Type drop-down list. When you locate a content item, select the check box next to it and click Add. A reference to the document appears in the Related Items field.
Click Create Document. The new document appears in the GS Document Library portlet.
Managing Documents
Creators, owners, and contributors can perform the following tasks in the GS Document Library portlet (except where indicated):
Download a Document – Viewers (as well as creators, owners, and contributors) can retrieve a copy of the file byclicking the document’s title and then clicking Download. Choose Open or Save.
Edit a Document – Modify the document or the attached file by clicking the document’s title and then clicking Edit. Enter your changes and click Done.
Delete a Document – Remove the document by hovering your mouse over it, clicking the arrow that appears, and choosing Delete Document. Deleting a document removes it from the database. By default, a contributor cannot delete a document.
Copy a Document to QuickLinks – Copy a document to the QuickLinks area by hovering your mouse over it, clicking the arrow that appears, and choosing Copy to QuickLinks.
Edit a Community Folder – Rename a folder by selecting it and clicking Edit.
Create a Community Subfolder – Select the parent folder, hover your mouse over it, click the arrow that appears, and choose Create New Subfolder.
Owners and Contributors can use the GS GroupNotes portlet to create and update formatted documents to share with the Community. Standard formatting includes bullets, italics, bold, or colored text, and so on. You can also insert links or references to web sites, other GroupNotes documents, and GroupSpace content items (such as Issues).
Tip:
You might want to create a folder before you create a document, so that you can place the document directly in the folder. Click Create Folder, enter a name, and click Create Folder.
Creating a GroupNote
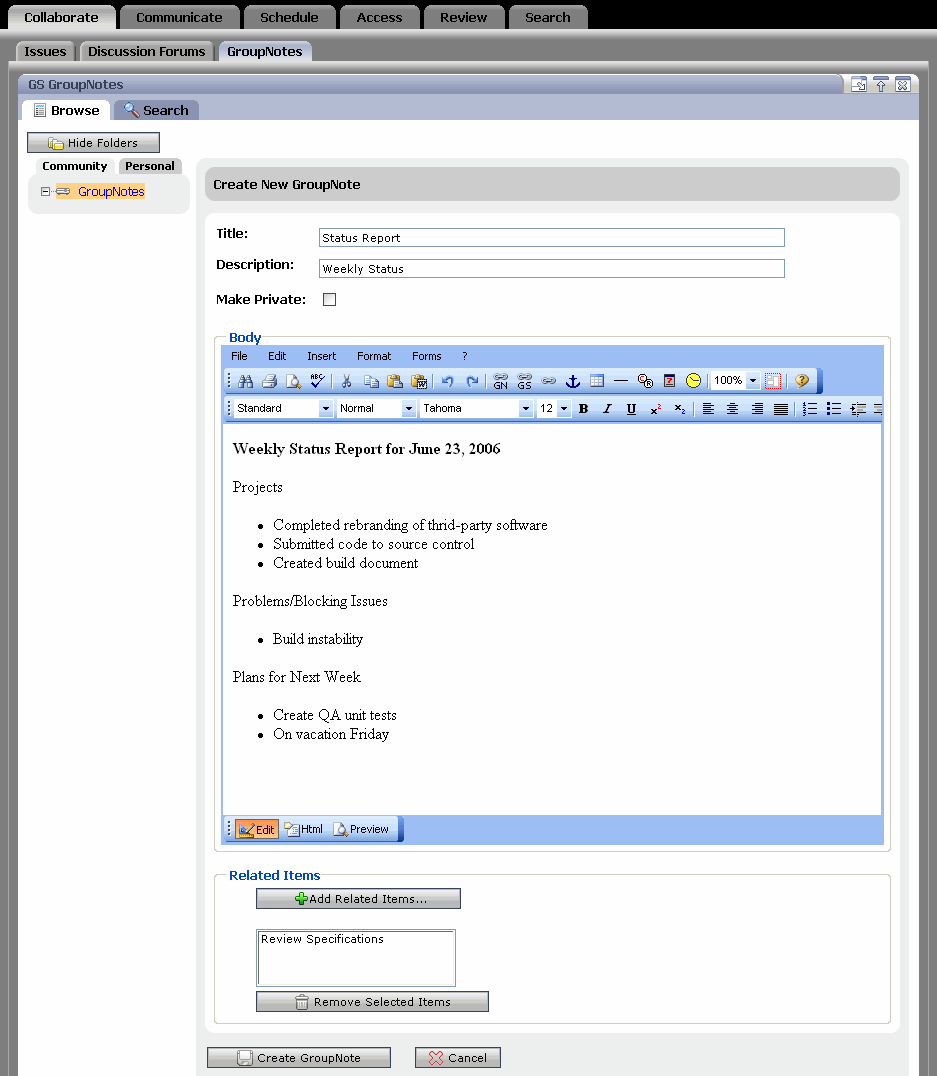
Perform the following steps to create a new document:
Select the Collaborate tab and the GroupNotes tab.
In the GS GroupNotes portlet, expand the tree and select the folder where you want to place the document.
Click Create GroupNote to start a new document.
In the Title field, enter a name for this document.
In the Description field, enter text that describes your document.
Select the Make Private check box to make this document viewable only by you in this Community. If you do not select the Make Private check box, the document is available to the entire Community, or to all Communities to which you belong. Personal documents are stored in a separate folder from Community and Private information.
In the Body area, type information about the GroupNote. If your System Administrator and Portal Administrator enabled the rich text editing formatting toolbar and the bottom toolbar for this portlet, you can use the formatting toolbar (see Figure 4-5 in Chapter 4) to format your text. Clicking the bottom toolbar’s HTML button lets you view the body with the HTML tags inserted, and clicking the Preview button allows you to view the GroupNote before you save it.
Tip:
If you do not see the formatting toolbar or the bottom toolbar, rich text editing and the bottom toolbar are not enabled for this portlet. Rich text editing and the bottom toolbar are disabled by default. For instructions on enabling rich text editing, see Setting Up the Rich Text Editor.
In the Body, you can insert the following kinds of links in a GroupNotes document:
Web Site – Choose Insert >Link to insert a link to a web site by adding the URL to a fully qualified URL. The fields in the Link Properties window correspond to standard HTML attributes for an anchor tag. Click OK.
GroupNote Rich Text Document – Choose Insert >Link to GroupNote to insert a link to another rich text object. Use the portlet search tool to locate the document you want to insert in this GroupNote.
GroupSpace Content item – Choose Insert > Link to GS Resource to insert a link to a content item, such as an Issue, contained in the virtual content repository. Use the portlet search tool to locate the content you want to insert in this GroupNote.
Click Add Related Items to insert a relationship to certain content or artifacts, or a QuickLink item to include information that pertains to this GroupNote. The Add Related Items window lets you search for content by choosing a QuickLink item or entering a search query. You can select a Full Text Search (to search content or metadata) or Field Search (to search content properties), enter a search query or keyword, and click Search. You can also narrow your search by selecting a type of resource from the Resource Type drop-down list. When you locate a content item, select the check box next to it and click OK. A reference to the document appears in the Related Items field.
Click Create GroupNote. The document appears in the GS GroupNotes portlet.
Click Done.
Managing GroupNotes
Owners, creators, and contributors can also perform the following tasks in the GS GroupNotes portlet:
Edit a GroupNote Document – Modify the GroupNote document by hovering your mouse over the title of the GroupNote. Click the arrow that appears and choose Edit GroupNote.
Change the Display Mode – Modify what displays by opening an existing GroupNote and clicking Display Mode. Select Normal Mode to display GroupNote folders and perform administrative tasks. Select Display Mode with Selected GroupNote to display only the content of this GroupNote.
Delete a GroupNote Document – Remove the GroupNote document by hovering your mouse over the GroupNote. Click the arrow that appears and choose Delete GroupNote. Deleting a GroupNote removes it from the database. A contributor cannot delete a GroupNote.
Rename a folder – Select the GroupNotes folder and click Edit. Enter a new folder name and click Update Folder.
The Tasks portlet allows you to create and track Community items or personal items on a To Do list. You can view recent tasks and quickly add new tasks. The Tasks portlet can store personal information and Community information.
The Tasks portlet provides summary information about a list of tasks including priority, attachments, subject, status, and due date. Tasks can be sorted by each of these fields, except file attachments and priority.
Adding a Task
Perform the following steps to create a new Task:
Select the Schedule tab and the Tasks tab.
Select the Community tab to add a Community task or the Personal tabto add a personal task.
Click Add Task
Enter the following information:
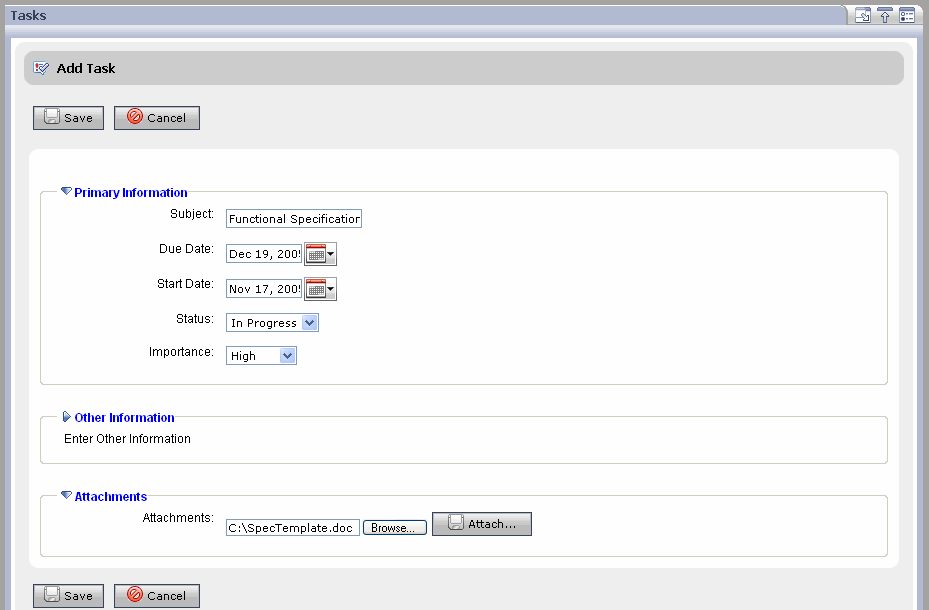
Primary Information – Click Primary Information and enter the following information:
Subject – Enter text describing the Task.
Due Date – Click the calendar icon and select a due date and time.
Start Date – Click the calendar icon and select a start date and time.
Status – Click the drop-down list and choose NotStarted, Completed, or InProgress.
Importance – Click the drop-down list and choose High, Low, or Medium. On the Tasks portlet, high priority tasks are denoted with a red exclamation point, while low priority tasks have a blue down arrow.
Other Information – Click Other Information to add categories for this Task (separated by a semicolon), adjust the Percent Complete, or add detailed Comments. If your System Administrator and Portal Administrator enabled rich text editing for this portlet, you can click Rich text to use the formatting toolbar to format your text, or click Plain text to enter text without formatting. If rich text editing is disabled for this portlet, the Rich text and Plain text links are not available.
Attachments – Click Attachments to add a document to this Task. Click Browse to locate the document and click Attach. The Task is saved before you add the attachment.
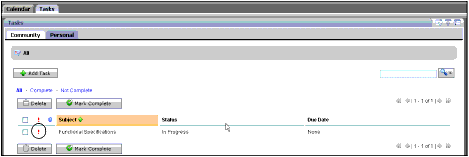
Click Save. This Task appears in the Tasks portlet with a red exclamation point to show it has a high priority, as shown in Figure 7-13.
Figure 7-13 High Priority Task
You can view information differently by clicking the columns to reorder them.
Managing Tasks
View Detail About a Task – See more information about the Task by clicking the Task name in the Subject column.
Edit a Task – Modify the Task’s details by clicking the Task name in the Subject column and clicking Edit.
Mark a Task as Completed on Your To Do List – If the task is completed, you can cross it off your list. Select the check box next to the Task and click Mark Complete. The Task now has a line through it. The line remains even if you refresh the page.
Find Tasks – Enter the subject of the Task in the Search bar and click Search.
Delete a Task – Remove a Task from your To Do list by selecting the check box next to the Task and clicking Delete. Click OK.
View Notifications for Tasks – View a notification when a Task is due or overdue by clicking the Notification link at the top of the GroupSpace application. In the Notifications Center, click Tasks, select the Delete check box for the task, and click Delete Selected. To set when the notification will expire, see Configuring the Notifications Center.
Using the Discussion Forums Portlet
The Discussion Forums portlet lets users post and monitor topics of interest. A Community owner or creator creates categories (folders) and Discussion Forums, and other Community members can post topics and reply to the threaded discussions. Community owners and creators can create, edit, and delete categories, Discussion Forums, and topics. Community owners, creators, and contributors have create and edit capabilities, and viewers have read capability only.
A Discussion Forum exists within the Community, rather than outside the Community (such as an RSS channel).
You can organize your Discussion Forums by creating categories to organize Forums with similar topics.
Adding a Category and a Discussion Forum
Perform the following steps to create a category and a Discussion Forum:
Select the Collaborate tab and the Discussion Forums tab.
You can create a category to organize Discussion Forums with similar topics. Click Add Category.
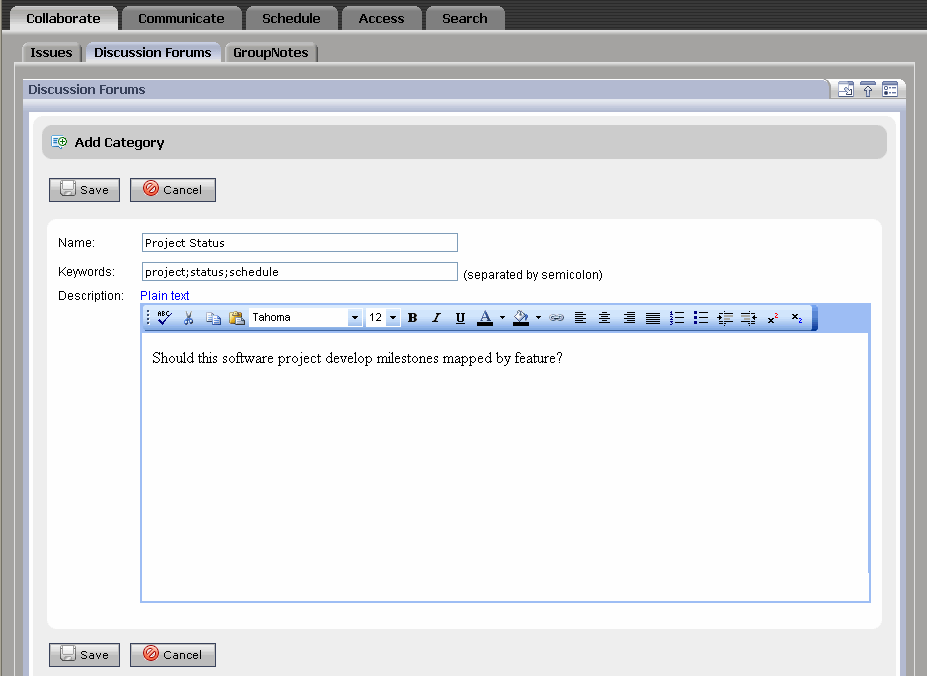
Enter the following information for the new category:
Name – Enter text describing the category that will contain the Discussion Forums.
Keywords – Enter searchable words that are contained in this Discussion Forum. Use a comma or a space to separate keywords; the or search connector is assumed when the search is performed. For example, car, truck retrieves car or truck. This field allows you to quickly retrieve relevant Discussion Forums when you perform a property search.
Description – Enter text describing the category. If your System Administrator and Portal Administrator enabled rich text editing for this portlet, you can click Rich text to use the formatting toolbar to format your text, or click Plain text to enter text without formatting. If rich text editing is disabled for this portlet, the Rich text and Plain text links are not available.
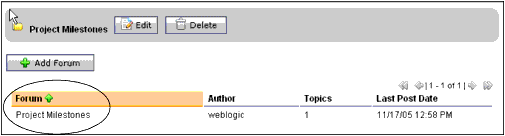
Create a Discussion Forum by selecting the category and clicking Add Forum.
Enter the following information for the new Discussion Forum:
Name – Enter text describing the purpose of the Discussion Forum.
Keywords – Enter searchable words that are contained in this discussion. Use a comma or a space to separate keywords; the or search connector is assumed when the search is performed. For example, car, truck retrieves car or truck. This field allows you to quickly retrieve the Discussion Forum when you perform a property search.
Author Masked – Select this check box to not display the author.
Description – Enter text describing the Discussion Forum topic. If your System Administrator and Portal Administrator enabled rich text editing for this portlet, you can click Rich text to use the formatting toolbar to format your text, or click Plain text to enter text without formatting. If rich text editing is disabled for this portlet, the Rich text and Plain text links are not available.
Click Add. The new Discussion Forum appears in the portlet, as shown in Figure 7-15.
Figure 7-15 New Discussion Forum
Adding a Discussion Topic
After you create a Discussion Forum, Community members can add topics to it.
Perform the following steps to add a topic to a Discussion Forum:
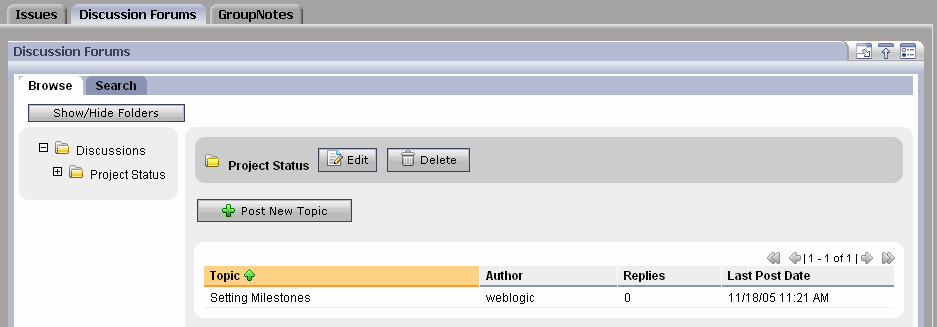
Select the Collaborate tab and the Discussion Forums tab.
Select the category and click the name of the Discussion Forum in the Forum column.
Click Post New Topic.
Enter the following information:
Name – Enter text describing this topic. The topic name must be unique, and the following characters are not permitted: \ and /.
Keywords – Enter searchable words that are contained in this topic. Use a comma or a space to separate keywords; the or search connector is assumed when the search is performed. For example, car, truck retrieves car or truck. This field allows you to quickly retrieve topics when you perform a property search.
Author Masked – Select this check box to not display the author.
Description – Enter text for your topic. If your System Administrator and Portal Administrator enabled rich text editing for this portlet, you can click Rich text to use the formatting toolbar to format your text, or click Plain text to enter text without formatting. If rich text editing is disabled for this portlet, the Rich text and Plain text links are not available.
Attachments – Add a file by clicking Attachments and clicking Browse. Locate your file and click Open. Add the file by clicking Attach.
Click Save. The Discussion Topic appears in the Discussion Forums portlet. See Figure 7-16.
Figure 7-16 The New Discussion Topic Appears in the Discussion Forums Portlet
Replying to a Discussion Topic
After you create topics, Community members can post replies to topics.
Perform the following steps to add a topic to a Discussion Forum:
Select the Collaborate tab and the Discussion Forums tab.
In the Browse tab, select the category and the Discussion Forum.
Click the name of the Discussion Forum in the Forum column.
Click the topic’s name in the Topic column and click Reply.
Enter your reply information and click Save.
Managing Discussion Forums
GroupSpace owners, creators, and contributors can also perform the following tasks in the Discussion Forums portlet:
Edit a Discussion Forum – Select the Discussion Forum’s category, click the Forum’s name in the Category column, and click Edit.
Edit a Category – Click the category’s name in the Category column and then click Edit.
Delete a Discussion Forum – Click the Discussion Forum’s name and click Delete. Deleting a Discussion Forum removes it and all its topics from the database.
In addition to adding a topic to a Discussion Forum, Community members can also perform the following tasks:
Edit Your Topic – Select the category and select the Discussion Forum. Click the topic’s name in the Topic column and click Edit.
Control What You See – Select the Discussion Forum and the topic, and click Discussion Overview to view the topics and replies in the Discussion Forum. Select Small, Medium, or Large for the amount of space available to display topics and replies. You can also select the Hide Previews check box.
View More Details – Click Discussion Details to view the author of the topic, date and time the topic was posted, and the body of the topic.
Using the Mail Portlet
The Mail portlet allows users to send and receive personal e-mail to other members in your GroupSpace Community and to people outside the Community.
Unread messages are highlighted and display a closed envelope icon. Messages in the Inbox that you have already read are not in bold text and the icon is not highlighted.
Configuring the Mail Portlet
You must configure your mail account and add information about your incoming and outgoing mail server.
Perform the following steps to configure your mail account for incoming and outgoing mail:
Select the Communicate tab and the Mail tab.
If the Add Account page does not display, click the Mail portlet’s Edit button.
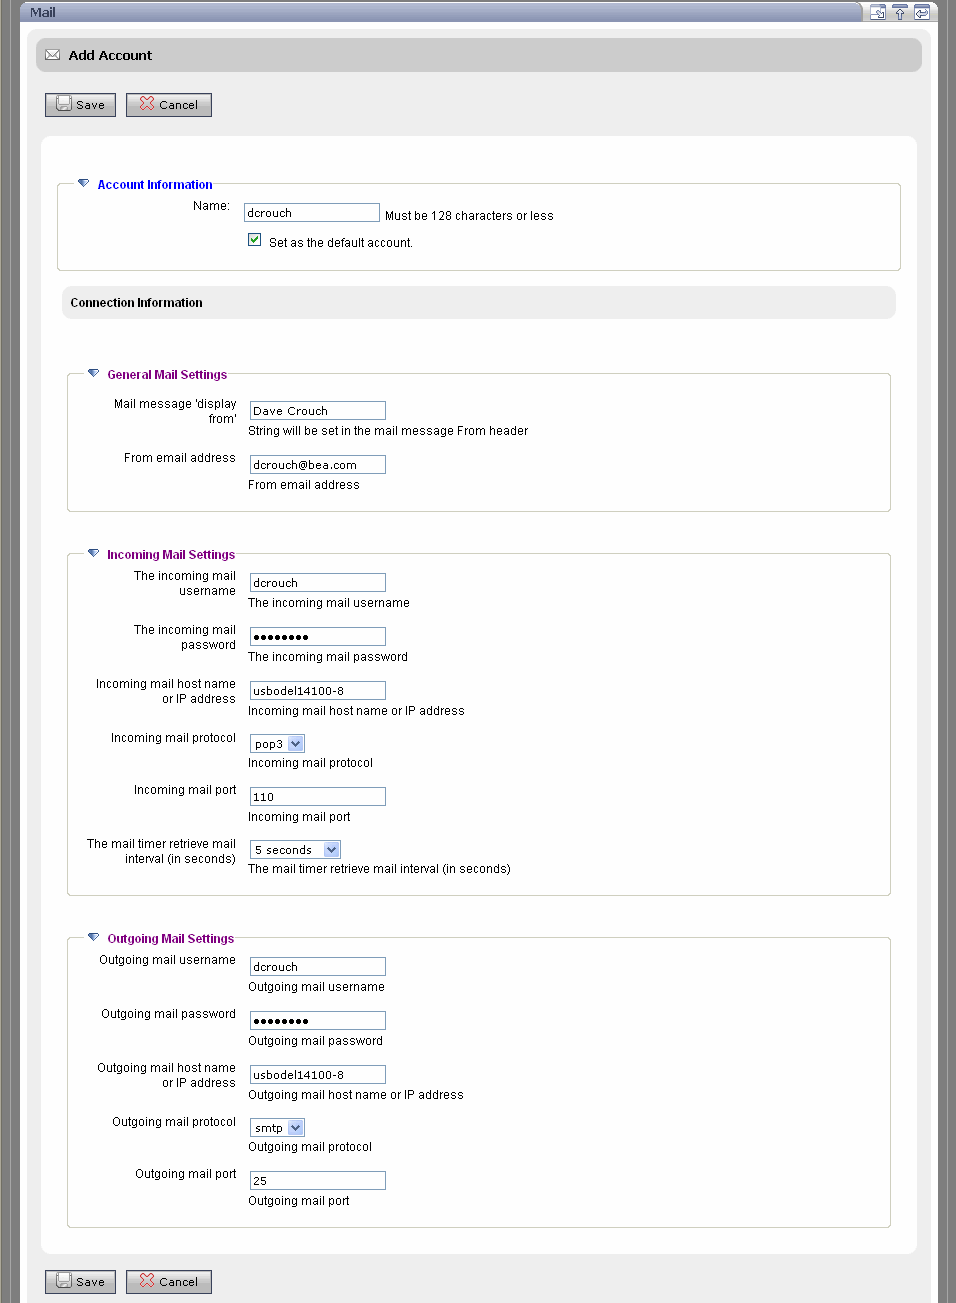
Enter information by clicking Account Information, General Mail Settings, Incoming Mail Settings, and Outgoing Mail Settings:
Account Information – Enter the name of your mail account. Do not use special characters. Select the Set as the default account to make this your default mail account.
General Mail Settings – In the Mail message ‘display from’ field, enter the name you want to appear in the From field in your e-mails. In the From email address field, enter your e-mail address.
Incoming Mail Messages – Complete all of the fields to set up your incoming mail server. Each field is required:
The incoming mail username – The username to access your incoming mail server.
The incoming mail password – The password to access your incoming mail server.
Incoming mail host name or IP address – The server name or IP address of the incoming mail server.
Incoming mail protocol – The protocol the incoming mail server supports. You can select POP3 or IMAP.
Incoming mail port – The port to connect to the incoming mail server. This defaults to the value for the selected protocol. Enter port 110 for POP3 or 143 for IMAP.
The mail timer retrieve mail interval – The time out value in seconds for the incoming mail server to poll for new messages.
Outgoing Mail Messages – Complete all of the fields to set up your outgoing mail server. Each field is required:
Outgoing mail username – The username to access your outgoing mail server.
Outgoing mail password – The password to access your outgoing mail server.
Outgoing mail host name or IP address – The outgoing host name or IP address.
Outgoing mail protocol – The protocol the outgoing mail server supports. You can select SMTP.
Outgoing mail port – The port to connect to the outgoing mail server. This defaults to the value for the selected protocol. For SMTP, enter 25.
If you entered and saved incorrect information when configuring the Mail portlet, an error appears. You should delete this incorrect setup information by removing the mail account you created.
Perform the following steps to delete the account from the list of mail accounts:
In the Mail portlet, click Edit (as shown in Figure 7-18) to get to the Mail Preferences window.
Figure 7-18 Click the Edit Icon to View the Mail Preferences Window
Click Mail Accounts to expand that section.
Select the account you want to delete.
Click Delete to remove the highlighted account.
Sending E-Mail
Perform the following steps to send an e-mail:
Select the Communicate tab and the Mail tab.
Click New Message to send a new e-mail.
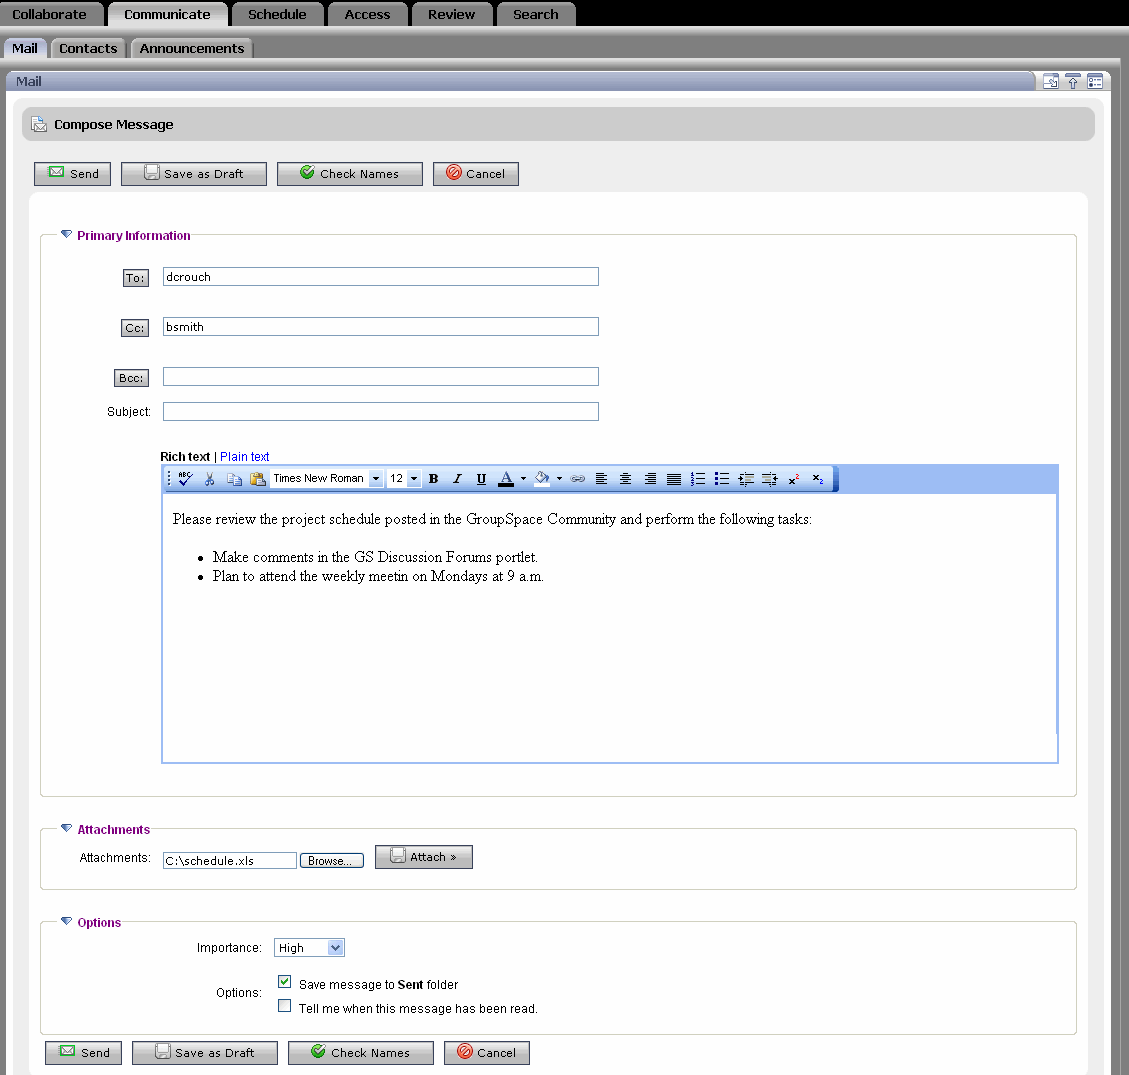
Enter information by clicking Primary Information, Attachments, or Options:
Primary Information – Click Primary Information and enter the recipients, subject, and additional text. The To field is the only required field. You can also click To to pick a recipient from your list of personal contacts. You can click Check Names to view your contacts. In the text area, enter text for the body of the e-mail. If your System Administrator and Portal Administrator enabled rich text editing for this portlet, you can click Rich text to use the formatting toolbar to format your text, or click Plain text to enter text without formatting. If rich text editing is disabled for this portlet, the Rich text and Plain text links are not available.
Attachments – Click Attachments to add a file to the e-mail. Click Browse, select the file, click Open, and click Attach. The file can be a document or a binary file.
Options – Click Options and select a priority for your e-mail. You can also save a copy of the e-mail to your Sent folder and be notified when the recipient reads the mail.
Click Send. (Clicking Save as Draft saves the e-mail in your Drafts folder so you can send it later.) You cannot delete your Inbox, Sent Items, or Drafts folders.
Viewing Mail
Perform the following steps to send and view your e-mail and attachments:
View an e-mail by clicking the item.
You can click Reply to send a reply to the e-mail, or Forward to send the e-mail to someone else.
If the e-mail has an attachment, click it and click the attachment name, and Open to view it or Save to download it.
Click Done to return to your other mail messages.
Tip:
Click Check Messages to refresh the page and display new e-mails.
Managing Mail
You can also perform the following tasks in the Mail portlet:
Change an E-Mail’s Status – Select the check box next to the e-mail, select Mark as Unread or Mark as Read from the drop-down list, and click the arrow next to the Message Actions field. For example, if you selected Mark as Unread, the e-mail changes from bold text to normal text and the envelope icon is no longer green.
Filter Your E-Mails – Click Unread or High Priority to view messages with that status. Click All to view all e-mails in your Inbox.
Create, Rename, Move, and Delete Folders – Manage your mail folders by clicking Manage Folders. Create a new folder by selecting where you want the folder, clicking the Create Subfolder link, entering a name, and clicking OK. You can also click Rename, Delete, Move, or Copy to make changes to folders you created.
Change E-Mail Accounts – Select a different account name from the Accounts drop-down list on the Mail portlet.
Delete an E-Mail – Remove an e-mail by selecting the check box next to it and clicking Delete. The deleted e-mail is placed in a Deleted folder. When you delete items from that folder, the e-mail and any attachments are removed from the database.
Create an E-Mail Signature – Enter text that you can attach to the bottom of outgoing messages by clicking the portlet’s Edit icon and clicking Mail Preferences. Enter the information in the Signature field and select the Add signature to outgoing messages check box and click Save. Click the Leave Edit icon to return to return to the Mail portlet.
Change the Number of E-Mails Displayed – Control how many e-mails display in the Mail portlet by clicking the portlet’s Edit button and clicking Mail Preferences. Select 10, 25, or 50 from the Messages Per Page drop-down list and click Save. Click Leave Edit to return to the Mail portlet.
View Notifications for E-Mail – View a notification when an e-mail item is delivered by clicking the Notification link at the top of the GroupSpace application. In the Notifications Center, click Email, select the Delete check box for the item, and click Delete Selected. To set when the e-mail notification will expire, see Configuring the Notifications Center.
Searching Mail
You can search for individual Mail folders and messages for keywords that appear in the Subject, Body, From, or Date fields.
See the Using the Search Portlets for more information on searching the Mail portlet, the GroupSpace Community, and the enterprise.
Using the Calendar Portlet
The Calendar portlet lets you create and schedule appointments. The Calendar portlet can store personal Calendar information and Community Calendar information.
You can customize the number of Calendar days that display. A Calendar appointment shows up in the Notifications Center when the appointment time is within the amount of time you specify.
Adding a Calendar Appointment
Perform the following steps to add an appointment to your calendar:
Select the Schedule tab and the Calendar tab.
Select the Community tab or the Personal tab to add an item to each of those Calendars.
Click Add Appointment. You can also click the appropriate time in the calendar and add the appointment.
Enter the following information about the appointment:
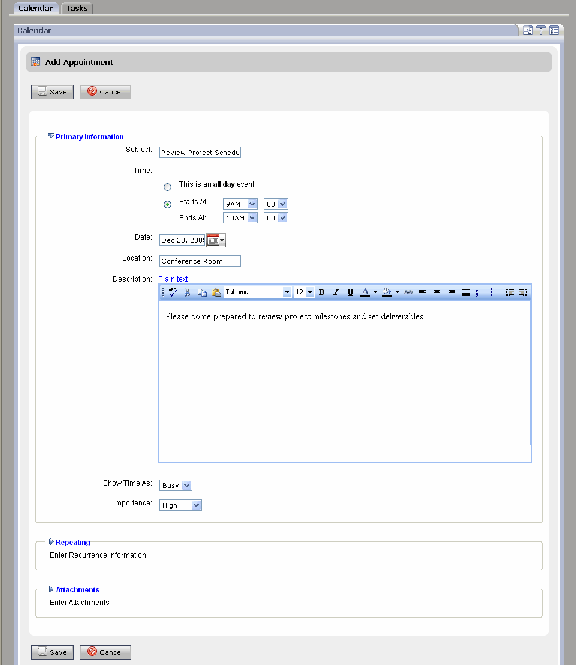
Primary Information – Click Primary Information and enter the subject, time, date, description, and location of your appointment. You can indicate whether the calendar shows your appointment time as busy or free. You can also indicate the importance of the appointment: High, Medium, or Low. These settings are reflected on the calendar.
In the Description field, enter text describing the appointment. If your System Administrator and Portal Administrator enabled rich text editing for this portlet, you can click Rich text to use the formatting toolbar to format your text, or click Plain text to enter text without formatting. If rich text editing is disabled for this portlet, the Rich text and Plain text links are not available.
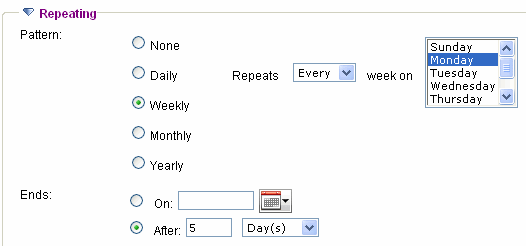
Repeating – Click Repeating and indicate the frequency of the appointment. For example, if you select Weekly, the appointment is scheduled automatically for the same day and time each week. By default, meetings do not repeat. You can also specify an end date for repeating meetings. Figure 7-20 shows a recurring meeting every Monday for five months.
Figure 7-20 Repeating Calendar Appointment
Attachments – Click Attachments and add a file to the appointment by clicking Browse, choosing a file on your file system, and clicking Attach.
See Figure 7-21 to view information for a new appointment.
Figure 7-21 New Calendar Appointment
Click Save. The new appointment appears in the Calendar portlet.
Managing Your Calendar
You can also perform the following tasks:
Edit an Appointment – You can reschedule or change an appointment’stime, date, or location by selecting the appointment and clicking Edit.
Changing the View – Modify what you see in the portlet by clicking Day, Week, Month, or Upcoming.All day appointments are shown at the top of the calendar page and indicated with a yellow bullet point to clearly distinguish them from timed appointments. Set the default view by clicking the Calendar portlet’s Edit icon.
Editing Preferences – Click the Calendar portlet’s Edit icon to specify the following preferences:
Time Zone – Select the time zone in which you are working.
Default View – Select Day, Week, or Month to change the scope of your displayed calendar. Select Upcoming Events to display the upcoming events view by default.
Number of days in Upcoming Events – Select the number of days to display for the Upcoming Events view.
Time Intervals – Select the interval of time you want your calendar to display by selecting one of the pre-set intervals for Day, Week, or Month views.
Week Starting Day – Select the day your typical work week begins.
Working Hours – Select starting and ending hours for your typical work day.
Deleting an Appointment – Select the appointment and click Delete.
View Notifications for Calendar Items– View a notification when a Calendar item is due by clicking the Notification link at the top of the GroupSpace application. In the Notifications Center, click Calendar, select the Delete check box for the item, and click Delete Selected. To set when the notification will expire, see Configuring the Notifications Center.
Using the Contacts Portlet
Use the Contacts portlet to view and manage names, addresses, phone numbers, e-mail addresses, and other information in a personal address book. The Contacts portlet can store Personal Contacts and Community Contacts.
The Contacts portlet works with the Mail portlet. If you receive an e-mail from someone, you can open the e-mail in the Mail portlet and click Add to Contacts to add the sender to your Contacts list.
Adding a Contact
Perform the following steps to add a new Contact:
Select the Communicate tab and the Contacts tab.
Select the Community tab to add a Community contact or the Personal tab to add a personal contact.
Click Add Contact. The Add Contact dialog appears.
Enter information about the contact by clicking each of the following:
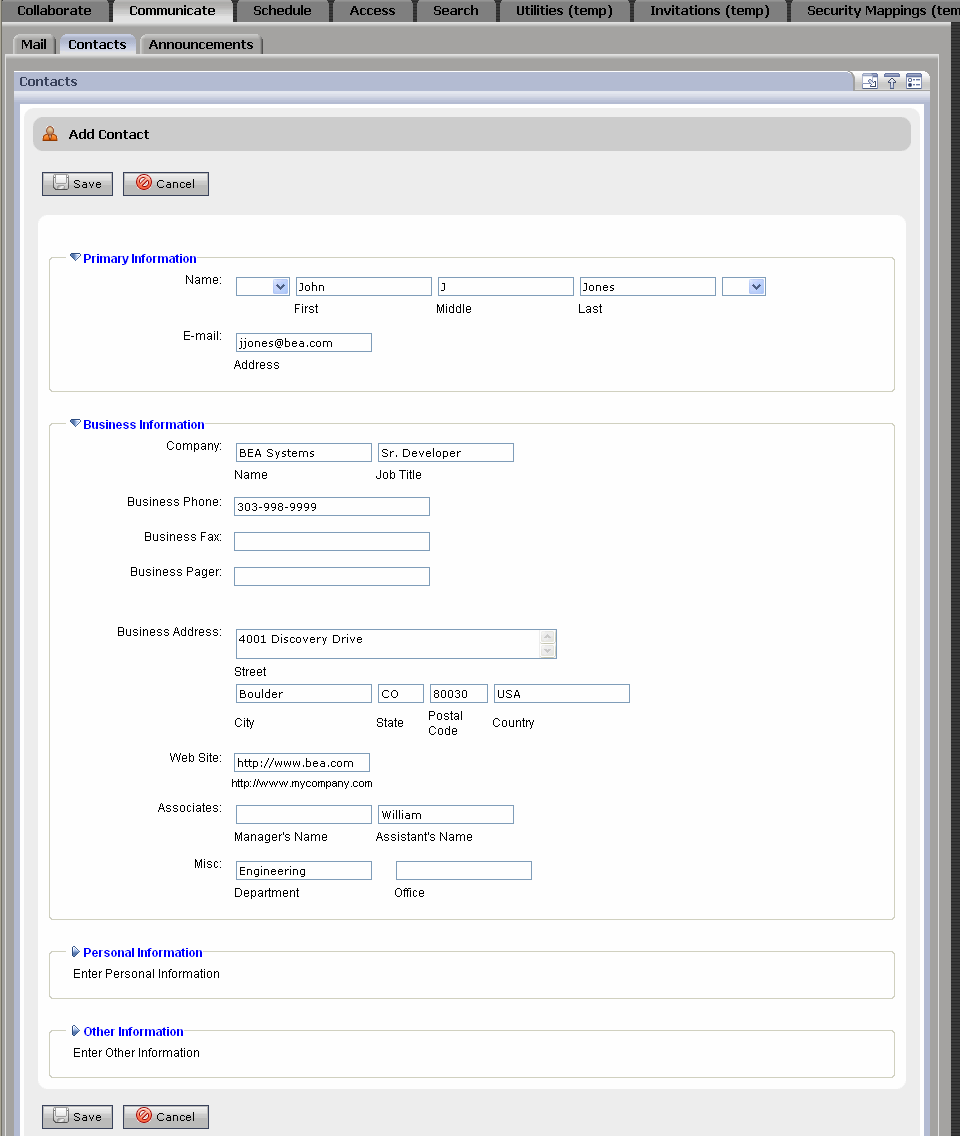
Primary Information – Enter the contact’s name, including first, middle, and last name, as well as title and name suffix. You can also enter the contact’s e-mail address.
Business Information – Enter the contact’s business details in the Business Information section. This section is optional.
Personal Information – Enter the contact’s personal information, such as home phone, personal cell phone, birthday, and so on. This section is optional.
Other Information – Enter information about the contact. This section is optional.If your System Administrator and Portal Administrator enabled rich text editing for this portlet, you can click Rich text to use the formatting toolbar to format your text, or click Plain text to enter text without formatting. If rich text editing is disabled for this portlet, the Rich text and Plain text links are not available.
See Figure 7-22 to view the fields for a new business contact.
Figure 7-22 Adding a New Business Contact
Click Save. The contact appears in the Contacts portlet, as shown in Figure 7-23.
Figure 7-23 New Contact
Filtering and Navigating Contacts
The Contacts portlet provides several ways to filter and navigate through your list of contacts. If the list of contacts is long, the GroupSpace application breaks it into pages. Navigate these pages using the arrow buttons.
To change the default number of contacts per page, click the portlet’s Edit icon. Click Addressbook Preferences and use the Contacts per Page drop-down list to change the default number of contacts that appear.
The Contacts portlet lets you filter the contacts that are displayed in the table in several ways, including the following:
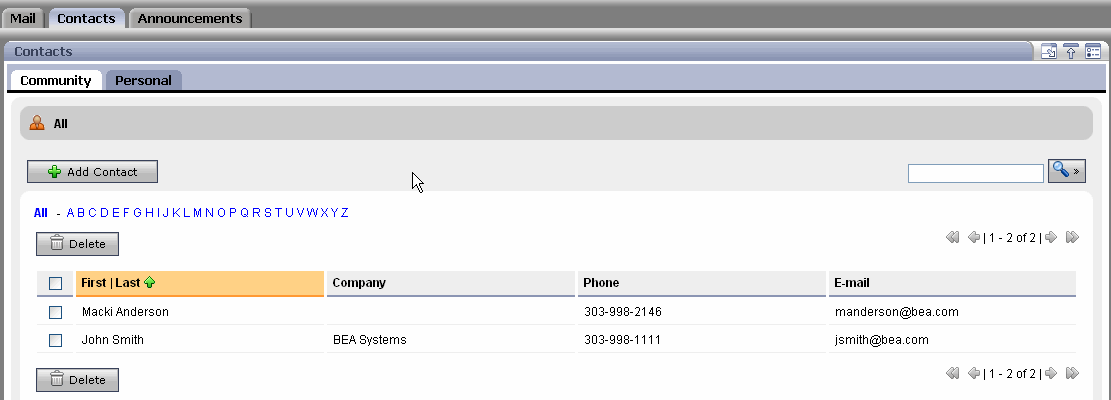
View All – Click All to list all contacts in the portlet, as shown in Figure 7-24.
Figure 7-24 Viewing All Contacts
Alphabetical – Click a letter link to list the contacts whose last names start with that letter.
Sort Contacts – You can sort the list of contacts by clicking the title of a column. For instance, to sort your contacts by last name in ascending order, click the heading of the Last column. The up arrow indicates that the column is sorted in ascending order. A down arrow indicates descending order.
Search for Contacts – You can search for contacts by entering a search term and clicking Search. For more information on searching contacts, see Searching Contacts.
Managing Contacts
You can also perform the following tasks:
Editing a Contact – Modify a contact’s information by clicking the contact’s name, clicking Edit, and modifying the information.
Deleting a Contact – Remove one or more contacts by selecting the check box next to the contact and clicking Delete. To select all check boxes in a column, click the check box in the table’s heading row.
Searching Contacts
You can use the following information to search for contacts:
First name
Middle name
Last name
Company name
E-mail address
To perform a search, enter the search string in the Search field and click Search. The results appear in the portlet.
See the Using the Search Portlets for more information on searching the Contacts portlet, the GroupSpace Community, and outside the GroupSpace Community.
Using the CM Browser Portlet
Use the CM Browser portlet to read content in WLP content repositories and non-WLP content repositories. The Shared Content Repository is the default content repository for a GroupSpace application that is created when you create a new GroupSpace domain. If you used the Domain Configuration Wizard to create a domain, and you selected the WebLogic Portal GroupSpace Application check box, the Shared Content Repository is installed automatically. You can browse this repository in your GroupSpace Community; to edit the content, use the WebLogic Portal Administration Console.
If you create a new enterprise application in Workshop for WebLogic and select the GroupSpace facets, the WLP Repository is added to it (rather than the Shared Content Repository).
You can browse this repository in your GroupSpace Community. You can set Visitor Entitlements on a repository or its sub folders; see the Security Guide for more instructions on setting up Visitor Entitlements.
Browsing Content
Perform the following steps to read content in the repository:
Select the Access tab and the Content tab.
In the Browse tab of the CM Browser portlet, select the repository with the documents you want to read. If a subfolder exists, click the subfolder to view its documents. The Shared Content Repository is the default content repository for a GroupSpace application that is created when you create a new GroupSpace domain.
View a document by clicking the document name.
Managing Content
You can also perform the following tasks:
View Details – Click Show Details (or click the document’s name) to see the content’s properties, type, and history.
View an Attachment – Retrieve a document’s attachment by clicking the item in the Attachment column. Click OK to view it or click Save to copy it to another location.
Editing Content – Use the Administration Console to modify and delete content in your repository.
Control the Number of Documents that Display – Click Get Item and Page Count to display the number of items retrieved and the page count.
Searching Content
To perform a search, click the Search tab in the CM Browser portlet. Enter the search string and click Search. The results appear in the portlet. You can also search using a Saved Search. See Using the Search Portlets for more information on searching the content in the CM Portlet, the GroupSpace Community, and outside the GroupSpace Community.
Using the Search Portlets
The Search portlets let you perform full text searches and browse information. All American Standard Code for Information Interchange (ASCII) characters are supported in a search expression.
You can perform three types of search in the GroupSpace Community:
Portlet Search – Allows you to search the portlet you are using. For example, a Contacts Search for Smith retrieves contacts named Smith listed in your Addressbook.
GroupSpace Search – Lets you search the current GroupSpace Community for content (by searching Links, Issues, Announcements, Documents, and so on). You can search the Community where you are logged in. You cannot search other Communities if you are not logged into that Community.
GS Enterprise Search – Helps you locate information outside the GroupSpace Community. You can search information stored on your server’s file system or on a web site. An Enterprise Search does not retrieve GroupSpace Community data or data stored in other WLP content repositories. Use the Content Management Browser portlet to retrieve data stored in other WLP content repositories.
Configuring an Enterprise Search
You must configure the GS Enterprise Search portlet to narrow its scope. For example, if you want to search URLs, you must add the URLS where the search can be performed to a configuration file. If you do not restrict an Enterprise Search, the results could be too large for you to manage.
Three configuration files exist for an Enterprise Search:
The AutonomyIDOLServer.cfg file – Performs a keyword search of databases that you specify in the configuration file. Do not modify the AutonomyIDOLServer.cfg file.
The HTTPFetch.cfg file – Performs a keyword search of the URLs that you added to the configuration file. The HTTPFetch.cfg file is located in the <WLPORTAL_HOME>\content-mgmt\thirdparty\autonomy-wlp10\win32\ HTTPFetch\ directory. Go to the [SPIDER] section and add the URLs to the web sites that you want users to be able to search. For example, the following entry in the HTTPFetch.cfg file makes the web sites www.johnsmith.com and www.yahoo.com targets for an Enterprise Search:
If you perform a search immediately after modifying the HTTPFetch.cfg file, the indexing is not completed and the search will not retrieve any results. Allow time for the indexing to finish.
The FileSystemFetch.cfg file – Performs a keyword search of the files on your hard drive or network drive. The FileSystemFetch.cfg file is located in the <WLPORTAL_HOME>\content-mgmt\thirdparty\autonomy-wlp10\win32\ FileSystemFetch\. Go to the [IMPORT] section and specify the path to the data directory that you want users to be able to search and specify the types of documents to search. The following example shows the document types you can search:
Perform the following steps to perform an Enterprise search:
Log in as a GroupSpace Community owner, creator, or member.
Select the Search tab.
In the GS Enterprise Search portlet, enter the keywords for your query by completing the following fields:
All of these words – Retrieves documents that contain every word listed in this field, in any order.
This exact phrase – Retrieves documents that contain an exact match, in this precise order.
Any of these words – Retrieves documents that contain at least one of the words listed in this field.
Include the following sources in the search – Select the drop-down list to pick individual content repositories or all databases that were configured to be searched. See Configuring an Enterprise Search.
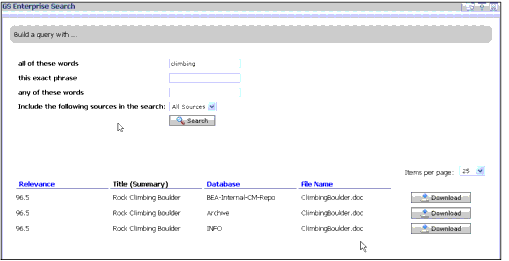
Click Search. The results display at the bottom of the Search portlet.
Figure 7-25 An Enterprise Search of Three Databases for the Word Climbing
Click Download to save a local copy of a document.
Performing a GroupSpace Search
A GroupSpace Search retrieves content and properties that are contained in the GroupSpace Portlets (Links, Issues, Document Library, Discussion Forums, and so on). For example, searching your GroupSpace application for an author with a specific name can retrieve documents written by the person, topics the person posted in a Discussion Forum, and so on.
If you want to perform a GroupSpace Search for restricted values (values that appear in a drop-down list, such as Priority or Status), you should perform a Field Search, rather than a Full Text Search. Within your Field Search, select the value from the drop-down list, such as In Progress for a Status field when searching Issues.
Perform the following steps to perform a GroupSpace search:
Select the Search tab or click the global Search button.
If you have already created a Saved Search, select the drop-down list to pick a search that you created and stored. See Saving Your Search Queries for instructions on saving a search phrase.
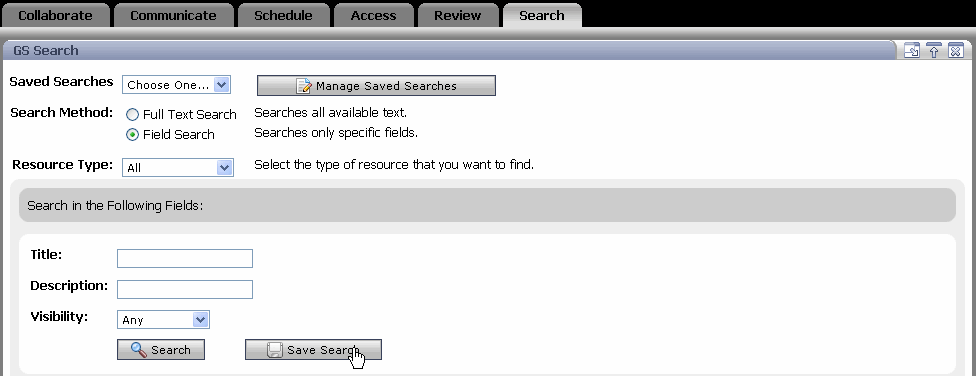
In the GS Search portlet, select Full Text Search or Field Search. A Full Text Search lets you search on specific words that might be part of either the property or the binary data. A Field Search searches just content properties, such as title, description, owner, status, resolution, and so on for the terms you specify for the portlets you want to search.
In the Resource Type drop-down list, select which GroupSpace portlet you want to search. You can search all the data in the portlets that are listed, or you can narrow your search to a specific portlet.
Tip:
You cannot perform a Field Search for the Discussion Forums portlet; Discussions does not appear in the Resource Type drop-down list.
Depending on the option you specified in
step 4, complete the fields for the search query.
Click Search. The results display at the bottom of the Search portlet, as shown in Figure 7-26.
Figure 7-26 A GroupSpace Search of All Portlets for the Word Project
Performing a Portlet Search
You can search the following portlets:
GS Issues
GS GroupNotes
Discussion forums
Mail
Contacts
Tasks
GS Document Library
GS Links
CM Browser
GS RSS Reader
If you want to perform a Portlet Search for restricted values (values that appear in a drop-down list, such as Priority or Status), you should perform a Field Search, rather than a Full Text Search. Within your Field Search, select the value from the drop-down list, such as In Progress for a Status field when searching Issues.
Perform the following steps to perform a portlet search:
Select the tab for the portlet you want to search and select the Search tab or locate the Search bar in the portlet.
If you are using the portlet’s Search bar, enter the keyword, as shown in Figure 7-27.
Figure 7-27 Portlet Search for the Word Project
If you are using the query builder in the portlet’s Search tab, select Full Text Search or Field Search. A Full Text Search lets you search on specific words that might be part of either the property or the binary data. A Field Search searches just content properties, such as title, description, owner, status, resolution, and so on for the terms you specify for the portlets you want to search.
Enter the keywords for your query by completing the following fields:
All of these words – Retrieves items with every word listed in this field.
This exact phrase – Retrieves items that contain an exact keyword match.
Any of these words – Retrieves items that contain at least one of the words listed in this field.
Click Search. The search results appear in the portlet. You can change the order in which they appear by clicking a column header.
Saving Your Search Queries
You can save your search terms so that you or other Community members can run them again later. A saved search consists of the search term, but not the search results. You can re-run the search exactly as it was saved or you can edit the search query before you run it. When you save the search term, you can determine who can view the saved search by marking it as Community, Personal, or Private.
You can save your search queries and run them against the following portlets:
GS Issues
GS Links
GS GroupNotes
GS Document Library
GS RSS Reader
Discussion Forums
Creating a Saved Search
Perform the following steps to create and save a search query:
Select the Search tab.
Select Full Text Search or Field Search. A Full Text Search searches all properties for your search term, while a Field Search searches specific properties, such as Title, Description, or Visibility for the values you enter.
At Resource Type, use the drop-down list to select which portlet you want to search. You can also select All to search all five portlets.
Complete the remaining fields for your query and click Save Search.
Complete the Title and Description fields for the saved search. The Title field must be unique according to the visibility—you can have a Private Default Search in the GS Issues portlet called Project and a Community Default Search in the GS Issues portlet called Project, but you cannot have two Community Default Searches in GS Issues that are both called Project.
At Visibility, select one of the following options to determine who can see the saved search:
Community – The saved search query is visible to the entire Community
Personal – The saved search query is visible to all Communities to which you belong
Private – The saved search query is visible just to you in this Community
Click Save to store and run the search.
Click Search to run the search.
Tip:
You can also search an individual portlet by selecting the Search tab within a portlet. For example, you can search only the GS Issues portlet.
Running a Saved Search
Perform the following steps to run a saved search:
Select the Search tab.
In the Saved Searches field, select a search query from the drop-down list. The fields are populated with the choices you made when you saved the search.
Click Search.
Editing the Properties of a Saved Search
Perform the following steps to change the name, description, and visibility (only from Private to Community) of a saved search:
View your saved searches by clicking Manage Saved Searches.
Click Edit Search to change the name or description of the search, or who can see the saved search. (If you want to change the search term, create a new search.) You can change the visibility of a saved search query only from Private to Community. You can also delete a saved search from the Manage Saved Searches page by selecting the check box next to the search and clicking Delete Searches.
From the Manage Saved Searches page, click Done.
Optimizing Portlet Performance
When you perform a GroupSpace search or a portlet search, the speed of the search can be affected by how you sort the columns and properties in the portlets. Some GroupSpace data has explicit properties, such as Title, Description, Owner, and Visibility. You can efficiently sort these explicit properties. All other properties are implicit. An implicit property sort is performed in memory after the data is retrieved. If your implicit property sort results in a large amount of data, you could experience a small delay in viewing the data.