|
|
This chapter includes the following topics:
The installation process includes these tasks:
You must have the following UCM components installed to use the UCM VCR Adapter. For details on installing these components, refer to the UCM installation documentation.
| Note: | This component is available on Oracle E-Delivery as one of the components included in part number V16530-01 Oracle Universal Content Management Web Content Management 10gR3 (10.1.3.3.7) for Windows, Linux and Unix. |
ss_docname_link_form.htm) must be checked in. You can obtain this Site Studio Link Form on the Oracle Technology Network, here: http://www.oracle.com/technology/products/content-management/ucm/samples/index.html. The UCM VCR Adapter is distributed as a public WebLogic Portal patch. You have two options for installing the patch. You can use the Smart Update application (part of your existing WLP installation) or you can perform a command-line installation of the patch file.
Smart Update provides a user interface that lets you install and manage WLP patches. Just start Smart Update, locate the public patch for the UCM VCR Adapter, and install it.
For detailed instructions on running and using Smart Update, see “Oracle Smart Update Installing Patches and Maintenance Packs” in Oracle Smart Update Installing Patches and Maintenance Packs.
You can also install the patch using the Smart Update command line utility. For detailed information on using this utility, see “Using the Command-Line Interface” in Oracle Smart Update Installing Patches and Maintenance Packs.
Here is an example Smart Update command-line installation. In this example, the Patch ID is AAAA. When following these instructions, you must replace AAAA with the correct ID of the patch.
.jar. In place of AAAA, use the correct ID of the patch you are installing.patch-catalog.xml and prod-info.xml files located in <BEA_HOME>/utils/bsu/cache_dir are updated based on one of the following two options. patch-catalog.xml and prod-info.xml files included in the patch file set you downloaded and replace the existing files of the same names that were created as part of the WLP 10gR3 GA installation process.patch-catalog.xml and prod-info.xml files. Then, either use Smart Update to directly install the patch or exit the Smart Update GUI and use these Smart Update command line instructions to install the patch manually. (Note that the GUI automatically downloads the patch catalog to the bsu/cache_dir of the selected installation.) .jar patch file into the Smart Update cache directory: <BEA_HOME>\utils\bsu\cache_dir, where AAAA is the ID of the patch you are installing.<BEA_HOME>\utils\bsu. AAAA is the ID of the patch you are installing:
bsu -prod_dir=<BEA_HOME>\wlportal_10.3 -patchlist=AAAA -verbose -install
The UCM VCR Adapter requires a Profile Trigger Field to have been configured on the UCM Server. This is done in the Configuration Manager applet, on the Profiles tab. For example, you could select the Type (dDocType) field as the trigger field.
| Note: | Follow the steps in this section only if you are installing the adapter into an existing WLP domain. If you create a new domain after performing the patch installation (as described in Install the Patch on page 2-2), you can skip the steps in this section. Any new domain created after the patch is installed will automatically receive the patch artifacts. |
| Note: | You must use separate tablespaces in your database for UCM and WLP, because both have a table called USER. For more information, see http://download.oracle.com/docs/cd/E13155_01/wlp/docs103/db/oracle.html#wp1063226. |
The basic steps for updating an existing domain are using the WebLogic Server Console to remove several J2EE Shared Libraries and to install new ones. You must perform these steps for each WLP domain in which you want to use the UCM VCR Adapter.
| Tip: | For more detailed information on deployment, see “Deploying Applications and Modules with weblogic.deployer” in Deploying Applications to WebLogic Server. |
<BEA_HOME>/user_projects/domains/<my_domain>/bin/startWebLogic.cmd/.sh http://<hostname>:<port>/console. For example, http://localhost:7001/console. | Tip: | To increase the number of rows that are displayed in the table, click Customize the table and set the Number of rows displayed per page value to a larger number, like 100. |
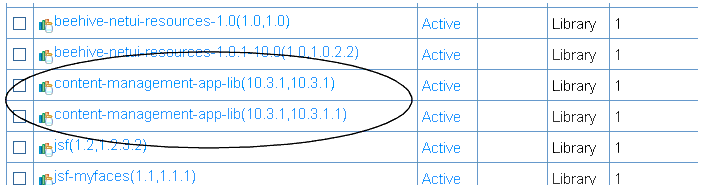
| Note: | The Status of these libraries was automatically set to Failed by the patch installer. |
content-management-app-lib(10.3.0,10.3.0)
content-management-app-lib(10.3.0,10.3.0.1)
content-management-web-lib(10.3.0,10.3.0)
content-management-web-lib(10.3.0,10.3.0.1)
| Note: | If you see an error message, it is possible to safely ignore it. To verify that the libraries were deleted, click Deployments again to refresh the screen. The libraries should be gone. If any of the libraries are still in the list, try deleting them again. |
<BEA_HOME>/user_projects/domains/<my_domain>/bin/startWebLogic.cmd/.shhttp://<hostname>:<port>/console. For example: http://localhost:7001/console
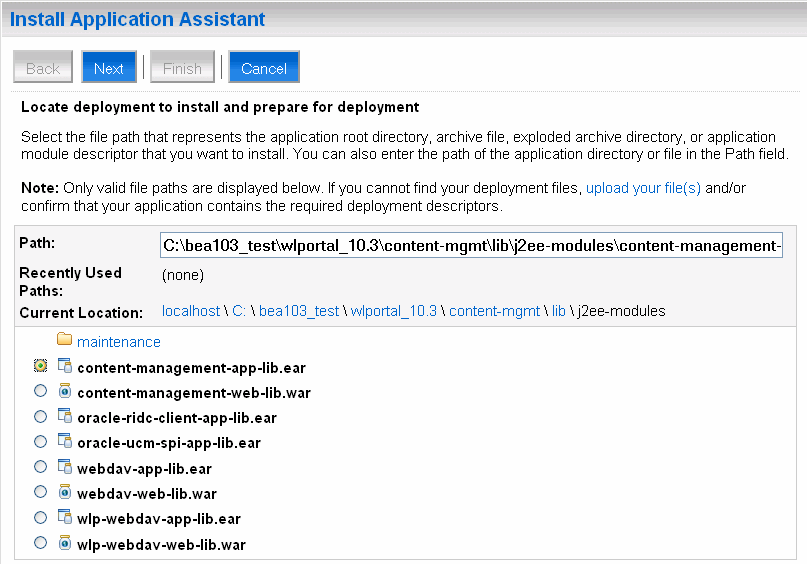
<BEA_HOME>\wlportal_10.3\content-mgmt\lib\j2ee-modules
| Note: | Now that the library has been installed, you need to update it, as explained in the following steps. |
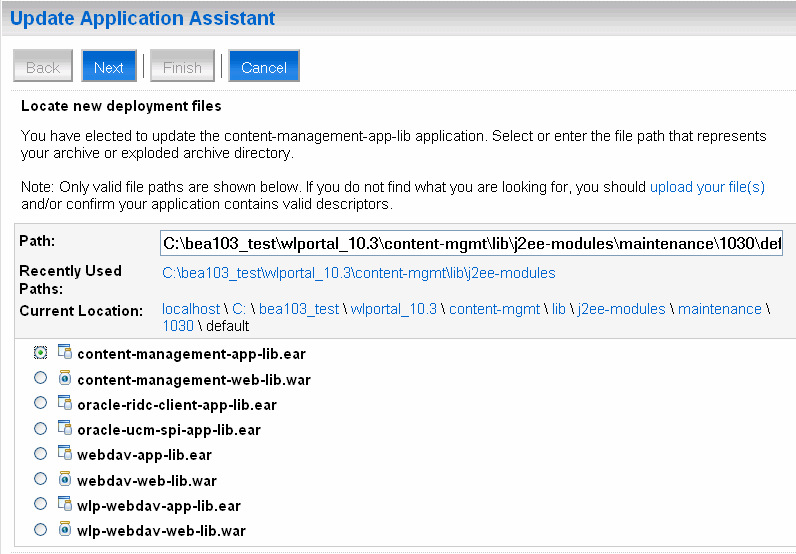
<BEA_HOME>\wlportal_10.3\content-mgmt\lib\j2ee-modules\maintenance\1030\default. | Note: | If you see an error message, ignore it. |
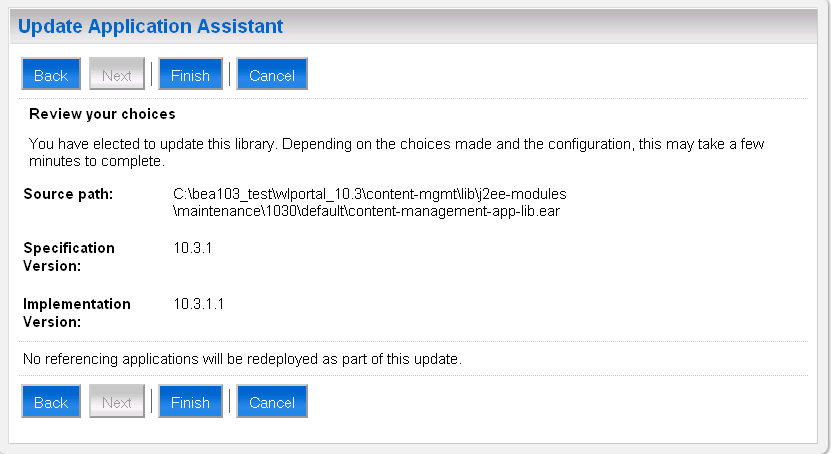
You have successfully installed the first library.
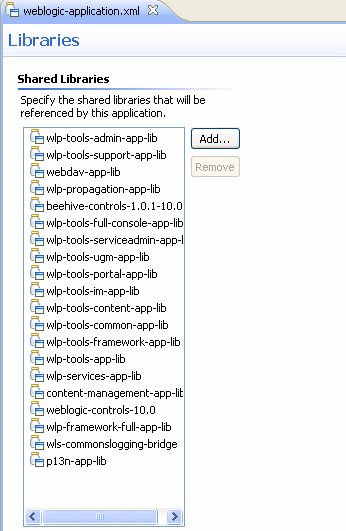
Use Workshop for WebLogic to add a library reference from your enterprise application to the UCM VCR Adapter library.
<EAR_PROJECT>/EarContent/META-INF folder. weblogic-application.xml and select Open With > WebLogic Deployment Descriptor Editor.
<BEA_HOME>/wlportal_10.3/content-mgmt/lib/j2ee-modules/
oracle-ucm-spi-app-lib.ear
weblogic-application.xml. weblogic-application.xml. You have successfully added the UCM VCR Adapter library to your portal project.
You can configure or adjust UCM repository caches in two ways: in the EAR project file META-INF/p13n-cache-config.xml or in the Portal Administration Console (under Configuration & Monitoring > Service Administration). Cache settings made in the Portal Administration Console take precedence over the file-based settings. You can also flush the caches from the Portal Administration Console.
| Note: | If you already have a p13n-cache-config.xml file configured for another repository, simply add the UCM repository cache settings into that file. |
Table 2-1 and Table 2-2 describes the available cache settings in p13n-cache-config.xml. Table 2-1 describes the VCR caches, which are caches used by the VCR component. These caches are repository specific and can exist for any repository. Table 2-2 describes the SPI caches, which are specific to the UCM SPI Adapter component.
The pattern for the cache entry names is <elementName>.<repositoryName>, where <repositoryName> is the name of the UCM repository as specified in the META-INF/content-config.xml file. For example, nodeCache.StellentRepository.
Note that <time-to-live> values are specified in milliseconds.
After the adapter is added to your WLP project, you are ready to configure it. Configuring means specifying how the adapter will talk to the UCM content repository. For example, the adapter has to know where the UCM server is running, its port number, an admin account name, and so on.
There are two configuration scenarios to consider. If you primarily work with the IDE in a development environment, you can configure the adapter by editing a configuration file. If you are a portal administrator who uses the WLP Administration Console, you can use the Administration Console to configure the adapter.
This section explains how to configure the adapter using a configuration file. Developers working primarily in the IDE commonly use this method.
| Note: | Because of the way in which WLP uses deployment plans, adapter configurations made in the WLP Administration Console take precedence over configurations made in the content-config.xml file. |
content-config.xml file. This file is located in the META-INF directory of your Portal EAR Project.
Table 2-3 describes the required elements in content-config.xml that you must configure to successfully use the adapter.
If you use the global config user security option (see
WLP-Secured Global Config User on page 2-20 or Natively-Secured Global Config User), this element specifies the UCM Server username that is used to retrieve data from UCM, regardless of the WLP user. In other words, all WLP users in an enterprise application will see the data for this UCM repository instance.
Note: If you configure the identity propagation option, do not specify this element (see
Identity Propagation with Native Security on page 2-20).
|
|
Specifies a UCM user account that is used to retrieve all types (ObjectClasses) from UCM. UCM profiles can take into account the UCM user when determining which fields are on a profile. WLP uses this setting to ensure that the UCM type retrieval is identical regardless of the WLP user. This user account does not need any special roles on the UCM server.
|
|
When this element is enabled, the native UCM security will be used to secure content. When disabled, the VCR federated security (entitlements) will be used to secure content in addition to the native UCM security. Default is false (disabled). For more information, see
Configuring Security on page 2-19.
|
|
Listing 2-1 shows a sample configuration file with the required elements highlighted in bold type.
     <!-- UCM test repository -->
     <content-store>
        <name>UCMRepository</name>
                  <class-name>com.oracle.content.spi.ucm.RepositoryImpl
                  </class-name>
            <username>wlpApp</username>
                <repository-property>
                  <description>Hostname on which the UCM Content Server
                   is running
                   </description>
                <name>ContentServerHostname</name>
                <value>10.221.19.72</value>
            </repository-property>
            <repository-property>
                <description>Port on which the UCM Content Server is running (on
                host named above)
                </description>
                <name>ContentServerPort</name>
                <value>4444</value>
            </repository-property>
            <repository-property>
                <description>Content Server uname in Admin role, for
                security checks
                </description>
                <name>ContentServerAdminUser</name>
                <value>sysadmin</value>
            </repository-property>
            <repository-property>
                <description>List of folder ObjectClasses</description>
                <name>folder_badge_objectClasses</name>
                <value>IDC:Folder</value>
            </repository-property>
            <repository-property>
                 <description>Single user for all type related interactions
                 </description>
                  <name>TypeRetrievalShapeUser</name>
                  <value>typeShapeUser</value>
            </repository-property>
            <repository-property>
                 <name>useNativeSecurity</name>
                 <value>true</value>
            </repository-property>
            <repository-property>
                <description>Protocol used to connect with the UCM Server.
                Valid options are INTRADOC or INTRADOC_SSL.  INTRADOC is the
                default.
                </description>
                <name>ContentServerServiceType</name>
                <value>INTRADOC</value>
            </repository-property>
            <repository-property>
                <description>Polling interval for the
                CacheInvalidator IntervalJob
                (must be equal to or greater than 2 min)
                </description>
                <name>CacheInvalidationInterval</name>
                <value>2</value>
            </repository-property>
            <repository-property>
                <description>Location on the filesystem of the
                client SSL keystore
                file. Only used when ContentServerServiceType
                is INTRADOC_SSL
                </description>
                <name>ContentServerSSLKeystoreFile</name>
                <value>c:/client_keystore</value>
            </repository-property>
            <repository-property>
                <description>SSL keystore password. Only used when
                ContentServerServiceType is INTRADOC_SSL
                </description>
                <name>ContentServerSSLKeystorePassword</name>
                <value>idcidc</value>
            </repository-property>
            <repository-property>
                <description>SSL keystore alias name.  Only used when
                ContentServerServiceType is INTRADOC_SSL
                </description>
                <name>ContentServerSSLKeystoreAlias</name>
                <value>SecureClient</value>
            </repository-property>
            <repository-property>
                <description>SSL keystore alias password.  Only used when
                ContentServerServiceType is INTRADOC_SSL
                </description>
                <name>ContentServerSSLKeystoreAliasPassword</name>
                <value>idcidc</value>
            </repository-property>
            <read-only>true</read-only>
            <binary-cache-max-entry-size>102400</binary-cache-max-entry-size>
             <!-- metadata search -->
             <search-is-enabled>true</search-is-enabled>
             <!-- full text search -->
             <fulltext-search-is-enabled>true</fulltext-search-is-enabled>
             <search-indexing-is-enabled>false</search-indexing-is-enabled>
    </content-store>
Users who typically work on staged or production portals use the WebLogic Portal Administration Console to configure content repositories. This section summarizes the basic configuration steps for this scenario. For more detailed instructions, see "Configuring Additional Repositories" in the Oracle Fusion Middleware Content Management Guide for Oracle WebLogic Portal.
Once the UCM repository is deployed and running it must be connected to WebLogic Portal so that it appears as part of its Virtual Content Repository. To add the UCM repository:
If using the global config user option (all users of the application use the same credentials to connect to UCM), this field specifies the user name of a valid user of the UCM repository. For more information on security, see
Configuring Security on page 2-19
|
|
| Note: | If you receive an error after clicking Create, click the Refresh Tree button. The words “can’t connect” appear next to the new repository name in the Administration Console. To correct the problem, select the new repository and use the Add Property dialog to add the required properties indicated by the error message: ContentServerHostname, ContentServerPort, ContentServerAdminUser. |
There are three ways to configure security for the UCM VCR Adapter, as explained in this section.
| Note: | The VCR adapter user identity assertion to the UCM content server will not work properly if the UCM Content Server users that are being referenced by WLP exist in an ActiveDirectory and the UCM Content Server has been configured to use a non-LDAP based ActiveDirectory. This configuration is not supported. |
| Note: | A local or global user identity store will work, as will an external LDAP-based store (either ActiveDirectory or other LDAP). |
| Note: | For best performance, use native security (useNativeSecurity = true). |
All users in the application use the same credentials to connect to the UCM instance. The data is secured through WebLogic Portal. WLP Content Entitlements will apply. Configure this type of security with these settings in the META-INF/content-config.xml file in the EAR Project, as described in the following table.
All users in the application use the same credentials to connect to the UCM instance. Data is secured through UCM. WLP Content Entitlements will not apply. Configure this type of security with these settings in the META-INF/content-config.xml file in the EAR Project:
WebLogic Portal and UCM use the same security store, such as a shared LDAP store. Each WLP user sees in the application what they are permitted to see on the UCM side. Entitlements (WLP content security) are disabled.
To verify the installation, open the WLP Administration Console, go to the Content Management section, and attempt to browse to the UCM repository and view its contents or types.


|