


|
|
The first step in creating a Message Format Definition file is to create a message format (the root node of a message format file).
Groups define fields that are related in some way (for example, the fields PAYDATE, HOURS, and RATE could be part of the PAYINFO group). You can create a group as a child of the message format item, as a child of another group, or as a sibling of a group or field.
| Note: | The Apply and Reset buttons are only enabled once changes are made to the detail panel’s components. |
Fields are a sequence of bytes that have some meaning to an application. (For example, the field EMPNAME contains an employee name.) You can create a field as a child of the message format item, as a child of a group, or as a sibling of a group or another field.
| Note: | The Apply and Reset buttons are only enabled once changes are made to the detail panel’s components. |
Comments contain notes about the message format or the data transformed by the message format. Comments are included in the message format definition for informational purposes only. You can create a comment as a child or sibling of any message format, group, or field.
| Note: | The Apply and Reset buttons are only enabled once changes are made to the detail panel’s components. |
References indicate that the description of the field or group format has been previously defined and you want to reuse this description without re-entering the data. Reference fields or groups have the same format as the original field or group, but you can change only the optional setting and the occurrence setting for the reference field or group. For example, if you have a “bill to” address and a “ship to” address in your data and the format for the address is the same, you only need to define the address format once. You can create the “bill to” address definition and create a reference for the “ship to” address.
| Note: | References are named exactly the same as the original item. For example, the “bill to” address definition and the “ship to” address definition would be named the same. If you want to reuse a group definition, create a generic group and embed it within a specific group. For example, in the previous example, you can create an address group within a bill_to group and reference address within a ship_to group. |
| Note: | The Apply and Reset buttons are only enabled once changes are made to the detail panel’s components. |
To save a message format file for the first time:
.MFL to message format files.To save a message format file using the same name, choose File > Save. The file is saved in the same location with the same name and extension.
To save a message format file using a different name, choose File > Save As and follow steps 1 through 5 above.
Format Tester parses and reformats data as a validation test. Using Format Tester, you can make sure the message formats you build using Format Builder produce the expected results.
Format Tester is available from Format Builder.
| Note: | To run Format Tester, you must have a message format document open in Format Builder. |
| Note: | Format Tester uses the currently loaded message definition document. |
Refer to Format Tester for more information.
The find feature allows you to search for hex or text values in the non-XML data.
The Goto feature allows you to move the cursor in the Non-XML editor to a byte offset you specify.
To move to a specified offset:
The debug log allows you to save your debug information to a text file.
To use the debug log, choose File > Debug Log. A dialog displays allowing you to enter a new path and file name or choose an existing file in which to save the debug information.
| Note: | If you select an existing file, the new debug information is appended to the end of the file. |
You can specify delimiters in Format Builder by entering the correct syntax. For example, to specify a tab character as the delimiter (‘\u009’), enter the construct \t to match it.
For more information, visit the following URL:
You can specify a delimiter either by reference or by value.
Variable-sized data types can have their termination point specified by a delimiter. A delimiter is a character that marks the end of the field. The field data continues until the delimiter character is encountered.
Specify one or more fields that contain the delimiter character. The delimiter is matched in the order the fields are listed. Clicking the Ref Fields button opens the Select Reference Fields dialog box. In this dialog box, you can select reference fields and set the order in which the delimiter is matched.
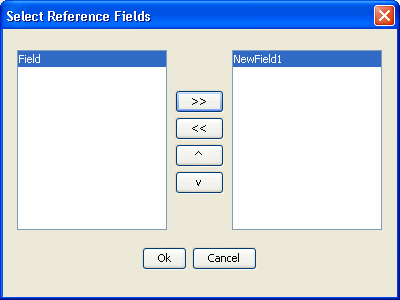
In Figure 12-1, The left pane lists fields that can be used as reference. Select a field by clicking on it and clicking the >> button to add the field. After selecting the fields, you can arrange the order of the fields by selecting a field on the right pane and clicking on the ^ or v button to move the field up or down. Click Ok. The selected fields names are displayed in the field to the right of the Ref Fields button. See Figure 12-2.
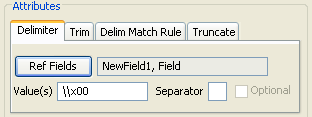
Enter the delimiter or delimiters separated by the specified Separator character. When both Ref Fields and Values are specified, the Ref Fields take precedence. If no delimiter match is found, the specified delimiter values are used to match the delimiter. Example values for Value(s) and Separator are:
The field delimiter can be comma, tilde, or semi-colon.
If the field is optional, the Optional check box is enabled and selected by default. To ensure that the binary data contain the delimiter even if the field is not present, you must clear the optional check box.
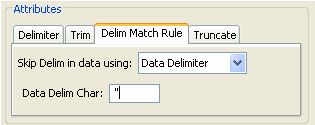
You can specify rules to skip delimiters that occurr inside the field data, so they are treated as field data instead of a delimiter. For instance, if the delimiter character is ;(semicolon), but the field data is A;B, the ; character occurring between A and B must not be considered as delimiter, but a part of field data. You can specify the following options to specify the delimiter match rule:
Specify the character that appears at the beginning and at the end of the field data. For example, if Data Delim Char is "(double quotation mark), the data appears as "A;B";. See Figure 12-3.
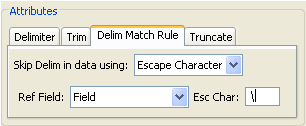
Specify an escape character that precedes the delimiter character occurring as part of the field data. The escape character value can be obtained via a reference field and by specifying the value in the Esc Char field. For example, if the Esc Char is \, then the data appears as A\;B;. See Figure 12-4
| Note: | The field delimiter, and all the shared delimiters of the parent structure are skipped even if the field is not the last field in the structure. For example, consider the following MFL structure: |
| Note: | Root Element |
| Note: | Group1 with shared delimiter * |
| Note: | Field1 with delimiter , |
| Note: | Field2 with delimiter " |
| Note: | Group2 with shared delimiter ~ |
| Note: | Field3 with delimiter , |
| Note: | Optional field4 with delimiter ~ |
| Note: | In this example, Field3 data might contain *,~ or, that are skipped by the specified escape character even if it is not the last field in Group2 |
Select this option if the delimiter match rule is not required.


|