Client Application Developer's Guide

     Previous  Next    Open TOC in new window    View as PDF - New Window  Get Adobe Reader - New Window
Content starts here

Using Excel to Access Data Services

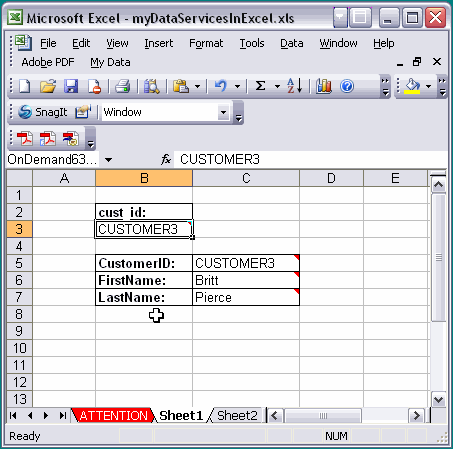
Using the AquaLogic Data Services Platform™ Excel Add-in you can invoke data service operations from Microsoft® Excel®. This has many uses:

This chapter provides a brief overview of the AquaLogic Data Services Platform Excel Add-in, focusing on:


Installing the Excel Add-in

This section describes installation of the Excel Add-in.

System Requirements

The following system requirements have been identified:

Installation Instructions

The AquaLogic Data Services Platform Excel Add-in is provided with AquaLogic Data Services Platform installation as a separate installation executable. You can directly install the executable or save the executable and install it from your desktop. The Excel Add-in installs on your local machine and also is accessible from Excel as a menu item.

Preparing To Install

Prior to installing the Excel Add-in, please be sure to uninstall any previous versions of the program. Refer to the Uninstalling ALDSP Excel Add-in section for instructions on how to complete this task.

Note: Microsoft .NET with SP1 is required for the ALDSP Excel Add-in installation. If Microsoft's .NET Framework is not installed on your system, or you have .NET 1.1 or earlier without SP1, the Excel Add-in prompts you to confirm its installation from the Microsoft Web site. Once the correct .NET install is complete, the system proceeds with the ALDSP Excel Add-in installation. (The installation of .NET could take up to 10 minutes for download and configuration.)

To install AquaLogic Data Services Platform Excel Add-in:

  1. Locate the Excel plug-in installation file. In can be found in following directory:
  2. <bea_home>/weblogic81/liquiddata/add-in

    where <bea_home> is the BEA installation on your system.

  3. Double-click on the installation file:
  4. aldsp_excel_addin_250_win32.exe
    Figure 6-1 Excel Add-in Installation


    Excel Add-in Installation

  5. Progress through the installation program using standard Next buttons.
  6. If you do not already have Microsoft .NET Framework 1.1 installed on your system, you will need to install it. This can be done through the Excel Add-in installation dialog.
  7. Determine the user of the application. (Typically anyone with access to your system would be able to use the Add-in.)
  8. Determine the location of the Add-in. By default the Add-in is installed in the following directory:
  9. C:\Program Files\BEA\AquaLogic Data Services Platform Excel Add-in
  10. Complete the installation, optionally launching Excel at the end of the process.
  11. Figure 6-2 Excel Menu Post-Installation of the Excel Add-in


    Excel Menu Post-Installation of the Excel Add-in

Accessing Excel Add-in Documentation

Once you have completed the installation, you will be able to obtain the Excel Add-in documentation:

AquaLogic Data Excel User Guide v2.pdf

This file is by default located in the following directory:

C:\Program Files\BEA\AquaLogic Data Services Platform Excel Add-in\Documentation

The documentation includes the following major topics:
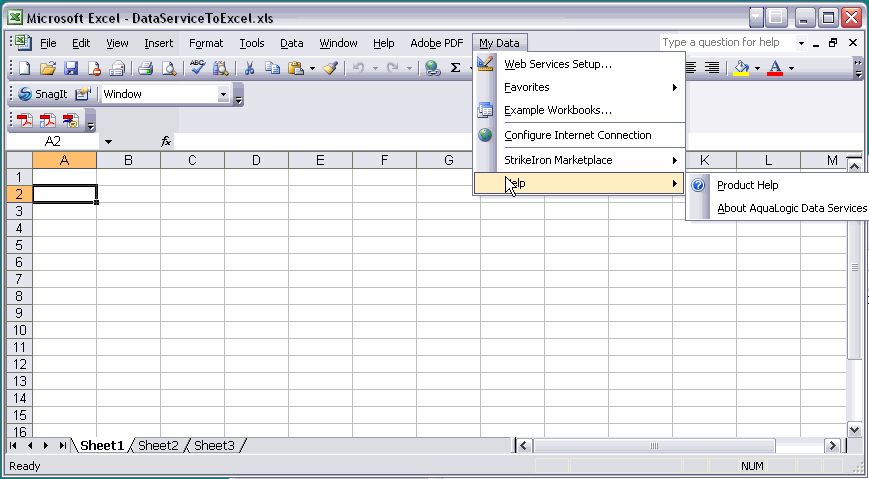
Tip: Information on using the Add-in is also available post-installation from the Excel MyData menu option (Figure 6-2).


Generating WSDL Files for the Excel Add-in

Before you access data services through the Excel Add-in, you need to generate a Web service WSDL file. The basic steps are:

Creating a WSDL File from a Data Service

Information on generating Web services, including WSDL files, from data services can be found in several locations:

Tip: Be sure and review the material referenced above so that you can properly generate a data service-compatible Data service control, Java Web service, and WSDL file for the Excel Add-in.

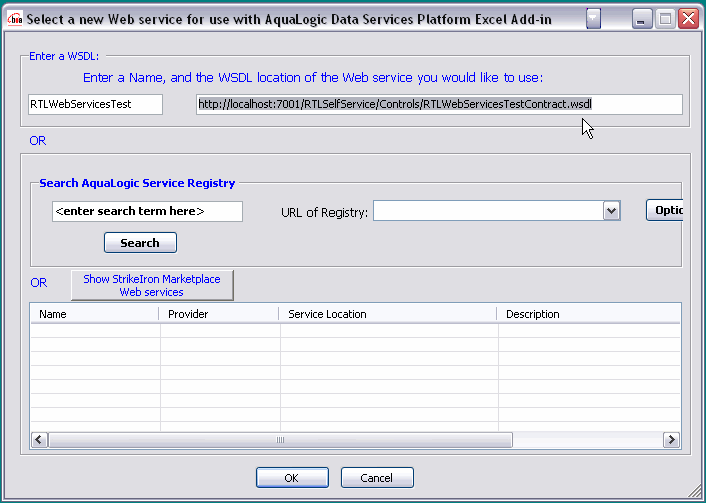
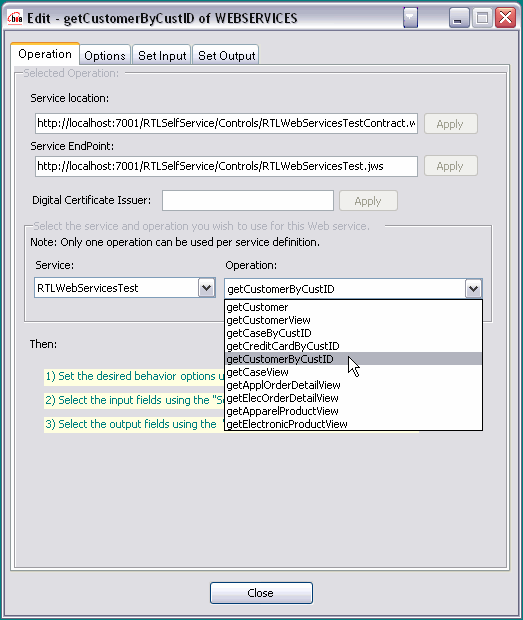
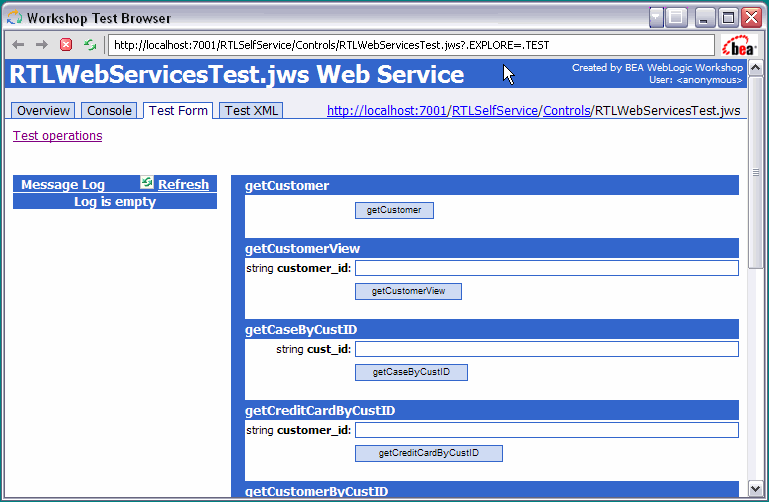
The RTLApp contains a Web service called RTLWebServices that you can use to verify the steps involved. Once your control is created — as explained in Enabling AquaLogic Data Services Applications for Web Service Clients on page 4-1 — you can quickly generate a compliant WSDL file by following these steps:

  1. Right-click on the RTLWebServices JCX (.jcx) file, selecting the Generate Test JWS File (Stateless) option, as shown in Figure 6-3.
  2. Figure 6-3 Generating a JWS File in the RTLApp


    Generating a JWS File in the RTLApp

  3. Right-click on your newly generated JWS file, selecting the Generate WSDL File option (Figure 6-4).
  4. Figure 6-4 Generating a WSDL File


    Generating a WSDL File

Tip: Test and verify your JWS file before attempting to use the WSDL address in the Excel Add-in.

Obtaining a Valid WSDL URL for Use with the Excel Add-in

The URL used to access your data service must:

An easy way to obtain the first portion address of your generated Web service is to run your JWS file in the WebLogic Workshop Test Browser. Simply open the Web service (JWS file) in WebLogic Workshop and click the Run icon or choose Start from the Debug menu.

Figure 6-5 RTLApp ElecDBTest Web Service in Test Browser

RTLApp ElecDBTest Web Service in Test Browser

In the above case, the URL is composed of the following elements:

Then, you need to substitute the full name of your WSDL file for the rest of the address. In this example you would substitute:

RTLWebServicesTestContract.wsdl

for:

RTLWebServicesTest.jws?.EXPLORE=.TEST

Thus the full path to the WSDL in your sample that you can use in the Excel Add-in would be:

http://localhost:7001/RTLSelfService/Controls/RTLWebServicesTestContract.wsdl

Using the Excel Add-in with a Remote or Deployed Server

If you plan to access your data through the Excel Add-in using a server other than your local development machine you also need to do the following:

  1. Take note of the current hostname and port settings.
  2. Set the hostname and port in the Weblogic Workshop Tools Arrow symbol WebLogic Server Arrow symbol Properties to reflect the address of the server you intend to use.
  3. Regenerate your WSDL file as described in Enabling AquaLogic Data Services Applications for Web Service Clients.
  4. Create an EAR file for deployment. This will establish the address of your WSDL to the currently set hostname and port settings. For additional information on creating EAR files for deployment see Deploying AquaLogic Data Service Platform Applications in the Administration Guide.


Example Showing Data Service-Generated Web Service Use in Excel

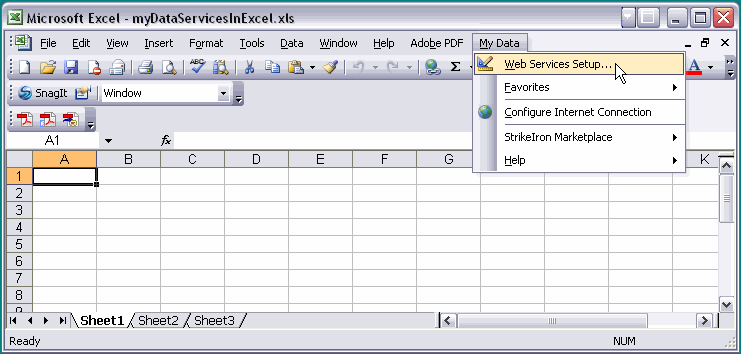
Assuming that the Excel Add-in has already been installed in a local copy of Excel, the next task is to make the URL address of your WSDL available to the Excel Add in. There are several straightforward steps involved.

  1. Access the Web services Setup option from the Excel Add-in MyData menu, as shown in Figure 6-6.
  2. Figure 6-6 Setting Up a Web Service for the Excel Add-in


    Setting Up a Web Service for the Excel Add-in

  3. When the Web Service Definitions dialog appears click the New button.
  4. Enter the WSDL location URL and an alias name for the WSDL (Figure 6-7). RTLWebServicesTest is used in this example. Then click OK.
  5. Figure 6-7 Entering a WSDL Location and an Alias Name for the New Web Service


    Entering a WSDL Location and an Alias Name for the New Web Service

  6. In the Web Service Definitions dialog, simply double-click on the alias name of your new service (RTLWebServicesTest) to activate the getCustomer operation wizard, as shown in (Figure 6-8).
  7. Figure 6-8 Web Service Operation Editor in Excel Add-in


    Web Service Operation Editor in Excel Add-in

Accessing Your Data Service Through Excel

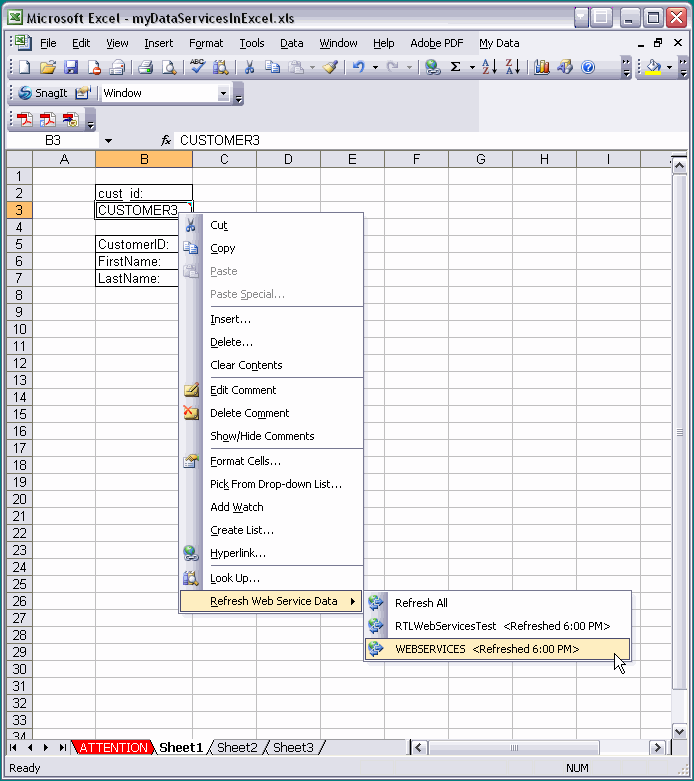
The next steps illustrate accessing a data service operation through Excel. A number of options are available; these are described in documentation referenced in Accessing Excel Add-in Documentation on page 6-4. In this section, only a basic example is provided.

  1. Select an operation. In the example shown in Figure 6-8, the parameterized getCustomerByCustID() operation (also the name of the underlying data service function) is selected.
  2. Click on the Set Input tab.
  3. Click the + symbol to the left of getCustomerByCustID.
  4. Click the cust_id input parameter (Figure 6-9).
  5. Figure 6-9 Selecting an Input Parameter


    Selecting an Input Parameter

  6. Drag the cust_id icon to your spreadsheet. A label and input field will appear on your spreadsheet. If you mouse over the input field, the full parameter path will be displayed (Figure 6-10).
  7. Figure 6-10 Input Parameter Field in Excel


    Input Parameter Field in Excel

  8. Move your cursor to another field in the spreadsheet.
  9. In the Excel Add-in Web service wizard click the Set Output tab.
  10. Using the + symbol, open the various layers of the getCustomerbyCustID operation to see the various data elements that the operation will retrieve (Figure 6-11).
  11. Figure 6-11 Selecting a Field for Display in Excel


    Selecting a Field for Display in Excel

  12. Drag the CustomerID, FirstName, and LastName elements to the spreadsheet.
  13. In the custID field input a valid customer ID number such as CUSTOMER2.
  14. Press Enter.
  15. Select the My Data -> Refresh Web Service Data -> WEBSERVICES option (Figure 6-12) from the menu (or right-click on any field in the spreadsheet to access the same option).
  16. Figure 6-12 Refreshing Data Using the Excel Add-in


    Refreshing Data Using the Excel Add-in

  17. View and optionally reformat or rearrange the resulting information (Figure 6-13).
  18. Figure 6-13 Formatted Results


    Formatted Results


  Back to Top       Previous  Next