Samples Tutorial

     Previous  Next    Open TOC in new window    View as PDF - New Window  Get Adobe Reader - New Window
Content starts here

Consuming Data Services using Data Service Controls

A Data Service control provides WebLogic Workshop applications with easy access to data service functions.


Objectives

After completing this lesson, you will be able to:


Overview

A convenient way to quickly access ALDSP from a WebLogic Workshop application, such as page flows, process definitions, portals, or Web services, is through the Data Service control.

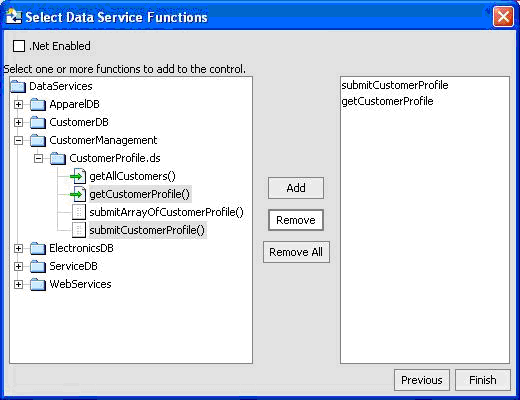
The Data Service control is a wizard-generated Java file that exposes to WebLogic Workshop client applications only those data service function that you choose. You can add functions to a control from data services deployed on any WebLogic Server that is accessible to the client application, whether it is on the same WebLogic Server as the client application or on a remote WebLogic Server.

If accessing data services on a remote server, information regarding the information that the service functions return (in the form of XML schema files) are first downloaded from the remote server into the current application. The schema files are placed in a schema project named after the remote application. The directory structure within the project mirrors the directory structure of the remote server.

When you create a Data Service control, WebLogic Workshop generates interface files for the target schemas associated with the queries and then a Java Control Extension (.jcx) file. The .jcx file contains the methods included from the data services when the control was created and a commented method that, when uncommented, allows you to pass any XQuery statement to the server in the form of an ad-hoc query.


8.1 Installing a Data Service Control

Data Service controls let you easily access data from page flows, process definitions, portals, or Web services.

Objectives

In this exercise, you will:

Instructions

  1. Right-click the Evaluation application folder.
  2. Choose Import Project.
  3. Choose Web Project.
  4. Navigate to <beahome>\weblogic81\samples\LiquidData\EvalGuide
  5. Select the CustomerManagementWebApp project and click Open.
  6. Click Import, and then click Yes when asked whether you want to install project files.
  7. Right-click the Evaluation application folder.
  8. Choose Install Arrow symbol Controls Arrow symbol Data Service.
Note: The Data Service option will not display if you previously installed a Data Service control.
  1. Expand the Libraries folder and confirm that the LiquidDataControl.jar file is installed.
  2. Figure 8-1 Data Service Control


    Data Service Control


8.2 Defining the Data Service Control

  1. Create a new folder in the CustomerManagementWebApp Web project, and name it controls.
  2. Define a new Java control as a Data Service control by completing the following steps:
    1. Right-click the controls folder.
    2. Choose New Arrow symbol Java Control.
    3. Select Data Service.
    4. Enter CustomerData in the File name field.
    5. Click Next.
    6. Figure 8-2 Creating a New Java Control


      Creating a New Java Control

    7. In the New Java Control - Data Service dialog box, click Create.
Note: Do not change any default settings.
Figure 8-3 Creating a New Data Service Control

Creating a New Data Service Control

    1. In the Select Data Service Functions box, expand the CustomerManagement and then the CustomerProfile.ds folders.
    2. Select getCustomerProfile().
    3. Press Ctrl.
    4. Select submitCustomerProfile().
    5. Click Add and then click Finish.
    6. Figure 8-4 Selecting Functions for the Data Service Control


      Selecting Functions for the Data Service Control

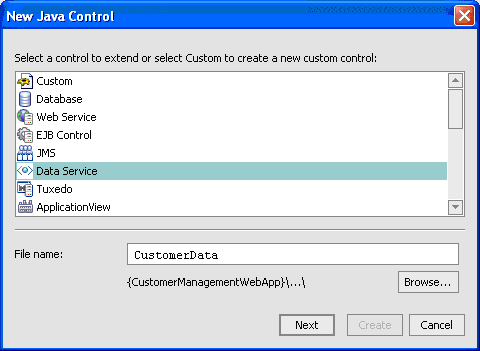
      It will take a few moments for the project to compile. After compilation, you should see a Java-based Data Service Control called CustomerData.jcx, with the following signatures:

      • getCustomerProfile() is a data service read function.
      • submitCustomerProfile() is a submit function for all the changes (inserts, updates, and deletes) done to the customer profile and persisting the data to the data sources involved.
Note: You can use the data service control that you define as any WebLogic Workshop control in a workflow, a JPF, or a portal.
  1. Open the CustomerData.jcx file in Source View. This file is located in CustomerManagementWebApp\controls.
  2. Add an import statement for the filterXquery class:
  3. import com.bea.ld.filter.FilterXQuery;
  4. Select and copy the comments and definition for the getCustomerProfile() function. It looks like this:
  5.     /** 
         *
         * @jc:XDS functionURI="ld:DataServices/CustomerManagement/CustomerProfile" functionName="getCustomerProfile" schemaURI="http://temp.openuri.org/DataServices/schemas/CustomerProfile.xsd" schemaRootElement="CustomerProfile" 
         */ 
        org.openuri.temp.dataServices.schemas.customerProfile.CustomerProfileDocument getCustomerProfile(java.lang.String CustomerID);
  6. Paste the copy on a new line and rename it getCustomerProfileWithFilter in the function definition.
  7.     /** 
         *
         * @jc:XDS functionURI="ld:DataServices/CustomerManagement/CustomerProfile" functionName="getCustomerProfile" schemaURI="http://temp.openuri.org/DataServices/schemas/CustomerProfile.xsd" schemaRootElement="CustomerProfile" 
         */     org.openuri.temp.dataServices.schemas.customerProfile.CustomerProfileDocument getCustomerProfileWithFilter(java.lang.String CustomerID, FilterXQuery filter); 
  8. Add the following parameter to the getCustomerProfileWithFilter() function:
  9. FilterXQuery filter

    After adding this parameter, the function signature will display as:

        /** 
         *
         * @jc:XDS functionURI="ld:DataServices/CustomerManagement/CustomerProfile" functionName="getCustomerProfile" schemaURI="http://temp.openuri.org/DataServices/schemas/CustomerProfile.xsd" schemaRootElement="CustomerProfile" 
         */     org.openuri.temp.dataServices.schemas.customerProfile.CustomerProfileDocument getCustomerProfileWithFilter(java.lang.String CustomerID, FilterXQuery filter); 


8.3 Inserting a Data Service Control into a Page Flow

At this point, you have created a Data Service Control and specified which data service functions (getCustomerProfile() and submitCustomerProfile()) you want to want to use in this control. However, the control is not yet associated with a page flow, from which end-users can retrieve data.

Objectives

In this exercise, you will:

Instructions

  1. Open CustomerPageFlowController.jpf in Flow View. (The file is located in the CustomerManagementWebApp\CustomerPageFlow folder.)
Note: There are two "errors" in the file, indicated by the two red marks in the scrollbar. This is because the getCustomer() and submitCustomer() functions are not yet associated with a Data Services Control.
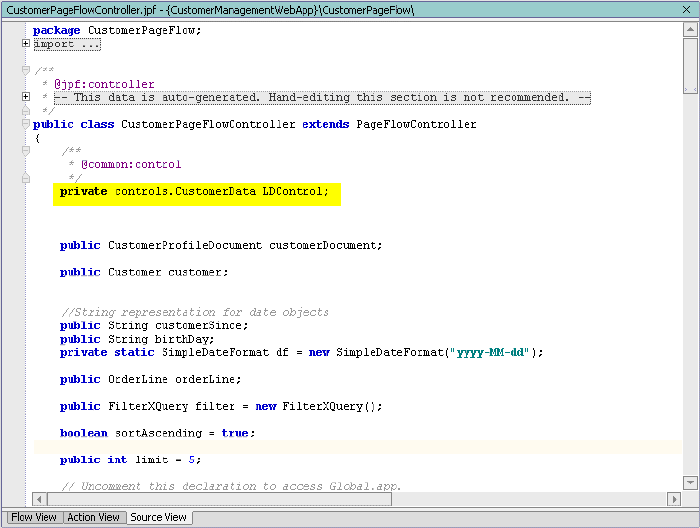
Figure 8-5 Page Flow View

Page Flow View

  1. In Data Palette, go to Controls. (If Data Palette is not open, choose View Arrow symbol Windows Arrow symbol Data Palette.)
  2. Choose Add Arrow symbol Local Controls Arrow symbol CustomerData, and name it LDControl.
  3. Click Create.
  4. Figure 8-6 Insert Custom Data Service Control
  5. Open the CustomerPageFlowController.jpf in Source View.
  6. Change the line:
  7. customerDocument = LDControl.gCustomerProfileWithFilter(form.getCustomerID(),filter);

to:

customerDocument = LDControl.getCustomerProfile(form.getcustomerID());
  1. Confirm that the page flow now includes the control as an instance variable:
  2.  private controls.CustomerData LDControl;
    Figure 8-7 Source View of a Data Service Control


    Source View of a Data Service Control


8.4 Running the Web Application

In this exercise you will see the Data Service Control in action.

Objectives

In this exercise, you will:

Instructions

Note: The WebLogic Server must be running.
  1. Build the CustomerManagementWebApp project.
  2. Open CustomerPageFlowController.jpf in Flow View.
  3. Click the Start icon (or press Ctrl + F5) to run the web application. The Workshop Test Browser opens after a few moments.
  4. Enter CUSTOMER3 in the customer ID field and click Submit. The profile and order information for Britt Pierce should be returned.
  5. Figure 8-8 Java Page Flow Results


    Java Page Flow Results

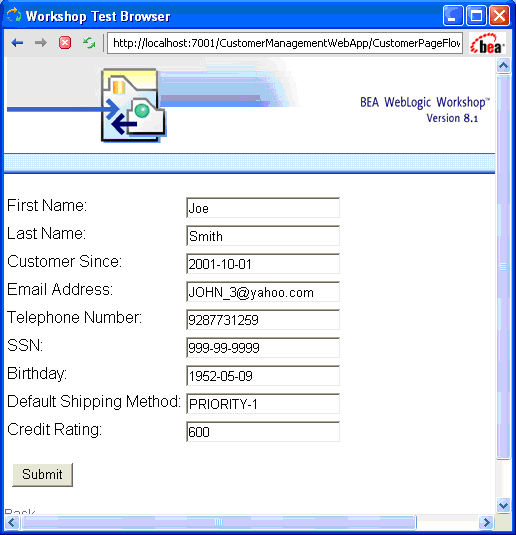
Modify the customer information by completing the following steps:

  1. Click Update Profile.
    1. Modify Email Address to the following:
    2. JOHN_3@yahoo.com
    3. Click Submit.
    4. Figure 8-9 Updating a Customer Profile


      Updating a Customer Profile

    5. Click Submit All Changes. (The link is at the bottom of the Workshop Test Browser page.)
  2. Add a new order line item by completing the following steps:
    1. In Order_3_0, click New Order Item. (The link is located at the bottom of all line items for Order_3_0.)
    2. Enter the new order information, as displayed in Figure 8-10, and then click Submit.
    3. Figure 8-10 Adding New Order Information


      Adding New Order Information

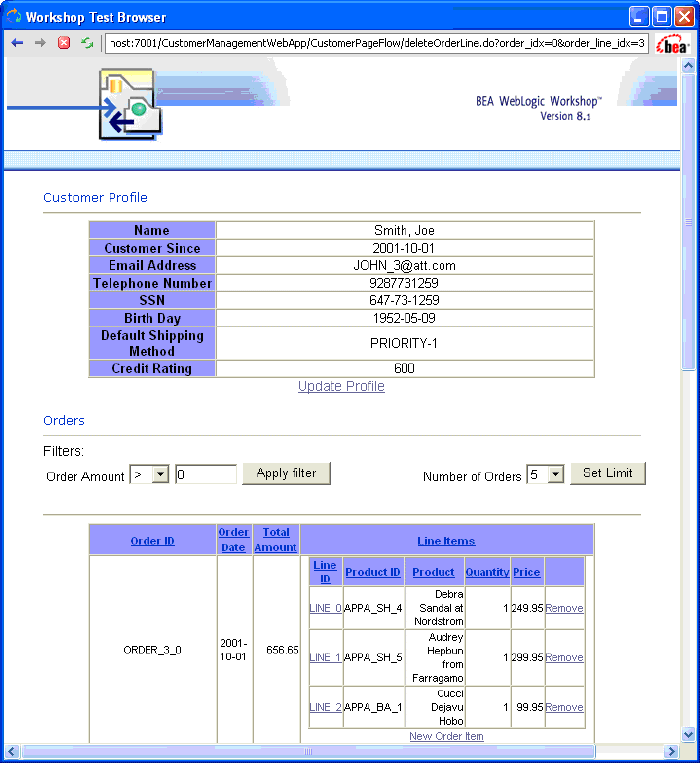
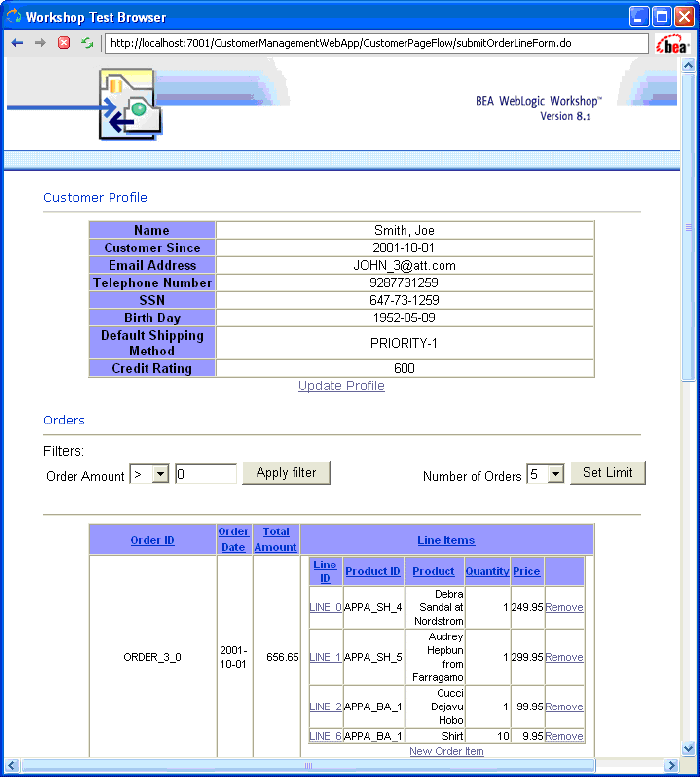
      The new order information displays in the Workshop Test Browser.

      Figure 8-11 Updated Data


      Updated Data

  3. Modify an existing order by completing the following steps:
    1. In Order_3_0, click Line 6.
    2. Enter 15 in the Quantity field.
    3. Click Submit to close the Order Information window.
  4. Click Submit All Changes. (The link is at the bottom of the Workshop Test Browser page.)
  5. Close Workshop Test Browser.
  6. Test whether the changes were persisted by completing the following steps:
    1. In WebLogic Workshop, open CustomerProfile.ds in Test View.
    2. Select getCustomerProfile(CustomerID) from the Function drop-down list.
    3. Enter CUSTOMER3 in the Parameter field.
    4. Click Execute.
    5. Expand the <creditrating>, <order> and <order_line> nodes to confirm that the changes persisted.
    6. Figure 8-12 Test View -- Confirm Changes


      Test View -- Confirm Changes


Lesson Summary

In this lesson, you learned how to:


  Back to Top       Previous  Next