


|
This section describes how to integrate AquaLogic Enterprise Security with AquaLogic Data Services Platform, using the WebLogic Server 8.1 SSM or WebLogic Server 9.x SSM. It includes the following topics:
AquaLogic Enterprise Security (ALES) can provide fine-grained entitlements for Data Services serviced by AquaLogic Data Services Platform (ALDSP) 2.1. AquaLogic Enterprise Security can be used to manage access control to entire services or elements of those services. AquaLogic Enterprise Security allows you to have common set of security policies for a heterogeneous environment, and a single security infrastructure that supports WebLogic Portal, WebLogic Server, and custom applications.
The ALES service does not replace all of the management functionality provided by the ALDSP. The ALDSP Administrative console (ldconsole) is still used to manage all of the attributes of the various data services aggregated by ALDSP (see Figure 12-1).
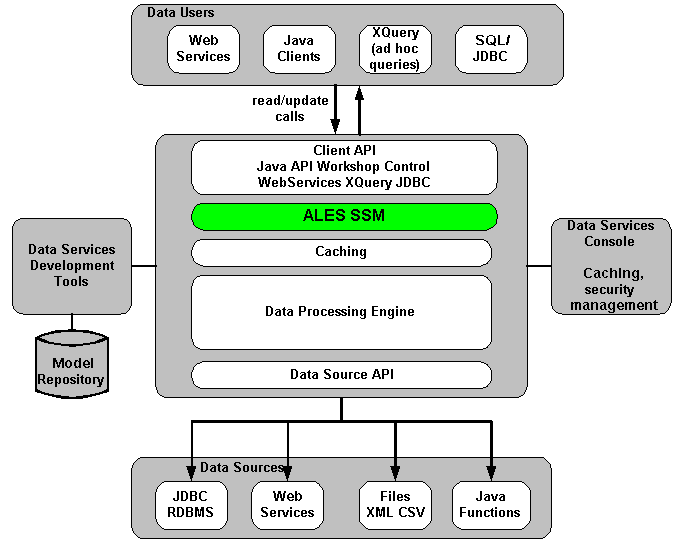
The AquaLogic Enterprise Security WebLogic SSM enables you to write, deploy, and manage fine-grained policy for controlling access to all WebLogic server application resources, including data services. A specific resource type ld allows a security administrator to represent the data services in the ALES resource hierarchy. Elements of that data service are also converted to the ALES format for evaluation by the ASI authorization engine.
For more information, see the following topics:
AquaLogic Data Service Platform (ALDSP) 2.1 requires WebLogic Server 9.2, 9.1, or 8.1 (with Service Pack 4 or 5) and uses the WLS 9.x or WLS 8.1 SSM. While the ALES framework allows for different security providers to be used with ALDSP, the following providers were certified:
The following use-case scenario is supported when you integrate AquaLogic Enterprise Security with AquaLogic Data Services Platform:
AquaLogic Enterprise Security integration with ALDSP has the following constraints and limitations:
Before you begin, you must ensure that the following pre-requisites are satisfied:
This section describes how to integrate AquaLogic Enterprise Security with AquaLogic Data Services Platform. Once integrated, you can use the AquaLogic Enterprise Security Administration Console to write and deploy a set of authorization and role mapping policies to protect Data Services and elements of those services.
| Note: | The instructions provided in this section use as an example the ALDSP sample application RTL App that ships with the ALDSP 2.1 software distribution. This procedure is representative of any integration of AquaLogic Enterprise Security with ALDSP. |
To integrate AquaLogic Enterprise Security with AquaLogic Data Services Platform, perform the following tasks:
startWebLogicALES file for WebLogic Server, as described in Creating the WebLogic Server startWebLogicALES File. Note that this procedure varies, depending on whether you are using WLS 8.1 or WLS 9.x.ld-server-core.jar in <WL_HOME>/liquiddata/lib with the jar in ALDSP 2.5 patch for ALES.
Before enabling your ALDSP domain for ALES, open the ALDSP Administration console:
http://<hostname>:<port>/ldconsole. Do the same to secure CustomerView.ds > CUSTOMER > ORDERS> ORDER_SUMMARY > OrderDate.
Securing ALDSP with ALES employs either the WLS 8.1 SSM or the WLS 9.x SSM. Install the WLS SSM on the machines on which you have installed ALDSP, as described in Installing Security Service Modules.
Next, create a new WLS SSM configuration named aldsprealm. An SSM configuration defines the set of security providers to use for adjudication, authentication, auditing, authorization, role mapping, and credential mapping services.
Refer to Table 12-1 and use the AquaLogic Enterprise Security Administration Console (for the WLS 8.1 SSM) or the WebLogic Server Administration Console (for the WLS 9.x SSM) to configure the security providers listed there. Set the Configuration ID to aldsprealm. For instructions on creating an SSM configuration, see
Configuring and Binding a Security Service Module in Installing Security Service Modules and the Console Help.
The SSM configuration must be bound to a Service Control Manager (SCM).
To bind the aldsprealm SSM configuration, see "Binding a Security Service Module to a Service Control Manager" in the Console Help.
The aldsprealm SSM configuration must be distributed.
To distribute the aldsprealm SSM configuration, see "Distributing Configuration" in the Console Help.
Before starting a WebLogic Server Security Service Module, you must first create an instance of the WebLogic Server Security Service Module using the Create New Instance Wizard.
For information about creating an instance of a WebLogic Server Security Service Module, see Creating an Instance of a Security Service Module in Installing Security Service Modules.
You must have the ALES Administration Server running prior to enrolling the Security Service Module. For information about enrolling a security service module, see Enrolling the Instance of the Security Service Module in Installing Security Service Modules.
Before you can start a WebLogic Server instance that uses BEA AquaLogic Enterprise Security, you must create the startWeblogicALES file based on the startWeblogic file that is located in the WebLogic domain. For information about how to do this, see:
The startWeblogic file for the ALDSP domain for RTLApp is located in:
<bea_home>\<weblogic_home>\samples\domains\ldplatform
If you are using the WLS 8.1 SSM, create a text file named security.properties and place it in the domain directory. You use this file to define the AquaLogic Enterprise Security realm and the default realm.
# AquaLogic Enterprise Security Configuration File
#
# This file contains AquaLogic Enterprise Security configuration
# properties. By default, the AquaLogic Enterprise Security runtime
# looks for a property file called 'security.properties' in the
# working directory
wles.realm=aldsprealm
wles.default.realm=aldsprealm
| Note: | This step does not apply if you are using the WLS 9.x SSM |
Developing a set of policies typically begins by determining which resources you need to protect and your access control requirements. You then create the identity directory, resources, groups, users, and roles that you will use to write policies to protect those resources. Next you write a set of authorization and role mapping policies to define access control on those resources. Finally, you deploy the set of polices to the WebLogic Server Security Service Module that you use to control access to your data services.
For more information on how to use the ALES Administration Console to write policy, see the Policy Managers Guide and the Console Help. In addition, the ALES Administration Server installation includes a set of sample polices for BEA AquaLogic Data Services Platform, located at BEA_HOME/ales26-admin/examples/policy/aldsp_sample_policy. You can import these sample policies and use them as a starting point for developing a full set of policies for your applications. For information about how to import the sample policies, see the README file in the sample directory and see also
Importing Policy Data in the Policy Managers Guide.
This section covers the following topics:
This section describes how to use the ALES Administration Console to create an identity directory, groups, and users for an ALDSP application.
| Note: | This procedure uses aldspusers as the name of the Identity directory; however, you can use a different name. |
To create the Identity directory and users:
aldspusers and click OK. The aldspusers directory appears in the list of Identity directories.LDSampleUsers Group.LDSampleUsers group:
Jack (password: weblogic)
Steve (password: weblogic)
Tim (password: weblogic)
This section describes how to use the ALES Administration Console to define the application resources that you will protect using ALES.
To configure resources, perform the following tasks:
| Note: | You can choose any application name for your ALDSP application. |
To create application resources, use the Administration Console to perform the following steps:
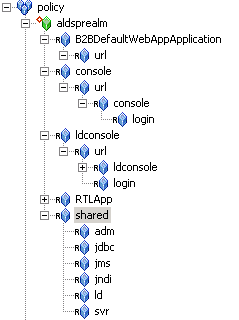
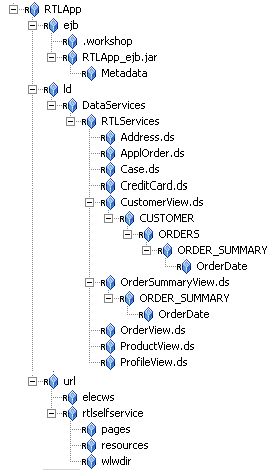
aldsprealm, select Binding from the Type drop-down list box, and click Ok. The aldsprealm resource appears under the Policy node.aldsprealm resource and click Configure. The Configure Resource dialog box appears.Figure 12-2 shows the ALDSP resource tree with all nodes expanded except the RTLApp node. The resources under that RTLApp node are shown in Figure 12-3. You must create the resources shown in Figure 12-2 and Figure 12-3.
This section describes how to use the Administration Console to create the role mapping policies that will be used to control access the sample ALDSP application.
Table 12-3 lists the role mapping policies required for the WebLogic domain.
To create the role mapping policies, refer to Table 12-3 and perform the following steps.
| Note: | If you do not create the Everyone role mapping policy correctly, none of the authorization policies defined in Figure 12-4 will work. |
aldsprealm, and click Add.allusers in the list box, click Add, and click Ok.This section describes how to use the Administration Console to create authorization policies to protect data services and application resources. Table 12-4 lists the authorization policies required for WebLogic Server, the WebLogic Server console, and the RTL sample application.
Perform the following steps to create the authorization policies listed in Table 12-4.
| Note: | If Table 12-4 lists multiple resources for a single privilege and role, you may define all of the resources in one authorization policy. |
When developing policies for use with a Security Service Module, you can use the Discovery mode feature to help define your policy components. Instructions for using Discovery mode are provided in the Resource Discovery section in the Policy Managers Guide.
Distribute policy and SSM configuration to the WebLogic Server SSM.
For information on how to distribute policy and SSM configuration, see "Deployment" in the Console Help. Be sure to verify the results of your distribution.
To start a WebLogic Server instance, perform the following steps:
To access the RTLApp running on an ALDSP server:
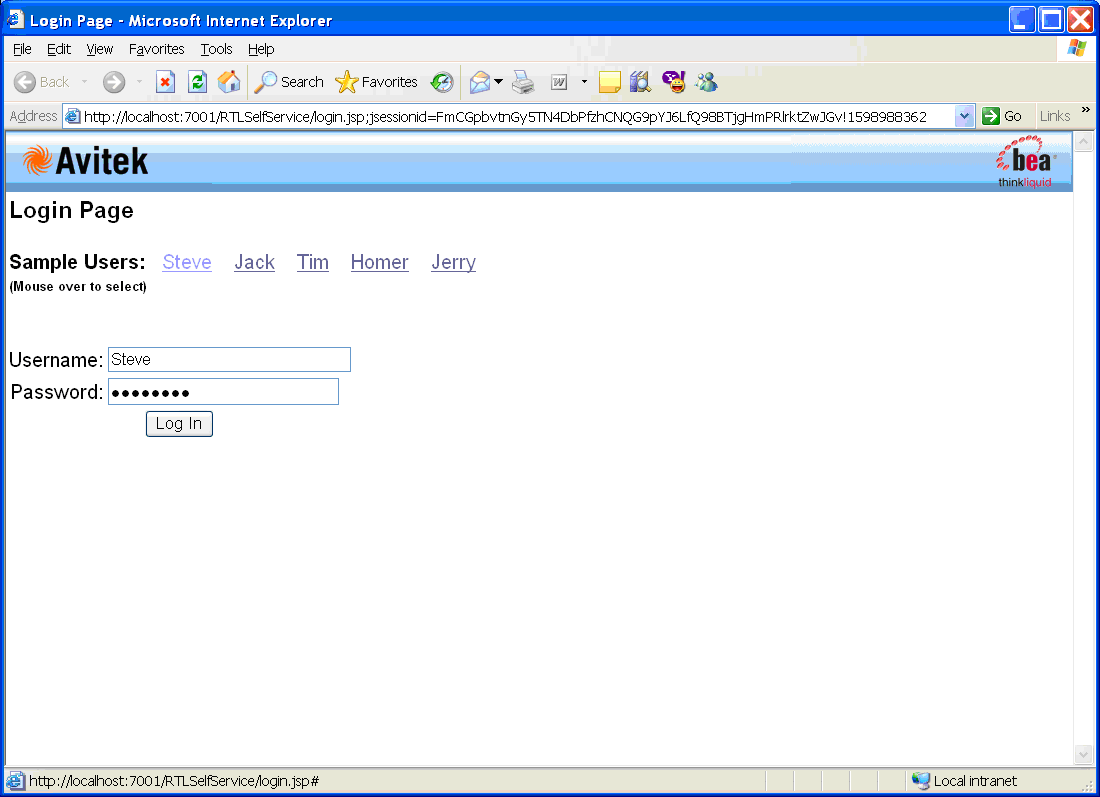
http://<hostname>:<port>/RTLSelfService, where <hostname> is the machine on which RTL application is running. The browser is redirected to the authentication page (see Figure 12-4).
ALES 2.6 provides mechanisms to redact ALDSP data both before and after the ALDSP Engine processes a client query request.
Redacting ALDSP data before the ALDSP Engine processes a client query request is called pre-processing. Redacting ALDSP data after the ALDSP Engine processes a client query request is called post-processing. This section describes both solutions. This section begins with an overview of the two solutions.
In the pre-processing data redaction solution, the result of the data-retrieving request is protected by adding security constraints before the XQuery function is executed. That is, before the ALDSP Engine processes a client query request, an ALES security constraint is created and inserted into the client query. Pre-processing may return either predicates to modify the original query, or provide a substitute function name.
ALDSP uses the WLS security framework to control access to the data services. When a user calls a function of a data service, the request is first authorized by WLS. ALDSP provides a plug-in mechanism to get additional obligations from the authorization response that is returned from the WLS security framework. These obligations are returned only when the authorization decision is is true, and are used to modify the original request to add additional restraints before it calls to the data services.
Because this approach is performed before pushing the query to the data sources, it is called pre-processing.
The pre-processing data redaction solution provides an ALES-specific plug-in. This plug-in calls the Java API to authorize the user request, then gets the response attributes from the authorization response and returns them as obligations.
Consider the sequence of events shown in Figure 12-7:
In the post-processing data redaction solution, the ALDSP engine retrieves the data from the data service and then invokes the relevant security XQuery function. The decision about what data to retrieve is already made, and the issue is whether to grant access and return the data. Because this approach processes the result-set after querying the data, it is called post-processing.
This approach may not be suitable for fast operations or very large data sets.
Consider the sequence of events shown in Figure 12-8:
The ALES-specific function access provider plug-in com.bea.security.ales.aldsp.ALESFunctionAccessProvider calls the Java SSM to do authorization, gets the response attributes, and then returns the response attributes as obligations to ALDSP engine. The ALES policy file needs to include policies with the response attributes appropriately defined.
For example, consider a policy such as the following:
grant (
//priv/ALDSP_QUERY,
//app/policy/RTLApp/ld/DataServices/RTLServices/OrderView.ds/getOrders,
//user/asi/system/
) if report_as("aldsp_replacement_function", "getOrdersThatAmountLessThan1000")
This policy permits user system to perform ALDSP_QUERY privilege on the data service OrderView's function getOrders, and returns the attribute aldsp_replacement_function, with a value getOrdersThatAmountLessThan1000 if the authorization decision is true.
When a data service client calls the getOrders function, ALDSP will call the ALES-specific implementations to do authorization. This policy will be evaluated and return an attribute aldsp_replacement_function with a value getOrdersThatAmountLessThan1000 if the authorization decision is true.
The ALES plug-in returns this attribute and value as obligations to the ALDSP engine.
Finally, the ALDSP engine calls the replacement function getOrdersThatAmountLessThan1000 instead of the original. This new function should have exactly the same signature; no additional verifications are performed at runtime.
ALDSP supports two types of obligations. You can use them alone or together.
ALES defines the privilege ALDSP_QUERY for use in policies. You must use this privilege for any policy for which you want to apply pre-processing.
ALES defines three response attribute names for you to use with a replacement function or XQuery expression. The attribute names are all in lower case.
These attribute names can be returned by the ALES evaluation functions report and report_as, and can also can be returned by user-defined evaluation functions.
report_as("aldsp_replacement_function", "ld:DataServices/RTLServices/OrderView:getOpenOrdersByCustID")
./order/amount < 1000, or ./order/amount < 1000 OR ./order/customerid eq `CUSTOMER4'.
./f1:region eq 'west', the namespace map should contain the following entry mapping the string prefix to the string namespace (for example, {"f1","http://com.bea.security"}):
report_as("aldsp_namespace_binding", "f1=http://com.bea.security") and report_as("aldsp_xquery_expression", "./f1:region eq 'west'")
Before you can use the pre-processing data redaction solution, you must integrate ALES with ALDSP, as described in TBS.
After you have done this, then:
These tasks are described in the sections that follow.
You need to modify the file set-wls-env, which is in the WLS SSM instance directory. To do this:
set-wls-env.bat. ldintegration.jar) to the end of WLES_POST_CLASSPATH environment variable.-Dcom.bea.ld.security.FunctionAccessQuery=com.bea.security.ales.aldsp.ALESFunctionAccessProvider to WLES_JAVA_OPTIONS.If you are going to use replacement functions to protect data services, implement the replacement function on the target data service. This replacement function must have the same signature (return type, and number and type of parameters) as the replaced function.
For example, if you are going to restrict OrderView.getOrders to return only the orders that total less than $1000, write an XQuery function (named something such as getOrdersThatAmountLessThan1000) to implement the restriction. This function must have the same return type, and same number and type of parameters as getOrders.
If you are going to use a replacement function to protect data services, define a policy that allows someone to access the target data service's function. (If you have an existing policy, you only need modify it.) Return a named attribute aldsp_replacement_function, the value of which is the replacement function. There are no additional access control checks performed for the replaced function.
For example, to use the function getOrdersThatAmountLessThan100 to replace the function getOrders when an anonymous user calls getOrders, define a policy such as:
grant (
 //priv/ALDSP_QUERY,
 //app/policy/RTLApp/ld/DataServices/RTLServices/OrderView.ds/getOrders,
 //user/asi/anonymous/
) if
report_as("aldsp_replacement_function","getOrdersThatAmountLessThan1000")
If you are going to use an XQuery expression to protect data services, define a policy that allows someone to access the target data service's function. Return a named attribute aldsp_xquery_expression, the value of which is the desired XQuery expression.
For example, to restrict the function getOrders to return orders that amount less than $1000 if an anonymous user calls it, define a policy such as:
grant (
 //priv/ALDSP_QUERY,
 //app/policy/RTLApp/ld/DataServices/RTLServices/OrderView.ds/getOrders,
 //user/asi/anonymous/
) if report_as("aldsp_xquery_expression", "./order/amount < 1000")
If namespaces are used in an XQuery expression, you must define namespace bindings. (Namespace bindings are not used for replacement function names; they must be fully qualified, including the namespace.) For example, consider the following policy:
grant (
 //priv/ALDSP_QUERY,
 //app/policy/RTLApp/ld/DataServices/RTLServices/OrderView.ds/getOrders,
 //user/asi/anonymous/
) if report_as("aldsp_xquery_expression", "./ns1:order/amount < 1000")
In this case, you need to define the mapping of namespace ns1 and return it. Therefore, you need to add another response attribute, as follows:
grant (
//priv/ALDSP_QUERY,
//app/policy/RTLApp/ld/DataServices/RTLServices/OrderView.ds/getOrders,
//user/asi/anonymous/
) if report_as("aldsp_xquery_expression", "./ns1:order/amount < 1000") and
report_as("aldsp_namespace_binding", "ns1=http://com.bea.security")
The ALDSP security XQuery functions, which are described in Creating a Security XQuery Function, enable you to specify custom security policies that can be applied to data elements. In particular, security XQuery functions are useful for creating data-driven policies (policies based on data values). For example, you can block access to an element if the order amount exceeds a given threshold.
ALES 2.6 provides two ALES Java methods that you can call from within your security XQuery function. (The ALES Java methods are used as XFL functions.) These ALES Java methods then invoke the WLS SSM, which determines whether the access request should be granted.
The first ALES Java function returns a Boolean value to indicate the result of the access permission decision. The second ALES Java function returns a string array that contains the result of the access permission decision, and response attributes. You can then use the response attributes to implement some specific logic in your security XQuery function.
You can use the ALES Java methods in place of, or in addition to, the following ALDSP
access control function extensions to the BEA implementation of XQuery:
For example, consider the typical security XQuery function usage shown in Listing 12-1. In this instance, you might replace the function fn-bea:is-access-allowed with an ALES Java method.
declare namespace demo="demo";
declare namespace retailerType="urn:retailerType";
declare function demo:secureOrders($order as element(retailerType:ORDER_SUMMARY) ) as xs:boolean {
if (fn-bea:is-access-allowed("LimitAccess",
"ld:DataServices/RTLServices/OrderSummaryView.ds")) then
| Note: | Because the security XQuery function depends on the data service schema, it is not XML schema-neutral. Therefore, you create the security XQuery function based on the custom data service schema. |
| Note: | One limitation of the custom security XQuery function is that it must be created in Workshop, instead of in ALDSP console. A custom XQuery security function cannot be created from the ALDSP console, because the console compiler does not access the custom functions used in it. |
ALES 2.6 includes the following two Java methods, both of which are in the class named com.bea.security.ales.aldsp.AccessController.
is_access_allowed
public static boolean is_access_allowed(String resource, String[] attributeNames, String[] attributeValues)
is_access_allowed_with_response_attributes
public static String[] is_access_allowed_with_response_attributes (String resource, String[] attributeNames, String[] attributeValues)
The ALES Java methods have three parameters:
The indexed attribute names in the first parameter correspond to the indexed attribute values in the second.
For example, assume that the second parameter contains the array an1,an2 and the third parameter contains the array av1, av2. This indicates two attributes. The first attribute's name is an1 and its value is av1. The second attribute's name is an2 and its value is av2.
These attributes and values are then evaluated in the context of the ALES policy.
| Note: | If the data type of the attribute value is not string, convert it to string via fn:string(). |
| Note: | In addition, ALES attributes support only integer numbers. If the attribute value is a decimal number, truncate it by using fn:round() before converting to string. |
If you use the ALES is_access_allowed method, the boolean return value represents the access permission, either true or false. You can return this boolean value directly to the security XQuery function, or do some additional operation based on the result.
If you use the is_access_allowed_with_response_attributes method, the first element of the array is the access permission decision, either true or false.
The other array elements represent the response attributes. One example is (`true', `ALESResponse', `ran1', `rav1_1', `rav1_2', `ALESResponse', `ran2', `rav2'), where:
true is the access permission.ALESResponse is a response attribute separator.ran1 and ran2 are response attribute names. rav1_1 and rav1_2 are the value of response attribute ran1. The response attribute ran1 is a list value.rav2 is the value of response attribute ran2. The response attribute ran2 is a single value.
You can test the access permission by comparing the first element of the string array with true or false.
In addition, you can use the response attribute value to implement additional logic, as described in How to Write Policies That Return Response Attributes as ALDSP Obligations.
There is nothing unique about the ALES policy that you create to protect an ALDSP resource, beyond the general requirement that the resource name, attribute names, and attribute values you specify in the ALES Java method must correlate with the policy. The general steps you perform to create a policy are described in How to Integrate the ALES Java Methods.
However, if you use the is_access_allowed_with_response_attributes method, you can create a policy that returns response attributes and then test those attributes.
As described in
Using Response Attributes, response attributes are typically specified using built-in evaluation functions that report name/value pairs. There are two functions for returning attributes: report() and report_as(). These functions always return TRUE (if there are no errors), and their information is passed to your application as response attributes, embedded within the ResponseContextCollector.
The report_as function allows you to write the policy to specify both the attribute name and value. For example, report_as("class", "A").
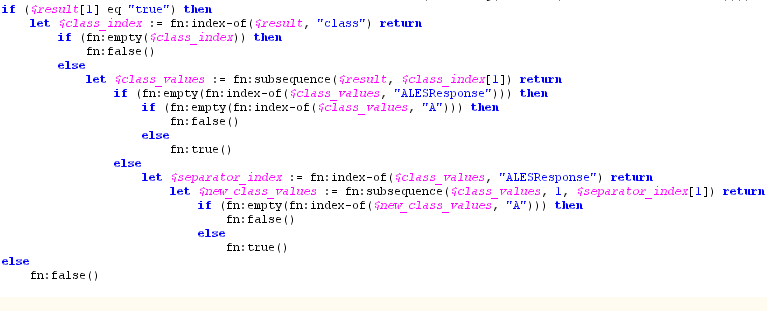
Then, in your security XQuery function, you can test the return response attributes. Remember that the first element of the array is the access permission decision, either true or false. For example, consider Figure 12-9:
The report_as function loads a named response attribute with a specified value. The value may be an attribute, a constant or a string literal. You can specify multiple values, in which case the response attribute is returned as a list.
While the report() and report_as()functions are run when the policy is evaluated, they are not really constraints of the policy. Data reported by the functions are returned only if the adjudicated authorization decision agrees with the policy. This means the attributes returned from GRANT policies are not passed to the caller unless the overall access decision is PERMIT.
Use Workshop, not the ALDSP console, to add a new XQuery function as the security XQuery function in the ALDSP application, as follows:
The XQuery Function Library (XFL) is a facility for providing auxiliary functions across multiple data services. The ALES Java method is an XFL function. You import it from a Java class shipped by ALES.
| Note: | If ALES policies for the affected DSP resource require any context parameters to be passed with the request, those parameters should be extracted in the custom XQuery Security function and passed to the SSM via the ALES Java function. |
| Note: | The ALES Java method is able to determine the authenticated subject to use for authorization, and you do not need to supply it. |
Before you can integrate the ALES Java methods into the ALDSP security XQuery function, you must configure the WLS SSM to protect the ALDSP domain, as outlined in Integrating with AquaLogic Data Services Platform: Main Steps.
After you have done this, then:
alesxfl.jar and api.jar from the WLS SSM lib directory to the ALDSP application's APP-INF/lib directory.alesxfl.jar, expand it, and select the class com.bea.security.ales.aldsp.AccessController.class.is_access_allowed or is_access_allowed_with_response_attributes, and finish the wizard.let $result := f1:is_access_allowed_with_response_attributes
("RTLApp/datacontrol/orderview",
("totalorderamount"),
(fn:string(fn:round ($order/TotalOrderAmount)))) return
The first parameter is the resource name as defined in ALES. The second parameter is a string array that contains attribute names. In the example, there is only one attribute, named totalorderamount. The third parameter is a string array that contains attribute values.
A detailed example is provided in ALES Security XQuery Function Integration Example.
The file location is <ALDSP_DOMAIN>/liquiddata.
The file name is <ALDSP_APPLICATION_NAME> LDConfig.xml.
<con:DSConfiguration> )whose id is the data service name to be protected.<con:AdminResources>, such as the following:<con:AdminResources>
<con:AdminResource>
<con:xpath>SecuredElementName</con:xpath>
<con:useTag>false</con:useTag>
</con:AdminResource>
<con:AdminResource>
<con:xpath> SecuredElementName </con:xpath>
<con:QueryRef>SecurityXQueryFunctionName</con:QueryRef>
<con:useTag>false</con:useTag>
</con:AdminResource>
</con:AdminResources>
SecuredElementName is the XPath of the secured data element and SecurityXQueryFunctionName is the custom security XQuery function name.
This example is based on the RTLApp that is shipped by ALDSP.
In this example, the data service OrderView is configured with a security XQuery function to protect its data elements. It is assumed that the application RTLApp has been deployed on an ALDSP domain that is protected by the WLS SSM.
The integration example follows these steps:
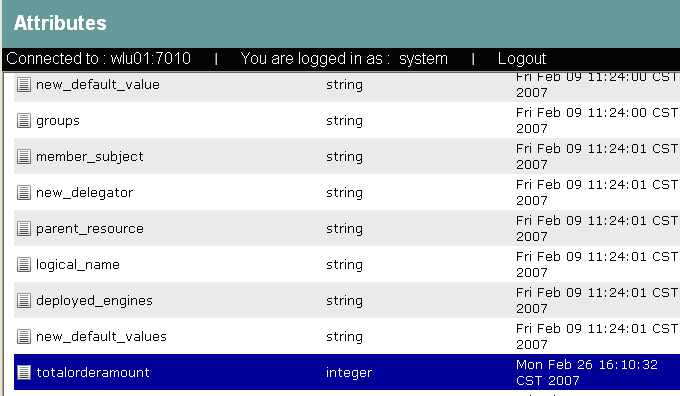
https://localhost:7010/asi).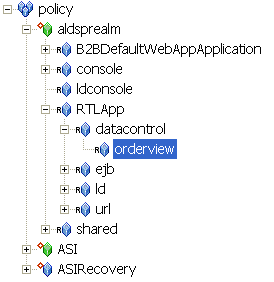
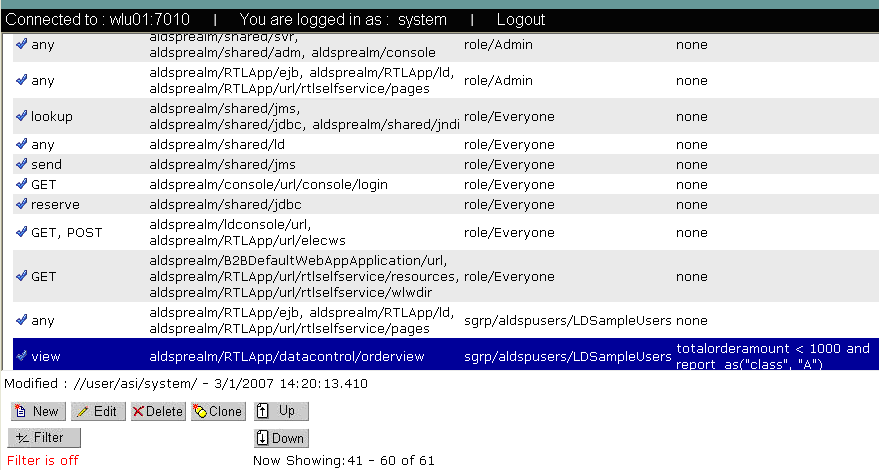
The privilege is view. The Subject is LDSampleUsers. The constraint is totalorderamount < 1000. Response attributes are returned via report_as("class", "A")".
alesxfl.jar and api.jar from the WLS SSM lib directory to the ALDSP application's APP-INF/lib directory.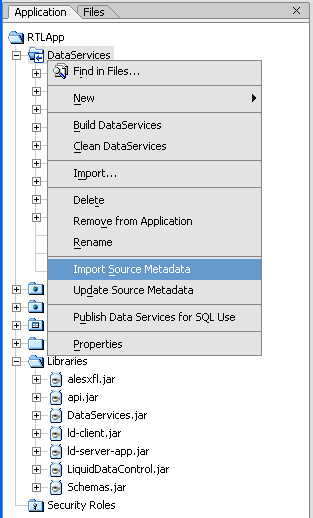
library.xfl, as shown in Figure 12-14. The following bullet points explain the function shown in the figure:OrderView.secureOrders.totalorderamount, which was defined in Step 1.c. The third parameter is a string array that contains attribute values. TotalOrderAmount is xsd:decimal. The function fn:round() converts the element into a integer. The function fn:string() converts the element into a string.true, it indicates that the current operation is permitted. class, which was defined in Step 1.d. class is not found, return false. class contains the value A.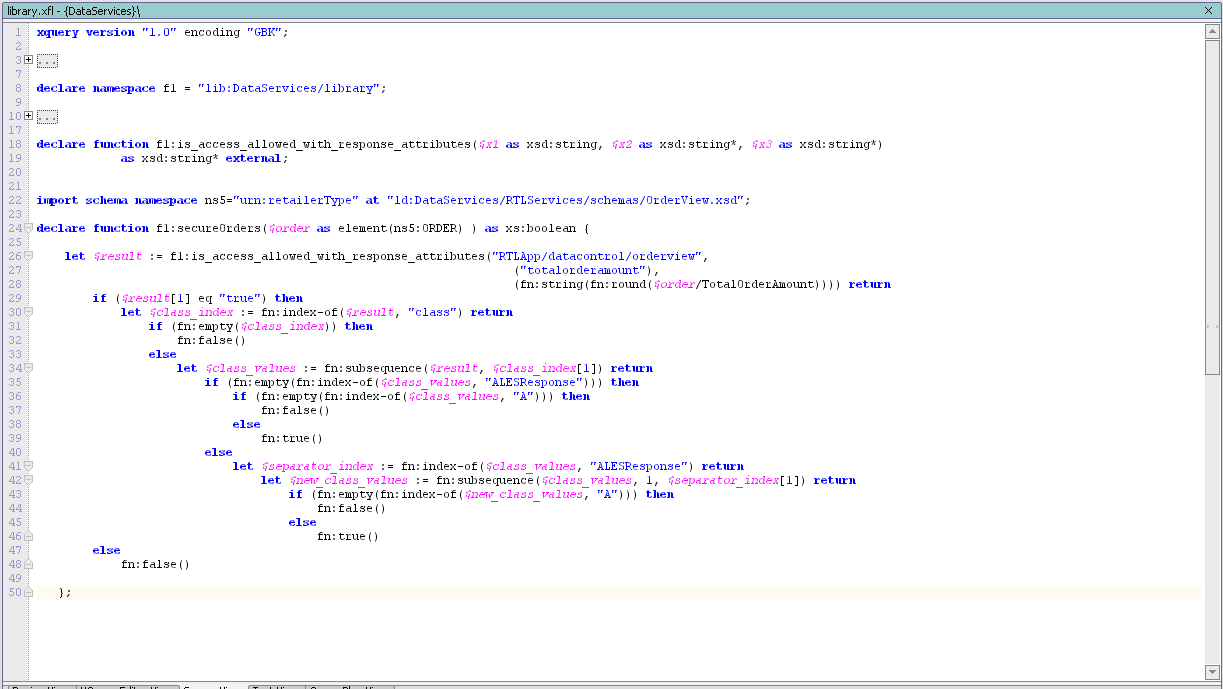
The file location is BEA_HOME/weblogic81/samples/domains/ldplatform/liquiddata.
The file name is RTLAppLDConfig.xml.
<con:DSConfiguration id="ld:DataServices/RTLServices/OrderView.ds">
<con:DSConfiguration> element:
<con:useTag>false</con:useTag>
<con:QueryRef>{lib:DataServices/library}secureOrders</con:QueryRef>


|