Policy Managers Guide

     Previous  Next    Open TOC in new window  Open Index in new window  View as PDF - New Window  Get Adobe Reader - New Window
Content starts here

Using the Entitlements Management Tool

This section covers the following topics:


What is the Entitlements Management Tool?

In addition to the Administration Console, AquaLogic Enterprise Security includes another user interface, the Entitlements Management Tool. The Entitlements Management Tool can be used by business users to manage roles, users and groups, and entitlements. This user interface enables you to manage your users' entitlements based on the Roles Based Access Control (RBAC) model. The Entitlements Management Tool enables business users to answer questions like "what entitlements does a user have?" or "which users are allowed to access a given resource?"

Understanding the RBAC Model

The Entitlements Management Tool implements a hierarchical RBAC model. In this model, there is a seniority relationship between roles: senior roles inherit the permissions of their juniors and junior roles inherit members of their parents. In this way, data is inherited in both directions, with membership moving down and permissions moving up the tree. Using a hierarchical model makes it possible to aggregate permissions associated with users.
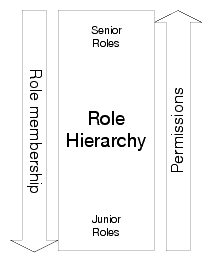
Figure 5-1 Roles Based Inheritance

Roles Based Inheritance

The Entitlements Management Tool displays which permissions and roles are assigned directly and which are inherited.

ALES RBAC Model Concepts

Four important concepts to understand in the ALES RBAC Model are:

Roles are defined to represent job functions in an organization (for example, teller or executive VP of Finance). A role's collection of permissions (and permission sets) represent the set of entitlements for a role - all of the actions that a role can take within a system. Roles can have attributes that will be available to the authorization system at runtime. Attributes follow the RBAC inheritance model from the child to the parent, so a parent role will have all the attributes of its child roles. Users and groups are assigned to roles via membership rules. A user or group can be assigned directly to a role, or conditionally assigned to a role.

Permissions are named objects that represent an action on a resource. Permission sets are named hierarchical objects that are collections of permissions. Under the inheritance model of the permission set hierarchy, parent permission sets inherit permissions and attributes from their children. Like roles, permissions and permission sets can have attributes that will be available to the authorization system at runtime. Permissions can either be assigned directly to a role, or to a permission set that is in turn assigned to a role. Attributes follow the RBAC inheritance model from the child to the parent, so a parent permission set will have all the attributes of its child permissions or permission sets.

Separation of duties constraints define exclusive relationships between roles. A separation of duties constraint allows you to say, for example: If a user has the role auditor he can not also have the role of trader. At runtime, the system will not allow a user to have both roles at the same time and thereby prevent a user from having incompatible permissions.

Summary of Entitlements Management Tool Functions

The Entitlements Management Tool provides the following functions:

Role Management Functions

Use the Roles node in the Entitlements Management Tool to:

For more information, see Working with Roles.

Permission Management Functions

Use the Permissions node in the Entitlements Management Tool to:

For more information, see Working with Permissions and Permission Sets

Separation of Duties Functions

Use the Separation of Duties node in the Entitlements Management Tool to:

For more information, see Separation of Duties Constraints

Entitlements Reporting Functions

Use the Reports node in the Entitlements Management Tool to:

For more information, see Generating Reports


Setting Up the Entitlements Management Tool

Before you can use the Entitlements Management Tool, you need to do the following:

Load the Entitlements Management Tool Policies

Before you can use the Entitlements Management Tool, you need to load the policies that govern access to and use of the tool. To load these policies:

  1. Using the Policy Import tool (policyloader), load the policies using the edited load.entitlements.conf file, using a command like the following:
  2. ..\..\bin\policyloader.bat <bea_home>\ales26-admin\entitlements\policy\load.entitlements.conf

    For more information about the Policyloader utility, see Importing Policy Data.

  3. Make sure there were no errors on import.
  4. Set new passwords for the default users:
    1. Log in to the ALES Administration Console and open the Identity node in the navigation tree.
    2. In the right pane, select asi, then select user.
    3. Select one of the default Entitlements Management Tool users, for example rolesadmin, and click the Edit button to set a new password for this user.
    4. Repeat for each of the other Entitlements Management Tool users (rbacadmin, permissionsadmin, reportingadmin).

Deploy the Entitlements Management Tool Web Application

The procedure for deploying the Entitlements Management Tool Web application depends on which servlet container you are using:

Deploying on WebLogic Server 9.x

  1. Start the WebLogic Server Administration Console for the WebLogic Server instance where the ALES Administration Server is installed.
  2. In the Change Center of the WebLogic Server Administration Console, click Lock & Edit.
  3. In the Domain Structure panel of the WebLogic Server Administration Console, click Deployments.
  4. Click Install.
    1. Locate the Entitlements Management Tool WAR file by navigating to <bea_home>\ales26-admin\entitlements\wls9.
    2. Select entitlementsadministration.war and click Next.
    3. Click Next.
    4. Click Next.
    5. Click Finish.
  5. In the Change Center of the WebLogic Server Administration Console, click Activate Changes.
  6. On the Deployments page, select the entitlementsadministration application.
  7. Select Start > Servicing all requests and click Yes.

Deploying on WebLogic Server 8.1

  1. Start the WebLogic Server Administration Console for the WebLogic Server instance where the ALES Administration Server is installed.
  2. In the left panel of the WebLogic Server Administration Console, select Deployments > Web Application Modules.
  3. Click Deploy a new Web Application Module.
  4. Navigate to <host>\<bea_home>\ales26-admin\entitlements\wls8.
  5. Select entitlementsadministration.war and click Next.
  6. Click Deploy.

Deploying on Apache Tomcat

  1. Stop the ALES Administration Server if it is running.
  2. Copy the WAR file for the Entitlements Management Tool, entitlementsadministration.war, from <bea_home>\ales26-admin\entitlements\tomcat\ to <bea_home>\ales26-admin\asiDomain\applications\.
  3. Restart the ALES administration server. The Entitlements Management Tool will be loaded.

Configuring the RBAC Model in SSMs

This section describes how to configure a Security Service Module to use the RBAC model.

  1. Install the SSM and create the SSM instance that you will use to secure your applications. For more information, see the Installing the Security Service Module guide for the type of SSM you are using.
  2. Add the RBAC policy. In the ALES Administration Console, add authorization policies for the resources you want to secure like the following:
  3. grant(any, //app/policy/resourcename, //role/Everyone) if
    rbac_eval_action_resource_in_entitlements(entitlements,sys_privilege);

  4. Distribute the policies.
  5. Set the metadirectory for the ASIAuthorizer provider. This procedure depends on which SSM you are configuring. For SSMs other than the WLS 9.x SSM:
    1. In the ALES Administration Console, navigate to ASIAuthorizationProvider.
    2. In the Metadirectory tab for the ASIAuthorizationProvider, check the Use Metadirectory checkbox and set JDBC URL, JDBC Driver, Database System, Database Login, and Database Login Password to the same values as in the DatabaseAuthenticator configured for the asiadmin security configuration.
    3. Distribute the configuration.
    4. For the WLS 9.x SSM:

    5. In the WebLogic Server Administration Console, select Security Realms and select the security realm you are configuring.
    6. In the Providers: Authorization tab, select the ASIAuthorizer.
    7. On the Provider-Specific tab for the ASIAuthorizer, check the Use Metadirectory checkbox and set JDBC URL, JDBC Driver, Database System, Database Login, and Database Login Password to the same values as in the DatabaseAuthenticator configured for the asiadmin security configuration.
    8. In the Change Center of WebLogic Server Administration Console, click Activate Changes.
  6. Restart the application or application server.


Using the Entitlements Management Tool

The Entitlements Management Tool is a browser-based web application. You can access it at this URL:

https://<hostname>:7010/entitlementsadministration

Like the ALES Administration Console, the Entitlements Management Tool supports only the Microsoft Internet Explorer browser.

Saving and Distributing Changes

When you use the Entitlements Management Tool to make changes, the tool's Save Changes and Revert Changes buttons become active. The Entitlements Management Tool uses a transactional change model; after you have made all the changes you need to make and click Save Changes, all the changes are committed in a single transaction. If the changes require it, they are distributed through the ALES Business Logic Manager.

Security for the Entitlements Management Tool

The Entitlements Management Tool defines the following roles by default that limit access to the tool:

Table 5-1 Default Roles
Role
Description
RBACAdmin
The RBACAdmin can perform all possible operations in the Entitlements Management Tool.
RolesAdmin
The Roles Admin can work only in the roles section of the navigation tree in the Entitlements Management Tool.
SodAdmin
The SoD Admin can work only in the Separation of Duties section of the navigation tree in the Entitlements Management Tool.
PermissionsAdmin
The Permissions Admin can work only in the permissions section of the navigation tree in the Entitlements Management Tool.
ReportingAdmin
The Reporting Admin can only generate reports.

The following users are defined by default, with the following roles:

Table 5-2 Default Users
User Name
Role
system
RBACadmin
rolesadm
RolesAdmin
permadm
PermissionsAdmin
reportingadm
ReportingAdmin


Working with Roles

The Entitlements Management Tool enables you to create hierarchies of roles. In a hierarchical role system, you can create a tree of roles, with each parent node in the tree possessing all the permissions of its child roles.

Viewing Roles

To view all the roles defined in your ALES security realm, in the left panel of the Entitlements Management Tool, expand Entitlements Management > All Roles. The Roles summary page displays a role's entitlements, with separate columns indicating which permissions are directly assigned, inherited from child roles, or denied to this role.
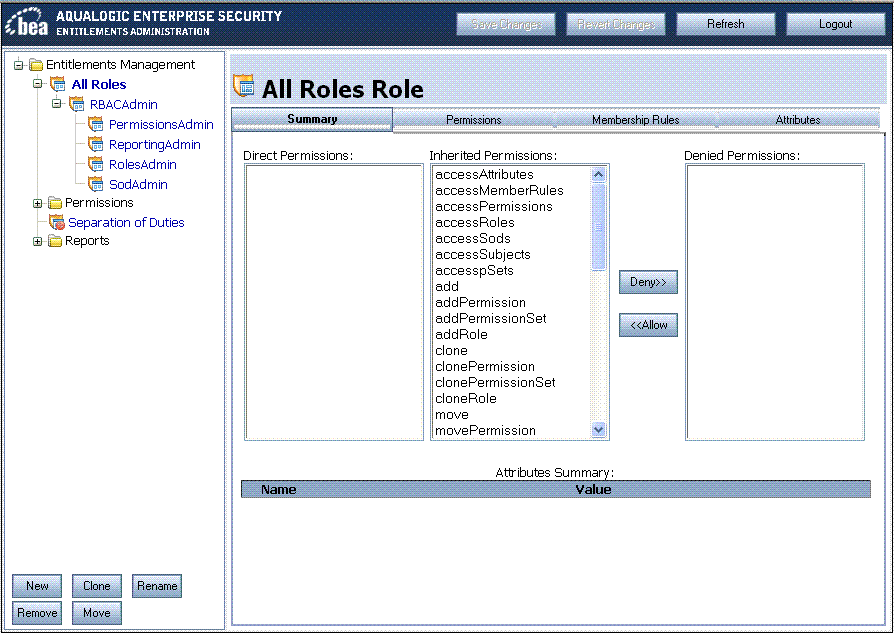
Figure 5-2 Roles Summary Page

Roles Summary Page

Creating a New Role

To create a new role:

  1. In the left panel of the Entitlements Management Tool, expand Entitlements Management > All Roles and then select the parent role under which you want to create a new role.
  2. At the bottom of the left panel of the Entitlements Management Tool, click the Add button.
  3. In the New Child Node page, give the new role a name and click OK.
  4. Next, assign permissions or permission sets to the new role.
  5. To assign a permission to a role:

    1. In the left panel of the Entitlements Management Tool, select the new role and click the Permissions tab at the top of the right panel of the Entitlements Management Tool.
    2. Click Modify Permissions. The Add Permissions to Role page appears. Use the Add and Remove buttons to specify the permissions you want to assign to the role and click OK.
    3. Figure 5-3 Adding Permissions to a Role


      Adding Permissions to a Role

      To assign a permission set to a role:

    4. In the left panel of the Entitlements Management Tool, select the new role and click the Permissions tab at the top of the right panel of the Entitlements Management Tool.
    5. Click Modify Sets. The Add Permission Sets page appears. The left column lists the names of the permission sets that have been defined in your installation.
    6. Figure 5-4 Adding Permission Sets to a Role


      Adding Permission Sets to a Role

    7. Select a permission set and the permissions contained in that permission set are displayed in the right column.
    8. Check the names of the permissions you want to assign to the role and click Ok.
  6. Define the membership of the new role. Click the Membership Rules tab at the top of the right panel of the Entitlements Management Tool and click New.
  7. The New Member Rule page appears. In the Subject tab, you can select the users or groups to include (using the Grant option) or exclude (using the Deny option) from the new role. Use the Add and Remove buttons to specify the users or groups covered by the grant or deny rule and click OK.

  8. Further define the role using the Conditions tab. You can limit membership in a role based on the presence or absence of attribute values you have previously defined as Declarations in the ALES Administration Console. For information about using declarations, see Declarations.
  9. In the Conditions field, enter one or more attribute-based conditions, such as:

    if subject.location = "New York"

    This member rule will apply only if the subject has the specified attribute name/value pair.

Assigning Role Attributes

You can assign attributes to roles. An attribute is a name/value pair that will be available to the ALES authorization system at run time. Assigning an attribute enables the creation of authorization policies based on the attribute value.

To assign an attribute to a role:

  1. In the left panel of the Entitlements Management Tool, expand Entitlements Management > All Roles and then select the role.
  2. In the right panel, click the Attributes tab and click Checkmark symbol.
  3. In the Modify Role Attribute page, enter the name and value of the attribute you want to assign.

Modifying and Removing Roles

You can use the Entitlements Management Tool to move, clone, delete, modify, or rename roles.

To move a role:

  1. In the left panel of the Entitlements Management Tool, select the role you want to move and click Move.
  2. In the Select the destination node page, select the role that should be the parent in the roles hierarchy and click OK.
  3. The role you moved, including all its child roles, is now a child of a different parent in the roles hierarchy.

To clone a role:

  1. In the left panel of the Entitlements Management Tool, select the role you want to copy and click Clone.
  2. In the Select the destination to clone page, select the role that should be the parent of the cloned role in the roles hierarchy and click OK.
  3. The role you cloned, including all its child roles, is now a child of a different parent in the roles hierarchy, while the original remains in its original place in the roles hierarchy. You then may want to modify the new cloned role to fit its purpose, including renaming the role.

To delete a role:

  1. In the left panel of the Entitlements Management Tool, select the role you want to delete and click Remove.
  2. In the Remove Node page, confirm that you want to delete the role and click OK.
  3. The role you selected, including all its child roles, is deleted.


Working with Identities

You can use the Entitlements Management Tool to manage user and group identities in your ALES security realm. The Identity node in the Entitlements Management Tool presents user and group information on three tabs:

By default, the Identity node has a single child identity directory, named asi. You can use the New and Remove buttons to add or delete other identity directories.

For more information about identities in ALES, see Identities.

Users Tab

To view all the users defined in your ALES security realm, in the left panel of the Entitlements Management Tool, expand Entitlements Management > Identity > asi. The Users tab displays user names, the groups each user is a member of, and attributes assigned to each user.
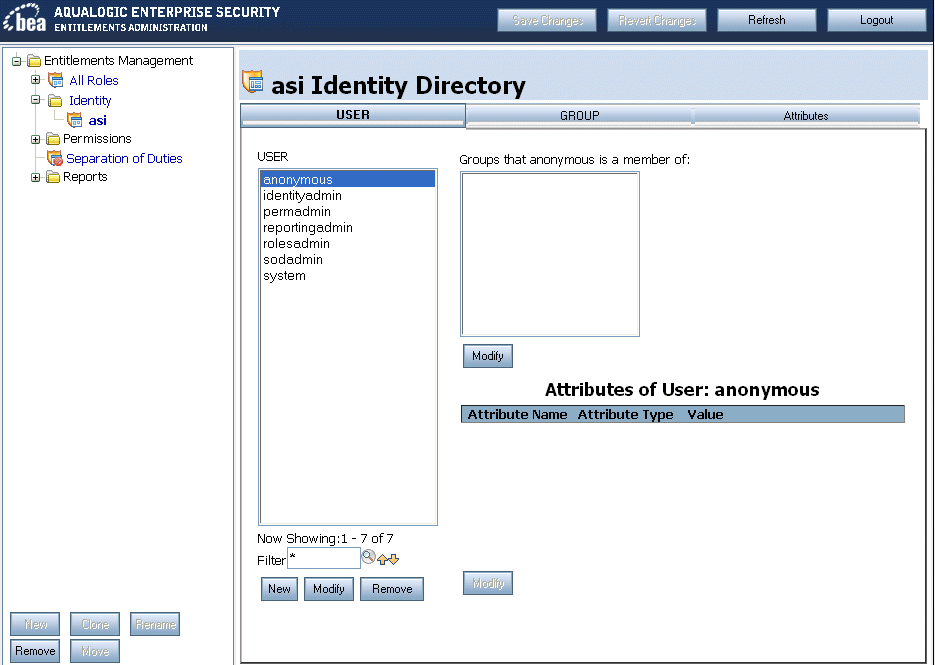
Figure 5-5 Users Tab

Users Tab

You can use this page to add or remove users and to specify which groups a user is a member of.

To add a user to a group:

  1. In the User column, select the username.
  2. In the Groups column, click Modify.
  3. In the Modify group membership window, use the Add and Remove buttons to set the user's group memberships and click Ok.

Groups Tab

To view all the groups defined in your ALES security realm, in the left panel of the Entitlements Management Tool, expand Entitlements Management > Identity > asi and click the Groups tab. You can use the Groups tab to add or remove groups and view a group's members and attributes.

Attributes Tab

To view all the identity attributes defined in your ALES security realm, in the left panel of the Entitlements Management Tool, expand Entitlements Management > Identity > asi and click the Attributes tab. You can use the Attributes tab to define identity attributes, which you can then assign to users. You can also modify or remove attributes.

To define a new attribute:

  1. In the left panel of the Entitlements Management Tool, expand Entitlements Management > Identity > asi and click the Attributes tab.
  2. In the Attributes tab, click New. The New Attribute window opens.
  3. In the New Attribute window, specify the new attribute's name, type, and default value, and whether the attribute is a list. Note that only list attributes can be group attributes. Click Ok.

To modify the value of an attribute for a user or group:

  1. Select the name of the user or group.
  2. Under Attributes, click Modify. The Modify User Attribute window opens.
  3. Set the new value for the attribute and click Ok.

For more information about identity attributes, see Identity Attributes and Understanding Identity Attributes in the Administration Console help.


Working with Permissions and Permission Sets

Permissions can be assigned to roles directly or be assigned to permission sets that are then assigned to roles. A permission set is a hierarchical collection of permissions that can be assigned to roles. A child permission set can only have one parent, but a permission set or permission can be assigned to many roles. In addition, permissions can be assigned to many permission sets.

Grouping permissions into permission sets can greatly ease the task of administering roles and policies. Since individual permissions are so specific and small-grained, a given role might require a large number of individual permissions. By grouping permissions into a permission set, it can be easier to create and maintain roles and permissions that correspond to business tasks.

Viewing Permission Sets

To view all the permission sets defined in your ALES security realm, in the left panel of the Entitlements Management Tool, expand Entitlements Management > Permissions > All Permission Sets. The Permission Sets summary page displays a permission set's entitlements, with separate columns indicating which permissions are directly assigned or inherited from child sets. The Permissions tab enables adding or removing permissions in a permission set, while the Attributes tab enables assigning attributes to a permission set, as described in Assigning Permission Attributes.
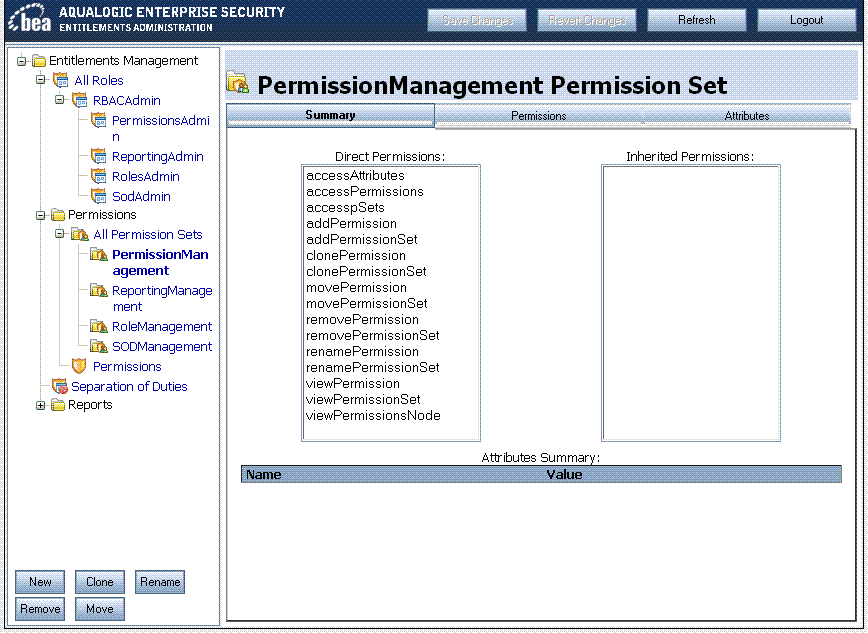
Figure 5-6 Permission Sets Summary Page

Permission Sets Summary Page

Creating a New Permission Set

To create a new permission set:

  1. In the left panel of the Entitlements Management Tool, expand Entitlements Management > Permissions and then select the parent node under which you want to create a new permission set.
  2. At the bottom of the left panel of the Entitlements Management Tool, click the Add button.
  3. In the New Child Node page, give the new permission set a name and click OK.
  4. Next, add permissions to the new permission set. In the left panel of the Entitlements Management Tool, select the new permission set and click the Permissions tab at the top of the right panel of the Entitlements Management Tool.
  5. Click Modify. The Add Permissions to Permission Set page appears. Use the Add and Remove buttons to specify the permissions you want to include in your new permission set and click OK.
  6. Figure 5-7 Adding Permissions to a Permission Set


    Adding Permissions to a Permission Set

Modifying the Permission Set Hierarchy

By default, the Entitlements Management Tool has no permission sets defined, and the only level of the permission set hierarchy is the All Permission Sets node. After you create one or more permission sets, you can modify the permission set hierarchy in a number of ways:

  1. In the left panel of the Entitlements Management Tool, expand Entitlements Management > Permissions and then select the permission set you want to move. Click Move.
  2. In the Select the destination node page, select the new parent node for the permission set you are moving and click OK.

Assigning Permission Attributes

You can assign attributes to permissions and permission sets. An attribute is a name/value pair that will be available to the ALES authorization system at run time. Assigning an attribute enables the creation of authorization policies based on the attribute value.

To assign an attribute to a permission or permission set:

  1. In the left panel of the Entitlements Management Tool, expand Entitlements Management > Permissions and then select the permission or permission set.
  2. In the right panel, click the Attributes tab and click New.
  3. Figure 5-8 Adding Attributes to Permissions


    Adding Attributes to Permissions

  4. In the Modify Permission Attribute page, enter the name and value of the attribute you want to assign.


Separation of Duties Constraints

Separation of duties constraints are used to prevent conflicts of interest in a role based system. Without separation of duties constraints, the hierarchical role model can give users permissions associated with conflicting roles. For example, suppose you have a trading system with Trader and TradeAuditor roles, both reporting to a VP. Without a separation of duties constraint, users with the VP role would inherit both the Trader and TradeAuditor entitlements. To ensure that the same user could not be the originator of a trade and the approver of the same trade, you can create a separation of duties constraint to that specifies that users with the TradeAuditor role cannot also have the Trader role.

Separation of duties places constraints on the assignment of users to roles so that membership in one role can preclude membership in another. The Separation of Duties node in the Entitlements Management Tool enables you to select a defined role (which we will refer to as "the constrained role") and then specify which other roles are denied to subjects who have the constrained role.

To create a new separation of duty constraint:

  1. In the left panel of the Entitlements Management Tool, select Separation of Duty.
  2. In the Separation of Duty page, click New.
  3. The Modify Separation of Duty page displays.

    Figure 5-9 Adding Separation of Duties Constraints


    Adding Separation of Duties Constraints

  4. From the tree of roles in the left column of the Modify Separation of Duty page, select the role for which you want to define a constraint.
  5. From the list of roles in the right column of the Modify Separation of Duty page, check the roles that should be denied to subjects in the constrained role.
  6. Click OK.

The Find Conflict button allows you to find any conflicting role assignment policies in the system based on the separation of duties defined. If any conflicting roles exist, you need to modify your role assignments to eliminate the conflicts.


Generating Reports

The Reports node of the Entitlement Management Tool enables you to generate reports about subjects, roles, permissions, and permission sets in your security realm. The following reports are available:
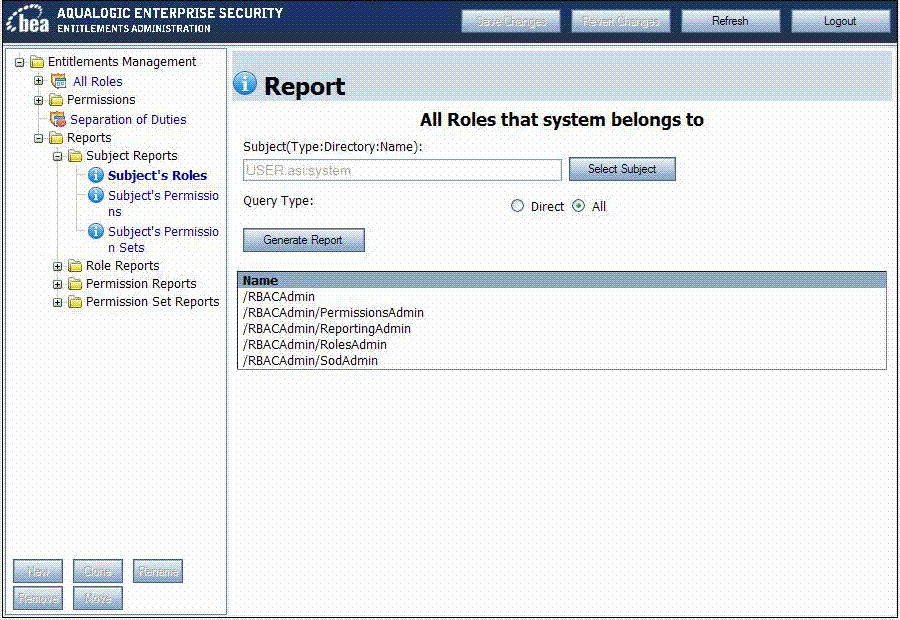
Table 5-3 Available Entitlement Reports
Report
Description
Subject's Roles
Which roles does this subject have?
Subject's Permissions
Which permissions does this subject have?
Subject's Permission Sets
Which permission sets does this subject have?
Role's Subjects
Which subjects have this role?
Role's Permissions
Which permissions does this role have?
Role's Permission Sets
Which permission sets does this role have?
Permission's Permission Sets
Which permission sets does this permission belong to?
Permission's Roles
Which roles have this permission?
Permission's Subjects
Which subjects have this permission?
Permission Set's Permissions
Which permissions are members of this permission set?
Permission Set's Roles
Which roles have this permission set?
Permission Set's Subjects
Which subjects have this permission set?

Figure 5-10 Reports in the Entitlements Management Tool

Reports in the Entitlements Management Tool

To generate a Subject's Roles report:

  1. In the left panel of the Entitlements Management Tool, expand Reports > Subject and select Subject's Roles.
  2. The Report page appears in the right panel.

  3. Use the Select Subject button to browse for the name of a subject. The subject can be either a user or a group.
  4. Select a query type, one of:
    • Direct - returns only the Subject's directly-assigned roles
    • All - returns both directly-assigned and inherited roles of the Subject
  5. Click Generate Report.
  6. The Reports page lists all the roles your selected Subject has.

Generating any of the other reports is essentially the same.


  Back to Top       Previous  Next