

|
This section provides information and guidelines about installing, configuring, and managing an Oracle database server to use with ALES. This must be performed before installing the ALES Administration Server.
To perform a database installation and setup, you must be a database administrator with permission to create a new instance.
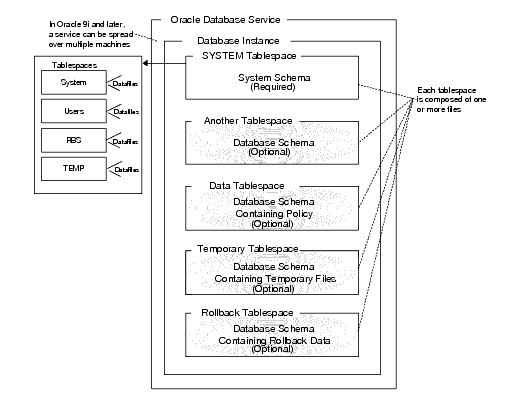
Each Oracle service is identified by a global database name and an Oracle system identifier referred to as the SID (see Figure D-1). The Oracle global database name is the full name of a database that uniquely differentiates it from any other databases in your network domain. One global database name can represent several database instances. The global database name is also known as the service name. The SID distinguishes the database instance from any other database instances on the same machine.

An Oracle instance is a running Oracle database made up of memory structures and background processes. Each instance is associated with an SID. With the Oracle Parallel Server, multiple instances can exist on different machines for a single database.
The policy database is a set of database schemas in which all data are stored. A database schema is a collection of objects associated with a particular schema name. The objects include tables, views, domains, constraints, assertions, privileges, and so on.
A datafile is an Oracle term for a file that contains the contents of logical database structures, such as tables and indexes. One or more datafiles form a logical unit of storage called a tablespace. A datafile is associated with only one tablespace and only one database.
A tablespace is a logical portion of a database used to allocate storage for table and index data. Each tablespace corresponds to one or more physical datafiles. Every Oracle database has a tablespace called SYSTEM and may have additional tablespaces. A tablespace is used to group related logical structures. The database username or user ID is a login that is given permission by the database administrator to access a specific database instance. This user is also called the schema owner, that is, the owner of the schema objects such as tables, views and triggers that are created.
Table D-1, Oracle Setup Requirements, on page D-3 describes the minimum requirements for the system on which the Oracle database server is installed.
This section provides additional instructions for installing and configuring an Oracle database for use with the AquaLogic Enterprise Security Administration Server.
To install and configure the database, perform the following tasks:
This section provides recommendations for installing the Oracle database and creating a database instance. When you run the Oracle installation program, it automatically starts the Database Configuration Assistant, which you use to create an instance of the database. If the Oracle database is already installed on the database host machine, you can skip this procedure and go to Creating an Instance of an Oracle Database.
To install the Oracle database and create a database instance, perform these steps:
| Note: | For Oracle 10g, the Database Configuration Assistant is run after the installer program (just as it is with Oracle 9i), however, for 10g, it does not prompt you for input. |
|
|||
|
|
|||
PATH environment variables:<drive>:\oracle\ora920\bin;C:\Program Files\Oracle\jre\1.3.1\bin;C:\Program Files\Oracle\jre\1.1.8\bin;Where <drive> is the hard drive on which the Oracle database is installed.To configure the Oracle database to accept remote connections from the Administration Server, you must configure an Oracle listener. This would only be necessary if you intend to install the Administration Server on a machine other than the machine on which the Oracle data is installed.
To configure an Oracle listener, perform the following steps:
SQLplus system/password@listenername.
where password is the password you assigned to the SYSTEM account upon installation and listenername is the name you assigned to the Oracle listener, for example asi.
This section describes how to create and configure an instance of an Oracle database. It assumes that the Oracle database software was installed.
| Note: | You should only perform this procedure when you want to create and configure instances of the database in addition to the instance that was created when the database software was installed. |
Perform the following steps to create an instance of an Oracle database:
| Note: | The section provides guidance to assist you, but it does not supersede the documentation provided by Oracle. |
This section covers the following topics:
lists and describes the batch and shell files provided for database administration. The files are located in the following directory:
bea\ales30-admin\bin\
bea is the BEA_HOME directory.ales30-admin is the installation directory for the Administration Server.
Exports policy data. See the
BEA AquaLogic Enterprise Security Policy Managers Guide for information on how to export policy. The
dbtype is the type of database, Sybase or Oracle.
|
|
Installs the policy database schema. See Installing the Policy Database Schema for information on how to install the database schema.
|
|
Before running these scripts with an Oracle database, you need to ensure the following setup steps are completed:
PATH environment.PATH includes the BIN and DLL directory of Oracle installation. ORACLE_HOME is set, $ORACLE_HOME/bin is in the PATH, and $ORACLE_HOME/lib in the LD_LIBRARY_PATH.BEA strongly recommends that you backup your original policy database regularly. A database backup is always recommended before you uninstall or re-install the policy database. You may need to contact your database or system administrator to assist with this process. Backups should be done on a regularly scheduled basis.
For instructions on backing up your Oracle database, see the Oracle Backup and Recovery Guide that comes with your Oracle documentation.


|