

|
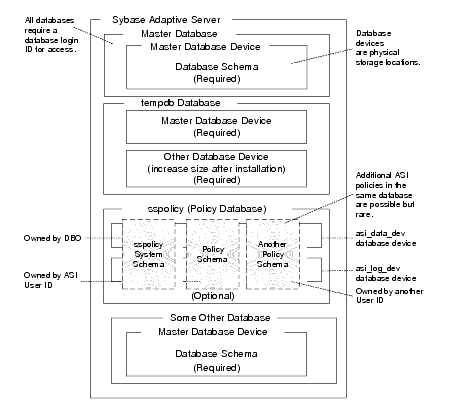
The Sybase Adaptive Server is the server in the Sybase client/server architecture (see Figure E-1). It manages multiple databases and multiple users, keeps track of the actual location of data on disks, maintains mapping of logical data description to physical data storage, and maintains data and procedure caches in memory.
The policy database is a set of database schemas in which all data are stored. The Sybase database contains a set of related data tables and other database objects organized and presented to serve a specific purpose.
A database device is a Sybase term that represents the portion of a device (a portion of a hard drive, such as a partition) that is dedicated to holding database data. When creating the database device, you can choose either a raw partition or an existing file system. Choosing a raw partition can increase the performance of the database server.

The Database Login ID is a login created by a system administrator to log onto the Adaptive Server. Each Database Login has a password and a default database to access. A login is valid if the Adaptive Server has an entry for that user in the system table syslogins.
The Database Administrator (DBA) has a special database login ID that can access all databases in the Adaptive Server. The DBA is also referred to as the system administrator. In fact, the name of the DBA login is sa (for System Administrator).
The Database Owner (DBO) is a special database login with permission to perform all actions on a policy database. Usually, the login that creates the database automatically becomes the DBO. The Database User ID is dbo (lowercase), which is different from its Database Login ID. For your policy database, you can use any Database Login ID as the DBO.
The Database User ID pertains to one specific database and is a login given permission by the DBO or DBA (system administrator) to access that one database. In most cases, the database user ID is the same as the Database Login ID. However, in some cases, they may be different, as with the special dbo user ID.
A database schema is a collection of objects associated with a particular schema name. The objects include tables, views, domains, constraints, assertions, privileges, and so on.
The policy owner is a Database User ID that controls the set of database schema in the database. BEA recommends that you not use dbo as a policy owner because it requires special administration. The AquaLogic Enterprise Security architecture allows multiple policy owners in its database, each owning a policy different from the other policies.
Table E-1 describes the minimum requirements for the system on which the Sybase Adaptive Server is installed.
This section provides recommendations for installing and configuring the Sybase database software. If the Sybase database is already installed on the database host machine, you can skip this procedure and go to Creating Sybase Database Devices.
To install the Sybase Adaptive Server, perform these steps:
| Note: | By default SYBASE names your database server based on your machine name. |
The policy database requires at least two database devices, each having at least 250 MB of free space. The first device stores policy data and the other stores the transaction log. You must create these two database devices before you create and configure the policy database.
| Note: | For better performance, BEA recommends a raw partition as the best configuration for the database device. Obviously, you must allocate sufficient disk space to ensure that the database meets your performance requirements. |
To Create Sybase Database devices on the Windows platform, perform the following steps:
sa (no password is required). The Sybase Central screen appears as shown in Figure E-2.| Note: | The user sa does not have a password by default. |
asi_log_dev, repeat steps 4. to 6., but set the database device name to asi_log_dev instead of asi_data_dev, and click Finish.| Note: | For instructions for creating Sybase database devices on Solaris and Linux platforms, see the Chapter “Managing Adaptive Server Databases” in the Sybase Adaptive Server Enterprise Configuration Guide for the particular platform. |
Table E-2 lists and describes the batch and shell files provided for database administration. The files are located in the following directory:
bea\ales30-admin\bin\
bea is the BEA_HOME directory.ales30-admin is the installation directory for the Administration Server.
Exports policy data. See the
BEA AquaLogic Enterprise Security Policy Managers Guide for information on how to export policy. The
dbtype is the type of database, Sybase or Oracle.
|
|
Installs the policy database schema. See Installing the Policy Database Schema for information on how to install the database schema.
|
|
Before running these scripts with a Sybase database, you need to ensure the following setup steps are completed:
PATH environment.SYBASE environmental variable is set. PATH includes %SYBASE%\OCS-12_5\bin and %SYBASE%\OCS-12_5\dll.PATH includes $SYBASE/OCS-12_5/bin and that LD_LIBRARY_PATH includes $SYBASE/OCS-12_5/lib.isql command (the name of the database server, login ID and password).
BEA strongly recommends that you backup your original policy database regularly. A database backup is always recommended before you uninstall or re-install the policy database. You may need to contact your database or system administrator to assist with this process. Backups should be done on a regularly scheduled basis.
If you have an existing backup procedure in place, you may choose to run it. Otherwise, follow these steps:
| Note: | See your Sybase documentation for further information on using these commands. |


|