

|
Before running the ALES installation program, you must create a policy database and ALES user. If you choose not to accomplish this using the DBConfig tool, you may do so manually. This appendix describes the manual steps in the following sections:
sqlplusdba/password@ASERVER
dba — username you use to access the database
password — database administrator password
ASERVER — name of the Oracle service (as defined in your tnsnames.ora file).
SQL>connect sys as sysdba
SQL>create tablespace DATA datafile ‘C:/Oracle/oradata/ASI/data.dbf’
size 10M autoextend on next 1M MAXSIZE 250M;
SQL>create roleasi_role;
SQL>grant create session toasi_role;
SQL> grant create table toasi_role;to asi_role;
SQL> grant create sequenceSQL>grant create trigger to asi_role;
where: asi_role is the new role.
This automatically uses the default tablespaces generated when Oracle was installed, but you can specify and use any tablespaces.
SQL> create userusernameidentified bypasswordSQL>default tablespaceDATA quotaunlimitedon DATA;
username — name to assign to the new ALES user
password — password to assign to the new user account
unlimited — size of the tablespace (shown here as set to unlimited).
conn sys as sysdba;grantasi_roletousername;commit;
In this case, you grant SELECT permission to the new ALES user. The Oracle database server does not allow you to grant the permission to the asi_role. ALES uses this dynamic view to check whether one of its tables is currently being accessed. Therefore, the SELECT permission is required.
After performing these steps, the Administration Server may be installed as described in Installation.
To install ALES with Sybase, you must first create the policy database and a ALES user account.
| Note: | BEA strongly recommends that you not use the dbo of the policy database as the policy owner. This requires additional database configuration that is beyond the scope of this guide. |
Please refer to Creating Sybase Database Devices if you have not already created the required database devices asi_data_dev and asi_log_dev as shown in this section.
To set up a policy database and the ALES user, perform these steps:
isql -Usa -S server_name
where server_name is the database server name.
1>use master
2>go
1>create databasedatabase_nameonasi_data_dev= 250
log onasi_log_dev= 250
2>go
database_name — name of the new database
asi_data_dev — data device name
Note: You may use a larger minimum database size if needed.
isql command prompt:1>use master2>go
1>sp_dboptionsspolicy, "select into/bulkcopy",true
2>go
1>sp_dboptionsspolicy, "abort tran on log full", true
2>go
1>sp_dboptionsspolicy, "trunc log on chkpt", true
2>go
1>sp_dboptionsspolicy, "trunc. log on chkpt.", true
2>go
For more information on the sp_dboption system procedure, see Sybase Adaptive Server Enterprise Reference Manual: Procedures.
| Note: | For development databases, set the trunc log on chkpt option to false if periodic dump transactions are not required. For production databases, set this option to true to back up and truncate the database and transaction logs. |
isql command prompt:1>use master1>
2>gosp_addlogin asi,password,database_name, null, "asi login"2>go
password — ALES user password, at least six alphanumeric characters or other characters allowed by Sybase
database_name — name of the ALES database. If an asi login already exists, you must use the sp_modifylogin command to set its default database to database_name.
isql command prompt:1>usesspolicy2>go1>sp_adduser asi2>go
isql command prompt:1>usesspolicy2>go
1>grant all to asi
2>go
After performing these steps, the Administration Server may be installed as described in Installation.
To install ALES with Microsoft SQL Server, you must first create the policy database and a ALES user account. This section describes how to do this.
| Note: | Microsoft SQL Server JDBC drivers are not shipped with ALES. ALES uses the MSSQL 2005 JDBC driver for connectivity to both MSSQL 2000 and MSSQL 2005. You can find this driver on the Microsoft download site. |
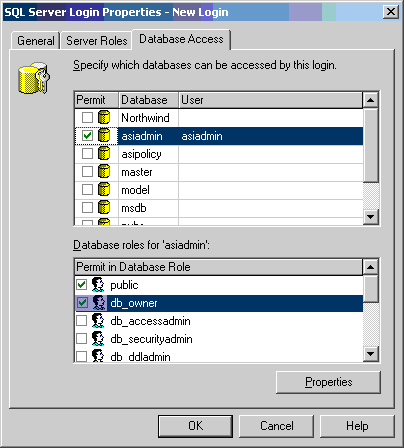
Figure 5-1 shows that a database named asiadmin has been created.

After performing these steps, the Administration Server may be installed as described in Installation.
To install ALES with PointBase 5.1, you must first create the policy database and a ALES user account. This section describes how to do this.
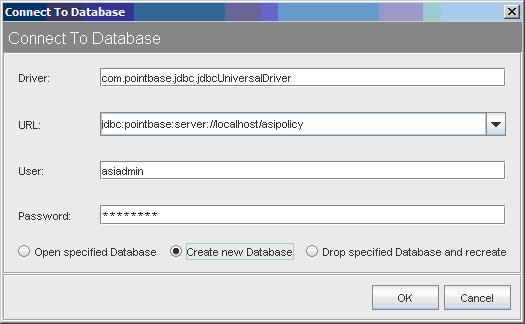
To create the database and ALES user, perform the following steps:
startPointbase.cmd/sh script located in Weblogic_Home/common/eval/pointbase/tools.startPoinyBaseConsole.cmd/sh script located in Weblogic_Home/common/eval/pointbase/tools.
Make sure the database is up when running the ALES installer, because the installer connects to the database and installs ALES-related tables.
After performing these steps, the Administration Server may be installed as described in Installation.
To install ALES with DB 2, you must first create the policy database and a ALES user account. This section describes how to do this.
To create the database and ALES user, perform the following steps:
CREATE DATABASE ALES AUTOMATIC STORAGE YES ON 'D:\' DBPATH ON 'D:\' USING CODESET GBK TERRITORY CN COLLATE USING SYSTEM PAGESIZE 16384;
applheapsz) to allow a larger application heap (from 256 to 512). The step also can be done by DB2 Control Centre.| Note: | The password of the system account must satisfy DB2 requirements (such as a combination of numbers and letters) or creation of the DB user will fail. |
After performing these steps, the Administration Server may be installed as described in Installation.


|