Tutorial: Designing a Purchase Order Processing System by Using AquaLogic Integrator

     Previous  Next    Open TOC in new window    View as PDF - New Window  Get Adobe Reader - New Window
Content starts here

Creating Proxy Service to Invoke a JPD

This chapter describes how to create proxy services for external clients.

The PurchaseOrderProcessingService proxy invokes the PurchaseOrderFulfillmentJPD via the PurchaseOrderFulfillmentJPD business service endpoint for fulfilling the purchase order. This chapter discusses the following topics:


Creating the PurchaseOrderProcessingService Proxy

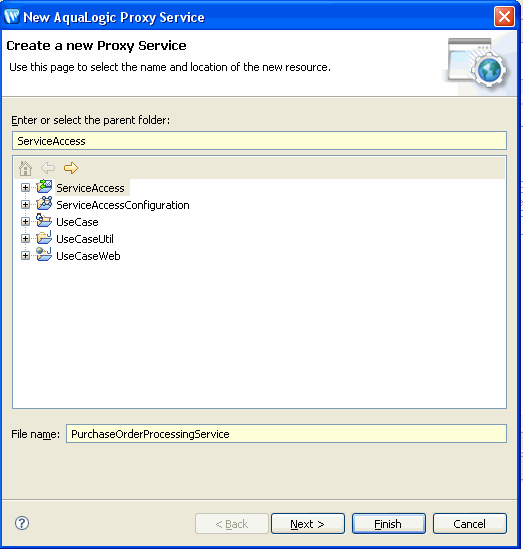
This section describes how to create PurchaseOrderProcessService proxy service from the Service Access folder in Project Explorer.

To Create PurchaseOrderProcessServiceProxy.proxy
  1. In Project Explorer, select Service Access, right-click on ProxyServices, and select New > Proxy Service. The New AquaLogic Proxy Service wizard is displayed.
  2. In the Create a new Proxy Service dialog box, enter 
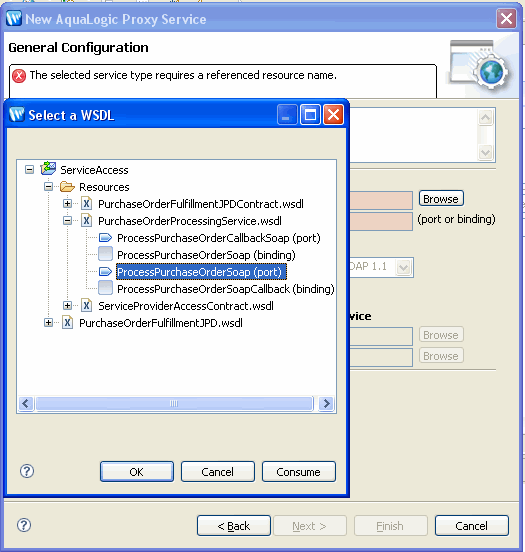
PurchaseOrderProcessingService as the File Name.
  3. Figure 6-1 Creating a Proxy Service


    Creating a Proxy Service

    Click Next.

  4. In the General Configurations dialog box, select WSDL Web Service, click Browse, expand ServiceAccess > Resources, and select PurchaseOrderProcessingService.wsdl.
  5. Expand PurchaseOrderProcessingService.wsdl, and select ProcessPurchaseOrderSoap (port) in the Select a WSDL dialog box, as shown in Figure 6-2.
  6. Figure 6-2 Select a WSDL


    Select a WSDL

    Click OK.

    The WSDL Web Service and ports are selected. Click Next. The Transport Configuration dialog box is displayed.

  7. Ensure that the Protocol is 
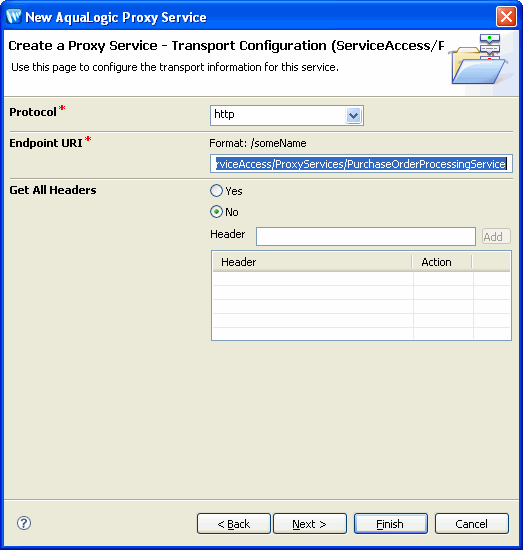
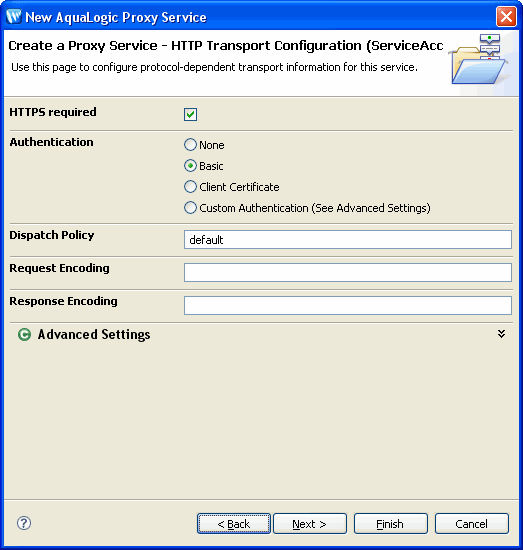
http, and the Endpoint URI is /ServiceAccess/ProxyServices/PurchaseOrderProcessingService, as shown in Figure 6-3.
  8. Click Next.
  9. Figure 6-3 Protocol and EndPoint URI


    Protocol and EndPoint URI

  10. In the Create a Proxy - HTTP Transport Configuration dialog box, do the following:
    • Select the HTTPS required check box.
    • Note: This step is required to ensure secure data transmission.
    • Select Basic in Authentication pane.
    • Note: This step ensures the proxy is protected and client needs to be authenticated to access the proxy.
      Note: Click Next.
Note: The security context is propagated to the WLI layer (PurchaseOrderFulfillmentJPD), to ALSB (ServiceProviderAccessProxy), to the external systems (inventory and credit card systems), so that no authentication is required while accessing the external systems from the PurchaseOrderFulfillmentJPD.

Figure 6-4 shows the Create a Proxy - HTTP Transport Configuration dialog box.

Figure 6-4 Select HTTPS Options

Select HTTPS Options

  1. Accept the default values in the Operation Selection Configuration dialog box, and click Finish.
  2. PurchaseOrderProcessingServiceProxy.proxy is now available under the ProxyServices folder in Project Explorer.

After you have created the proxy service, you must design the pipeline for the proxy.

Designing a ProxyService Pipeline

To design the proxy service pipeline, switch to the ALSB perspective. In the Design view of the PurchaseOrdeProcessingService.proxy, click Message Flow. The Design Palette is activated.

Figure 6-5 shows the Design Palette in ALSB perspective.

Figure 6-5 Design Palette

Design Palette

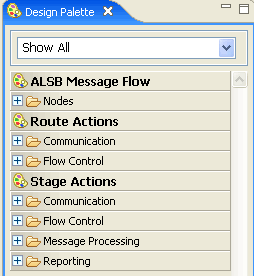
For more information about ALSB Design Palette, see Using the AquaLogic Service Bus IDE.

To Design the Proxy Service Pipeline
  1. In the Design view of PurchaseOrderProcessingService.proxy, click Message Flow.
  2. From the Design Palette, expand Nodes, drag and drop a Pipleline Pair under PurchaseOrderProcessingService.proxy in the Design view.
Note: A PipelinePair node consists of a Request pipeline and a Response pipeline. Pipelines can include one or more stages, which in turn include actions.
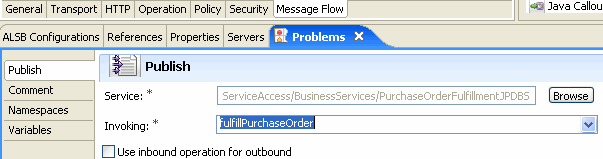
  1. Expand Nodes, drag and drop Stage node, under Request in PipelinePairNode. Name this Pipeline as Process Purchase Order.
  2. From the Design palette, expand Stage Actions > Communications, and select Publish. Drag and drop Publish node under Stage node.
  3. In the Properties tab of the Publish node, click Browse to select a service. From the Select a Service Resource dialog box, select PurchaseOrderFulfillmentJPDBS.biz, as you are now publishing to the PurchaseOrderFulfillmentJPD. Figure 6-6 shows the Service Resource dialog box.
  4. Figure 6-6 Select a Service


    Select a Service

    Select fulfillPurchaseOrder from the Invoking drop-down list. The Properties tab of the Publish node is as shown in Figure 6-7.

    Figure 6-7 Publish Node - Properties


    Publish Node - Properties

  5. From the Design palette, expand Stage Actions > Message Processing, and select Assign node. Drag and drop Assign node into the Request pipeline.
  6. In the Properties tab of the Assign node, click Expression, and enter the following code in the XQuery Editor dialog box that is displayed:
  7. <soap:Body xmlns:soap="http://schemas.xmlsoap.org/soap/envelope/" xmlns:open="http://www.openuri.org/" xmlns:pur="http://www.openuri.org/PurchaseOrder">

    <open:fulfillPurchaseOrder>

    <open:orderId>{$body/pur:PurchaseOrder/pur:PurchaseOrderId/text()}</open:orderId>

    <pur:OrderLineItemInfo>

    {$body/pur:PurchaseOrder/pur:OrderLineItemInfo/*}

    </pur:OrderLineItemInfo>

    <pur:CreditCardInfo>

    {$body/pur:PurchaseOrder/pur:CreditCardInfo/*}

    </pur:CreditCardInfo>

    </open:fulfillPurchaseOrder>

    </soap:Body>

    Enter Variable as body.

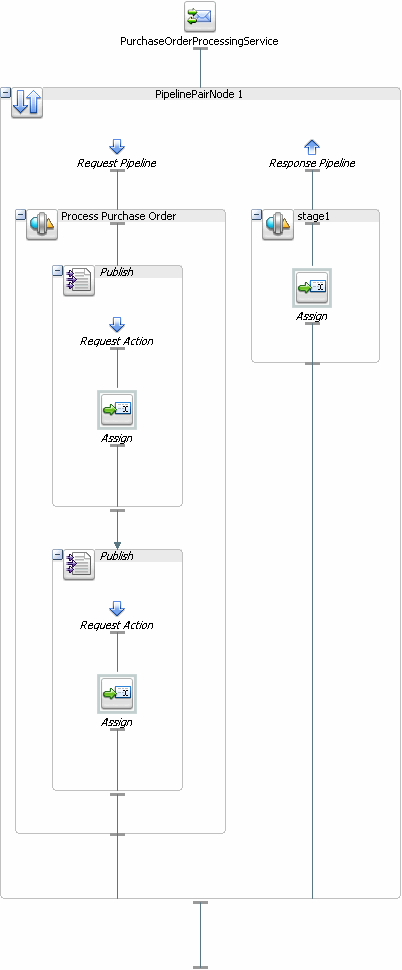
You have now created the message flow to publish to PurchaseOrderFulfillmentJPDBS.biz. Figure 6-9 shows the message flow.
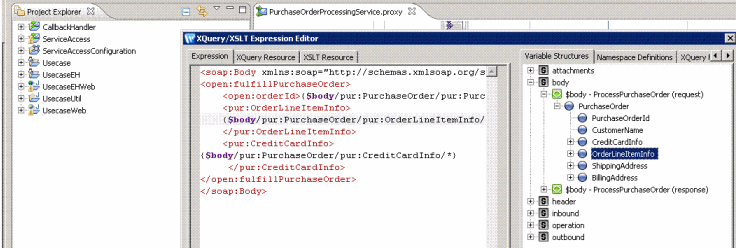
Note: Alternately, the expressions in the XQuery/XSLT Expression Editor can be dragged and dropped into the Expression tab. Figure 6-8 illustrates an example:
Figure 6-8 Expression Editor

Expression Editor

  1. Add a Stage node under the Response pipeline. Drag and drop an Assign node under this Stage node.
  2. In the Properties tab of the Assign node, click Expression, and enter the following expression:
  3. <SOAP-ENV:Body xmlns:SOAP-ENV="http://schemas.xmlsoap.org/soap/envelope/">
      <ns0:ProcessPurchaseOrderResponse xmlns:ns0="http://www.openuri.org/"/>
    </SOAP-ENV:Body>

    In the Variable field, type body.

    Figure 6-9 Publishing to PurchaseOrderFulfillmentJPD


    Publishing to PurchaseOrderFulfillmentJPD

The PurchaseOrderFulfillmentJPD invokes the external systems: inventory and credit card systems, and publishes these results to the message broker channels.

The PurchaseOrderAggregatorService aggregates these results and invokes the shipping service external system.

Testing the Proxy

After creating the PurchaseOrderProcessingService.proxy, you can verify whether the PurchaseOrderProcessingProxy has invoked the PurchaseOrderFulfillmentJPD.

To test the PurchaseOrderProcessingProxy

You can use the TestClient from the UseCaseWeb/src/alint.client.test to test the proxy. Right-click TestClient.java, select Run As > Run on Server.

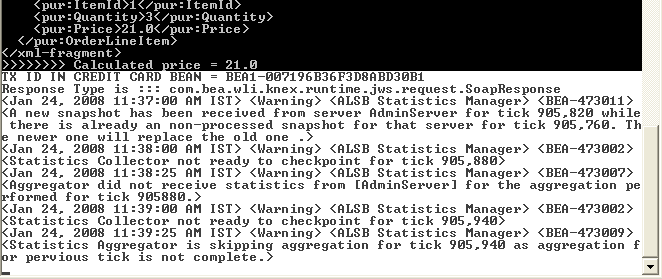
To check whether the external services: inventory service, credit card service are invoked, see the debug messages on the server console, which are displayed as shown in Figure 6-10. These messages are displayed only if the PurchaseOrderProcessingService.proxy has invoked the external services.

Figure 6-10 Debug Messages on Server Console

Debug Messages on Server Console

In this chapter, you invoked the PurchaseOrderFulfillmentJPD business service endpoint by using the PurchaseOrderProcessService proxy service. In Aggregating the Purchase Order Fulfillment Results, you will design the PurchaseOrderAggregatorJPD, which aggregates the results of the order fulfillment and handle the order shipment. You will then modify the message flow of the PurchaseOrderProcessingService proxy to invoke the PurchaseOrderAggregatorJPD.


  Back to Top       Previous  Next