


|
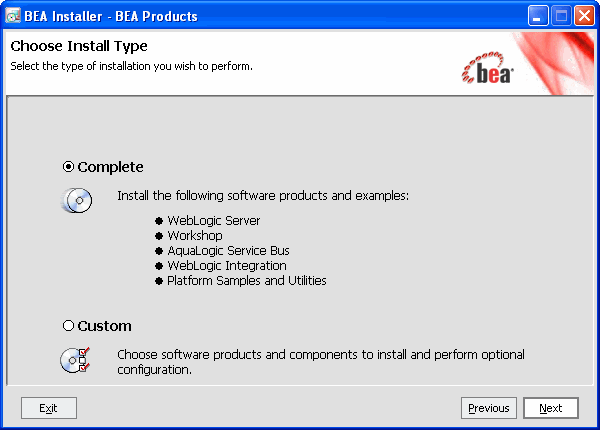
The ALINT installation program provides a complete framework for the installation and uninstallation of ALINT, or individual components such as WLI or ALSB as required. You can install ALINT using either the Complete or the Custom installation programs on machines irrespective of Operating Systems.
This chapter provides step by step procedure to install the following Products in the ALINT installer using the installation wizard.
For more information about these BEA products, see BEA Product documentation.
You can use the ALINT installation program in one of the following modes:
Graphical-mode installation is an interactive, GUI-based method for installing your software. It can be run on both Windows and UNIX systems. This chapter provides the procedures to install BEA products in the graphical-mode.
If you want to run graphical-mode installation, the console attached to the machine on which you are installing the software must support a Java-based GUI. All consoles for Windows systems support Java-based GUIs, but not all consoles for UNIX systems do.
| Note: | If you attempt to start the installation program in graphical mode on a system that cannot support a graphical display, the installation program automatically starts console-mode installation. |
Console-mode installation is an interactive, text-based method for installing your software from the command line, on either a UNIX system or a Windows system. For instructions for using this method, see BEA Products Installation Guide.
Silent-mode installation is a noninteractive method of installing your software that requires the use of an XML properties file for selecting installation options. You can run silent-mode installation in either of two ways: as part of a script or from the command line. Silent-mode installation is a way of setting installation configurations only once and then using those configurations to duplicate the installation on many machines. For information about running the installation program in the silent mode, see BEA Products Installation Guide.
You can install ALINT using three different installers. The following sections describe various methods of installing ALINT:
Start the installation program by selecting the installation program. For example, to install ALINT on Windows based system, use alint300_win32.exe.
The installation program prompts you to enter specific information about your system and configuration.
For instructions on responding to the prompts during installation, see Table 2-1.
Table 2-1
Specify the BEA Home directory that will serve as the central support directory for all BEA products installed on the target system. If you already have a BEA Home directory on your system, you can select that directory (recommended) or create a new BEA Home directory. If you choose to create a new directory by typing a new directory name in the BEA Home Directory field, the installation program automatically creates one for you. You can also click Browse and select a directory from the BEA Home Directory Selection window.Click Next.
|
|||||
|
|||||
|
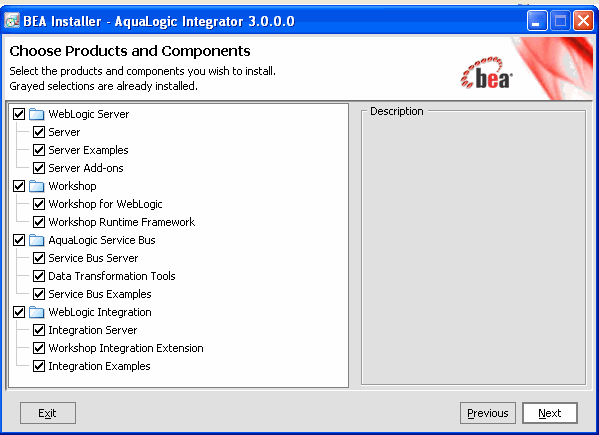
When you select or clear a component at the folder level, all subcomponents are selected or cleared accordingly.
Figure 2-2 lists the components you can choose to install from the Choose Products and Components window.
|
|||||
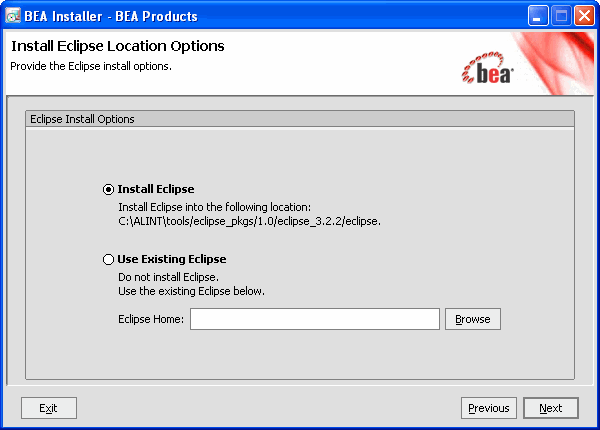
Specify whether or not you want to install eclipse. Clear the check box for this option if you do not want to install eclipse, or if you already have . Click Next after choosing the directory to install Eclipse. The Choose Product Installation Directories window is displayed.
|
|||||
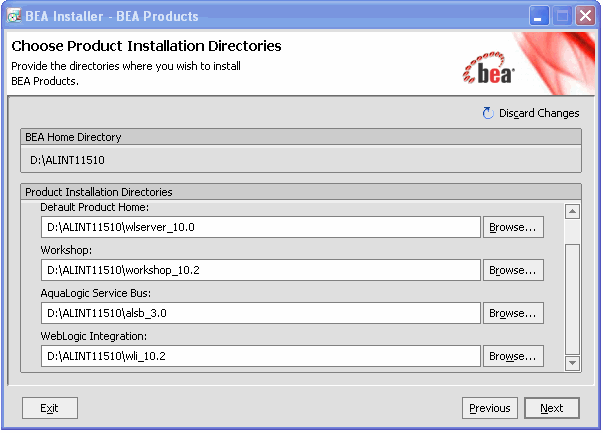
Specify the directory in which you want to install the software and click Next. You can accept the default product directory (
weblogic<version>) or create a new product directory.
If you choose to create a new directory, the installation program automatically creates one for you.
If you go back to the Choose BEA Home Directory window to change the BEA Home Selection, the following changes occur based on the type of changes you make to the home directory:
|
|||||
|
|||||
Choose whether you want to install the Windows services indicated, specifically the WebLogic Server Node Manager service. Node Manager is used to monitor, start, and stop server instances in a domain.
If you select Yes, enter the Node Manager Listen Port in the appropriate field. The default is
5556.
|
|||||
Specify the Start menu folder in which you want the Start menu shortcuts created. You can select from the following options:
Selecting this option provides all users registered on the machine with access to the installed software. However, only users with Administrator privileges can create shortcuts in the All Users folder. Therefore, if a user without Administrator privileges uses the Configuration Wizard to create domains, Start menu shortcuts to the domains are not created. In this case, users can manually create shortcuts in their local Start menu folders, if desired. Press
Selecting this option ensures that other users registered on this machine will not have access to the Start menu entries for this installation. Press |
|||||
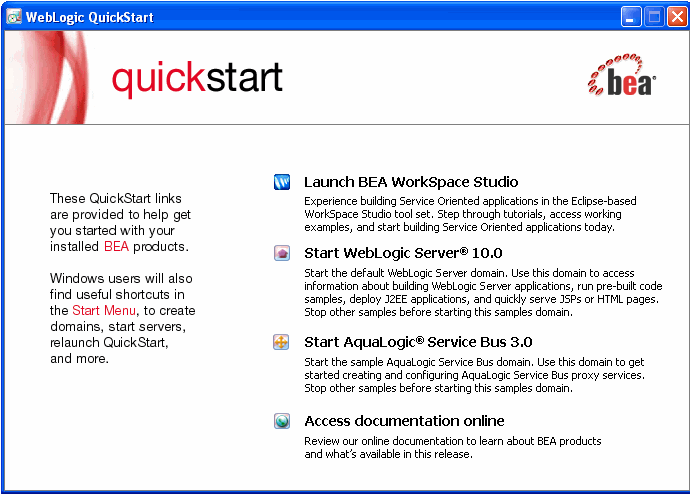
Specify whether you want to run the QuickStart application. QuickStart, designed to assist first-time users in evaluating, learning, and using the software, provides quick access to the sample domains, information for upgrading your applications, and the online documentation.
|
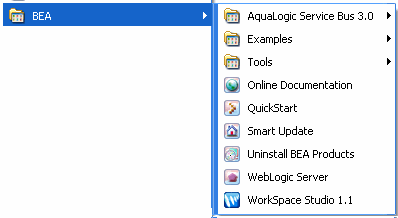
When you install ALINT on a Windows system, the installation program automatically creates shortcut entries on the Start Menu.
The BEA Products folder (Start > Programs > BEA Products) contains the shortcut files shown in the following figure:
The installation program creates a directory structure for the components installed.
alsb_3.0 - contains ALSB program files.
jdk150_11 - the JDK version that is being used.
jrockit150_11 - the JRockit version that is being used.
modules - contains the modules installed in the BEA Home directory.
tools - contains the eclipse tool files.
user_projects - contains the domain files created by the user.
utils - contains executable jar files to apply patches, and files to uninstall the product
wli_10.2 - contains WebLogic Integration 10.2 program files
wlserver_10.0 - contains WebLogic Server 10.0 program files.
workshop_10.2 - contains WebLogic Workshop program files.
| Caution: | You must install WLI, ALSB and WLS in the default location inside the BEA_HOME. You must also retain the default product directory names for ALSB (alsb_3.0) and WLS (wlsserver_10.0), Workshop (workshop_10.2), and Workspace Studio (workSpaceStudio_1.1). |
| Notes: |
Prerequisite: As a prerequisite to installing WLI 10.2, you need to have ALSB 3.0 installed on your machine.
If you have ALSB 3.0 installed on your machine, you need to install WLI to be able to access the ALINT functionality. On a Windows based system, you can install WLI using the platform1020_win32.exe installer, in the same BEA Home directory which already has ALSB 3.0 installed.
Prerequisite: As a prerequisite to installing ALSB 3.0, you need to have WLI 10.2 installed on your machine or if you have older WLI version upgrade to WLI 10.2, then link to next section.
Similar to installing WLI, on a Windows based system, you can install ALSB using the alsb300_wls100_win32.exe installer, in the same BEA Home directory which already has WLI 10.2 installed.
For ALSB Installation procedures, see ALSB Installation document.
After you have completed the product upgrade following the steps mentioned in Installation, you can now consider doing an upgrade to ALINT domain.
For upgrading to WLI 10.2 from previous versions, see Upgrading from WLI, 8.x, WLI 9.2, WLI 9.2 MP1 to WLI 10.2.
For upgrading to ALSB 3.0 from previous versions, see Upgrading from ALSB 2.x to ALINT.
| Notes: | For a domain upgrade from WLI, extend the existing WLI domain to include ALSB 3.0. For more information see Creating a Domain. |
| Note: | Similarly, extend an existing ALSB domain to include WLI on the same domain. See Creating a Domain. |


|