|
|
The following sections describe how to use BEA Tuxedo services from AquaLogic Service Bus, which is referred to as outbound:
You must have a WTC server configured with one local access point and one remote access point. This provides access from AquaLogic Service Bus to Tuxedo services. For information on configuring WTC, refer to Configuring WebLogic Tuxedo Connector for Tuxedo Transport.
To utilize the Tuxedo service from AquaLogic Service Bus, you must configure a new Business Service in the AquaLogic Service Bus Console. For more information about Business Services, see Business Services in the Using the AquaLogic Service Bus Console.
Log in to the AquaLogic Service Bus Console. Perform the configuration steps in the order presented, using the instructions in the following sections.
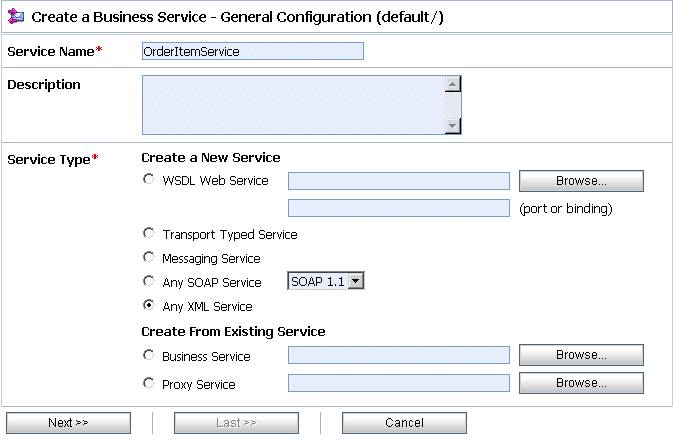
The Create a Business Service – General Configuration page displays, as shown in Figure 3-1.
Service Name – The name of the service.
Service Type – Select Any XML Service (the default).
| Note: | Tuxedo Transport only supports Any XML Service and Messaging Service as Service Types. |
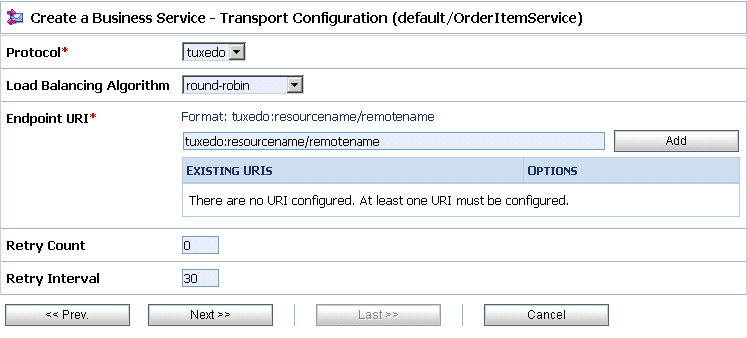
Load Balancing Algorithm – Leave the default as is, or select another algorithm.
Endpoint URI - Specify one or more endpoint URIs that correspond to the endpoint URI on the server where the service was deployed. The URI format is tuxedo:resourcename[/remotename]. The URI resourcename corresponds to a WTC Import name and the remotename corresponds to the service name exported by the remote Tuxedo domain.The URI resourcename is required, and the remotename is optional.
If more than one URI is specified, you must have unique resource names for the endpoints. If no remote name is specified, its value is the value of the resource name. If no remote name is entered or if remote and resource name are the same, only one URI is allowed. In this case resource name and remote name will have the same value. This allows already defined WTC Imports to make use of WTC load-balancing and failover.
| Note: | If you configure two identical URIs, an error displays notifying you that the service name already exists. |
The Tuxedo Transport uses the resource name and remote name from the URI to dynamically create a WTC Import.
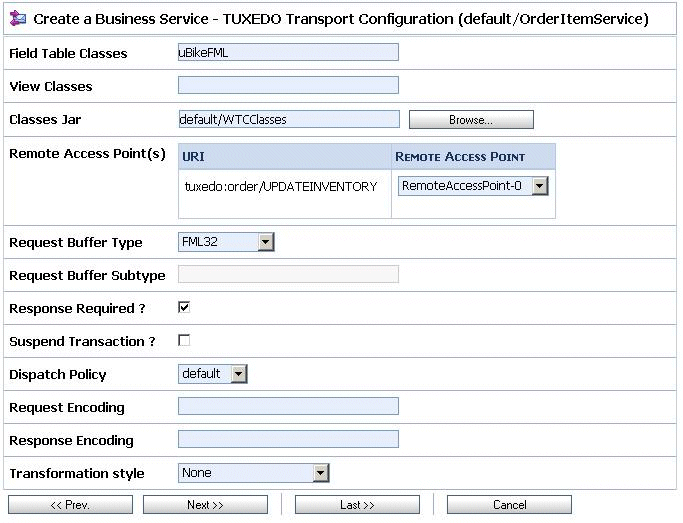
Field Table Classes – Optional field. Enter the name of the class or classes describing the FML/FML32 buffer received. These are used for the FML/FML32-to-XML conversion routines to map field names to element names. This is a space separated list of fully qualified class names.
View Classes – Optional field. Enter the name of the class or classes describing the VIEW/VIEW32 buffer received or sent. These are used for the VIEW-to-XML or VIEW32-to-XML conversion routines to map field names to element names. This is a space separated list of fully qualified class names.
Classes Jar – Select a Generic Resource that contains a JAR file with the FML/FML32 or VIEW/VIEW32 classes necessary for this endpoint operation.
Remote Access Point – Select a remote access point from the drop-down list that is associated with the Import. The drop-down list contain remote access points configured in WTC. A Business Service cannot be created if there is no associated remote access point.
If more than one URI has been specified, there will be one remote access point field per URI and the URI displays for informative purposes. If more than one URI exists, each requires a different remote access point. If the URI specified already corresponds to an existing WTC resource, the corresponding remote access point displays, but cannot be modified.
Request Buffer Type – Select from the drop-down list the type of buffer that the remote Tuxedo service will receive.
Request Buffer Subtype – This field is enabled if the previous Request Buffer Type value is VIEW or VIEW32. Enter the buffer subtype with which to associate the request buffer.
Response Required? – Select the check box to indicate a bidirectional call. If not checked, the underlying tpcall is invoked with TPNOREPLY flag, and a null response is posted asynchronously.
Suspend Transaction – Select the check box to suspend the transaction, if it exists. This is useful when the remote service does not support transactions.
Dispatch Policy – Select a WLS Work Manager from the drop-down list, if available. The default Work Manager is presented and used if no other WLS Work Manager exists. This Work Manager is used to asynchronously post a null reply in the case of a one-way invocation.
Request Encoding – Specify a character set encoding for requests in Tuxedo transports.
Response Encoding – Specify a character set encoding for responses in Tuxedo transports.
Transformation Style – The ordering or grouping of elements when FML or FML32 buffers are transformed into XML. Select one of the following choices:
When specifying a Business Service and defining the endpoint URIs, entering a remote name that is different from the resource name allows you to use the AquaLogic Service Bus load balancing and failover capabilities. In this case, you can define multiple service names and associate them to a service that is replicated across multiple remote domains. The resource name must be unique, but remote names do not have the same restriction.
Now that you have configured AquaLogic Service Bus to work with BEA Tuxedo, you can test the application. One way to test the configuration is to click on the Test icon from the AquaLogic Service Bus Console.
The following list of tasks summarizes the process of testing outbound usage of BEA Tuxedo by AquaLogic Service Bus.
A response page displays the results of the service request.


|