Database Installation Locate
The database may be set up during installation or by using the Setup tool after installation. Both of these scenarios use the same set of GUI panels shown in this section.
To run the Setup tool, execute the following script from the bin subdirectory of your installation:
| Windows: | setup.bat |
| UNIX: | ./setup.sh |
See command-line parameters in Setup.
Select your database. For more information on the Setup tool, please see Reconfiguring After Installation.
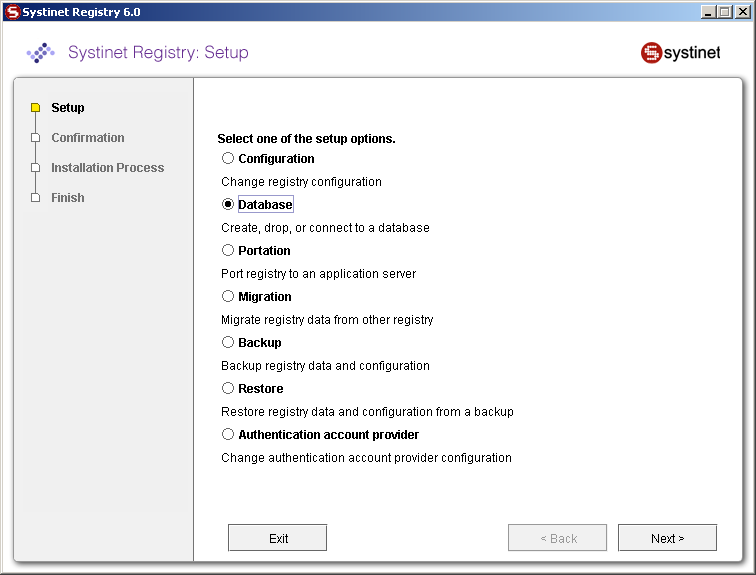
Database Creation Method Locate
The registry requires a database. During installation you can create a new database, create schema in an existing empty database or connect to an existing database with created schema. Using the Setup tool, you can also drop a database or database schema. Select your database operation on the following panel:

Select a method from those shown in Figure 22.
- Create database
Create new database/users/tablespaces (depending on the type of database server) and database schema. This is the easiest way to attach the required database to BEA AquaLogic Service Registry. Note that you must have the credentials of the database administrator.
- Create schema
Create a new schema in existing database. Select this method if you have access to an existing empty database with the ability to create tables and indexes. This option is suitable when you does not know the administrator's credentials. We assume the administrator has already created a new database/users/tablespaces for this option.
- Drop database
Drops the whole database/users/tablespaces. Note that this option depends on the type of database server.
- Drop schema
Drops all tables in the database but leave the empty database.
- Configure database
Configure registry database. Use this method if the registry database already exists, for example, from a previous BEA AquaLogic Service Registry installation of the same release number, and fill in only the connection parameters.
Select Database Type Locate
Figure 23 shows the supported database engines that can be prepared for BEA AquaLogic Service Registry. The panel may differ if another method was selected in the previous step.
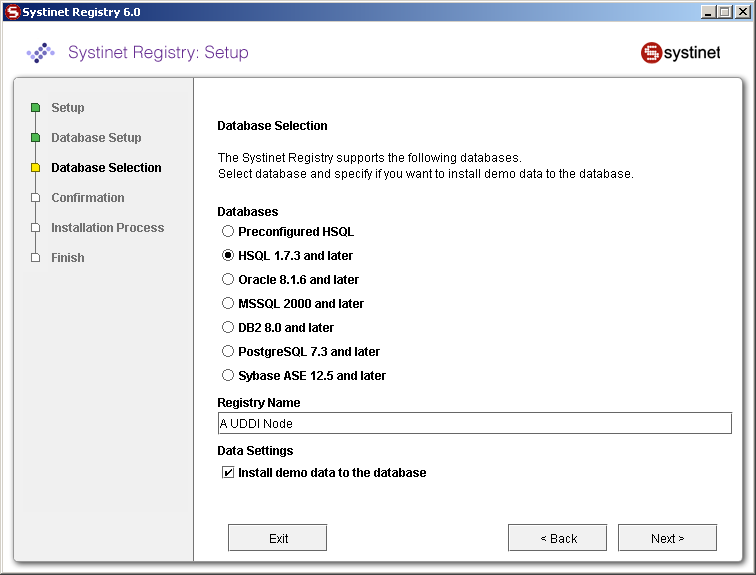
Follow these links for selected database.
Preconfigured HSQL Locate
The default database is the preconfigured HSQL. The installer or Setup tool creates database named REGISTRY_HOME/hsqldb/uddinode and the user account uddiuser with the password uddi in the database. Note that all database files can be found in REGISTRY_HOME/hsqldb directory.
![[Note]](../images/note.gif) | Note |
|---|---|
This database is recommended for evaluation and testing purposes only. | |

Oracle Locate
The Create database option on the installer/Setup tool does not mean to create a new physical database. The installation process only creates a new tablespace in an existing database and a new user of the default tablespace is set up on the created one. Then a database schema is created and UDDI data are loaded. Because relational tables are created in the schema of the specified user, if you want to create more UDDI databases (such as databases for publication and discovery registries for the approval process), you must create UDDI databases with different database users.
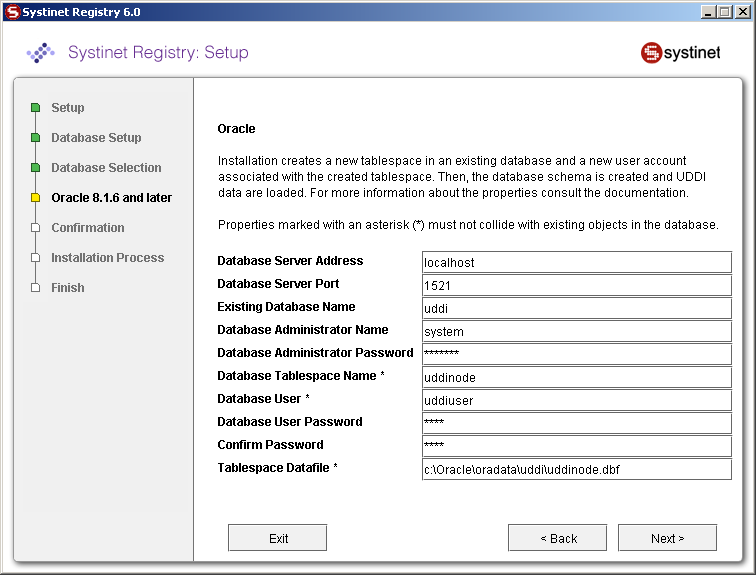
Oracle database creation requires the following properties. To connect or create a schema requires a subset of these properties. Please note that properties marked with an asterisk (*) must not collide with existing objects in the database.
- Database Server Address
Usually the host name or IP address of the computer where the database server is accessible.
- Database Server Port
Port on which the database listens for a connection
- Existing Database Name
Name of a database that already exists into which the BEA AquaLogic Service Registry tablespace will be created.
- Database Administrator Name
User name of the administrator of the database; required to create a new tablespace on the existing database
- Database Administrator Password
Password for the administrator account specified in the previous text box.
- Database Tablespace Name *
Name of the tablespace to be created in the existing database and which will store UDDI data structures.
- Database User *
A new user account which will be created to connect to the tablespace.
- Database User Password
Password for the user account specified in the previous text box.
- Confirm password
Again, if it is not the same as in the previous text box, you cannot continue.
- Tablespace Datafile *
Enter the path to the tablespace data file.
Continue with JDBC Driver.
MSSQL Locate
The installation process creates a new database on the database server under the given user name. The database schema is created and UDDI data are loaded. This user should have the Database Creators server role.
![[Important]](../images/important.gif) | Important |
|---|---|
Make sure your database server has case-sensitive collation, otherwise all comparisons will be case insensitive, even if the caseSensitiveMatch findQualifier is set. Alternatively, you can create a database with case-sensitive collation manually and use the create schema option. | |
| Important |
|---|---|
If you selected the option Create database in the installation/Setup panel shown in Figure 22, you need a database user account with the Database creators server role. To create such account, you can use the SQL Server Enterprise Manager:
| |
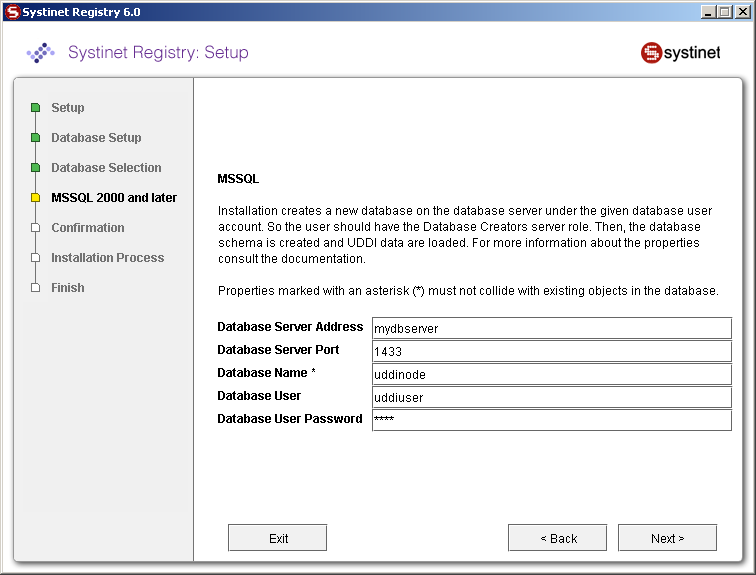
MSSQL database creation requires the following properties. To connect or create schema requires a subset of these properties. Please note that properties marked with an asterisk (*) must not collide with existing objects in the database.
- Database Server Address
Usually the host name or IP address where the database server is accessible.
- Database Server Port
Port on which the database listens for a connection.
- Database name *
Name of the database that will hold UDDI data structures.
- Database user
User name of a user who is able to create a new database.
- Database User Password *
Password for the user specified above.
Continue with JDBC Driver.
DB2 Locate
The Create database option from the installer/Setup tool does not create a new database physically. The installation process creates a new tablespace in an existing database with the given (existing) bufferpool and associates the tablespace with the given file. Permission to use the tablespace is given to the specified user. Then, a database schema is created and UDDI data are loaded.
| Important |
|---|---|
Because relational tables are created in the implicit schema, if you want to create more UDDI databases (such as databases for publication and discovery registries for the approval process), you must create UDDI databases with different database users. | |
| Important |
|---|---|
The Create database option requires a bufferpool with 8k page size and an database user account, that can use a temporary tablespace with such bufferpool.
| |
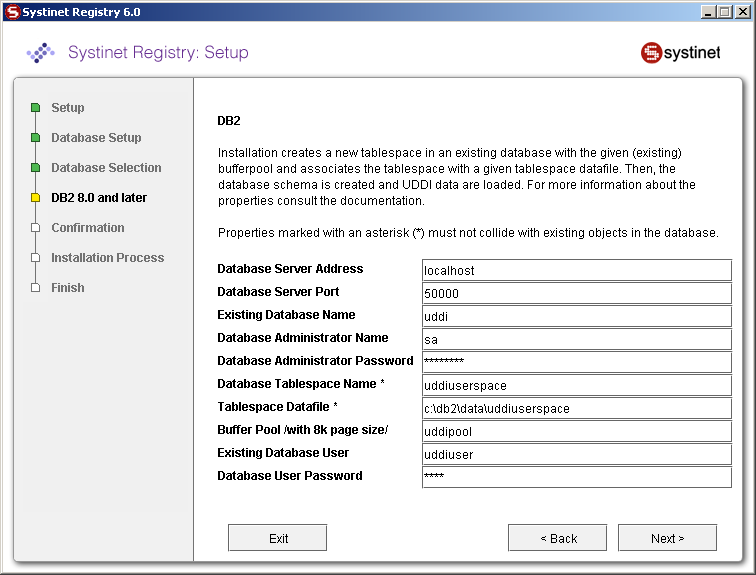
DB2 database creation requires the following properties. To connect or create schema requires a subset of these properties. Please note that properties marked with an asterisk (*) must not collide with existing objects in the database.
- Database Server Address
Usually the host name or IP address where the database server is accessible.
- Database Server Port
Port on which the database listens for connection.
- Existing Database Name
Name of a database that already exists. The UDDI tablespace will be created in this database.
- Database Administrator Name
User name of the administrator of the database; this is required to create a new tablespace on the existing database.
- Database Administrator Password
Password for the user specified in the previous text box.
- Database Tablespace Name *
Name of tablespace to be created in the existing database and which will store UDDI data structures
- Tablespace Datafile *
Full path of the host machine where the tablespace files will be stored
Important You must have read and write permissions to this directory.
- Buffer pool with 8k page size
Buffer pool for database; it must have pages with a size of 8k.
- Existing Database User
User name of a user having the following authorities: connect database, create table and create schema implicitly.
Important The user also must have access to a temporary tablespace with the associated 8k-length bufferpool to use for temporary tables.
- Database User Password
Password for the user specified in the previous text box.
Specify the BEA AquaLogic Service Registry Administrator account which will be created in the database. (If configure database is selected, this administrator account must correspond to one existing in the database.)
| Important |
|---|---|
Increase transaction log size (parameter logfilsiz) from default value 250 to 1000. You can use the Control Center tool to make this change. | |
Continue with JDBC Driver.
PostgreSQL Locate
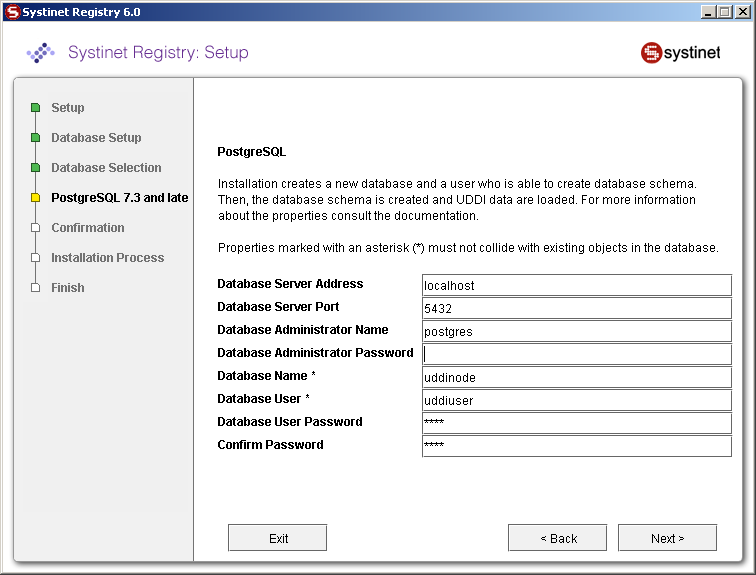
The installation process creates a new database and a user who is able to create schema/tables. Then the database schema is created and UDDI data are loaded.
PostgreSQL database creation requires the following properties. To connect or create a schema requires a subset of these properties. Please note that properties marked with an asterisk (*) must not collide with existing objects in the database.
- Database Server Address
Usually the host name or IP address where the database server is accessible
- Database Server Port
Port on which the database listens for a connection.
- Database Administrator Name
User name of the administrator of the database; this information is required to create new tablespace on the existing database.
- Database Administrator Password
Administrator's password.
- Database Name *
Name of the database that will hold UDDI data structures.
- Database User *
User name for one user of the database specified in the previous text box.
- Database User Password
Password for the user specified above.
- Confirm Password
Note that if this is not the same as in the previous text box, you cannot continue.
Continue with JDBC Driver.
HSQL Locate
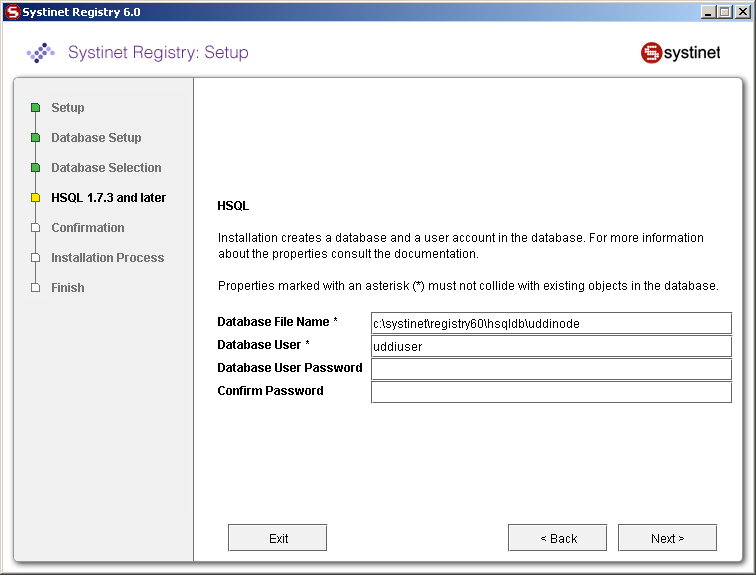
The installation process creates a new database and a user who is able to create schema/tables.
The HSQL database requires the following properties.
- Database File Name
Full path to the file which will hold data structures.
- Database User
User name for one account authorized to access this database
Sybase Locate
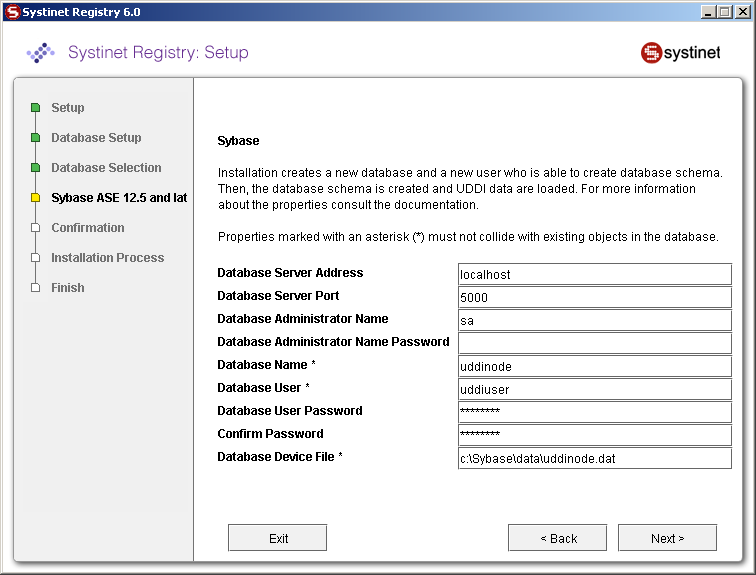
The installation process creates a new database and a new user who is able to create tables. Then database schema is created and UDDI data are loaded.
| Important |
|---|---|
You must configure the Sybase database server with at least 8K page size. Servers with a lesser page size may refuse some requests to store data. | |
Sybase database creation requires the following properties. To connect or create a schema requires a subset of these properties. Please note that properties marked with an asterisk (*) must not collide with existing objects in the database.
- Database Server Address
Usually the host name or IP address where the database server is accessible.
- Database Server Port
Port on which the database listens for connection.
- Database Administrator Name
User name of administrator of the database; required to create a new database and its device on the existing database server.
- Database Administrator Password
Password for this user.
- Database name *
Name of the database to create
- Database User *
User name of a new user of the database named in the previous text box.
- Database User Password
Password for the user named in the previous text box.
- Confirm Password
Note that if it is not same as in the previous text box, you cannot continue.
- Database Device File *
Location of new device for the new database; this file should not previously exist.
Continue with JDBC Driver.
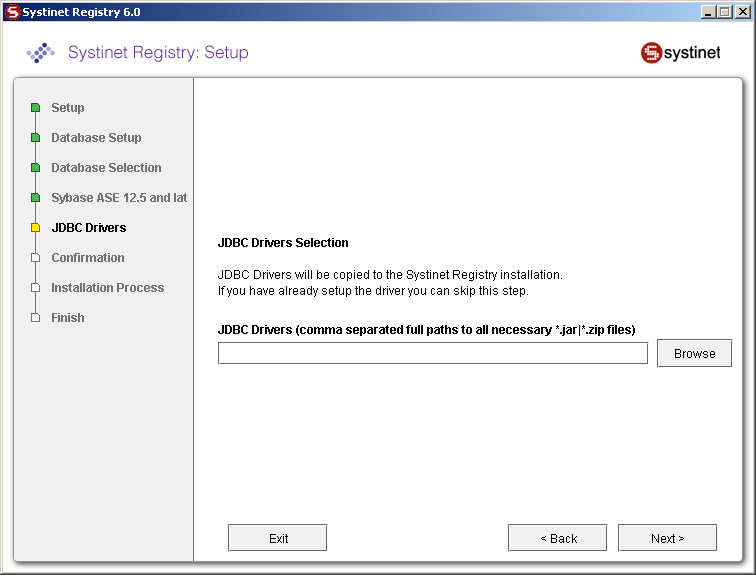
JDBC Driver Locate
Select the JDBC Driver as shown in Figure 12. It is not necessary to configure this path for the HSQL and PostgreSQL databases as the JDBC drivers for these databases are installed in the distribution. It is also not necessary if you have already configured this path previously for the selected database. The JDBC drivers are usually supplied by database vendors.
Account Backend Locate
If you created database or schema, you can configure an authentication account provider.
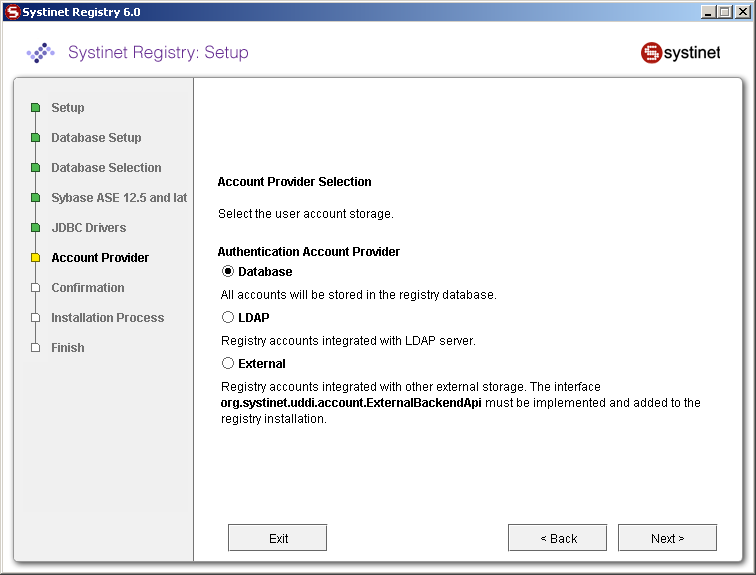
Figure 13 allows you to select the authentication account provider.
- Database
All accounts will be stored in the registry database. This is the recommended backend.
- LDAP
Registry accounts integrated with LDAP server.
- External
Registry accounts integrated with other external storage. To integrate BEA AquaLogic Service Registry, with an external backend, you must implement the interface com.systinet.uddi.account.ExternalBackendApi and add it to the registry installation.
For more information about LDAP and External account backends, please see External Accounts Integration
Multilingual Data Locate
This section describes how BEA AquaLogic Service Registry supports the storage of UDDI structures in the multilingual data format.
There are two types of text fields in UDDI structures: Unicode fields and ASCII fields.
- Unicode fields
are intended for human readable information, the field length is measured in number of characters as follows:
Field Name Max Length (in chars) name of businessEntity and businessService 255 keyName 255 keyValue 255 useType 255 description 255 addressLine 80 personName 255 - ASCII fields
are intended for machine processing, such as URIs. The length is measured in bytes. ASCII fields can typically hold multilingual data. Its length is limited by the number of bytes of its serialized form in UTF-8 encoding. For example, the name of a tModel can carry 85 Japanese characters, because Japanese characters are encoded into three bytes each under UTF-8 encoding (255/3=85).
Field Name Max Length (in bytes) name of tModel 255 overviewURL 4096 discoveryURL 4096 sortCode 10 email 255 phone 50 accessPoint 4096 instanceParms 8192
HSQL Locate
HSQL supports Unicode characters in both types (Unicode and ASCII) of fields.
MSSQL Locate
MSSQL supports Unicode characters only in Unicode fields. Unicode characters are stored successfully to ASCII fields only if they match with the server collation, otherwise are converted to question marks (?). For example, Japanese characters are stored correctly if the Japanese_Unicode_Cl_AS collation is default to the server. If the English collation is set up, Japanese characters are converted to ? characters.
Oracle Locate
Oracle database supports Unicode characters in both types (Unicode and ASCII) of fields.
PostgreSQL Locate
PostgreSQL supports Unicode characters in both types of fields. However, the length of database columns are specified in bytes instead of characters. For example, to store a description a 6*255 bytes long varchar column is required in order to save all possible 255-characters long Unicode strings.
The default database schema guarantees storage of 3-byte characters in Unicode fields. If you want to guarantee storage of characters greater than three bytes, edit the default PostgreSQL database schema REGISTRY_HOME/etc/db/postgresql/schema_core.sql, then create a new database using the Setup tool.
DB2 Locate
The DB2 database supports Unicode characters in both types of fields. Maximal length of a field is measured in bytes in the default database schema despite it being a Unicode field. You can use any Unicode characters, but allowed string length is not guarantied. For example, the name of a tModel can carry 85 Japanese characters, because Japanese characters are encoded into three bytes each under UTF-8 encoding (255/3=85).
Note that longer strings produce a database exception. The restriction is made because the cumulative length of indexed columns is limited to 800 bytes. The default schema prefers performance to multiple language support.
If you want to use Unicode fields with longer byte-length you must enlarge appropriate database columns. However indexes with cumulative length longer than 800 bytes must be removed as these can harm performance. Follow these steps:
Install BEA AquaLogic Service Registry with the no database option.
Modify the database schema file REGISTRY_HOME/etc/db/db2/schema_core.sql
Increase column lengths for names and keyValues.
Remove appropriate indexes.
Use the Setup tool to create the database.
Sybase Locate
Sybase supports Unicode characters in both types of fields. However, varying length character (varchar) columns are supported up to a 255-byte length. By default Unicode columns are 255 bytes long (except addressLine), which is sufficient for ASCII characters. You can use other characters, but allowed string length is not guarantied. For example, the name of a tModel can carry 85 Japanese characters, because Japanese characters are encoded into three bytes each under UTF-8 encoding (255/3=85). Longer strings are truncated.
If you want to use Unicode fields with longer byte-length, you can change the varchar datatype to the text datatype. However, indexes are not allowed on text columns and such indices must be removed. This may harm performance. Follow these steps:
Install BEA AquaLogic Service Registry with no database option
Modify the database schema file REGISTRY_HOME/etc/db/sybase/schema_core.sql
Change column datatype for names and keyValues.
Remove appropriate indexes
Use the Setup tool to create database.
JDBC Drivers Locate
BEA AquaLogic Service Registry requires by default the following classes for connection to the database. Please ensure that your downloaded JDBC JAR(s) includes them:
| Database | Driver class |
|---|---|
| DB2 | com.ibm.db2.jcc.DB2Driver |
| HSQL | org.hsqldb.jdbcDriver |
| MSSQL | com.microsoft.jdbc.sqlserver.SQLServerDriver |
| Oracle | oracle.jdbc.driver.OracleDriver |
| PostgreSQL | org.postgresql.Driver |
| Sybase | com.sybase.jdbc2.jdbc.SybDriver |
Alternative JDBC Drivers Locate
This section describes the use JDBC drivers other than the default drivers mentioned above. Suppose you downloaded FooJDBC.jar, where the driver class is foo.jdbc.Driver and the connection string is jdbc:foo:....
If you want to use an alternative JDBC driver while you already installed the registry and set up database with the default JDBC driver, edit the file REGISTRY_HOME/app/uddi/conf/database.xml as follows:
Add
<universalDriver name="fooDriver">
    <JDBC_driver>foo.jdbc.Driver</JDBC_driver>
    <URI_pattern>jdbc:foo:...</URI_pattern>
</universalDriver>
at the end of <databaseMappings/> element
You can use following parameters in the <URI_pattern> element
${hostname} - hostname or IP address of the database server
${port} - Port where the database server listens for requests
${dbName} - Name of the database
${userName} - Name of database account
${userPassword} - Password of the account
Replace the parameters with corresponding values using the Setup tool or the Registry Console.
Replace the className attribute of the interfaceMapping element with fooDriver value for your database. Determine the right databaseMapping element by value of type attribute.)
If you want to create a database with the alternative JDBC driver (without needing to use the default driver):
Install the BEA AquaLogic Service Registry without the database.
Modify REGISTRY_HOME/app/uddi/conf/database.xml as described above.
Replace the driver class and connection string in the installation scripts in REGISTRY_HOME/etc/db/ <database_type>/installXXX.xml
Run the Setup tool to create database.