Group Management Locate
User groups simplify management of access rights to each UDDI data structure. You can use groups to group users with similar rights.
The administrator can:
Create and manage user groups
Manage group membership
Create and Manage Groups Locate
To create a new group:
Click on the Manage menu tab. On the Manage tab, select the Registry management link, and then click the Group management button. This returns the Group Management page.
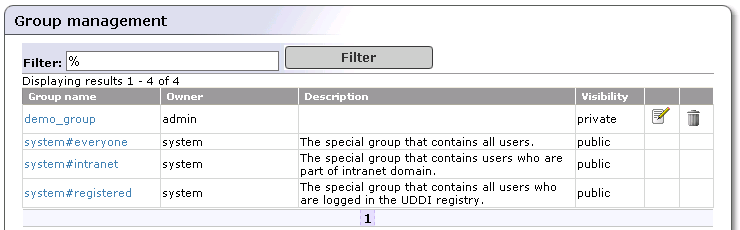
To display all groups on the registry, click Filter. This returns a Group list like the one shown in Figure 5.
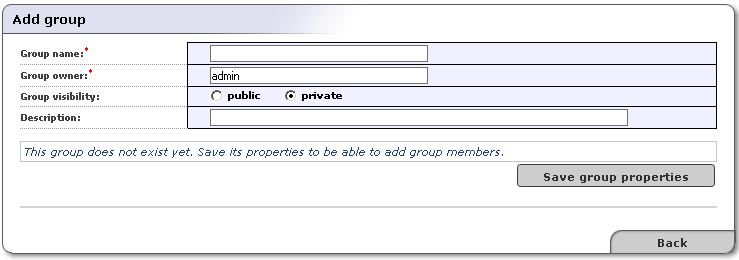
Click the Add Group button. This returns a blank Add group page much like the one shown in Figure 6.
In the edit box labeled Group name, type the name of your group. In the edit box labeled Group owner, type the owner of the group. The default owner is Admin. These two fields are required.
Use the radio buttons labeled public and private to set group visibility.
Both public and private groups are visible to all users in the registry, meaning that all users are able to see which groups exist. Public and private groups differ in that members of public groups are visible to all users of the registry whereas members of private groups are visible only to the owner of the group.
Optionally, Enter a description of the group in the box labeled Description.
Click the Save group properties button. This returns the Users list and Group members sections shown in Figure 5.
In the Users list section, click Filter to display a list of all of the registry's users.
Use the drop down list in this section to sort users by Login name or Full name.
Use the text box to further filter users. You can use % as wildcard in this field.
Check the boxes next to all members you wish to include, and click the right-pointing arrow (
 ) to move them to the Group
members table.
) to move them to the Group
members table.Group members are updated in the database once you click the arrow buttons.
Manage Group Membership Locate
To add or remove members from a group:
Click on the Manage main menu tab.
Click on the Registry management link. This returns the main Registry Management page.
Click the Group management button. This returns the Group list shown in Figure 5.
Enter your search criteria, then click the Filter button. Click Filter without search criteria to return a list of all groups.
Click the Edit button (
 ) in the row with the group you want to manage.
This returns the Edit Group page. Specify search criterion
for user accounts, then click the
Filter button.
) in the row with the group you want to manage.
This returns the Edit Group page. Specify search criterion
for user accounts, then click the
Filter button.Use the arrow buttons (
and
 ) to add and remove users as shown in Figure 7