Taxonomy Management Locate
This chapter describes how administrators can build and maintain taxonomies using the Registry Console. Before you start to manage taxonomies, we recommend reading User's Guide, Taxonomy: Principles, Creation and Validation to become familiar with taxonomy principles.
The following tasks are described in this chapter:
Adding a taxonomy - How to add taxonomies BEA AquaLogic Service Registry.
Finding taxonomies - How to locate taxonomies in BEA AquaLogic Service Registry.
Editing taxonomies - How to change taxonomy categorization, compatibilities, and a taxonomy type that is important in range queries comparison.
Editing a taxonomy structure - How to add categories, disable nodes, edit node values, and delete nodes.
To view the Taxonomy management page:
Log on as administrator.
Click the Manage tab under the Main menu, and then click on the Registry management link under the Manage menu tab.
Click Taxonomy management. This returns a blank Taxonomy management page. To view a selection of taxonomies, select a filter from the drop down list labeled Show. Possible filters are:
Favorite taxonomies
Enterprise taxonomies
All taxonomies hide system
All taxonomies including system
This returns a list of taxonomies similar to that shown in Figure 11.
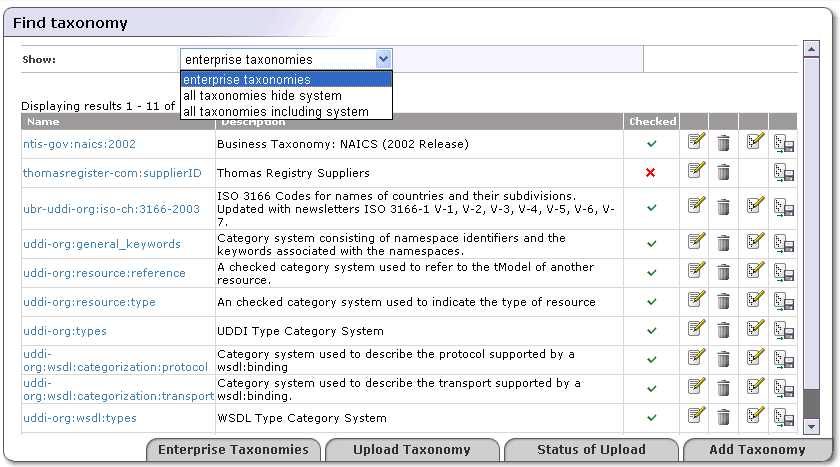
Use the page shown in Figure 11 to search enterprise taxonomies. You can classify taxonomies according to the following overlapping groups:
Enterprise taxonomies - The BEA AquaLogic Service Registry administrator can define which taxonomies will be present in the enterprise taxonomies list. The Enterprise taxonomies button located in the bottom part of Figure 11 allows you to manage a list of enterprise taxonomies for all registry user accounts.
Favorite taxonomies - All registry users can define their list of favorite taxonomies. See User's Guide, favorite Taxonomies for more information on how to manage your list of favorite taxonomies.
System taxonomies - When you edit a taxonomy you can assign whether the taxonomy is a system taxonomy using the check box System taxonomy.
The reason for this taxonomy classification is to make taxonomy management and UDDI entity categorization easier.
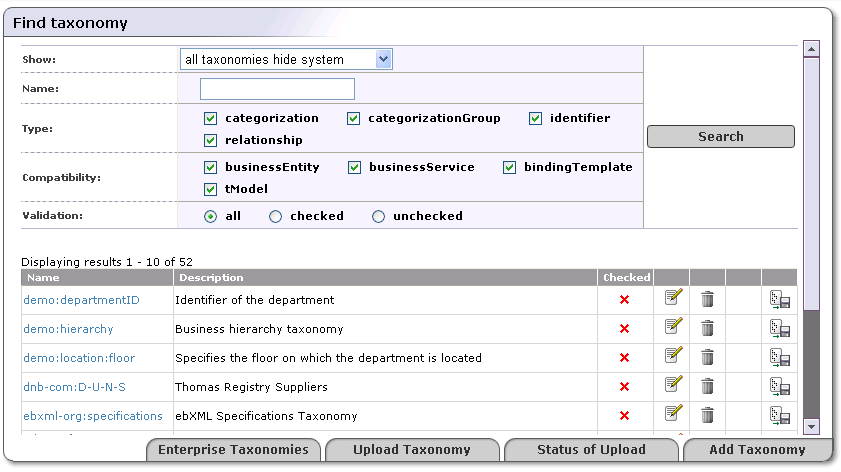
If you want to manage taxonomies which are not in the enterprise taxonomy list, select see all taxonomies including system taxonomies from the drop down list labeled Show. The page shown in Figure 12 will appear. You can search taxonomies using the following criteria: taxonomy name, type, compatibility, and validation.
Adding Taxonomies Locate
You can also add a root for a taxonomy by hand and build it through the Registry Console.
To add a taxonomy:
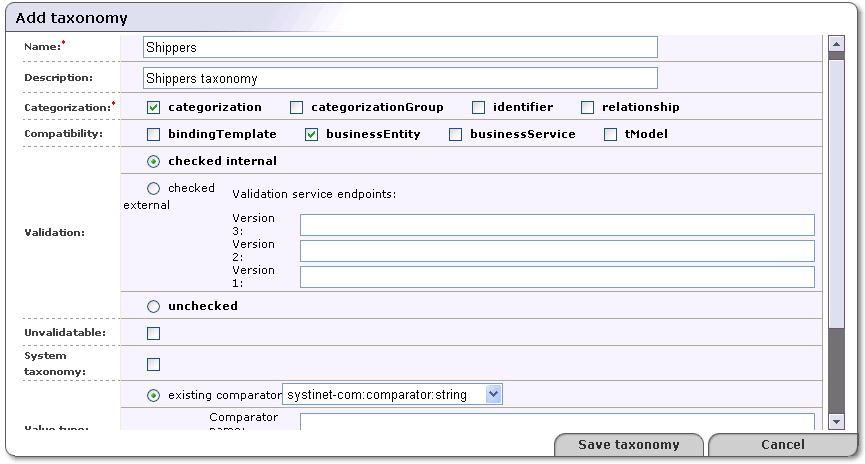
Click the Add taxonomy button shown in Figure 12.
Fill in as many of the fields on the Add taxonomy page, shown in Figure 13, as you require. Only two fields are required to create a taxonomy: Name and Categorization, however the more information you provide, the more useful your taxonomy will be.
In the field labeled Name, name your taxonomy.
Skip the field labeled tModel key. This key is generated when you save the taxonomy.
In the field labeled Description, briefly describe the use of the taxonomy.
Check one or more of the boxes in the section labeled Categorization. Categorizations are discussed in Taxonomy Types.
You may enforce that your taxonomy can be used only within the UDDI structures of your choice. Select one or more of the main UDDI structure types in the section labeled Compatibility.
Validation In this section, specify whether the values in keyedReferences within the taxonomy will be checked or not.
Select checked internal if you want BEA AquaLogic Service Registry to check keyedReferences in which the taxonomy is used against a validation service deployed within BEA AquaLogic Service Registry.
Select checked external if you want BEA AquaLogic Service Registry to check keyedReferences in which the taxonomy is used against a validation service deployed on a remote SOAP stack such as Systinet Server.
If you are using an external validation service, provide at least one Validation service endpoint.
Select unchecked if you do not want BEA AquaLogic Service Registry to perform any checks on values used in keyedReferences in which the taxonomy is used.
Use the box labeled Unvalidatable to mark taxonomies as temporarily unavailable.
Check the box labeled System taxonomy if you want to mark the taxonomy for internal use. Users and administrators can filter System taxomies easily when searching in the Business Service Console.
Select a Value type for keyValues. You can choose from three existing comparators or create a custom comparator. Existing comparators are:
string - keyValues are treated as string values. If keyValues type is unknown then keyValues are treated as strings. The maximum length is 255 characters.
numeric - keyValues are treated as decimal numbers. The value can have maximum 19 digits before the decimal point and maximum 6 digits after the decimal point.
date - keyValues are treated as dates.
If you want to categorize using a custom comparison, you must create a new comparator tModel and implement a transformation service. The Transformation service endpoint must start with the class: prefix. Please see the Types of keyValues and Custom Ordinal Types for more information.
Use the box labeled Add to favorites to mark the taxonomy as either a personal favorite. This is an option available to all users.
Check the box labeled Add to enterprise to mark the taxonomy specific to the particular enterprise or application. For more information, see Enterprise Taxonomies
Click Save taxonomy.
![[Note]](../images/note.gif) | Note |
|---|---|
Later, you will be able to modify all taxonomy attributes except the validation type. See Editing Taxonomies for attribute descriptions. | |
Finding Taxonomies Locate
To locate a taxonomy in BEA AquaLogic Service Registry:
Log on as administrator.
Click the Manage tab under the Main menu, and then click on the Registry management link under the Manage menu tab.
Click Taxonomy management. This returns a blank Taxonomy management page. Select a filter from the drop down list labeled Show. Possible filters are:
Favorite taxonomies
Enterprise taxonomies
All taxonomies hide system
All taxonomies including system
This returns a list of taxonomies similar to that shown in Figure 11.
On the returned Find taxonomy page, you can further filter the results by
name
type - Types are discussed in Taxonomy Types
compatibility
validation
From the list of taxonomies the fit the filter criteria, select the taxonomy you wish to view by clicking on its name.
Editing Taxonomies Locate
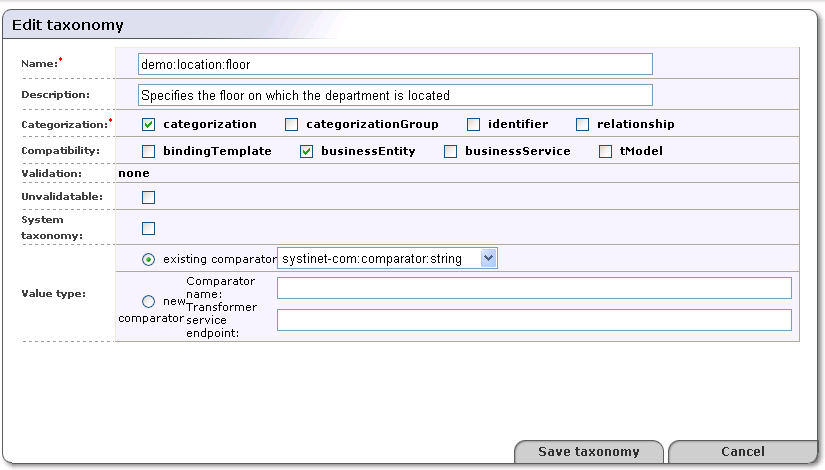
The Registry Console makes it possible to change any taxonomy attribute except the validation type attribute. To edit a taxonomy:
Identify the taxonomy you want to edit as described in Finding Taxonomies.
Click on the Edit Taxonomy icon in the Find Taxonomy page shown in Figure 12. This loads the Edit taxonomy page shown in Figure 14.
In the field labeled Name, edit the taxonomy's name.
In the field labeled Description, briefly describe the use of the taxonomy.
Check one or more of the boxes in the section labeled Categorization. Categorizations are discussed in Taxonomy Types.
You may enforce that your taxonomy can be used only within the UDDI structures of your choice. Select one or more of the main UDDI structure types in the section labeled Compatibility.
Validation In this section, specify whether the values in keyedReferences within the taxonomy will be checked or not.
Select checked internal if you want BEA AquaLogic Service Registry to check keyedReferences in which the taxonomy is used against a validation service deployed within BEA AquaLogic Service Registry.
Select checked external if you want BEA AquaLogic Service Registry to check keyedReferences in which the taxonomy is used against a validation service deployed on a remote SOAP stack such as Systinet Server.
If you are using an external validation service, provide at least one Validation service endpoint.
Select unchecked if you do not want BEA AquaLogic Service Registry to perform any checks on values used in keyedReferences in which the taxonomy is used.
Check the box labeled Unvalidatable to mark the taxonomy as temporarily unavailable. When you save a checked taxonomy without a validation service, the taxonomy will be saved with Unvalidatable toggled on.
Select a Value type for keyValues. You can choose from three existing comparators or create a custom comparator. Existing comparators are:
string - keyValues are treated as string values. If keyValues type is unknown then keyValues are treated as strings. The maximum length is 255 characters.
numeric - keyValues are treated as decimal numbers. The value can have maximum 19 digits before the decimal point and maximum 6 digits after the decimal point.
date - keyValues are treated as dates.
If you want to categorize using a custom comparison, you must create a new comparator tModel and implement a transformation service. The Transformation service endpoint must start with the class: prefix. Please see the Types of keyValues and Custom Ordinal Types for more information.
Editing a Taxonomy Structure Locate
While the fields in the Edit Taxonomy page are used for controlling global attributes, the management of nodes within the taxonomy itself is handled by categories. Here you can add nodes, edit node values, and enable or disable them.
![[Tip]](../images/tip.gif) | Tip |
|---|---|
Registry Console provides you with unique functionality to manage taxonomy structures using a drag-and-drop wizard. | |
| Note |
|---|---|
Changing taxonomy structure is allowed only for checked taxonomies which are validated by the internal validation service. | |
Adding Categories to a Taxonomy Locate
| Note |
|---|---|
Before we begin assigning names to a taxonomy it is important to consider how the naming system will function. Taxonomy values in UDDI consist of name and value pairs, like entries in a hash table. As with hash table values, the trade-off between economy of space and extensibility must be taken into consideration. Too long a Value string will be wasteful; too small and it will not be extendable. | |
To add a node to a branch or root:
Identify the taxonomy you want to edit as described in Finding Taxonomies.
Click the Edit taxonomy structure icon (
 ) in the
Find taxonomy page as shown in
Figure 12.
) in the
Find taxonomy page as shown in
Figure 12. ![[Important]](../images/important.gif)
Important This icon is only available for checked taxonomies that are validated by the internal validation service. You cannot edit the structure of unchecked taxonomies and checked taxonimies that are validated by other services.
The Edit taxonomy structure page will appear.
On this page, right-click on the taxonomy's folder icon to display its context menu, and select the Add category action.
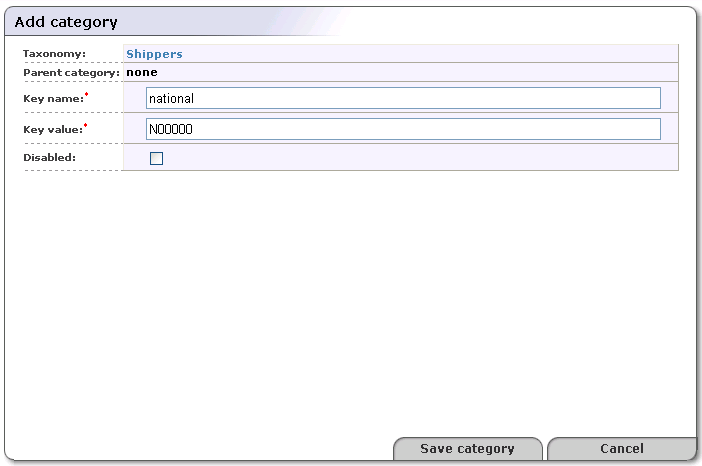
This displays the Add category page. Provide the required Key name and Key value, and click Save category.
In the shipping taxonomy example shown in Figure 15, we use a value algorithm that employs an array of six alphanumeric characters:
The first element in the array signifies the first geographic division.
The second and third elements signify further geographic subdivisions where necessary.
The fourth character indicates transport mode.
The fifth character is reserved for an extension to the system allowing a coded category containing a maximum of thirty-six divisions.
The sixth can be used for a weight coding system.
Check the box labeled Disabled to mark the category as either helper or deprecated. Note that disabled categories cannot be used as valid options in keyedReferences.
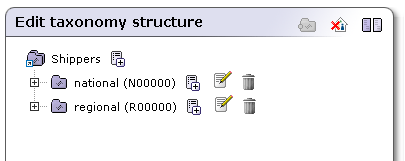
Click the Save category button. This builds the taxonomy as shown in Figure 16.
Drag-and-Drop Editing Locate
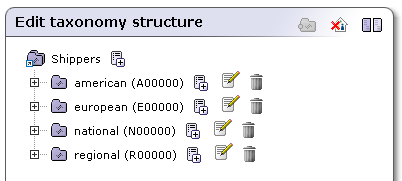
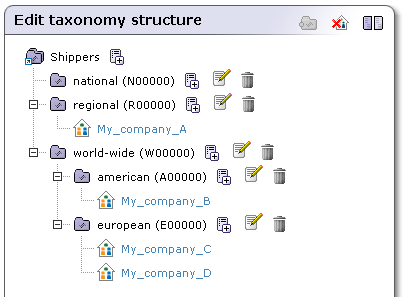
To demonstrate the drag-and-drop functionality, we will extend the Shippers taxonomy from previous section.
Add four non-disabled categories with the following attributes:
Key name: national; Key value: N00000.
Key name: regional; Key value: R00000
Key name: american; Key value: e00000.
Key name: european; Key value: e00000.
The result is shown in Figure 17.
Add a new category {world-wide,W00000} to the same level as all previous taxonomies.
We want to put both the european and american categories under the world-wide category as shown in Figure 18.
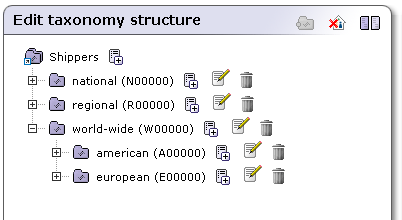
To do so, click on the european category node and drag it to the world-wide category node. Do the same with the american category node. The structures will be displayed as shown in Figure 18.
| Note |
|---|---|
When you drag a category with all child nodes, the child nodes are dragged along with the parent. | |
For taxonomies with many categories you can use two taxonomy
trees and drag categories from the left taxonomy tree and drop
them to the right taxonomy tree. To enable this two-tree
display, click on the Second taxonomy tree
icon ( ).
).
The Edit taxonomy structure also allows you to see UDDI
entities categorized with a category from the taxonomy tree. An
example of displayed business entities categorized with the
Shippers taxonomy is shown in Figure 19. To switch to the
view of categorized UDDI entities, click the house icon
( ).
).
Deleting and Disabling Nodes Locate
There are two policy choices for dealing with categories of entities that cease to be active. Either:
They can be marked as disabled.
They can be deleted entirely from the taxonomy.
To delete a taxonomy node,
Navigate through the taxonomy tree via the Edit taxonomy page.
Right-click on the category node's icon and select the Delete option from its context menu.
Important Because this process is irreversible you will be asked to confirm.
To disable a taxonomy node:
Navigate through the taxonomy tree via the Edit taxonomy page.
Right-click on the category node icon to display its context menu.
Select the Edit category option from the context menu. This returns the Edit category page.
On the Edit category page, check the option labeled Disable.
Click the Save category button.
Uploading Taxonomies Locate
To upload a taxonomy:
Log on as administrator.
Click Manage main menu tab, then click on the link Registry management under the Manage menu tab.
Click the Registry management button. A list of taxonomies like the one shown in Figure 12 will appear.
Click the Upload taxonomy button.
| Note |
|---|---|
The format of data on this page is described in the Persistence Format of the Developer's Guide. | |
Downloading Taxonomies Locate
There are two obvious cases in which you will want to download a taxonomy from the database:
If you are planning to edit the taxonomy, it is good to keep a safe copy for version control. You can either edit the downloaded copy directly, and even manage it through a versioning system, or keep the downloaded copy as the safety copy and edit the taxonomy directly through the Registry Console and save changes directly to the database.
You may wish to replicate the taxonomy for other systems in other departments of your organization. These departments or branches may even tailor the taxonomy for their own purposes.
To download the taxonomy, click the
Download ( ) icon. This returns the system
Save file dialog. The default name for the
destination file is the taxonomy name with a
.xml extension appended. Rename the file if you
choose, then save the taxonomy file as you would any other.
) icon. This returns the system
Save file dialog. The default name for the
destination file is the taxonomy name with a
.xml extension appended. Rename the file if you
choose, then save the taxonomy file as you would any other.
Deleting Taxonomies Locate
If at any point you decide that a taxonomy is no longer necessary,
you can delete it by clicking the Delete
taxonomy icon ( ) in the Find
Taxonomy page.
) in the Find
Taxonomy page.
| Important |
|---|---|
Because this procedure is irreversible you will be asked to confirm your deletion. | |