Replication Management Locate
Selective One-way Replication is a subscription-based replication mechanism under which a slave registry retrieves update and change notifications from a master registry. The slave registry then applies these to its own data.
Replication is set up by a subscription defining the set of businessEntities or tModels being replicated. The subscription filter is a find_business or find_tModel query with no special requirements.
Each time replication is invoked, the slave registry retrieves a set of changed businessEntities and referenced tModels. The tModels are referenced in tModelKeys of either tModelInstanceInfos or keyedReferences. These changes are then saved.
![[Important]](../images/important.gif) | Important |
|---|---|
Referenced tModels are only replicated if the slave registry does not already contain them. If a tModel is already present in the slave registry, it will not be replicated to the slave registry, even if the tModel has been modified in the master registry. | |
| Important |
|---|---|
Replicated data should not be changed because such changes in the slave registry will be lost when someone changes these entities in the master registry and the replication is automatically processed. Note also that replicated data should be stored under an account having administrator's privileges (admin). | |
Replication may fail or produce warning messages. The failure may occur for one of the following reasons:
The master registry is not accessible or the connection is broken during data replication;
Saving/Deleting of a subscribed businessEntity on the slave registry fails.
A warning is produced when:
The subscribed businessEntity is not accessible on the master registry. For example because of ACL GET denied permission;
Referenced tModels are not accessible on the master registry;
Referenced tModels are saved/deleted.
Replication tries to obtain all changes to subscribed data since the last successful replication.
Replication process logs can be found in the REGISTRY_HOME/log/replicationEvents.log file. You can edit the REGISTRY_HOME/conf/log4j.config and make replication logging more detailed by uncommenting the following statement:
log4j.category.replication_v3.com.systinet.uddi.replication.v3.ReplicatorTask=DEBUG,replicationLog
Master Registry Setup Locate
To set up the master registry:
If you do not have an account on the master registry, you must create one. It can be a standard account.
![[Note]](../images/note.gif)
Note The default subscription limit for a new user is five. The BEA AquaLogic Service Registry Administrator may increase the subscriptions limit for the user.
Log into the master registry account.
Create a subscription for the replication with the following details:
The subscription filter must be a find_business or find_tModel query.
Set the Notification listener type drop down list to None
The brief option is recommended to reduce the amount of transferred data.
For more information, please see Publishing Subscriptions.
Slave Registry Setup Locate
| Note |
|---|---|
Only the administrator of the slave registry should do this. | |
There are two parts to the slave registry configuration:
Master registry information including the location of master registry endpoints for inquiry, subscription and security APIs, and the username/password pair on the master registry needed to obtain notifications;
Slave registry information including the username/password pair on the slave registry for the user who will own the replicated data, and the notification interval.
To set up replication:
Log on as Administrator to the slave registry.
Click the Manage main menu tab, then click on the link Registry management under the Manage menu tab.
Click Replication management. This returns a list of replications.
Click Add replication.
Fill in the form under the Master tab as described in Figure 20.
Fill in the form under the Slave tab as described in Figure 21.
Specify permissions for replicated data under the Permissions tab as shown in Figure 22.
Click Save replication.
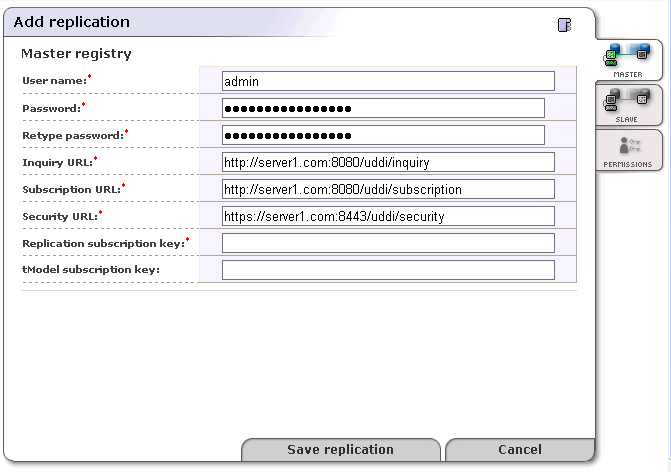
User name - Name of the user who created the replication subscription on the master registry
Password - Password of the user who created this subscription. This password is encrypted in the configuration file.
URLs of Master Registry - All URLs (Inquiry URL, Subscription URL and Security URL) must refer to the same master registry. Moreover the URLs must not refer to the slave registry itself, otherwise you can loose some data.
Inquiry URL - Inquiry URL of master registry. For example, http://master.mycompany.com:8080/uddi/inquiry. The inquiry URL is used to obtain full standard UDDI v3 structures.
Note UDDI v2 keys are not included in the UDDI v3 structure and replicated structures differ with regard to v2 keys. To replicate v2 keys, specify the URL of the proprietary inquiry API, which returns extended structures including v2 keys. This extended API has the context /uddi/export. For example, http://master.mycompany.com:8080/uddi/export.
Subscription URL - Master registry's subscription URL. For example, http://master.mycompany.com:8080/uddi/subscription.
Security URL - Master registry's security URL. For example, https://master.mycompany.com:8443/uddi/security.
Replication subscription key - key of the find_business or find_tModel subscription from the master registry.
tModel subscription key - key of the helper subscription for changes to tModels from the master registry.
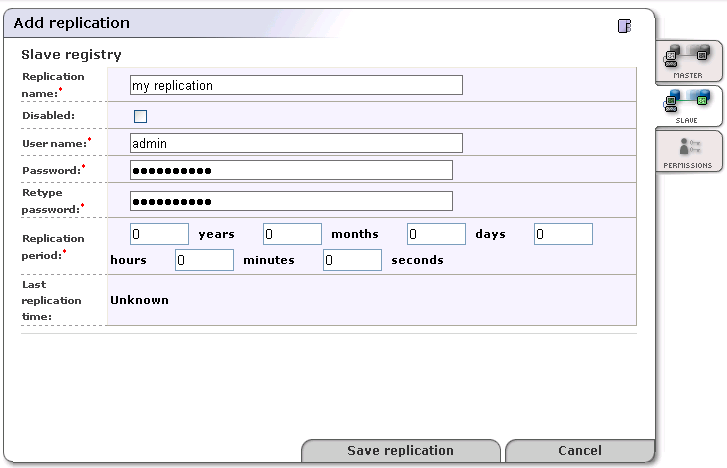
Replication name - Name the replication for better orientation within the list of replications.
Disabled - Check this box to disable replication.
User name - User account name under which replicated data will be stored.
Important The user must have the ApiManagerPermission on org.systinet.uddi.client.v3.UDDI_Publication_PortType API for all * actions to be able to generate keys without having the appropriate keyGenerator. For more information, see User's Guide, Generating Keys. By default, the only user who can do this is the admin.
Replication period - Specify the period between replications by entering the appropriate number in the boxes for years, months, days, hours, minutes, and seconds. The default period is one hour.
Last replication time - The date and time when the last replication occurred.
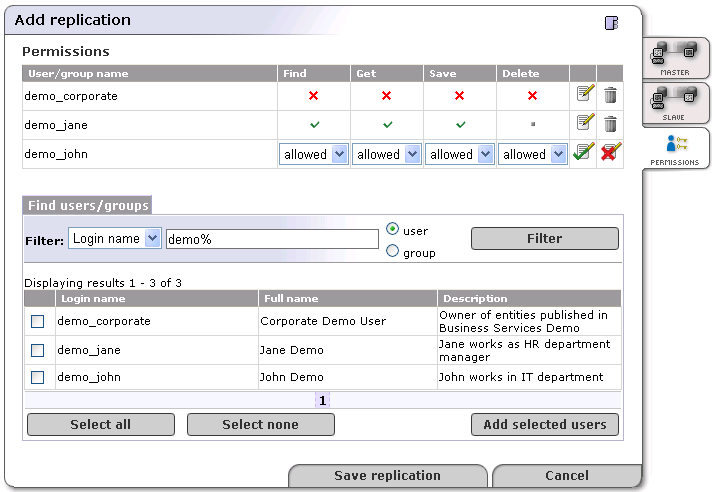
In the page shown in Figure 22, the administrator can set up permissions for replicated data. If you do not enter any data on this page, all users from the slave registry have find and get permissions on replicated data.
To specify permissions on replicated data:
Enter a filter criteria for users or groups, and click Filter.
Check the box in front of users or groups. Then, click the Add selected users button. Selected users or groups will be added to the permissions list.
Click the Edit icon to change permissions for Find, Get, Save and Delete operations
Click the Save replication button.
![[Tip]](../images/tip.gif) | Tip |
|---|---|
Use the button Replicate now on the replication page to test the replication settings. | |