This chapter provides an overview of security options for an AquaLogic User Interaction deployment.
The purpose of this chapter is assist in developing a security plan and should not be considered a replacement for the services of qualified security professionals. BEA does not not advocate the use of any specific security configuration. BEA does provide professional consulting services to assist in securing an AquaLogic User Interaction deployment. To engage BEA professional services, contact your BEA representative.
This chapter discusses the following topics:
Security Architecture provides an overview of the AquaLogic User Interaction component security architecture, including intra-component communication, firewalls, and the DMZ.
SSL provides an overview of SSL in the AquaLogic User Interaction deployment, including how and where CA certificates should be imported into the various AquaLogic User Interaction services.
Security Architecture
This section describes AquaLogic User Interaction component architecture from a network security perspective. This includes how various components communicate with each other and which components need to be exposed to the end consumer.
Component Communication
With the exception of the database and Search, all requests from the AquaLogic Interaction portal component are made using HTTP 1.1. This provides the following security advantages:
There are third party tools to help monitor and audit HTTP 1.1 traffic.
Each component web service uses a single, configurable port number, which eases firewall configuration.
The AquaLogic Interaction portal component implements the full range of HTTP security, including SSL/TLS certificates and basic authentication.
Single Sign-On (SSO) third party products that are designed to protect HTTP traffic can be used to protect web services residing in the internal network. For details on SSO and AquaLogic Interaction, see Authentication and SSO.
Communication between the ALUI components can be further secured by:
Using a separate network or subnet for the ALUI components and the DB.
Using technologies such as IPSec, VPN, or SSL.
AquaLogic User Interaction and the DMZ
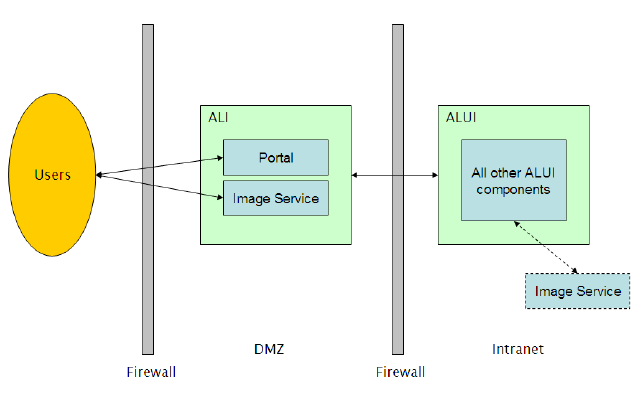
A basic security architecture that limits external exposure to AquaLogic User Interaction products and other backend systems is illustrated in Figure 2-1.
Figure 2-1 Basic Security Architecture
In this configuration, only the AquaLogic Interaction Portal component and Image Service are placed within the DMZ. The AquaLogic Interaction Portal component and Image Service should be the only AquaLogic Interaction components installed in the DMZ. When the Portal is separate from other AquaLogic Interaction components, persistent data in the search and database components and backend tasks in the automation service are isolated from the external network.
The Portal gateways requests to all other AquaLogic User Interaction components and backend services, communicating with HTTP 1.1 across the firewall and into the internal network. The server housing the AquaLogic Interaction Portal should be hardened by a security professional, as it receives direct user requests. All communication should be SSL-encrypted.
To avoid traffic across the firewall between non-portal AquaLogic User Interaction components and the Image Service, another Image Service can be placed within the internal network.
Note:
This is one potential network topology. For topologies involving software and hardware loadbalancing, see Load Balancing.
SSL
Configuring AquaLogic User Interaction to use SSL is a relatively complex procedure that requires knowledge of SSL and CA certificates. This section provides an overview of the procedure. For more details, see the Administrator Guide for AquaLogic Interaction.
In the general case, the AquaLogic Interaction portal Image Service would be secured with SSL, while another, unsecured Image Service would reside in the internal network for other AquaLogic User Interaction components. In this case the AquaLogic User Interaction Activity Services would use the unsecured Image Service and would only need to be configured for SSL communication with the Portal.
The following sections explain how to configure the various AquaLogic User Interaction components for SSL:
After AquaLogic Interaction components are installed, the security mode for the portal can be set. The security mode specifies how SSL is incorporated into your AquaLogic User Interaction deployment. Security mode options are described in the following table:
Security Mode
Description
0
Portal pages remain in whatever security mode—http or https—that the user initially uses to access the portal. For example, if a user accesses the portal via http, all the portal pages will remain http; if a user accesses the portal via https, all the portal pages will remain https. This is the default setting.
Note:
This mode is not recommended for production deployments or deployments that are exposed to the external network.
1
Certain portal pages are always secured via SSL and other pages are not. For example, the login page might always be secured but a directory browsing page might not. The page types that are secured are configurable.
Note:
This mode is not generally recommended.
2
All portal pages are always secured via SSL.
Use this mode if there is no SSL accelerator. In this mode, the Web server should provide an SSL endpoint.
Note:
Configuring the SSL endpoint directly on a Tomcat application server is not recommended. A Web server should be used in front of the application server, and the SSL certificate should be installed on the Web server.
3
The portal uses an SSL accelerator.
This is the most common configuration for production deployments. As with Security Mode 2, users are not connecting to the application server directly, so the front-end application server and the channel between the accelerator and the application sever must be secured.
Use the following steps to configure AquaLogic Interaction for SSL:
Configure SSL on Web servers or SSL accelerators that front-end the AquaLogic Interaction Portal and Image Service components. Refer to your Web server or SSL accelerator documentation for instructions on configuring SSL and creating, signing, and installing an SSL certificate.
Configure the Portal component:
<PT_HOME>/settings/config/portalconfig.xml.
Ensure that HTTPSecurePort and HTTPPort are set to the ports you want to use.
Change ApplicationURL0 from * to
http://host_name:port/portal/server.pt
Note:
The port number is not necessary for .NET deployments.
Change SecureApplicationURL0 from * to
https://host_name:port/portal/server.pt
Note:
The port number is not necessary for .NET deployments.
If multiple URL mappings are configured, ensure that these entries are updated as in c and d. Refer to the comments in the configuration file for more information on URL mapping.
Change SecurityMode from 0 to 1, 2, or 3.
Change ImageServerSecureBaseURL from http to https. Ensure that the Image Service port is correct.
If the Image Service is secured with SSL, set ImageServerConnectionURL to the secure URL. The CA certificate used by the Image Service must be imported into the Portal application server. For details, see Importing CA Certificates.
If any portlets or remote servers use JSControls or Adaptive Portlets, the image service CA certificate must be imported into their runtimes as well. The JSControls libraries are embedded in server and IDK products, but are identified by XML stored on the Image Service.
If any remote server — including portlet servers, authentication sources, profile sources, or content services — is secured with SSL, import the remote server CA certificate into the Portal application server. For details, see Importing CA Certificates.
For each application server that makes requests to an SSL-secured service, the CA certificate from the secured service must be imported. The following two sections detail the process for importing CA certificates into a Java Application Server or IIS and .NET.
Importing CA Certificates Into a Java Application Server or Standalone AquaLogic User Interaction Product
For Java application servers the CA certificate is imported into the cacerts keystore.
To import the CA certificate:
On the computer that makes requests to an SSL secured service, open a command prompt.
Copy the CA certificate to this computer.
Note:
The CA certificate is in the CA of the secured service. Save the .der encoded certificate as a .cer file.
Import the certificate using keytool. For example:
CA_alias is the alias for the CA. For example, verisign or the server hostname.
CA_certificate_path is the path and filename of the .cer file to be imported.
CA_keystore_path is the path to the cacerts keystore. The cacerts keystore is typically located under the home of the JVM being run by the application server, <JVM_home>/lib/security/cacerts.
When prompted, enter the password for the cacerts keystore. The default password is changeme.
Importing CA Certificates into IIS and .NET
For IIS and .NET, the CA certificate is imported into the MMC.
On the computer that makes requests to an SSL secured service, open a command prompt.
Copy the CA certificate to this computer.
Note:
The CA certificate is in the CA of the secured service. Save the .der encoded certificate as a .cer file.
Run MMC from the command line,
> mmc
Click Console | Add/Remove Snap-in.
Click Add.
Click Certificates.
Click Computer Account and then click Next.
Click local computer and then click Finish.
Close the Add Standalone Snap-in dialog box.
Close the Add/Remove Snap-in dialog box by clicking OK.
In the MMC tree, expand to Console Root | Certificates | Trusted Root Certificate Authorities | Certificates.
Right click Certificates and select All Tasks | Import. Click Next.
Select the CA certificate to import. Click Next.
Choose to place all certificates in the Trusted Root Certification Authorties store.
Click Next and then click Finish.
Restart IIS.
Configuring Activity Services to Use a Secure Portal or Image Service
This section describes how to configure Collaboration, Publisher, Studio, and Workflow to use a secure Portal or Image Service.
Configuring Collaboration to Use a Secure Portal or Image Service
Collaboration does not require any changes to function in security modes 1 or 2, as it uses the Portal's Image Service settings. A certificate is not required.
If you are using Security Mode 3, import the certificate of the CA that signed the Image Service and/or Portal certificate into Collaboration. For details, see Importing CA Certificates.
However, if the host/port of the normal Image Service URL used by browsing users is not accessible from Collaboration (for example, the Image Service is on a different machine than Collaboration), you must change the jscontrols component that Collaboration uses. This problem generates error messages that are displayed in the Calendar portlets. To avoid these errors:
Open the Collaboration config.xml configuration file, located in <PT_HOME>/ptcollab/5.0/settings/config.
In the following line, set the URL to the value of ImageServerConnectionURL set in the portal portalconfig.xml configuration file.
Configuring Publisher to Use a Secure Portal or Image Service
If the Image Service is secured with SSL:
Open the Publisher content.properties configuration file, located in <PT_HOME>/ptcs/6.3/settings/config.
Change the following Image Service entries:
For Security Modes 1 or 2, find and replace all occurrences of http://machine_name/imageserver with https://machine_name/ imageserver, where machine_nameis the name of the computer hosting Publisher.
For Security Mode 3, change the following entries:
Some of the above entries are HTTP and some are HTTPS. Ensure that the port is correct for each.
Import the CA certificate from the Image Service and Portal into Publisher. For details, see Importing CA Certificates.
Restart Publisher.
Configuring Studio to Use a Secure Portal or Image Service
Import the CA certificate from the Image Service and Portal into Studio. For details, see Importing CA Certificates.
Configuring Workflow to Use a Secure Portal or Image Service
If you changed the AlternateImageServerURL in the content.properties file, perform the following steps so that Publisher can communicate the alternate Image Service URL to Workflow:
Restart Publisher. This writes the URL to Workflow.
After Publisher has restarted, restart Workflow. This forces the Workflow Web application to re-query Publisher for the alternate Image Service URL.
Import the CA certificate from the Image Service and Portal into Workflow. For details, see Importing CA Certificates.