| SIP Servlet Engine© Documentations |
| Top > SIP Servlet Programming > SIP Servlet Programming > EchoServlet Tutorial |
EchoServlet Tutorial
This tutorial describes process steps for developing a SIP servlet in the following order:
- Setting your development environment
- Creating and Building a Program
- Deploying to a Server
- Checking the Operation
You can download the file used in this tutorial from the following link:
sip-tutorial.zip
The program created in this tutorial only supports OKISoftphone. It does not run on other soft phones such as Windows Messenger.
Setting your development environment
Before starting the tutorial, make sure all required software programs are installed in your system. The following software programs are required to build the application.
- Java (J2SE 1.4.1_06 or later)
- Apache Ant 1.5.3 (or later)
- WebLogic Server 8.1 SP3
You should also make sure that the following environment variables are properly set.
- JAVA_HOME
- BEA_HOME
- ANT_HOME
- PATH (the following directories must be included: $JAVA_HOME/bin, $ANT_HOME/bin)
In addition, when you start and test your application, you need all software programs required to run SIP Servlet Engine 3.0.
Next, you determine the directory used for the development and expand the distribution file in the directory. In this tutorial "/home/develop/sip" is used as the development directory.
$ cd /home/develop/sip
$ jar xf sip-tutorial.zip
The distribution file creates a directory named sip-tutorial, which contains the following folders necessary to develop the application.
Table 1: Structure of Distribution File (after expanded)
| File name | Description |
|---|---|
| sip-tutorial/build.xml | An Ant build file that describes how to build the SIP servlet and create an archive. |
| sip-tutorial/WEB-INF/sip.xml | A Deployment descriptor file that describes configuration of the SIP servlet. |
| sip-tutorial/WEB-INF/web.xml | A Deployment descriptor file that describes configuration of the servlet context. |
| sip-tutorial/WEB-INF/src/com/oki/sip/tutorial/EchoServlet.java | SIP servlet program (source). |
In SIP Servlet Engine 3.0 (WebLogic Server version), you must specify web.xml if you develop an application that only uses SIP (including the one in this tutorial). For more information about settings in web.xml, see here.
These four files are created by application developers. Table 2 shows a list of files you create in the following steps as well as the above files:
Table 2: File Structure in Development Phase
| File name | Description |
|---|---|
| sip-tutorial/build.xml | See Table 1. |
| sip-tutorial/WEB-INF/sip.xml | See Table 1. |
| sip-tutorial/WEB-INF/web.xml | See Table 1. |
| sip-tutorial/WEB-INF/src/com/oki/sip/tutorial/EchoServlet.java | See Table 1. |
| sip-tutorial/WEB-INF/classes/com/oki/sip/tutorial/EchoServlet.class | A class file generated by compiling EchoServlet.java. |
| sip-tutorial/WEB-INF/lib/sip-equips-signals.jar | A Jar file necessary to run EchoServlet. |
| sip-tutorial/sip-tutorial.war | A War file created for deployment. |
Creating and Building a Program
In this step, you create a program. In this tutorial, we create a SIP servlet as a sample application. This servlet converts a received message in a MESSAGE request from OKISoftphone to upper case and sends it back.
This tutorial assumes that the program is already developed since a discussion of program operation is outside the scope of this tutorial.
For information about the program operation, see this section.
Developers must specify information about deployment of the SIP servlet as well as creating the program. For Web applications, use web.xml. For SIP applications, use sip.xml to do this task.
sip.xml
sip.xml is a deployment descriptor file that initializes a SIP servlet and sets receipt conditions. List 2 shows example settings necessary to start the Echo servlet. In this example, all MESSAGE methods are received by the Echo servlet.
For more information about sip.xml, see the SIP Servlet API specification.
List 1: sip.xml
<?xml version="1.0" encoding="UTF-8"?>

<!DOCTYPE sip-app
   PUBLIC "-//Java Community Process//DTD SIP Application 1.0//EN"
   "http://www.jcp.org/dtd/sip-app_1_0.dtd">

<sip-app>
  <display-name>SIP Servlet Tutorial</display-name>

  <servlet>
    <servlet-name>echo</servlet-name>
    <servlet-class>com.oki.sip.tutorial.EchoServlet</servlet-class>
    <load-on-startup/>
  </servlet>

  <servlet-mapping>
    <servlet-name>echo</servlet-name>
    <pattern>
      <equal>
        <var>request.method</var>
        <value>MESSAGE</value>
      </equal>
    </pattern>
  </servlet-mapping>

  <session-config>
    <session-timeout>1</session-timeout>
  </session-config>
</sip-app>
web.xml
In SIP Servlet Engine 2.1 (WebLogic Server version), you should specify web.xml as well as sip.xml. You must specify web.xml if you develop an application that only uses SIP (including the one in this tutorial). You must specify the <listener> tag in web.xml as shown below:
List 2: web.xml
<?xml version="1.0" encoding="ISO-8859-1"?>

<!DOCTYPE web-app
    PUBLIC "-//Sun Microsystems, Inc.//DTD Web Application 2.3//EN"
    "http://java.sun.com/dtd/web-app_2_3.dtd">

<web-app>
  <listener>
    <listener-class>com.oki.sip.engine.server.ContextEventHook</listener-class>
  </listener>
</web-app>
Building with Ant
In real-world development work, you repeat a cycle of creating and modifying your code, building ,deploying , and testing. Therefore, it is recommended that you automate tasks from build through test. For development with Java, Ant from ASF (Apache Software Foundation) is widely used. This tutorial shows a development process using Ant.
List 3 shows the build.xml file included in the distribution. This file defines the following build targets:
Table 3: Main Targets of Ant Build File
| Target Name | Description |
|---|---|
| all | Compiles with javac and stores the result in the classes directory. |
| war | Archives the result of the build in the sip-tutorial.war file. |
| clean | Deletes class, archive, and backup files. |
List 3: build.xml
<?xml version="1.0"?>

<project name="sip-tutorial" default="compile" basedir=".">
  <property file="${user.home}/build.properties"/>
  <property file="build.properties"/>
  <property environment="env"/>

  <property name="top"     value="${basedir}"/>
  <property name="classes" value="${top}/WEB-INF/classes"/>
  <property name="src"     value="${top}/WEB-INF/src"/>
  <property name="sip.top" value="${env.BEA_HOME}/sip"/>
  <property name="wls81"   value="${env.BEA_HOME}/weblogic81/server"/>

  <target name="all" depends="prepare,compile"/>
  <target name="war" depends="all,deploy"/>

  <target name="prepare">
    <mkdir dir="${classes}"/>
  </target>

  <target name="clean">
    <delete dir="${classes}" />
    <delete>
      <fileset dir="${top}" defaultexcludes="no">
        <include name="sip-tutorial.war" />
        <include name="**/*~" />
      </fileset>
    </delete>
  </target>

  <path id="classpath">
    <fileset dir="${sip.top}/lib">
      <include name="*.jar" />
    </fileset>
    <fileset dir="${sip.top}/auxlib">
      <include name="*.jar" />
    </fileset>
    <fileset dir="${wls81}/lib">
      <include name="*.jar" />
    </fileset>
  </path>

  <target name="compile" depends="prepare">
    <javac srcdir="${src}"
           destdir="${classes}"
	   encoding="euc-jp"
           debug="on"
           optimize="on"
           deprecation="on" >
      <classpath refid="classpath"/>
    </javac>
  </target>

  <target name="deploy">
    <copy todir="${top}/WEB-INF/lib">
      <fileset dir="${sip.top}/lib">
        <include name="sip-equips-signal.jar" />
      </fileset>
    </copy>

    <war jarfile="${top}/sip-tutorial.war" webxml="${top}/WEB-INF/web.xml">
      <fileset dir="${top}">
        <exclude name="build.xml" />
        <exclude name="sip-tutorial.war" />
        <exclude name="WEB-INF/web.xml" />
      </fileset>
    </war>
  </target>

</project>
An operation example of the Ant command is shown below. This example shows an output generated when you compile with the Ant command:
$ cd /home/develop/sip
$ ant all
Buildfile: build.xml

prepare:
   [mkdir] Created dir: /home/develop/sip/sip-tutorial/WEB-INF/classes

compile:
   [javac] Compiling 1 source file to /home/develop/sip/sip-tutorial/WEB-INF/classes

all:

BUILD SUCCESSFUL
Total time: 2 seconds
Next example is an output for the war target. The example shows an output generated when you specify the war target and create the sip-tutorial.war file.
$ ant war
Buildfile: build.xml

prepare:

compile:

all:

deploy:
     [copy] Copying 1 file to /home/fukuda/tmp/sip-tutorial/WEB-INF/lib
      [war] Building war: /home/fukuda/tmp/sip-tutorial/sip-tutorial.war

war:

BUILD SUCCESSFUL
Total time: 1 second
By completing this build process, you can create the War file necessary to deploy the application.
Deploying to a Server
This section describes how to deploy the generated War file to your WebLogic Server. You can use WebLogic Server's management console called Administration Console to deploy your application.
For information about using the Admin Console, refer to the BEA document, "Deploying Applications and Modules" in the Administration Console Online Help.
In the Administration Console, expand the mydomain->Deployments->Web Application Modules node. (Figure 1)
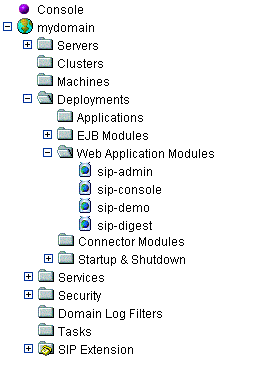
Figure1: Admin Console Screen (before application deployment)
This node displays a list of Web and SIP applications that are already deployed. Click Web Application Modules and select Deploy a New Web Application Module on the configuration screen.
A window for selecting a Web application module archive displays. Navigate to the directory that contains sip-tutorial.war. Select sip-tutorial.war and click Assign Module.
A window for reviewing your choice and deploying appears. After confirming the settings, Click Deploy. This starts deploying your application. When the deployment is completed, a window is displayed (Figure 2).
Check that the Last action status column indicates success and sip-tutorial is added in the Web application module tree. (Figure 3).
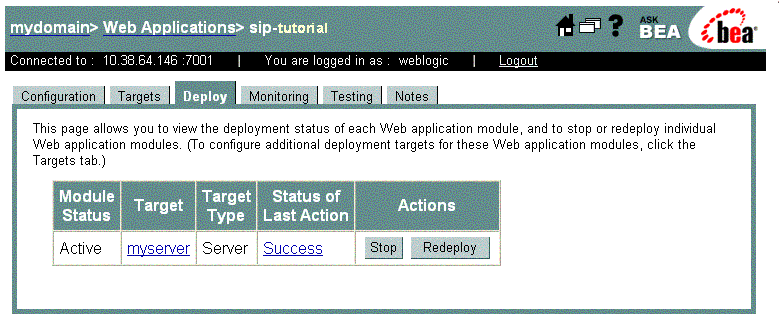
Figure 2: Admin Console Screen after Deployment
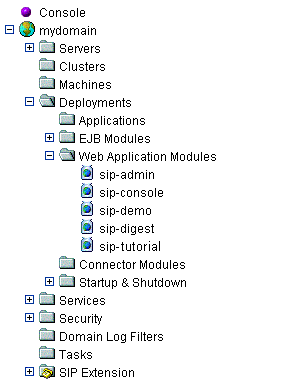
Figure 3: Admin Console Screen (after application deployment)
In this tutorial, you deployed the application using the Administration Console. WebLogic Server provides a number of ways to deploy applications. *1 When you deploy SIP applications, you can use these methods. The deployment process of SIP applications is exactly the same as Web applications.
Checking the Operation
Once deploying the SIP application, you can test its operation.
Check <servlet-mapping> settings in the sip.xml file to see that filter conditions of the SIP application in SIP Servlet Engine and those in this sample do not overlap. When you use sip-demo, all MESSAGE requests are configured to be forwarded to the "chat" servlet. You must comment out this part or reconfigure it so that only particular users are sent to the Echo servlet.
Figure 4 shows an OKISoftphone screen appeared when MESSAGE is sent. Figure 5 shows the SIP sequence. Figure 6 shows results in captured packets.
Before a discussion of the operation, the chat process specification of OKISoftphone is summarized below. *2
- The application uses the MESSAGE method to send a chat message, but works in the pager-mode that realizes a chat outside the SIP dialog.
- It uses its own header, X-Chat-Id to hold the sessions between the SIP messages because SIP transactions are discarded every time and it can not use the transaction ID to relate the messages each other in the pager-mode.
- There are three types of chat messages for different uses: These types can be identified by analyzing the message body.
- Chat Session Establishment
- At the beginning of a chat, the sender side sends the MESSAGE with its empty body to establish the chat session. The receiver terminal responds to this with a 302 and the sender side sends the message with its body to the Contact.
- Chat Session Completion
- At the end of a chat, the sender side sends the MESSAGE containing only the SIP URI of the sender.
- Chat Message Sending
- In normal message sending, the sender sends the MESSAGE containing the SIP URI of the sender on the first line, followed by the message body on the subsequent lines and : at the end.
You can see from the specification, Figure 5 and 6 that each message belongs to one of the following types.
- F1 and F2
- Chat Session Establishment
- F3 - F6
- Chat Message Sending Messages from F3 to F6 comprise a group for sending and receiving. Every time a message is sent from OKISoftphone, the four messages are carried over the network
- F7 and F8
- Chat Session Completion
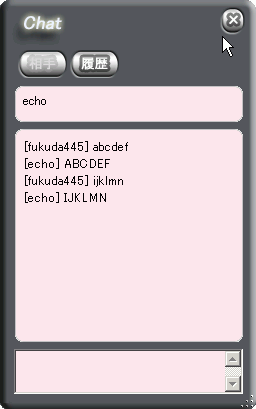
Figure 4: OKISoftphone Chat Screen
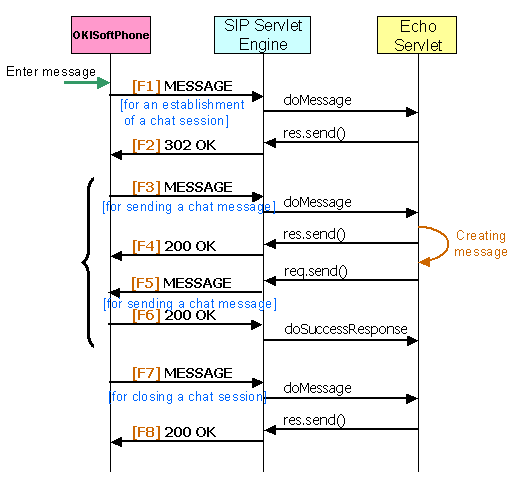
Figure 5: Sequence Diagram
Figure 6: SIP Messages
[F1]
MESSAGE sip:echo@act2343.eoa.telcom.oki.co.jp SIP/2.0
Via: SIP/2.0/UDP 172.21.164.217:5060;branch=z9hG4bK75db1c40
Max-Forwards: 70
To: sip:echo@act2343.eoa.telcom.oki.co.jp
From: sip:fukuda445@act2343.eoa.telcom.oki.co.jp;tag=172891200
Call-ID: 79131c40-7b82800ca5d44a37805b1d246a09575f@act2865
CSeq: 1 MESSAGE
Allow: INVITE,ACK,CANCEL,BYE,INFO,MESSAGE,SUBSCRIBE,NOTIFY
X-Chat-Id: 359629bbcfd8070224632.fukuda445@act2343.eoa.telcom.oki.co.jp
Content-Type: text/plain
Content-Length: 0
[F2]
SIP/2.0 302 Moved Temporarily
Call-ID: 79131c40-7b82800ca5d44a37805b1d246a09575f@act2865
CSeq: 1 MESSAGE
From: sip:fukuda445@act2343.eoa.telcom.oki.co.jp;tag=172891200
To: <sip:echo@act2343.eoa.telcom.oki.co.jp>;tag=jtag-3f4be5da-514a-4dff-b755-bf4de59c1d9f
Via: SIP/2.0/UDP 172.21.164.217:5060;branch=z9hG4bK75db1c40
Contact: sip:act2343.eoa.telcom.oki.co.jp:5060
Content-Length: 0
Server: OKI CenterStage AP V2.0
X-Chat-Id: 359629bbcfd8070224632.fukuda445@act2343.eoa.telcom.oki.co.jp
[F3-a]
MESSAGE sip:act2343.eoa.telcom.oki.co.jp:5060 SIP/2.0
Via: SIP/2.0/UDP 172.21.164.217:5060;branch=z9hG4bK60091c40
Max-Forwards: 70
To: sip:echo@act2343.eoa.telcom.oki.co.jp
From: sip:fukuda445@act2343.eoa.telcom.oki.co.jp;tag=140647488
Call-ID: 26651c40-b2dd0e09b02b475e872cb593ffd7a608@act2865
CSeq: 1 MESSAGE
Allow: INVITE,ACK,CANCEL,BYE,INFO,MESSAGE,SUBSCRIBE,NOTIFY
X-Chat-Id: 359629bbcfd8070224632.fukuda445@act2343.eoa.telcom.oki.co.jp
Content-Type: text/plain
Content-Length: 51

sip:fukuda445@act2343.eoa.telcom.oki.co.jp\r\n
abcdef:
[F4-a]
SIP/2.0 200 OK
Call-ID: 26651c40-b2dd0e09b02b475e872cb593ffd7a608@act2865
CSeq: 1 MESSAGE
From: sip:fukuda445@act2343.eoa.telcom.oki.co.jp;tag=140647488
To: <sip:echo@act2343.eoa.telcom.oki.co.jp>;tag=jtag-c1fbd9cd-2027-4bae-81d4-a08000141107
Via: SIP/2.0/UDP 172.21.164.217:5060;branch=z9hG4bK60091c40
Content-Length: 0
Server: OKI CenterStage AP V2.0
X-Chat-Id: 359629bbcfd8070224632.fukuda445@act2343.eoa.telcom.oki.co.jp
[F5-a]
MESSAGE sip:172.21.164.217:5060 SIP/2.0
Call-ID: b22ddfd5-9e1d-4469-a315-9d6040ae761f@172.21.164.21
CSeq: 1 MESSAGE
From: <sip:echo@act2343.eoa.telcom.oki.co.jp>;tag=jtag-0e41ae8b-7518-4ea4-b4b7-93861f58bdc7
To: <sip:fukuda445@act2343.eoa.telcom.oki.co.jp>
Via: SIP/2.0/UDP act2343.eoa.telcom.oki.co.jp:5060;branch=z9hG4bK1gdgcs
Contact: <sip:act2343.eoa.telcom.oki.co.jp:5060;transport=udp>
Max-Forwards: 70
Content-Length: 46
Content-Type: text/plain; charset=UTF-8
X-Chat-Id: 359629bbcfd8070224632.fukuda445@act2343.eoa.telcom.oki.co.jp

sip:echo@act2343.eoa.telcom.oki.co.jp\r\n
ABCDEF:
[F6-a]
SIP/2.0 200 Ok
Via: SIP/2.0/UDP act2343.eoa.telcom.oki.co.jp:5060;received=172.21.164.21;branch=z9hG4bK1gdgcs
To: sip:fukuda445@act2343.eoa.telcom.oki.co.jp;tag=1736711233
From: sip:echo@act2343.eoa.telcom.oki.co.jp;tag=jtag-0e41ae8b-7518-4ea4-b4b7-93861f58bdc7
Call-ID: b22ddfd5-9e1d-4469-a315-9d6040ae761f@172.21.164.21
CSeq: 1 MESSAGE
Allow: INVITE,ACK,CANCEL,BYE,INFO,MESSAGE,SUBSCRIBE,NOTIFY
Content-Length: 0
[F3-b]
MESSAGE sip:act2343.eoa.telcom.oki.co.jp:5060 SIP/2.0
Via: SIP/2.0/UDP 172.21.164.217:5060;branch=z9hG4bK60461c47
Max-Forwards: 70
To: sip:echo@act2343.eoa.telcom.oki.co.jp
From: sip:fukuda445@act2343.eoa.telcom.oki.co.jp;tag=1420958791
Call-ID: 16eb1c47-47c2929079fa4a5c9ef7cea6e9a59c96@act2865
CSeq: 1 MESSAGE
Allow: INVITE,ACK,CANCEL,BYE,INFO,MESSAGE,SUBSCRIBE,NOTIFY
X-Chat-Id: 359629bbcfd8070224632.fukuda445@act2343.eoa.telcom.oki.co.jp
Content-Type: text/plain
Content-Length: 51

sip:fukuda445@act2343.eoa.telcom.oki.co.jp\r\n
ijklmn:
[F4-b]
SIP/2.0 200 OK
Call-ID: 16eb1c47-47c2929079fa4a5c9ef7cea6e9a59c96@act2865
CSeq: 1 MESSAGE
From: sip:fukuda445@act2343.eoa.telcom.oki.co.jp;tag=1420958791
To: <sip:echo@act2343.eoa.telcom.oki.co.jp>;tag=jtag-3951db36-1fb4-4676-8967-ed6ee4cfba20
Via: SIP/2.0/UDP 172.21.164.217:5060;branch=z9hG4bK60461c47
Content-Length: 0
Server: OKI CenterStage AP V2.0
X-Chat-Id: 359629bbcfd8070224632.fukuda445@act2343.eoa.telcom.oki.co.jp
[F5-b]
MESSAGE sip:172.21.164.217:5060 SIP/2.0
Call-ID: 4390970c-4fdf-4bd0-84a9-837697b55406@172.21.164.21
CSeq: 1 MESSAGE
From: <sip:echo@act2343.eoa.telcom.oki.co.jp>;tag=jtag-f5539851-7474-4c37-8022-bcb9c50b52b7
To: <sip:fukuda445@act2343.eoa.telcom.oki.co.jp>
Via: SIP/2.0/UDP act2343.eoa.telcom.oki.co.jp:5060;branch=z9hG4bK4w7ch7
Contact: <sip:act2343.eoa.telcom.oki.co.jp:5060;transport=udp>
Max-Forwards: 70
Content-Length: 46
Content-Type: text/plain; charset=UTF-8
X-Chat-Id: 359629bbcfd8070224632.fukuda445@act2343.eoa.telcom.oki.co.jp

sip:echo@act2343.eoa.telcom.oki.co.jp\r\n
IJKLMN:
[F6-b]
SIP/2.0 200 Ok
Via: SIP/2.0/UDP act2343.eoa.telcom.oki.co.jp:5060;received=172.21.164.21;branch=z9hG4bK4w7ch7
To: sip:fukuda445@act2343.eoa.telcom.oki.co.jp;tag=1256266824
From: sip:echo@act2343.eoa.telcom.oki.co.jp;tag=jtag-f5539851-7474-4c37-8022-bcb9c50b52b7
Call-ID: 4390970c-4fdf-4bd0-84a9-837697b55406@172.21.164.21
CSeq: 1 MESSAGE
Allow: INVITE,ACK,CANCEL,BYE,INFO,MESSAGE,SUBSCRIBE,NOTIFY
Content-Length: 0
[F7]
MESSAGE sip:act2343.eoa.telcom.oki.co.jp:5060 SIP/2.0
Via: SIP/2.0/UDP 172.21.164.217:5060;branch=z9hG4bK175f1c4c
Max-Forwards: 70
To: sip:echo@act2343.eoa.telcom.oki.co.jp
From: sip:fukuda445@act2343.eoa.telcom.oki.co.jp;tag=333126732
Call-ID: 6a401c4c-50812d60621c4d869e53942c154a6001@act2865
CSeq: 1 MESSAGE
Allow: INVITE,ACK,CANCEL,BYE,INFO,MESSAGE,SUBSCRIBE,NOTIFY
X-Chat-Id: 359629bbcfd8070224632.fukuda445@act2343.eoa.telcom.oki.co.jp
Content-Type: text/plain
Content-Length: 42

sip:fukuda445@act2343.eoa.telcom.oki.co.jp
[F8]
SIP/2.0 200 OK
Call-ID: 6a401c4c-50812d60621c4d869e53942c154a6001@act2865
CSeq: 1 MESSAGE
From: sip:fukuda445@act2343.eoa.telcom.oki.co.jp;tag=333126732
To: <sip:echo@act2343.eoa.telcom.oki.co.jp>;tag=jtag-4f623ef6-4292-433d-b3f0-e53c3718534f
Via: SIP/2.0/UDP 172.21.164.217:5060;branch=z9hG4bK175f1c4c
Content-Length: 0
Server: OKI CenterStage AP V2.0
X-Chat-Id: 359629bbcfd8070224632.fukuda445@act2343.eoa.telcom.oki.co.jp
Appendix 1: Description of EchoServlet Program
As described earlier, EchoServlet is an application that converts a received message from OKISoftphone to upper case and sends it back.
List 4 shows the source code of the Echo servlet.
List 4: EchoServlet.java
001: package com.oki.sip.tutorial;
002:
003: import java.io.*;
004: import javax.servlet.*;
005: import javax.servlet.sip.*;
006: import com.oki.sip.equips.signal.BasicSipServlet;
007:
008: public class EchoServlet extends BasicSipServlet {
009:
010:     public void init() throws ServletException {
011:         super.init();
012:     }
013:
014:     /**
015:      * Method invoked upon receiving MESSAGE method.
016:      */
017:     protected void doMessage(SipServletRequest req)
018:         throws ServletException, IOException
019:     {
020:         if(req.getContentLength() == 0) {
021:             initChat(req);
022:             return;
023:         }
024:
025:         // Retrieves information from request
026:         String msg = (String) req.getContent();
027:
028:         // Isolates sender information (msender) from message body (mbody).
029:         String msender = null;
030:         String mbody = null;
031:         int index = msg.indexOf("\r\n");
032:         if(index > 0) {
033:             msender = msg.substring(0, index);
034:             mbody = msg.substring(index + 2);
035:             if(mbody.endsWith(":"))
036:                 mbody = mbody.substring(0, mbody.length() - 1);
037:         } else {
038:             msender = msg.trim();
039:             mbody = null;
040:         }
041:
042:         if(mbody == null) {
043:             terminateChat(req);
044:         } else {
045:             sendChat(req, mbody);
046:         }
047:     }
048:
049:     /**
050:      * Method that establishes new chat session.
051:      */
052:     private void initChat(SipServletRequest req)
053:         throws IOException, ServletException
054:     {
055:         SipServletResponse res = createResponse(req, 302);
056:
057:         res.setAddressHeader("Contact", getLocalContact(req));
058:         res.send();
059:         invalidateAppSession(res);
060:     }
061:
062:     /**
050:      * Method that sends messages to chat session.
064:      */
065:     private void sendChat(SipServletRequest req, String mbody)
066:         throws IOException, ServletException
067:     {
068:         Address remote = req.getFrom();
069:         Address local = req.getTo();
070:         String chatID = req.getHeader("X-Chat-Id");
071:
072:         // Sends 200 response.
073:         SipServletResponse res = createResponse(req, 200);
074:         res.send();
075:         invalidateAppSession(res);
076:
077:         // Creates message body.
078:         String emsg = local.getURI().toString() + "\r\n" + mbody.toUpperCase() + ":";
079:
080:         // Gets destination contact information from location management.
081:         SipURI remoteURI = (SipURI) remote.getURI();
082:         Address contact = (Address) getLocation().getContacts(remoteURI, null).get(0);
083:
084:         // Create SIP request.
085:         SipApplicationSession appSession = getSipFactory().createApplicationSession();
086:         SipServletRequest req2 = initiateRequest(appSession,
087:                                                  "MESSAGE",
088:                                                  local,
089:                                                  remote);
090:         req2.setContent(emsg, "text/plain; charset=UTF-8");
091:         req2.setHeader("X-Chat-Id", chatID);
092:         req2.setRequestURI((SipURI) contact.getURI());
093:
094:         // Sends SIP request.
095:         req2.send();
096:     }
097:
098:     /**
099:      * Method that discards chat session.
100:      * 200 response.
101:      */
102:     private void terminateChat(SipServletRequest req)
103:         throws IOException
104:     {
105:         SipServletResponse res = createResponse(req, 200);
106:         res.send();
107:         invalidateAppSession(res);
108:     }
109:
110:     /**
111:      * Method that handles response to MESSAGE sent form SIP servlet.
112:      */
113:     protected void doResponse(SipServletResponse res)
114:         throws IOException, ServletException
115:     {
116:         if(res.getStatus() >= 200)  // If last response,
117:             invalidateAppSession(res);
118:     }
119:
120:     /**
121:      * Method that creates contact information from SipServletRequest.
122:      */
123:     private Address getLocalContact(SipServletRequest req)
124:         throws ServletParseException
125:     {
126:         StringBuffer sb = new StringBuffer();
127:         sb.append("sip:");
128:         sb.append(req.getLocalAddr());
129:         if(req.getLocalPort() > 0) {
130:             sb.append(":");
131:             sb.append(req.getLocalPort());
132:         }
133:
134:         return getSipFactory().createAddress(sb.toString());
135:     }
136:
137:     /**
138:      * Method that creates response that is a copy of X-Chat-Id header.
139:      */
140:     private SipServletResponse createResponse(SipServletRequest req, int code) {
141:         SipServletResponse res = req.createResponse(code);
142:         String chatID = req.getHeader("X-Chat-Id");
143:         if(chatID != null)
144:             res.setHeader("X-Chat-Id", chatID);
145:
146:         return res;
147:     }
148:
149:     /**
150:      * Method that disables AP session.
151:      */
152:     private void invalidateAppSession(SipServletResponse res) {
153:         SipSession session = res.getSession();
154:         SipApplicationSession appSession = session.getApplicationSession();
155:         appSession.invalidate();
156:     }
157: }
The following describes the operation of the program.
The init method specifies initialization parameter settings (<init-param>) in the sip.xml file. This program only initializes its parent class since it has no initialization parameters. (Line 11)
An implementation of the SipServlet init method of SIP Servlet API 1.0 has a bug. Normally, an HTTP servlet can invoke the init method on the parent class without explicitly calling super.init(). In SipServlet, this call is not executed.
Next, invoke the doMessage() method that describes operations of the program body. (Line 17). This method is called each time the SIP servlet container receives a MESSAGE request.
As described earlier, OKISoftphone has three types of doMessage() requests. doMessage() determines the type of the received request to execute an appropriate operation.
First, it checks length of the message body. (Line 20) If its length is 0 (represents a request to establish a new chat session), it passes the operation to the initChat method, which establishes a chat session.
It then extracts the message body from the request (Line 26) and parses the message.(Line 29-40) After parsing the message, the sender's SIP URI on the first line is stored in the local variable msender, the message body on the subsequent lines is stored in the local variable mbody.
If the message body does not exist (mbody == null), which represents a request to discard the chat message, it passes the operation to the terminateChat method, which then discards the session. (Line 43) If the message body exists, which represents a normal message sending, it passes the operation to the sendChat method, which executes the operation specific to this application. (Line 45)
The initChat method creates a response that sends 302 (Line 55), specifies contact information about the SIP servlet (Line 57), and sends it. (Line 58) After sending the response, it discards the SIP application session that is no more required. (Line 59)
It is recommended that you explicitly discard unnecessary SIP application sessions although they are automatically deleted due to a timeout and resources are collected.
The initChat method uses the getLocalContact method (Line 123-135) to get contact information about the SIP servlet. This method generates a SIP URI string from a local host-related method provided by SipServletRequest. Passing the string to the createAddress method of SipFactory generates an Address object, which represents contact information. The getSipFactory used in the method is one of utility methods provided by the base class BasicSipServlet.
sendChat is a method that handles the logic that is specific to this application to generate and send an upper case message from the received message. It first extracts information necessary to create a response message from the SIP request (line 68-70), then creates and sends back a 200 response. (Line 73-75) After sending the response, this application session is discarded.
The code generates a message body conforming to the format of OKISoftphone. (Line 78) The SIP URI from the To header in the request is used as a sender.
In this application, the SIP address used as a sender is extracted from location information. The INVITE method can get contact information from the request header. But in the MESSAGE method (RFC3428), the Contact header can not be included in a request. So you have to specify contact information in another way. This application gets a contact address from location information on the terminal. (Line 82) The getLocation method is a utility method provided by BasicSipServlet to take the location management component.
At this point All necessary information has been specified to get a new request. (line 85) The code generates a request in this session. (Line 86) It specifies the message body (Line 90), an additional header for maintaining the chat session (Line 91), a request URI (Line 92) in the generated request and sends the request. (Line 95) Unlike sending a response, the session is not discarded. The lifecycle of the SIP transaction generated by this request lasts until the time the last response from Softpone is received. This application session is discarded at that time. The doResponse method (Line 113) is invoked when this servlet receives a response. This method determines whether the received response is the last one. If it is the last response, this method discards the application session.
The terminateChat method is used to discard a chat session. In this application it simply sends a 200 response since no resources are used in the session.
Appendix 2: Collaboration with CenterStage-NS
In the preceding sections, you have deployed your application on SIP Servlet Engine, directly connected the engine, and performed validation. These steps are suitable in the development phase. But in the production phase you normally make Sip Servlet Engine work with CenterStage-NS. In this case, requests from a client are delivered to a SIP Servlet Engine application through CenterStage-NS.
It is recommend that you use NumberMap as a means of sending messages from a client to SIP Servlet Engine via CenterStage-NS. Using NumberMap, you can register multiple destinations with a single SIP URI (specifically, its user part) and specify SIP Servlet Engines in list form. CenterStage-NS performs regular health checks on these servers. If one server fails, you can automatically select any available application server.
For information about collaboration with CenterStage-NS, see the administrators guide.
To use the NumberMap function of CenterStage-NS, your application must supports the health check by CenterStage-NS. This health check is performed with an OPTIONS message. You must add a function of sending a 200 OK response to this massage to your application.
The SIP servlet that sends a 200 OK response to OPTIONS is included in sip-demo. But this section provides an example to implement this function without using sip-demo.
List 5 shows additional code that describes the health check. List 6 shows an example of sip.xml. In List 5 the OPTION support function is added to the existing SIP servlet. You can create a SIP servlet that only has this function. In the example below, a request is configured to be delivered to EchoServlet02 only if the user part of the URI is 0123456.
List 5: EchoServlet02.java
[Same parts as EchoServlet are omitted]
   protected void doOptions(SipServletRequest req)
       throws ServletException, IOException
   {
       // Sends 200 response.
       SipServletResponse res = req.createResponse(200);
       res.send();
   }
List 6: sip.xml
 <?xml version="1.0" encoding="UTF-8"?>

 <!DOCTYPE sip-app
    PUBLIC "-//Java Community Process//DTD SIP Application 1.0//EN"
    "http://www.jcp.org/dtd/sip-app_1_0.dtd">

 <sip-app>
   <display-name>SIP Servlet Tutorial</display-name>

   <servlet>
     <servlet-name>echo</servlet-name>
     <servlet-class>com.oki.sip.tutorial.EchoServlet02</servlet-class>
     <load-on-startup/>
   </servlet>

   <servlet-mapping>
     <servlet-name>echo</servlet-name>
     <pattern>
       <or>
         <and>
           <equal>
             <var>request.to.uri.user</var>
             <value>0123456</value>
           </equal>
           <equal>
             <var>request.method</var>
             <value>MESSAGE</value>
           </equal>
         </and>
         <and>
           <equal>
             <var>request.method</var>
             <value>OPTIONS</value>
           </equal>
         </and>
       </or>
     </pattern>
   </servlet-mapping>
   <session-config>
     <session-timeout>1</session-timeout>
   </session-config>
 </sip-app>
Edit sipserver.xml, located in the startup directory of SIP Servlet Engine, to add an IP address of a SIP proxy that sends OPTION to trustedHost.
 <!-- Define filter -->
 <filter classname="com.oki.sip.engine.security.BlockingFilter"/>
 <filter classname="com.oki.sip.engine.security.WLSSecurityManagerFilter">
   <filter-param>
     <param-name>trustedHost</param-name>
     <param-value>siplb.oki.co.jp,172.22.0.3,172.22.0.4</param-value>
   </filter-param>
 </filter>
This list describes the minimum steps required to run EchoServlet02. For a description of formal steps to safely change configurations of running CenterStage-NS, see "CenterStage-NS Maintenance Manual."
Edit numbermap.xml, located under /opt/sipns in the SIP proxy (SIP server), to specify that a SIP request whose user part begins with 0123456 is redirected to SIP Servlet Engine (IP address: 172.21.164.21).
 <configurationparameters>
   <scope>
     <name>NumberMappingRules</name>
     <Entry>
       <TelNumber>0123456</TelNumber>
       <IPAddress>172.21.164.21</IPAddress>
     </Entry>
   </scope>
 </configurationparameters>
Reload the configuration file of CenterStage-NS in order for these changes to take effect.
 $ su ops                  [Become OpS user]
 Password: ***             [OpS use password]
 % hltmon stop             [Stop health check]
 % cnf rld                 [Execute reload command]
 Start......
 Configuration Reloaded.
 End........
 % hltmon start            [Start health check]
 % exit                    [Exit OpS user]
Ensure that Number Map is properly set.
 $ su ops                  [Become OpS user]
 Password: ***             [OpS use password]
 % get number-map        [Command to display NumberMap settings]
 Prefix          IP Address
 ======          ==========
 0123456         172.21.164.21
Ensure that messages can be redirected to the Number Map destination. (health check has succeeded.) The status is Ok if EchoServlet02 sends a 200 OK response to OPTIONS.
 % get mgc-route         [Command to get status of destination]
 IP Address              Status
 ==========              ======
 172.21.164.21            UP
In Number Map redirection, the user part of the SIP-URI is in a form of telephone number. The domain part should be a SIP domain name (ServerNames) set in CenterStage-NS. In his example, the domain name can be "act2343.eoa.telcom.oki.co.jp", "dm1.oii.oki.co.jp", or "172.21.164.21".
 % cnf get ServerInfo ServerNames  [Command to get config value]
 Start......
 Scope: ServerInfo
 Name : ServerNames
 Value: act2343.eoa.telcom.oki.co.jp,dm1.oii.oki.co.jp,172.21.164.21
 End........
You must not register a user of the telephone number (e.g. sip:0123456@act2343.eoa.telcom.oki.co.jp) with the location server.
Add SIP-URI to be redirected (e.g. sip:0123456@act2343.eoa.telcom.oki.co.jp) to an address book and register it with a buddy list. Send MESSAGE from the chat screen.
-
*1: For example, you can deploy applications from Ant.
*2: For more information, see the OKISoftphone specification.
Last Modified:Thu Apr 08 15:33:06 JST 2004
| Copyright © 2003, 2004 Oki Electric Industry Co.,Ltd. All rights reserved. |