| SIP Servlet Engine© Documentations |
| Top > Overview > sip-admin Users Guide |
sip-admin Users Guide
Introduction
This document describes how to use the sip-admin that is one of the demo applications provided with SIP Servlet Engine.
Overview of the sip-admin
sip-admin is a demo application which uses the user management interface, location management interface, presence ACL*1 management interface that are the SPI provided with SIP Servlet Engine. In addition, this application works as an administration tool when performing SIP-based real-time communication.
For example, when performing SIP-based real-time communication, you need to register SIP users with the SIP server, and you may need to specify, for each SIP user, the users who are permitted or rejected to watch its presence information. The sip-admin provides the screens for setting them easily.
You can use this application to search/edit/remove user information, edit security information for SIP users, and resister/search/remove the user information in each SIP user's ACL that manages the users who are permitted or rejected to watch its presence information.
Operating Instructions
The following sections describe how to use the sip-admin. For instructions about how to install, see Installation.
Starting the sip-admin
Specify the following URL in a Web browser.
http://hostname:portnumber/sip-admin/
Then, the sip-admin login screen appears, as shown in the following figure. This means the sip-admin's successful startup.
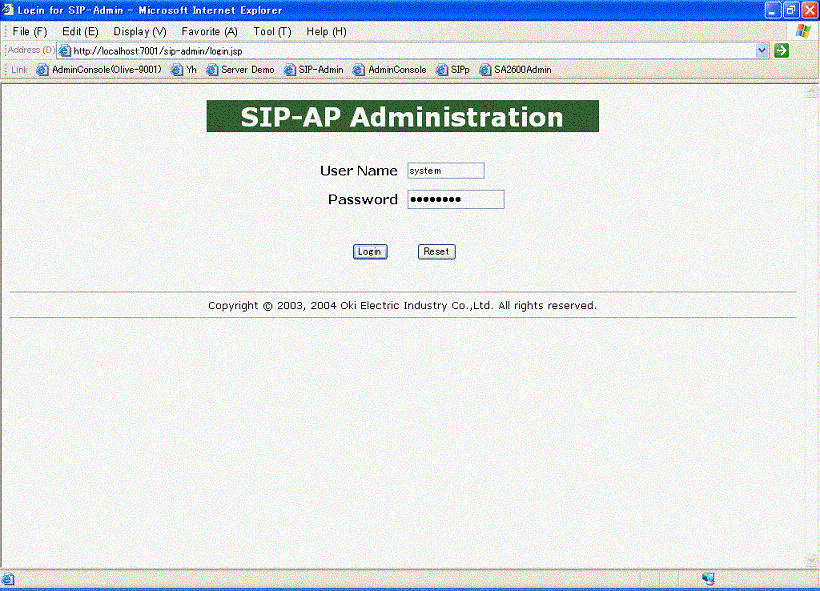
Figure 1 Login screen
Login
When the login screen appears, enter the user name and the password and click the Login button to log in.
- Each input item and its description:
| Item | Description |
|---|---|
| User Name | Enter the user name with WebLogic administrator privileges. |
| Password | Enter the password for the user with WebLogic administrator privileges. Entered password characters are displayed as "*" to protect from prying eyes. |
After the login is completed, the sip-admin Top screen appears, as shown in the following figure.
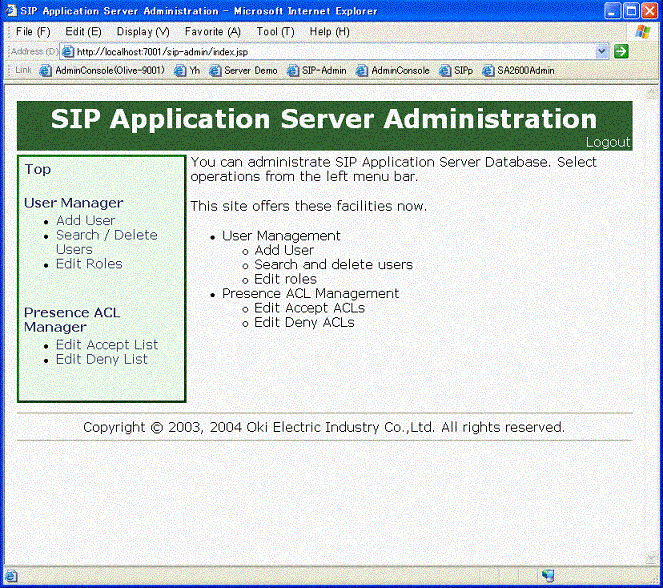
Figure 2 Top screen
User Management
To add a user, search/remove a user, and edit a role, click each link in the User Management menu.
Add User
When you click the User Management-->Add User, the Add User screen appears, as shown in the following figure.
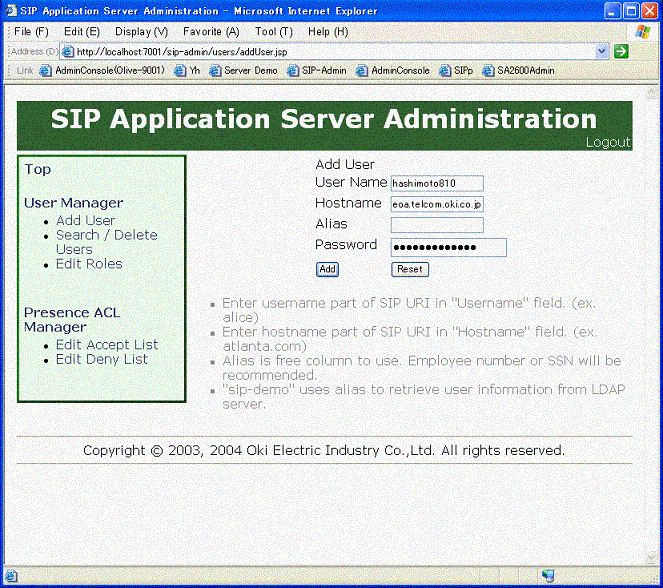
Figure 3 Add User screen
In this screen, you can add a new SIP user. The following table shows the items in this screen and their description.
- Each input item/button and its description:
| Item | Description |
|---|---|
| User Name | Enter the string that represents the user part of the sip-uri. (When registering a user through the sip-admin, specify the same string for the user part of the sip-uri (Subscriber) and the user name of the SIP user (login account)). |
| Host Name | Enter the string that represents the host part (domain part) of the sip-uri. |
| Alias | Enter the alias information. The sip-demo*2 application provides the function that searches users with this alias information. |
| Password | Enter the password for this SIP user. |
| Add | Click to add the SIP user information. If you do not enter the items (User Name, Host Name, and Password) correctly, an error screen appears. |
| Reset | Click to revert the items other than the Host Name to the initial values. The initial values are empty. |
Search/Remove User
When you click the User Management-->Search/Remove User, the Search/Remove User screen appears, as shown in the following figure.
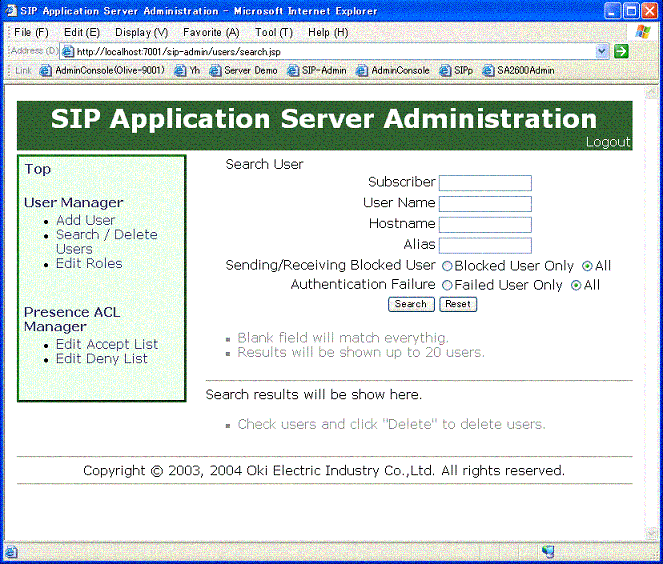
Figure 4 Search/Remove User screen
In this screen, you can search and display SIP users registered with the SIP server, and edit and remove the user information in the search result. The following table shows the items in this screen and their description.
- Each input item/checkbox/button and its description:
| Item | Description |
|---|---|
| Subscriber | Enter the string that represents the user part of the sip-uri. You can enter the wildcard characters ("*", "?") to perform fuzzy search. |
| User Name | Enter the string that represents the user name of the SIP user (login account). You can enter the wildcard characters ("*", "?") to perform fuzzy search. |
| Host Name | Enter the string that represents the host part (domain part) of the sip-uri. You can enter the wildcard characters ("*", "?") to perform fuzzy search. |
| Alias | Enter the alias information. You can enter the wildcard characters ("*", "?") to perform fuzzy search. |
| Incoming/Outgoing Blockage | Select if you search only for incoming/outgoing blocked users. |
| REGISTER Failed | Select if you search only for the users who failed to REGISTER one or more times. |
| Search | Click to search and display the user information which meets the any specified search condition. |
| Reset | Click to revert the last entered item to the initial value. The initial values are empty for the input fields and the Display Both for the checkboxes. |
When you click the Search button, the Search/Remove User screen that displays the search result appears, as shown in the following figure.

Figure 5 Search/Remove User screen with the search result
This screen displays the users who meet the any specified search condition. The maximum number of users is 20.
- Each item/checkbox/button and its description:
| Item | Description |
|---|---|
| Remove checkbox | Select if you remove the user. To remove this user from the server, click the Remove button after selecting here. |
| Remove button | Click to remove the user selected in the Remove checkbox. |
| Online/Offline link | This item shows the status of the displayed users (online/offline). Click the link to move to the Edit User Information screen. |
You can click the Online/Offline link to move to the Edit User Information screen. In this screen, you can edit the user information. 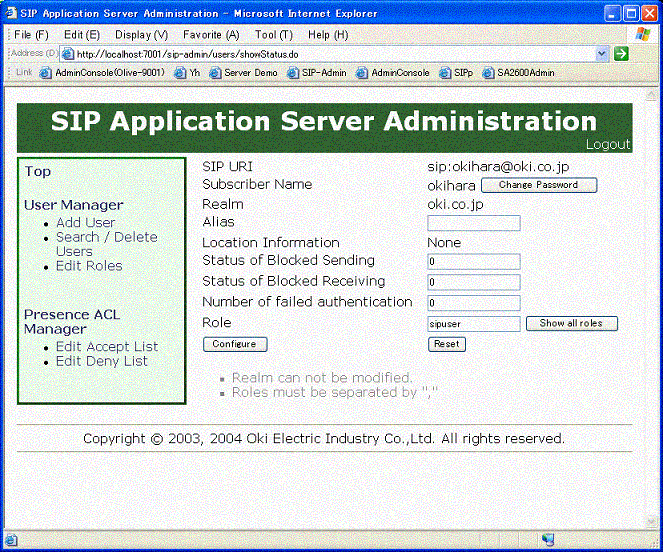
Figure 6 Edit User Information screen
- Each input item/button and its description:
| Item | Description |
|---|---|
| SipURI | This item shows the sip-uri. You can not edit it. |
| Subscriber | This item shows the user name of the SIP user. You can not edit it. |
| Change Password | Click to open the Change Password screen. |
| Realm | This item shows the realm of the SIP user. You can not edit it. |
| Alias | Enter the alias information. |
| Registration Information | This item shows the registration information of the SIP user. (if he/she is online.) |
| Clear Registration Information | Click to clear the registration information of the SIP user. (if he/she is online.) |
| Outgoing Blockage State | 0 represents the non-blockage state and 1 represents the blockage state. |
| Incoming Blockage State | 0 represents the non-blockage state and 1 represents the blockage state. |
| Number of Authentication Failures | This item shows the number of authentication failures. |
| Role | This item shows the security role information of the SIP user. If you want to give multiple roles (privileges) to the user, enter the roles separated by a comma ",". |
| Display All Roles | Click to display all the security roles registered with the AP server. |
| Set | Click in order for your change to take effect. |
| Reset | Click to clear the last entered item. |
Edit Role
When you click the User Management-->Edit Role, the Edit Role screen appears, as shown in the following figure.
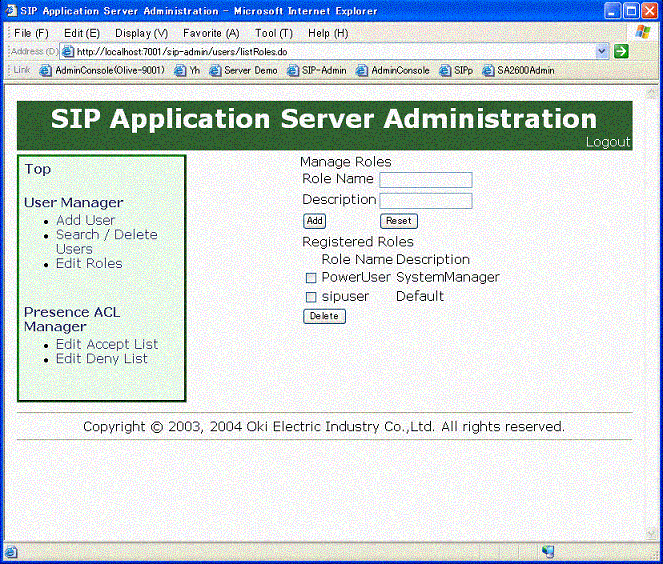
Figure 7 Edit Role screen
In this screen, you can edit security role information used when performing the SIP server authentication. The following table shows the items in this screen and their description.
- Each input item/checkbox/button and its description:
| Item | Description |
|---|---|
| Role Name | Enter the role name used when performing security checking, such as authentication. |
| Description | Enter a description of the corresponding privilege. |
| Add | Click to add the entered role name. |
| Reset | Click to clear the last entered item. |
| Remove | Click to remove the role name selected in the Remove checkbox. The default role sipuser can not be removed. |
| Role Name | This item shows the role names currently registered. |
| Description | This item shows the descriptions of the privileges related to the currently registered role names. |
| Remove checkbox | Select if you remove the role. |
Presence Management
To edit a permission list or rejection list, click each link in the Presence Management menu.
Edit Permission List
When you click the Presence Management-->Edit Permission List, the Edit Permission List screen appears, as shown in the following figure.
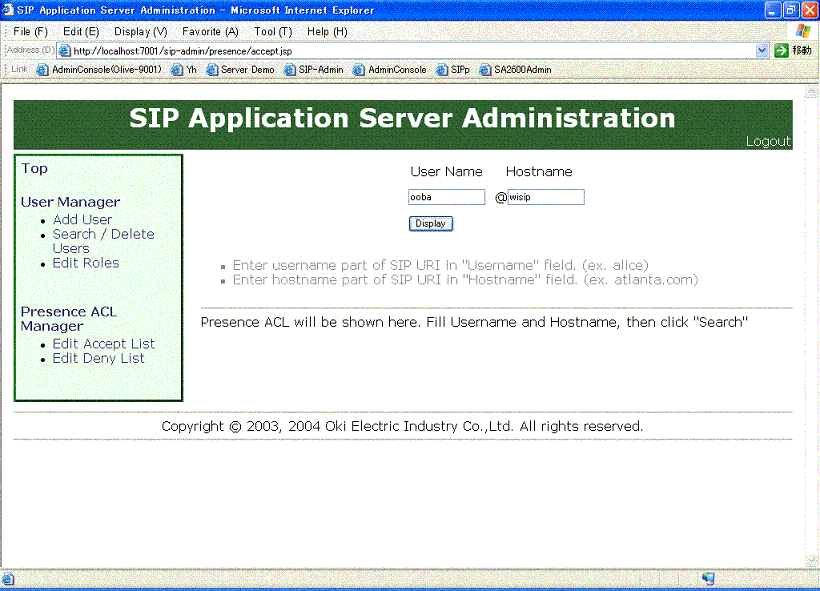
Figure 8 Edit Permission List screen
In this screen, you can edit a permission list that manages the users who are permitted to watch the specified user's presence. The following table shows the items in this screen and their description.
- Each input item/button and its description:
| Item | Description |
|---|---|
| User Name | Enter the string that represents the user part of the sip-uri. |
| Host Name | Enter the string that represents the host part (domain part) of the sip-uri. |
| Display | Click to list the users who are permitted to watch the specified user's presence. |
When you click the Display button, the Edit Permission List screen that shows the display result appears, as shown in the following figure.
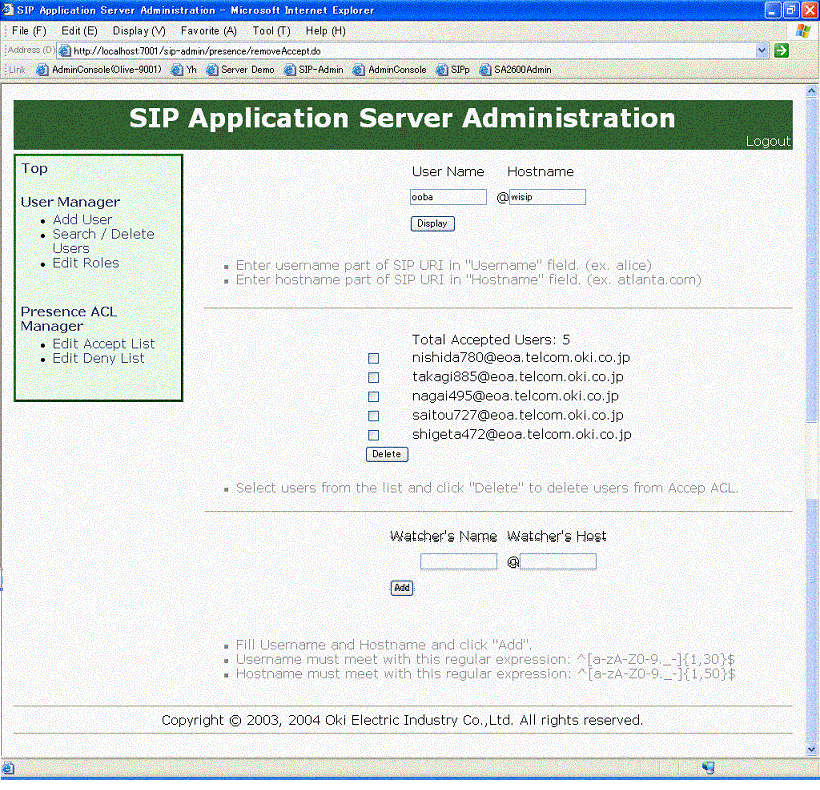
Figure 9 Edit Permission List screen with the display result
You can remove a user from the display result. And you can add the sip-uri for the user who is newly permitted.
- Each input item/checkbox/button and its description:
| Item | Description |
|---|---|
| Remove checkbox | Select if you remove the user. To remove this user from the permission list, click the Remove button after selecting here. |
| Remove button | Click to remove the user selected in the Remove checkbox. |
| Watcher User Name | Enter the string that represents the user part of the sip-uri for the user who is newly permitted to watch the presence. |
| Watcher Host Name | Enter the string that represents the host part of the sip-uri for the user who is newly permitted to watch the presence. |
| Add button | Click to add the specified user to the permission list. |
Edit Rejection List
When you click the Presence Management-->Edit Rejection List, the Edit Rejection List screen appears, as shown in the following figure.

Figure 10 Edit Rejection List screen
In this screen, you can edit a rejection list that manages the users who are rejected to watch the specified user's presence. The following table shows the items in this screen and their description.
- Each input item/button and its description:
| Item | Description |
|---|---|
| User Name | Enter the string that represents the user part of the sip-uri. |
| Host Name | Enter the string that represents the host part (domain part) of the sip-uri. |
| Display | Click to list the users who are rejected to watch the specified user's presence. |
When you click the Display button, the Edit Rejection List screen that shows the display result appears, as shown in the following figure.
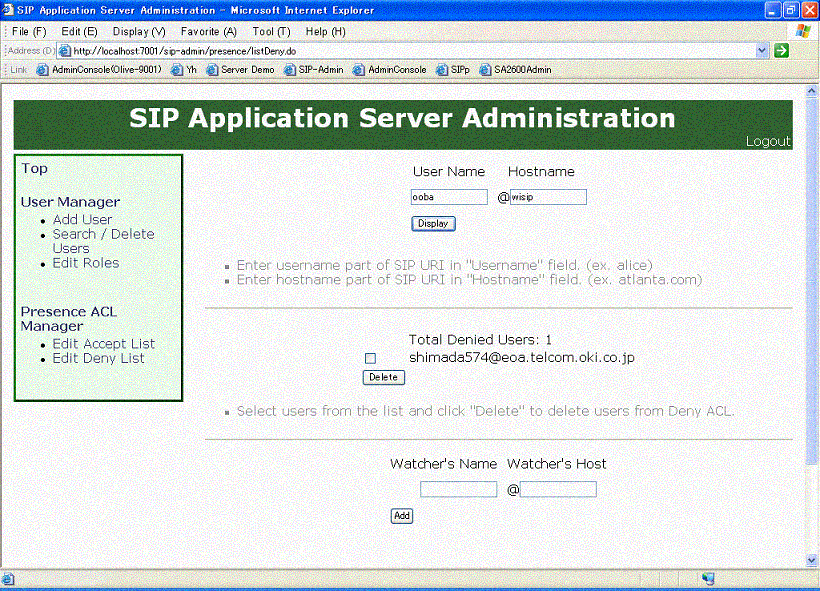
Figure 11 Edit Rejection List screen with the display result
You can remove a user from the display result. And you can add the sip-uri for the user who is newly rejected.
- Each input item/checkbox/button and its description:
| Item | Description |
|---|---|
| Remove checkbox | Select if you remove the user. To remove this user from the rejection list, click the Remove button after selecting here. |
| Remove button | Click to remove the user selected in the Remove checkbox. |
| Watcher User Name | Enter the string that represents the user part of the sip-uri for the user who is newly rejected to watch the presence. |
| Watcher Host Name | Enter the string that represents the host part of the sip-uri for the user who is newly rejected to watch the presence. |
| Add button | Click to add the specified user to the rejection list. |
Logout
To log out of the sip-admin, click the Logout link in each screen. After the logout is completed, the login screen appears again.
-
*1: ACL: Access Control List
*2: sip-demo: a demo application provided with SIP Servlet Engine in combination with sip-admin
Last Modified:Tue Dec 28 15:06:58 JST 2004
| Copyright © 2003, 2004 Oki Electric Industry Co.,Ltd. All rights reserved. |