In previous chapters, you have designed and built a process flow from tasks. Now, you must add the finishing touches that will make your process flows work correctly with eLink.
The eLink Process Design Assistant assigns attributes for task parameters during palette generation. These attributes are used to implement process flows. This section explains the implementation procedure.
When palettes are generated, task attributes are generated for every parameter of the included operations. Similarly, template generation creates attributes for the Root Task of the process. These parameter attributes hold the expressions which instruct the eLink Business Process Option's agents as to how to move data to and from the other components (Data Integration Option and application adapters) within the eLink environment. Default assignments are also generated for each parameter.
So, for example, the attributes and default parameter assignments displayed in Figure 5-1 are created for the Withdrawal task during palette generation. The parameter shown is the input parameter AMOUNT. Because it is an input parameter, it is given the assignment
AMOUNT[*]=$JOB.AMOUNT[*]. The output parameter BALANCE is given the default assignment
$JOB.BALANCE[*]=BALANCE[*].
The syntax and meaning of these expressions is explained in the next section.
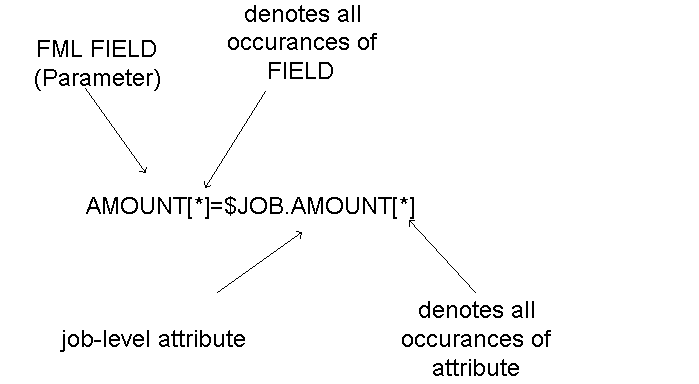
Consider the default parameter assignment for AMOUNT (shown in Figure 5-2).
This statement assigns the job-level value of AMOUNT to the FML field AMOUNT. Using the asterisk in brackets [*], this is done for all occurances of AMOUNT.
The secret to making processes work is to make sure that the right data is flowing through the right places in the process.
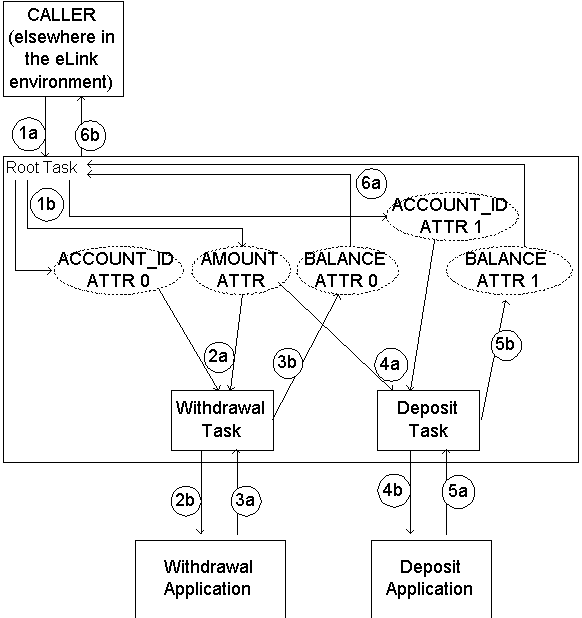
Figure 5-3 shows the data flow through a process.
Refer to Figure 5-3 above as the numbered items are explained.
In Step 1a, the caller calls the Transfer process and supplies three input values – the two account numbers (for the withdrawal and deposit accounts, respectively) and the amount to transfer. The input FML Fields from the caller are ACCOUNT_ID[0], ACCOUNT_ID[1], and AMOUNT[0]. However, before these values can be used, they must be assigned to job-level attributes.
As Step 1b indicates, these inputs are assigned to job-level attributes according to the expressions stored in the Root Task parameter attributes. All movement of data between FML Fields and attributes within a process is controlled by parameter assignment expressions. For inputs and outputs to the entire process (at the start and end of the flow), these expressions are stored in the Root Task parameter attributes. The parameter attributes are automatically added to the Root Task by the eLink Process Design Assistant during Template Generation. For this example, we will use the same names for the FML Fields and the corresponding job-level attributes. Since they are job-level attributes they will be qualified by the prefix $JOB.
Hence, the correct parameter assignment expressions for the Root Task are:
$JOB.ACCOUNT_ID[0]=ACCOUNT_ID[0] This indicates that:
Business Process and Task Parameter Attributes
Parameter Attributes & Default Assignments
Figure 5-1 Generated Attributes & Default Parameter Assignments

Parameter Assignments Explained
Figure 5-2 AMOUNT Parameter Assignment (Analyzed)
Data Flow Through the Business Process Engine
Figure 5-3 Data Flow Through the Transfer Process
Data Flow By the Numbers
$JOB.ACCOUNT_ID[1]=ACCOUNT_ID[1]
$JOB.AMOUNT[0]=AMOUNT[0]
Using a wildcard to refer to all instances of a given attribute or field can further shorten this expression. This is the syntax used by the eLink Process Design Assistant when generating parameter attributes:
$JOB.ACCOUNT_ID[*]=ACCOUNT_ID[*] This indicates that:
$JOB.AMOUNT[*]=AMOUNT[*]
While we will continue to indicate specific instances of the attributes and FML Field occurrences throughout this example, you will typically work with wildcards.
As the process flow runs, the Withdrawal Task becomes ready to execute. In Step 2, the FML Fields for the Withdrawal operation, ACCOUNT_ID[0] and AMOUNT[0] are assigned values from $JOB.ACCOUNT_ID[0] and $JOB.AMOUNT[0] respectively:
ACCOUNT_ID[0]=$JOB.ACCOUNT_ID[0]; We were looking at the FML Fields ACCOUNT_ID[0] and AMOUNT[0] arriving into the process in Step 1. The values stored in the $JOB.ACCOUNT_ID[0] and $JOB.AMOUNT[0] process attributes during Step 1 will be sent (as FML Fields) to the application in Step 2. This explains why the Root and Withdrawal assignments seem like they are reversed in order.
In Step 3, the result of the funds withdrawal is the ending balance for Account 1, so the parameter assignment for the withdrawal result is:
$JOB.BALANCE[0]=BALANCE[0]
As our process flow continues (not illustrated is the dependency that prevents the Deposit Task from starting before the Withdrawal Task has completed), we arrive at Step 4.
In Step 4, the FML Fields to be sent to the Deposit operation, AMOUNT[0] and ACCOUNT_ID[0] are assigned values from $JOB.AMOUNT[0] and $JOB.ACCOUNT_ID[1] respectively. Note that the second instance of the Account Number (the Deposit Account's Number) is being used. However, since the Deposit operation only expects a single Account Number occurrence zero of the FML Field must be sent. This implies the following parameter assignments:
AMOUNT[0]=$JOB.AMOUNT[0] The result of the funds deposit is the ending balance for Account 2, so the parameter assignment for the deposit result is:
$JOB.BALANCE[1]=BALANCE[0]
Again we can see that the second instance of the Balance process attribute is being updated.
At this point, we have the resulting Balance for the Withdrawal Account in the first instance of the job-level Balance attribute. The second instance of the Balance attribute contains the final Balance for the Deposit Account. Our caller is expecting these results to be returned in two occurrences of the FML Field BALANCE. Therefore, the parameter assignments on the output side of the process (Step 6) are:
BALANCE[0]=$JOB.BALANCE[0]; The data types supported by FML32 and the Business Process Engine must be mapped to support moving data between the two environments. When adding an attribute for use in a PerformCondition, use Table 5-1 to determine the data type of the attribute.
The type of the Process attribute will be either an Integer (signed long integer), String, or DateTime. The eLink agents will convert values in the best possible way. For example, eLink does not support a native DateTime value. These values will be converted to and from FML strings. Similarily, floating point FML fields will be stored as strings. The eLink agents will use the datatype information encoded within the FML Field Ids, together with the attribute type information to determine what conversions to make.
Char
CxxIcString
String
CxxIcString1
CARRAY
Not Supported
String
CxxIcDateTime2
Short
CxxIcInteger
Long
CxxIcInteger
Float
CxxIcString
Double
CxxIcString
You can use conditions to manage the flow in a process. There are two mechanisms for specifying conditions: PerformConditions and IterateConditions.
AMOUNT[0]=$JOB.AMOUNT[0]
ACCOUNT_ID[0]=$JOB.ACCOUNT_ID[1]
BALANCE[1]=$JOB.BALANCE[1]
Data Type Management
Table 5-1 Data Type Equivalents
FML type
Process Engine type
Working with Conditions
A PerformCondition has the following general format:
attribute_or_property operator value [ logical operator ]
Attribute and property names are case-sensitive, and must be entered exactly as stored in the database. Usually, such names are uppercase. The specified value must have the same datatype as the attribute; for example, integer or string.
You can combine attribute-operator-value statements with logical operators to form complex PerformConditions. The maximum length of a PerformCondition is 254 characters.
A PerformCondition may specify attributes defined for the job or task. To distinguish between the two, you must prefix the attribute name with one of the following strings:
General form of a PerformCondition or IterateCondition
Attributes in PerformConditions
The prefix is required, even if the attribute is not defined for both the job and the task.
For example, this PerformCondition checks if the value of the current job's
AMOUNT_OWED attribute is greater than 10,000:
$JOB.AMOUNT_OWED > 10000
You can use the Batch Registry to get a list of attributes for a job or task class. Remember that attribute names are case-sensitive, and must be entered exactly as defined for the job or task.
In addition to attributes, PerformConditions can also use some properties defined for a job or task. For example, the following PerformCondition will skip a task if its priority is less than 5:
$TASK.PRIORITY < 5
One important point concerns the
$TASK.$ITERATE_COUNT and
$TASK.$PERFORM_COUNT properties: they are incremented after the PerformCondition is evaluated, and before the iterate condition is evaluated. So, to iterate a task three times, you would use the following:
$TASK.ITERATE_COUNT < 3
This means: "If this task has not been iterated three times already, iterate it."
Certain restrictions apply to using properties in PerformConditions; see Using internal attributes for more information.
A PerformCondition can include the operators in Table 5-2. Some operators are valid only with certain data types.
Properties in PerformConditions
Operators used in PerformConditions
Attribute data types include string, integer, and DATETIME. String values must be enclosed in single quotes, whether the value is a single word or many words. String values are case-sensitive. They can contain spaces, semi-colons, and double quotes. For example, the following strings are legal:
However, these two strings are not equivalent:
To test
DATETIME attributes, you must specify the date and time value as:
DATETIME(value)
The value format is [yy]yy-mm-dd [hh:mm:ss]. For example:
$JOB.INVOICE_DUE_DATE > DATETIME(1995-04-21)
You can also test
DATETIME values against the
CURRENT keyword, which evaluates to the current date and time. For example, to determine if an invoice is past due, you might use this PerformCondition:
$JOB.INVOICE_DUE_DATE < CURRENT
You can combine attribute-operator-value statements with logical operators to form compound statements. Enclosing statements in parentheses is optional; you need parentheses only to change the standard left-to-right order of evaluation (see next section).
For example, to determine if a candidate is eligible for a loan, you might use this PerformCondition:
$JOB.LOAN_AMOUNT > 500 AND $JOB.REFERENCES >= 3 OR $JOB.VP_APPROVAL = 'TRUE'
You can use parentheses to group attribute-operator-value statements. For example, you could write the PerformCondition in the previous section like this:
($JOB.LOAN_AMOUNT > 500) AND You can also use parentheses to change the order in which InConcert evaluates the parts of a PerformCondition. InConcert evaluates statements in left-to-right order. Using parentheses, you can make sure that related statements are evaluated together.
For example, this PerformCondition evaluates to true if the date of hire is before January 1, 1991 and the person has a Masters or Ph.D. degree.
$JOB.HIRE_DATE < DATETIME(1991-01-01) AND But this PerformCondition evaluates to true if the person has a Masters degree and was hired before January 1, 1991, or the person has a Ph.D.
($JOB.HIRE_DATE < DATETIME(1991-01-01) AND You can include an internal attribute in a PerformCondition, such as Due Date or Duration. In most cases, however, you cannot include an internal attribute in a PerformCondition. The reason is that most built-in attributes are really properties, not attributes. You cannot include properties in a PerformCondition.
A property is auxiliary information about an object in the database, such as a process or task. Many properties appear as read-only "attributes" in the InConcert Property Sheet, such as Process Created By, User Working On, Time Acquired, and Time Completed. Others, such as the Role, Pool, Due Date, Duration, and Priority, are modifiable task properties; AutoActivate is another modifiable task property.
One of the few built-in attributes that you can include in a PerformCondition is Application, because this is a real attribute. To include a built-in attribute in a PerformCondition, you must specify the attribute name as it is stored in the database, not as it appears in the Attributes window. The Application attribute's real name is
IC_APPLICATION. You can use the Batch Registry utility to list other attribute names for different objects in the database; for details, see the Business Process Option Administration Guide.
Table 5-3 lists the built-in internal task attributes. Attributes for tasks in process instances are read-only. For example, the Acquired By attribute indicates which worker acquired a task. The Business Process Engine sets this attribute automatically for each task in an active process; it cannot be changed during process design.
The following restrictions apply to the attribute types shown in Table 5-3:
Compound statements
Grouping statements with parentheses
($JOB.REFERENCES >= 3) OR ($JOB.VP_APPROVAL = 'TRUE')
($JOB.DEGREE = 'MASTERS' OR DEGREE = 'Ph.D.')
$JOB.DEGREE = 'MASTERS') OR $JOB.DEGREE = 'Ph.D.'
Using internal attributes
Summary of built-in task attributes
An attribute is information about a task or process and is displayed in the task window. An attribute might be information the worker uses while performing the task (such as the due date or priority) or information the worker supplies to complete the task (such as total cost).
Attributes can be defined by their scope:
About attribute values
When you set an IterateCondition and Iterate Count on a parent task, the task's subtasks do not automatically inherit that count.
For example, you might expect that setting a parent task's Iterate Count to 3 – meaning the task should iterate 3 times when its IterateCondition is satisfied – would cause each subtask itself to iterate 3 times for every 1 time the parent iterates. This would result in each subtask being performed a total of 9 times. But this is not the case.
Instead, the subtasks' Iterate Counts are reset to zero (0) at the end of each iteration of the parent task, which results in the subtasks being performed only as many times as the parent task itself is performed – in our example, 3 times.
Thus we can see that the Iterate Count when specified on a parent task has the following semantics: Iterating a parent task means to iterate as a whole the group consisting of the parent task plus all its subtasks.
The following are additional examples of PerformConditions:
$JOB.CLAIM_AMOUNT < 1000
The value of the
CLAIM_AMOUNT attribute is less than 1000.
$JOB.SIZE > 5 AND $JOB.ORIGIN = 'New York'
The value of the
SIZE attribute is greater than 5 and the value of the
ORIGIN attribute is New York.
($JOB.CLAIM_AMOUNT > 1000) AND ($JOB.CLAIM_AMOUNT < 10000)
The value of the
CLAIM_AMOUNT attribute is greater than 1000 and less than 10000.
($JOB.REPORT_TYPE = 'shipping damage') AND The value of the
REPORT_TYPE attribute is shipping damage and the report was filed after January 15, 1995 at 5:00 PM.
Before adding PerformConditions to a task, you must add some key attributes to it. You use the Design Pad to add Perform and IterateConditions to tasks. The Perform Condition and Iterate Condition Wizards consist of pages that assist you as you create an InConcert Perform or IterateCondition.
To specify a PerformCondition:
Iterating tasks and subtasks
Examples of PerformConditions
($JOB.DATE_FILED > DATETIME(1995-01-15 17:00:00))
Adding PerformConditions to tasks
Instructions for Specifying a PerformCondition
 button. The first page of the Perform Condition Wizard appears,
shown in Figure 5-4.
button. The first page of the Perform Condition Wizard appears,
shown in Figure 5-4.
Figure 5-4 First page of the Perform Condition Wizard
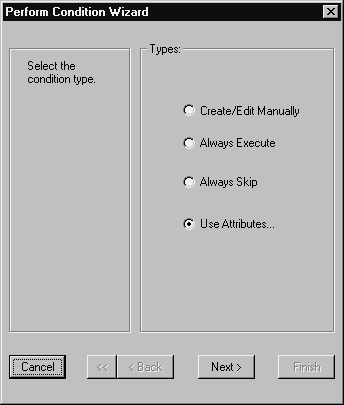
If you want to make changes on an earlier page while you are working in the Perform Condition Wizard, you can return to that page by clicking the Back button.
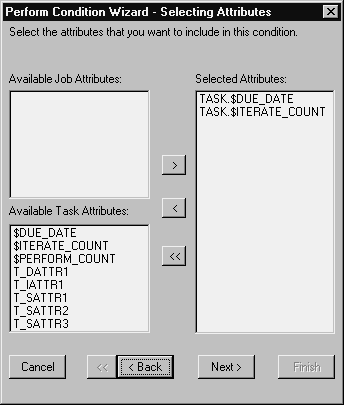
To create a PerformCondition based on task attributes:
Figure 5-5 The Selecting Attributes page
Note:
eLink features dynamic creation of attributes at runtime. As each task in a process (beginning with the Root Task) executes, parameter assignment expressions are evaluated. An incoming FML field's contents may need to be stored in a process-level (or a parent task's) attribute. If this attribute does not already exist, it will be created by the eLink agent. While this saves a geat deal of work, you may find that you need to manually create some of these attributes at design time in order to use them in perform or iterate conditions.
To remove a job or task attribute from the new PerformCondition, select the attribute in the Selected Attributes listbox and click the left arrow button to move it back to the Available Job Attributes or Available Task Attributes listboxes.
To remove all attributes from the new PerformCondition, click the double arrow button.
Figure 5-6 The Creating Expressions page
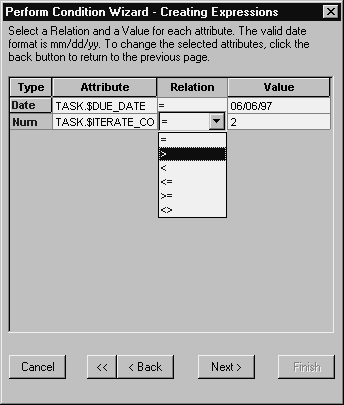
You can change the attribute row order by dragging the button at the left edge of the row up or down the column.
Figure 5-7 The Combining Expressions page
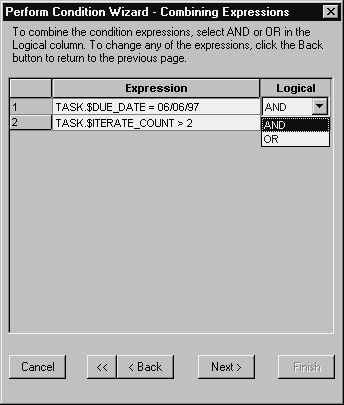
You can change the attribute row order by dragging the button at the left edge of the row up or down the column.
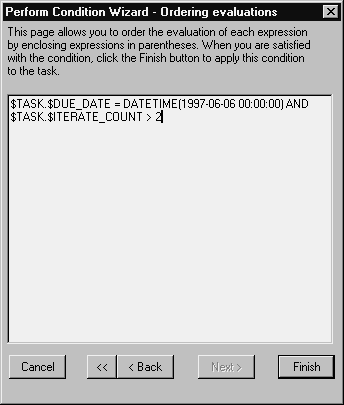
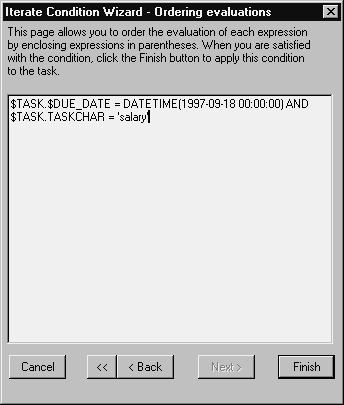
Figure 5-8 The Ordering Evaluations page
To create a PerformCondition with evaluation expressions:
Figure 5-9 The Ordering Evaluations page
To specify an IterateCondition:
button. The first page of the Iterate Condition Wizard appears,
shown in Figure 5-10.
Figure 5-10 First page of the Iterate Condition Wizard

To create an IterateCondition based on task attributes:
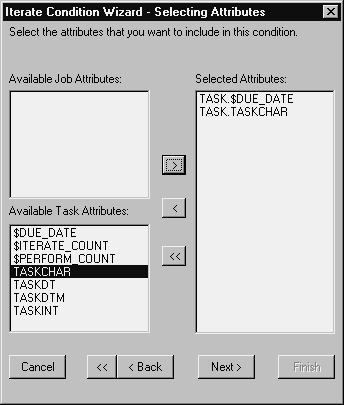
Figure 5-11 The Selecting Attributes page
To remove a job or task attribute from the new IterateCondition, select the attribute in the Selected Attributes listbox and click the left arrow button to move it back to the Available Job Attributes or Available Task Attributes listboxes.
To remove all attributes from the new IterateCondition, click the double arrow button.
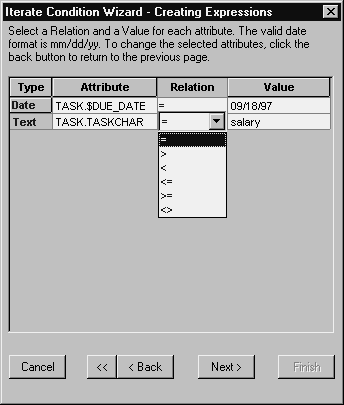
Figure 5-12 The Creating Expressions page
You can change the attribute row order by dragging the button at the left edge of the row up or down the column.
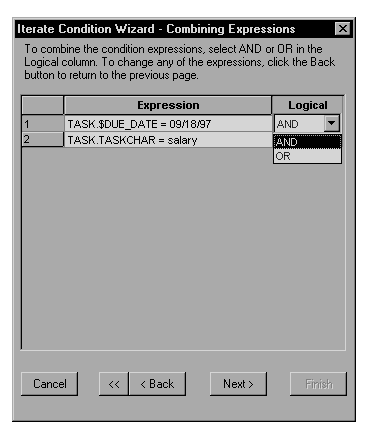
Figure 5-13 The Combining Expressions page
You can change the attribute row order by dragging the button at the left edge of the row up or down the column.
Figure 5-14 The Ordering Evaluations page
To create an IterateCondition with evaluation expressions:
Figure 5-15 The Ordering Evaluations page
The Process Manager tool lets you view the status of processes in progress. The Business Process Engine also allows you to start processes within this tool. However, since agents are responsible for starting all processes in the eLink environment, you will never need to manually start processes with the Process Manager. In fact, eLink will not successfully run processes started manually.
Processes started manually with the Process Manager will not run correctly in eLink. Processes can be correctly started in the following ways:
You have privileges to manage any of the processes displayed in the Current Processes folder in the Process Manager window.
You can perform the following procedures with the Process Manager:
Managing Processes with the Process Manager
To use the Process Manager, you must have already started the Business Process Window by clicking on the Edit Flow button in the Business Interface Window.
To start the Process Manager:
In the main window, choose File > Open > Process Manager, or click the
The icons to the left of each process name represent the status of the process. When you move your cursor over the icon, the status bar shows you the status message.
The Process Manager includes two standard folders:
Opening the Process Manager
Instructions for Starting the Process Manager
 button on the toolbar. The Process Manager window appears with two panes. The pane on the left displays your folders. The pane on the right displays the contents of the open folder. An example is shown in Figure 5-16.
Figure 5-16 The Process Manager window
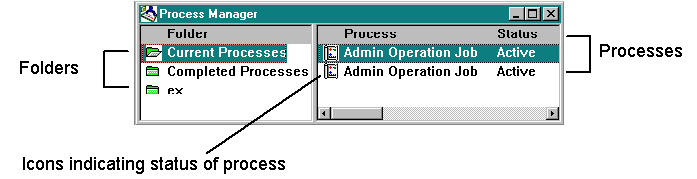
You can also create personal folders to group processes. In the example above, the user has created a personal folder and copied process definitions that she regularly starts.
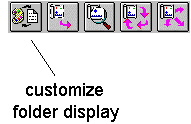
In addition to the main Process Manager window, the buttons shown in Figure 5-17 appear on the main toolbar. Because eLink automates the starting of processes, only the customize button is useful.
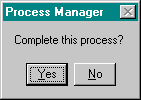
A process automatically completes when the last task in the process is done. You can also force completion of a process.
When you force process completion, tasks with either a Waiting or Ready status are skipped. Tasks that are Acquired are removed from the worker's list of tasks. Changes to documents are discarded, unless the worker checked in the document before you forced the process to completion.
You cannot force a process to completion if another user has acquired the root task. If you acquired the root task, or the root task is Activated or Waiting, you can still complete the process.
To force a process to completion:
Figure 5-17 Process Manager toolbar buttons
Completing a process
Instructions for Forcing a Process to Completion
When a process is completed, it is moved into your Completed Processes folder. The process remains in that folder until you delete it.
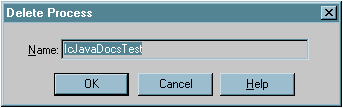
To delete a completed process:
Figure 5-19 The Delete Process dialog box
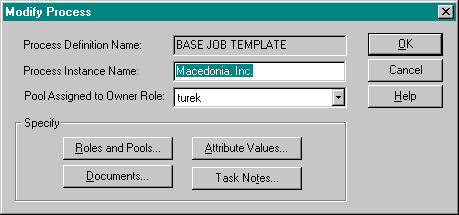
You can modify assignments for tasks that have not yet been completed. These assignments include:
When you modify a process, that process automatically suspends. When you are done modifying the process, it automatically resumes.
To modify parts of a process:
Instructions for Modifying Parts of a Process
Figure 5-20 The Modify Process dialog box
You can suspend and resume an active process. (You cannot suspend a completed process.) When you suspend a process, the status of all Ready tasks changes to Waiting.
To suspend a process:
Select the process you want to suspend in your Current Processes folder. Choose Process > Suspend. The icon for the process indicates the process is suspended.
To resume a process:
Select the suspended process in your Current Processes folder. Choose Process > Resume. The icon for the process indicates that the process is active.
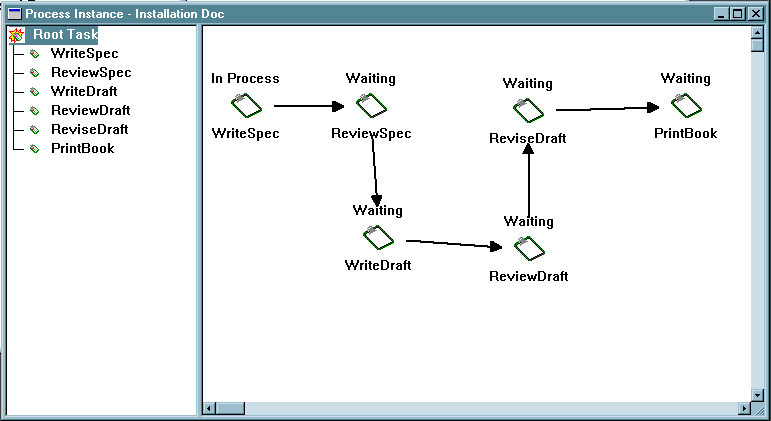
You can view the status of any process in your Process Manager window.
Viewing the status of a process displays a window with two panes. The left pane is the hierarchy pane, which displays the structure of the process. The right pane is the task pane; it displays the flow of the process at a single level in the process structure. For each task in the process, the task pane displays the task name and the status of the task.
You can display other information about the tasks in the task pane, for example, the time completed. You can also view details about individual tasks in the process, which include the following information:
Instructions for Suspending a Process
Instructions for Resuming a Process
Viewing the status of a process
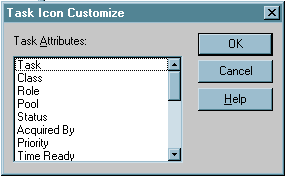
The Process Status window adds a special button to the toolbar, which allows you to change the information displayed above each task.
To view the status of a process:
Instructions for Viewing the Status of a Process
To view other levels of the process:
Select a task in the left pane. Do one of the following:
Figure 5-21 The Process Status window
Instructions for Viewing Other Levels of the Process
To change the information displayed for each task:
Choose View > Customize, or click the
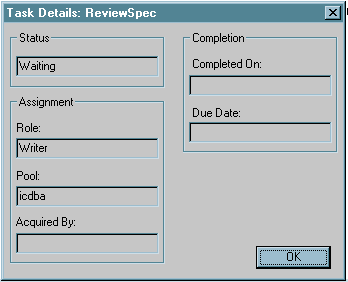
To view the details of a specific task:
Select a task in the hierarchy pane. Choose Task > Show Details. The Task Details window appears, shown in Figure 5-23. When you are done viewing the information, click OK to dismiss the dialog box.
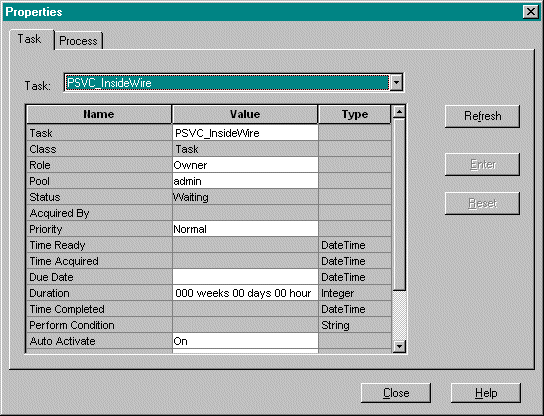
To view the properties of a task:
Select a task in the right pane of the Process Manager window. Choose View > Properties. The Task Property Sheet appears in read-only mode, shown in Figure 5-24, allowing you to view but not change the task properties. Click Close to close the Property Sheet.
The Process Manager lets you organize your work environment: you can use folders to organize your processes, and you can customize how your processes are displayed in a folder.
The Process Manager window includes two standard folders: Current Processes and Completed Processes. To help organize your work in the Process Manager, you can:
Instructions for Changing the Information Displayed for Each Task
 button on the toolbar. The Task Icon Customize dialog box appears, shown in Figure 5-22. Select the attribute you want to display in the Task Attributes listbox and click OK.
Figure 5-22 The Task Icon Customize dialog box
Instructions for Viewing the Details of a Specific Task
Figure 5-23 The Task Details dialog box
Instructions for Viewing the Properties of a Task
Figure 5-24 The Task Property Sheet
Using folders to organize the Process Manager
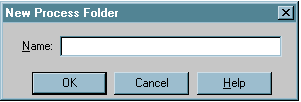
To create a new folder:
Instructions for Creating a New Folder
Figure 5-25 The New Process Folder dialog box
You can keep copies of process definitions in Process Manager folders. You can select these process definitions to start new processes, rather than searching for process definitions each time you need to start a process.
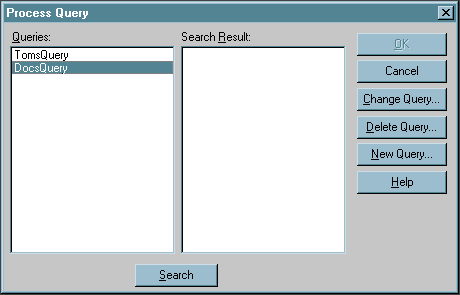
To find a process definition and add it to a folder:
Figure 5-26 The Process Query dialog box
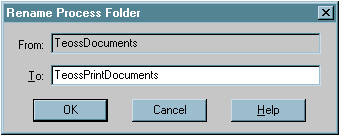
To rename a folder:
Select the folder you want to rename. Choose Folder > Rename. The Rename Folder dialog box appears, shown in Figure 5-27. Enter a new name for your folder in the To box and click OK.
Figure 5-27 The Rename Process Folder dialog box
You can move processes between folders using either of these methods:
With the Edit menu, you can copy or move processes. With drag-and-drop, you can only copy processes.
You can copy and move processes freely between personal folders. You can also copy processes in the Current Processes folder and Completed Processes folder. However, you cannot change the contents of the Current Processes folder by moving a process into or out of the folder. Nor can you move a process into the Completed Processes folder.
To copy or move a process with the Edit menu:
To copy a process with drag-and-drop:
To delete a personal folder:
You can remove a process definition from a personal folder, or you can delete a process definition from the system. You must have the necessary privileges to delete a process definition from the system. (If you created the process definition, you automatically have the privileges necessary to delete it.)
To remove a process definition from a personal folder:
To remove a process definition from a personal folder and delete it from the system:
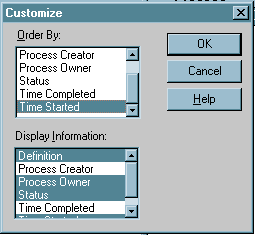
You can customize how processes are displayed in Process Manager folders by specifying the order in which the processes are displayed and what information is displayed about them. You can sort processes using different options, such as the Process owner or the Time completed. When processes are sorted, they are displayed in groups.
You can also specify the information that is displayed about each process, such as the process definition name or status.
To organize your process display:
Instructions for Copying or Moving a Process with the Edit Menu
Instructions for Copying a Process with Drag-and-Drop
Instructions for Deleting a Personal Folder
Deleting processes from personal folders
Instructions for Removing a Process Definition from a Personal Folder
Instructions for Removing a Process Definition from a Personal Folder and Deleting It from the System
Customizing how processes are displayed in folders
Instructions for Organizing Your Process Display
button on the toolbar. The Customize
Folder Display dialog box appears, shown in Figure .
Figure 5-28 The Customize Folder Display dialog box