|
|
|
|
|
|
Installing the Software
This section provides information on installing the BEA Java Adapter for Mainframe (JAM) software.
Installation topics are grouped by platform, by component (JAM or CRM) if the component installations differ for particular platforms, and by type of installation. Console mode or graphics mode installations are available. Also, you may have to run the installation program multiple times depending on your configuration.
Action List
As you install the JAM software, see the action list below and refer to the appropriate information sources.
Prerequisites
Before you install JAM, you should complete the following tasks:
|
|
Your action... |
Refer to... |
|---|---|---|
|
1 |
You should have verified that all required pre-installation tasks have been performed. |
Installing on UNIX in Console Mode
To install the JAM software in console mode on UNIX, run the BEA standard installation shell script for the particular platform upon which you wish to install JAM. The scripts are:
Select which components to install, and where to install them, based on your configuration requirements.
Perform the following steps to install the JAM software in console mode on a certified UNIX platform:
$ su -
Password:
> cd /mnt
mnt> ls
wljam42_Sol7.bin wljam42_Sol8.bin wljam42_Hp.bin wljam42_Aix.bin wljam42_Nt.exe mvsnt mvsunix os390.tar
/mnt> export JAVA_HOME=<BEA_HOME>/jdk130
/mnt> export PATH=<BEA_HOME>/jdk130/bin:$PATH
Example: If your BEA Home directory is /usr/bea, then these environment variables should be set as follows:
/mnt> export JAVA_HOME=/usr/bea/jdk130
/mnt> export PATH=/usr/bea/jdk130/bin:$PATH
mnt> sh wljam42_Sol7.bin -i console
Note: Listing 2-1 provides an example of a default console mode installation with the assumption that WebLogic Server, BEA WebLogic Process Integrator, and BEA WebLogic XML/Non-XML Translator are installed. For an explanation of the various installation options, see "Installing in Graphics Mode."
Listing 2-1 Console Mode Installation Example
Preparing to install...
Preparing CONSOLE Mode Installation...
=================================================================
BEA WebLogic Java Adapter for Mainframe(created with InstallAnywhere by Zero G)
-----------------------------------------------------------------
=================================================================Introduction
------------
This installer will guide you through the installation of 'WebLogic Java Adapter for Mainframe'. On each step, answer the questions provided.  Type "quit" at any time to exit the installer.
PRESS <ENTER> TO CONTINUE: <ENTER>
=================================================================License Agreement
-----------------
Please read before installing:
BEA WebLogic Java Adapter for Mainframe(r) v4.2 Software License
The Software and accompanying documentation (respectively "Software" and "Documentation") ...
.
.
.
User Count means the number of users specified on the uniform product code label provided on the outside packaging of the Product.
PRESS <ENTER> TO CONTINUE: <ENTER>
Connection Management Software means the computer programs ...
.
.
.
... countries
Copyright 2000, 1996-1999 BEA Systems, Inc., or its suppliers, as applicable.
All Rights Reserved.
DO YOU AGREE WITH THE TERMS OF THE LICENSE? (Y/N): Y
=================================================================Choose Install Set
------------------
Please Choose the Install Set to be installed by this installer.
  ->1- Typical Install
    2- Customize...
ENTER THE NUMBER FOR THE INSTALL SET, OR <ENTER> TO ACCEPT THE DEFAULT  1
=================================================================
Choose BEA Home Directory
-------------------------
    1- Create a New BEA Home
    2- Use Existing BEA Home
Enter a number:  2
    1- //usr/wlc1bea
    2- //usr/bea
    3- //usr/rosetta
    4- /usr/laguna/bea
Existing BEA Home: 2
=================================================================Choose Product Directory
------------------------
    1- Modify Current Selection (/usr/bea/wljam4.2)
    2- Use Current Selection (/usr/bea/wljam4.2)
Enter a number: 2
=================================================================
Installing...
-------------
[==================|==================|==================|======]
 [------------------|------------------|------------------|------]
=================================================================
Install Complete
----------------
Congratulations. 'WebLogic Java Adapter for Mainframe' has been successfully installed to:
   /usr/bea/wljam4.2
PRESS <ENTER> TO EXIT THE INSTALLER: <ENTER>
Uninstalling on UNIX in Console Mode
If you install JAM in console mode, you must uninstall it in console mode.
To uninstall JAM in console mode:
> cd /usr/bea/wljam4.2/uninstaller
/usr/bea/wljam4.2/uninstaller> sh Uninstall -i console
Listing 2-2 displays a JAM uninstallation.
Listing 2-2 Console Mode Uninstallation Example
Preparing CONSOLE Uninstall...
=================================================================
BEA WebLogic Java Adapter for Mainframe (InstallAnywhere Uninstaller by Zero G)
-----------------------------------------------------------------
About to uninstall...
BEA WebLogic Java Adapter for Mainframe
This will completely remove all components installed by InstallAnywhere. It will not remove files and folders created after the installation.
PRESS <ENTER> TO BEGIN THE UNINSTALL, OR 'QUIT' TO EXIT THE UNINSTALLER: <ENTER>
=================================================================
Uninstall...
------------
[==================|==================|==================|======]
[------------------|------------------|------------------|------]
================================================================
Uninstall Complete
------------------
All items were successfully uninstalled.
PRESS <ENTER> TO EXIT THE UNINSTALLER: <ENTER>
Installing in Graphics Mode
Both the JAM and the CRM components are installed on Windows NT and non-mainframe UNIX-based machines with the JAM installation program. This installation program is a standard BEA installation program. The file names of the JAM installation program are as follows:
Select which components to install, and where to install them, based on your configuration requirements.
Perform the following steps to install the JAM software:
On Windows NT:
The Run window displays.
The Introduction screen (see Figure 2-1) displays.
On UNIX:
$ su -
Password:
> cd /mnt
/mnt> ls
wljam42_Sol7.bin wljam42_Sol8.bin wljam42_Hp.bin wljam42_Aix.bin wljam42_Nt.exe mvsnt mvsunix os390.tar
/mnt> export JAVA_HOME=<BEA_HOME>/jdk130
/mnt> export PATH=<BEA_HOME>/jdk130/bin:$PATH
Example: If your BEA Home directory is /usr/bea, then these environment variables should be set as follows:
/mnt> export JAVA_HOME=/usr/bea/jdk130
/mnt> export PATH=/usr/bea/jdk130/bin:$PATH
/mnt> export DISPLAY=xx.xx.xx.xx:0.0
(where xx.xx.xx.xx is the IP address of the machine from which you are installing)
Note: If you are installing remotely from Windows NT, you must use an X-Windows terminal emulator.
/mnt> sh wljam42_Sol7.bin
The Introduction screen (see Figure 2-1) displays.
Figure 2-1 Introduction Screen
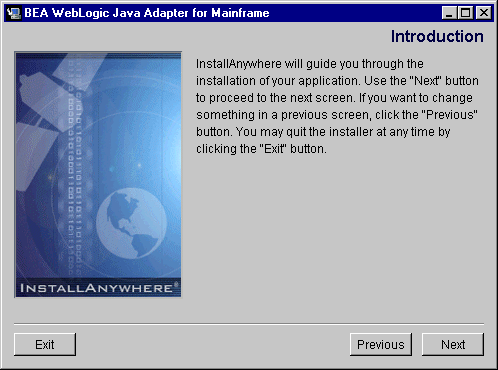
Figure 2-2 License Agreement Screen
Note:
If you select No, you will not
be able to continue with the installation. You must either exit the
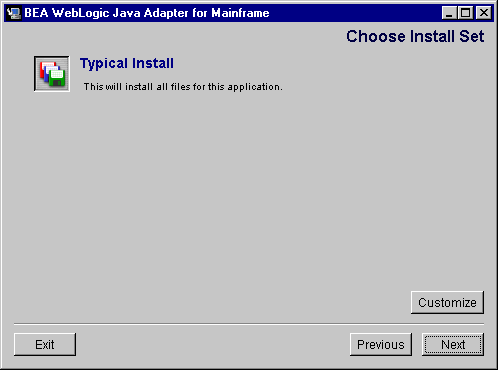
installation or go back to the Introduction screen. Figure 2-3 Choose Install Set
Screen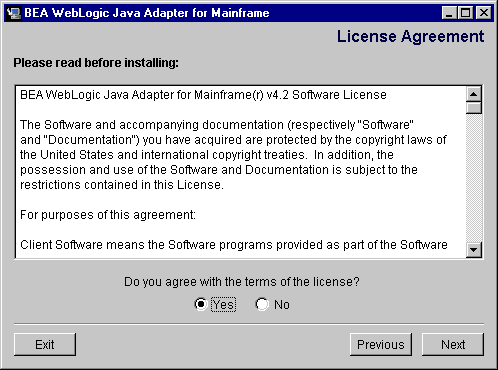
Selecting this option installs all of the components available for your platform. See Table 2-1 for the components available.
Table 2-1 Components Available for Installation by Platform
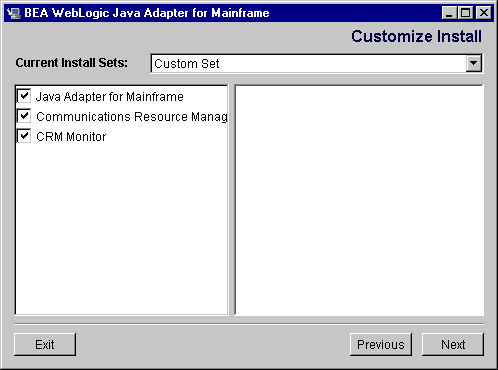
The Customize Install screen appears
(see Figure 2-4) for the platform upon
which you are installing JAM. The applications available for each certified
platform are listed in Table 2-1. Figure 2-4 Customize Install
Screen
Note: To determine whether or not you need to run this installation program on another machine, see "Determining Your Configuration."
Figure 2-5 Choose BEA Home Directory Screen
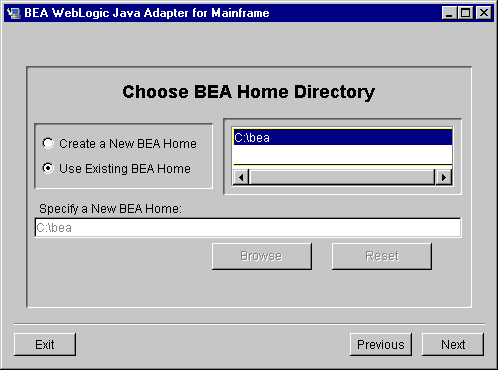
If you have WebLogic Server 6.0 Service Pack 2, WebLogic Process Integrator 2.0, and WebLogic XML/Non-XML Translator 2.0 installed on your machine under the BEA Home directory that you created, the Choose Product Directory screen displays (see Figure 2-7).
If you already have one or more BEA Home directories on your system, you can use one of those directories as follows:
If you have WebLogic Server 6.0 Service Pack 2, WebLogic Process Integrator 2.0, and WebLogic XML/Non-XML Translator 2.0 installed on your machine under the BEA Home directory that you selected, the Choose Product Directory screen displays (see Figure 2-7).
If you are:
You have probably installed WebLogic Server under a different BEA Home directory than the one you selected or created in the Choose BEA Home Directory screen.
Figure 2-6 Installer Can't Find WebLogic Server 6.0 SP2 Message
The Choose Product Directory screen displays (see Figure 2-7).
If you are installing the JAM gateway and have not installed WebLogic Server, WebLogic Process Integrator, or WebLogic XML/Non-XML Translator, refer to Table 2-2 for more information.
Table 2-2 Installation Alternatives
If you do not want the result listed in Table 2-2, click Exit. You will exit the installation program
without installing JAM. You can rerun the JAM installation program after you
have installed the software that will give you the desired result. If you do want the result listed in Table 2-2, click Next to proceed to the Choose Product Directory
screen (see Figure 2-7). Figure 2-7 Choose Product Directory
Screen
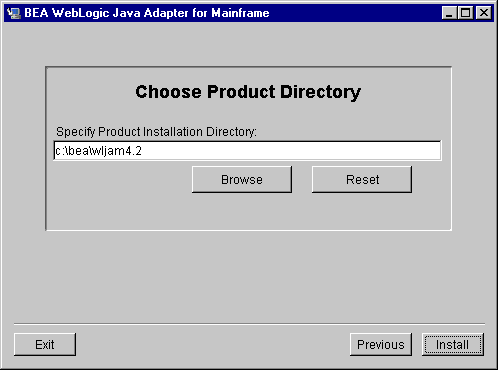
Warning: It is is highly recommended that your installation directory remain <BEA Home>\wljam4.2.
Figure 2-8 Install Complete Screen
Uninstalling in Graphics Mode
Perform the following steps to uninstall the JAM software:
Choose Start. >Programs. >BEA WebLogic E-Business
Platform. >
WebLogic Java Adapter for Mainframe
4.2. >Uninstall Java Adapter for Mainframe from the Start menu. The screen in Figure 2-9 is displayed.
On UNIX:
> cd /usr/bea/wljam4.2/uninstaller
/usr/bea/wljam4.2/uninstaller> sh Uninstall
The screen shown in Figure 2-9 displays.
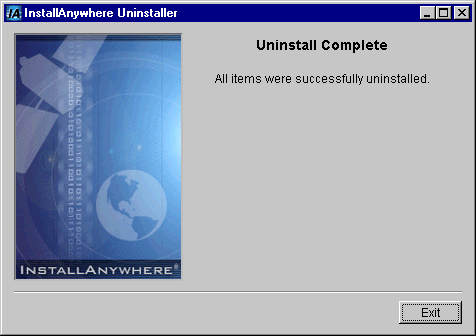
Figure 2-9 JAM Uninstall Start Screen

Figure 2-10 JAM Uninstallation Complete Screen
Installing the CRM on OS/390 UNIX
The following steps install the CRM on OS/390 UNIX. This installation is for a distributed configuration where the CRM resides on the mainframe in an OS/390 UNIX environment.
Note: This procedure assumes the installer is familiar with File Transfer Protocol (FTP) functions.
tar xvfo os390.tar
Executing the tar command extracts the install.sh script and subdirectories containing the software to be installed from the tar file.
sh install.sh
The installation script prompts you for responses. Listing 2-3 is a sample installation. It shows the installation of the CRM in a distributed configuration on an OS/390 mainframe platform. User responses are in bold.
Listing 2-3 Sample Script for CRM Component Installation on an OS/390 Unix Platform
cmadm@dalsun4:/cmhome/dist/fig-4: >sh install.sh

01) os390/os390r8

Install which platform's files? [01-      1 , q to quit, l for list]: 1

** You have chosen to install from os390/os390r8 **

Communications Resource Manager Release 1.2

This directory contains the Communications Resource Manager 1.2
for IBM OS/390 Unix R8 on IBM OS/390.

Is this correct? [y,n,q]: y

To terminate the installation at any time
press the interrupt key,
typically <del>, <break>, or <ctrl+c>.

The following packages are available:

  1     crm             SNA Communications Resource Manager

Select the package(s) you wish to install (or 'all' to install
all packages) (default: all) [?,??,q]: all

Communications Resource Manager
(OS390) Release 1.2
Copyright (c) 2001 BEA Systems, Inc.
All Rights Reserved.
Distributed under license by BEA Systems, Inc.
BEA eLink is a trademark of BEA Systems, Inc.

Directory where Communications Resource Manager files are to be installed
(Enter your directory path) [?,q]: /bea/wljam4.2

Using /bea/wljam4.2 as the Communications Resource Manager base directory

The following CRM stack support options are available:

  1     vtm28 OpenEdition MVS 390

Select an option [?,??,q]: 1

Determining if sufficient space is available ...
68000 blocks are required
270552 blocks are available to /bea/wljam4.2

Unloading /bea/loads/dist/fig-4/os390/os390r8/crm/CRMSA.Z ...
6800 blocks
x bin/CRMLOGS
x bin/CRM
x bin/crmdown
x bin/crmlkoff
x bin/crmlkon
x bin/uss.env
x lib/ctxdebugs_12.dll
x lib/ctxos_12.dll
x lib/ctxprim_12.dll
x lib/ctxplat_12.dll
x lib/csxappc.dll
x lib/csxxfm.dll
x lib/csxxmw.dll
x lib/csxgpw.dll
x lib/csxcrm.dll
x lib/csxxcrm.dll
x lib/csxscrm.dll
x lib/libgp40.dll
x lib/libgpnet.dll
... finished

Unloading /bea/loads/dist/fig-4/os390/os390r8/crm/STKSA.Z ...
241 blocks
x lib/csxvtm28.dll
... finished

Changing file permissions...
... finished

Installation of Communications Resource Manager was successful

Please don't forget to fill out and send in your registration card
 >
Installing the CRM on OS/390 MVS
This section explains how to install the CRM on OS/390 Multiple Virtual Storage (MVS). This installation is for a distributed configuration where the CRM resides on the mainframe in an OS/390 MVS environment.
Note: While certain JAM components are certified on IBM OS/390 2.8, 2.9, and 2.10, problems may be encountered starting these components on OS/390 depending on variations of IBM PTF levels. To determine the appropriate PTFs to apply, see the BEA Java Adapter for Mainframe Release Notes.
Summary of Installation Tasks
The following list is a summary of the tasks detailed in "Installation Procedure for CRM on OS/390 MVS."
Note: The installation process assumes the installer is familiar with Job Control Language (JCL) job operations and File Transfer Protocol (FTP) functions.
Installation Files
The installation for this environment is semi-automated. Three JCL files are provided to facilitate prerequisites for allocating data sets in the MVS environment and to unload JAM product software into the allocated data sets.
The product CD-ROM contains the following files relating to this installation procedure:
Installation Procedure for CRM on OS/390 MVS
Perform the following steps to install the CRM component on an OS/390 MVS platform:
dsupload.jcl
install.jcl
uncmprss.jcl
Use the SET statements in the DSUPLOAD job to set the high-level qualifiers of the receiving datasets according to the following syntax:
SET PRODHLQ=[QUALIFIER]
The DSUPLOAD job has the following steps:
DELOAD
Deletes any existing data sets previously created so you can run this JCL multiple times, if necessary.
CREATE
Allocates the initial data sets needed to receive the product software files.
Table 2-3 MVS Installation Product Files and DD Name Data Sets
|
Product File |
Set Statement |
Your Dataset Name |
|---|---|---|
|
JAM42.LOAD |
PRODHLQ |
.LOAD |
|
JAM42.DATA |
PRODHLQ |
.DATA |
|
JAM42.SAMPLE |
PRODHLQ |
.SAMPLE |
Note the following example of a PUT command: Transfer the datasets using the PUT command. Use the SET statements to alter the job for your
environment according to the following syntax: In this statement, [QUALIFIER] is the
high-level qualifier for the CRM load library. The load library containing the
JAM42.LOAD program objects must
be a partitioned data set with extended attributes (PDSE). The PDSE minimally
must have storage class SMS declaration for OS/390 v2.8. In this statement, [CLASS NAME] is the
storage class name of the PDSE. This is required for OS/390 v2.8. In this statement, [QUALIFIER] is the
high-level qualifier for the sample and data datasets. These are standard
PDS. The INSTALL job has the following steps: Deletes any existing data sets created
by the INSTALL job so you can
run this JCL multiple times, if necessary. Creates the MVS data sets for you.
This step includes the minimal JCL
needed to create the data sets for OS/390 v2.8. You may change the JCL to
reflect your own environment. Use Table 2-4 as a
worksheet to fill out the names of the datasets created in this
step. Table 2-4 Set Statements and
Corresponding Datasets
Set
Statement Your
Dataset Name BEAPDSE .LOAD BEAPDS .DATA BEAPDS .SAMPLEput JAM42.LOAD 'BEA.JAM42.LOAD'
SET BEAPDSE=[QUALIFIER]
SET SCLASS=[CLASS NAME]
SET BEAPDS=[QUALIFIER]
DELOLD
CREATE
Modify the following variables in the
JCL to the high-level qualifier you listed in the tables according to the
following syntax: Use the qualifier you listed in Table 2-3. Use the PDSE qualifier you listed in
Table 2-4. Use the PDS qualifier you listed in Table 2-4. The UNCMPRSS job has the following step: Performs a TSO RECEIVE to uncompress
and unload the data in your installation datasets created in step
8.<PRODHLQ>=[QUALIFIER]
<BEAPDSE>=[QUALIFIER]
<BEAPDS>=[QUALIFIER]
UNLOAD
Note: To manually perform the TSO RECEIVE command, which unloads the data in your installation data sets created in Step 8, enter the following command:
TSO RECEIVE INDS(`xxx')
When prompted, enter:
DA("yyy")In these statements, the following definitions apply:
Verifying Installation Files and Directories
The JAM CD-ROM contains the following libraries and executable programs for each of the following installation scenarios and their supported platforms. After installing the JAM software, verify that these libraries and programs are installed on your system.
JAM Gateway Installation
All directories are relative to the installation directory.
Solaris (Version 7 or 8)
Verify that the following JAM files are installed by the JAM software:
Table 2-5 Solaris Installation Files and Directories
AIX Verify that the following JAM files are installed by the
JAM software: Table 2-6 AIX Installation Files and
Directories
HP-UX Verify that the following JAM files are installed by the
JAM software: Table 2-7 HP-UX Installation Files and
Directories
Windows NT Verify that the following JAM files are installed by the
JAM software: Table 2-8 Windows NT Installation Files
and Directories
JAM Plug-in for WebLogic Process
Integrator If you had WebLogic Process Integrator installed on your
Solaris, AIX, HP-UX, or Windows NT machine prior to running the JAM gateway
installation, the following files will be installed into your <WebLogic Process Integrator Home>/lib (<WebLogic Process Integrator
Home>\lib on Windows NT) directory: If WebLogic Process Integrator was not installed on your
Solaris, AIX, HP-UX, or Windows NT machine prior to running the JAM gateway
installation, these two files were installed into your <WebLogic Integration Home>/repository/lib
(<WebLogic Integration
Home>\repository\lib on Windows NT) directory. Note: Other
distribution files will be installed into the <WebLogic Integration Home>/repository/lib
(<WebLogic Integration
Home>\repository\lib on Windows NT) directory. These files are not
listed in this section. Communications Resource Manager (CRM)
Installation Verify that the CRM files listed by section are
installed on your system. All directories are relative to the specified
installation directory. Also included are the ATMI libraries that ship with the
standalone CRM. For encryption purposes, the libgp that is shipped is the one enabled for 40-bit
encryption. Platform-specific stack abstraction libraries are included in these
tables as well. Note: The CRM is
not available on Solaris 8, AIX, or HP-UX. Solaris 7 Verify that the following CRM application files are
installed by the JAM software:
Table 2-9 Solaris Installation Files
and Directoriesjampi.jar
jampi.war
OS/390 UNIX
Verify that the following CRM application files are installed by the JAM software.
Table 2-10 OS/390 UNIX Installation Files and Directories
OS/390 MVS
Verify that the following CRM application files are installed by the JAM software.
Table 2-11 OS/390 MVS Installation Files and Directories
Windows NT
Verify that the following CRM application files are installed by the JAM software
.Table 2-12 Windows NT Installation Files and Directories
CRM Monitor Installation
The java-enabled CRM monitor files are as follows:
Setting Up the License Key
The CRM cannot be used without a valid software license. A 30-day license file is automatically installed when you install JAM. When you purchase the software, a permanent JAM license key file will be provided to you by BEA. Follow the directions below to update your license file on the target system.
To update your JAM software license:
c:\> cd bea
c:\bea> UpdateLicense <JAM license key file>
Your license file (license.bea) is now updated with the information in your JAM license key file. This addition to your BEA license file allows you to connect to a mainframe through the CRM.
Adding JAM to the CLASSPATH
The jam.jar file should be placed in your WebLogic Server CLASSPATH so that JAM will work. Place jam.jar in your CLASSPATH as follows:
For UNIX:
For Windows NT:
What Do I Do Next?
After you have installed the JAM software and set up the license file and classpath, you are ready to configure and use the JAM product. Refer to the BEA WebLogic Java Adapter for Mainframe Configuration and Administration Guide, the WebLogic Java Adapter for Mainframe Programming Guide, and BEA WebLogic Java Adapter for Mainframe Scenarios Guide for detailed information about configuring and using the JAM Gateway and the CRM.
 |
 |
|
|
|
Copyright
© 2001 BEA Systems, Inc. All rights reserved. |