| Download Docs | Site Map | Glossary | |
|
|
|||
| bea.com | products | dev2dev | support | askBEA |
|
|
|
||||||||
| e-docs > Liquid Data for WebLogic > Building Queries and Data Views > Example 2: Aggregates |
|
Building Queries and Data Views
|
Aggregate functions produce a single value from a set of input values. An example of an aggregate function in Data View Builder is the count function, which takes a list of values and returns the number of values in the list.
Find the number of orders placed in the Broadband database for a given customer who is also in the Wireless database.
This query relies on a data view called "AllOrders" which retrieves customers who are in the Broadband database and also in the Wireless database. For each of these customers, the customer ID and orders are retrieved. Then, we use the Aggregate function "count" to determine how many orders are associated with a given customer. At query runtime, a customer ID is submitted as a query parameter and the result returns the number of orders associated with the given customer ID.
To create the solution, follow these steps:
Aggregates Demo... If you are looking at this documentation online, you can click the "Demo" button to see a viewlet demo showing how to build the conditions and create the mappings described in this example. This demo previews the steps described in detail in the following sections. The demo assumes you already have the target schema in the server Repository and have created and configured the data view data source required for this example.
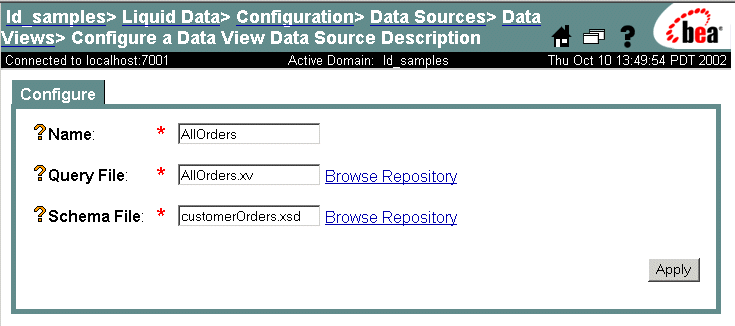
Ex 2: Step 1. Locate and Configure the "AllOrders" Data View
For this example, we will use a data view data source called AllOrders.xv. This data view is available in the Samples server repository. The path to the data_views folder in the Liquid Data server repository is:
ld_repository/data_views/
See Example directories for information on how example directory names are used.
Just in case you want to verify that you have the right data view file, the following code listing shows the XML for this data view.
Listing 9-4 XML Source for AllOrders.xv Data View File
<customers>
	{
	for $PB-BB.CUSTOMER_1 in document("PB-BB")/db/CUSTOMER
	for $PB-WL.CUSTOMER_2 in document("PB-WL")/db/CUSTOMER
	where ($PB-WL.CUSTOMER_2/CUSTOMER_ID  eq  {--! ppright !--} $PB-BB.CUSTOMER_1/CUSTOMER_ID)

	return
	<customer id={$PB-WL.CUSTOMER_2/CUSTOMER_ID}>
		<first_name>{ xf:data($PB-WL.CUSTOMER_2/FIRST_NAME) }</first_name>
		<last_name>{ xf:data($PB-WL.CUSTOMER_2/LAST_NAME) }</last_name>
		<orders>
			{
			for $PB-BB.CUSTOMER_ORDER_4 in document("PB-BB")/db/CUSTOMER_ORDER
			where ($PB-BB.CUSTOMER_1/CUSTOMER_ID  eq  {--! ppright !--} $PB-BB.CUSTOMER_ORDER_4/CUSTOMER_ID)
			return
			<order id={$PB-BB.CUSTOMER_ORDER_4/ORDER_ID} date={$PB-BB.CUSTOMER_ORDER_4/ORDER_DATE}></order>
			}
		</orders>
	</customer>
	}
</customers>
Use the WLS Administration Console to Configure Your Data View Data Source
To start the WLS Administration Console for the Liquid Data Samples server running on your local machine, type the following URL in a Web browser address field:
http://localhost:7001/console
Login to the console by providing the following default username and password for the Samples server.
User Name and Password for Samples WLS Administration Console
Ex 2: Step 2. Restart the Data View Builder and Find the New Data View
Ex 2: Step 3. Verify the Target Schema is Saved in the Repository
For this example, we will use a target schema called customerOrdersA.xsd. This schema is available in the Samples server repository. The path to the schemas folder in the Liquid Data server repository is:
ld_repository/schemas/
Just in case you want to verify that you have the right schema file, the following code listing shows the XML for this schema.
Listing 9-5 XML Source for customerOrdersA.xsd Target Schema File
<?xml version = "1.0" encoding = "UTF-8"?>
<xsd:schema xmlns:xsd = "http://www.w3.org/2001/XMLSchema">
	<xsd:element name="customers">
		<xsd:complexType>
			<xsd:sequence>
				<xsd:element name="customer" minOccurs="0" maxOccurs="unbounded">
					<xsd:complexType>
						<xsd:sequence>
							<xsd:element name="first_name" type="xsd:string"/>
							<xsd:element name="last_name" type="xsd:string"/>
							<xsd:element name="orders" minOccurs="0" maxOccurs="unbounded">
								<xsd:complexType>
									<xsd:sequence>
										<xsd:element name="order" minOccurs="0" maxOccurs="unbounded">
											<xsd:complexType>
												<xsd:sequence>
												</xsd:sequence>
											<xsd:attribute name="id" type="xsd:string"/>
											<xsd:attribute name="date" type="xsd:string"/>
											<xsd:attribute name="amount" type="xsd:string"/>
											</xsd:complexType>
										</xsd:element>
									</xsd:sequence>
								</xsd:complexType>
							</xsd:element>
							<xsd:element name="amount" type="xsd:string"/>
						</xsd:sequence>
					<xsd:attribute name="id" type="xsd:string"/>
					</xsd:complexType>
				</xsd:element>
			</xsd:sequence>
		</xsd:complexType>
	</xsd:element>
</xsd:schema>
Ex 2: Step 4. Open the Data Sources and Target Schema
Ex 2: Step 5. Map Source Nodes to Target to Project the Output
Ex 2: Step 6. Create Two Query Parameters to be Provided at Query Runtime
Create two Query Parameter variables: first_name and last_name, that you can use to insert variable customer information when the query runs. Create both variables as type xs:string. Do this as follows:
Ex 2: Step 7. Assign the Query Parameters to Source Nodes
Assign the first_name and last_name Query Parameter variables to customer first name and last name nodes in the AllOrders data view as follows:
Ex 2: Step 8. Add the "count" Function
Add the count function and specify the input and output as follows:
Note: Create complex or aggregate functions only on the desktop by double-clicking as described in this step. Do not attempt to drag and drop them directly into the Conditions tab.
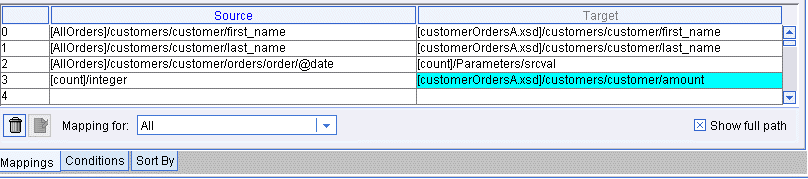
Ex 2: Step 9. Verify Mappings and Conditions
Your mappings should look like those shown in Figure 9-2.
Figure 9-2 Mappings for Example2: Aggregates
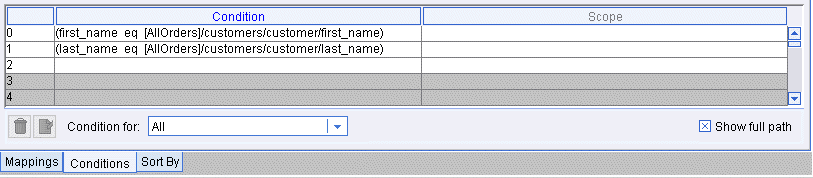
Your Conditions should like those shown in Figure 9-3.
Figure 9-3 Conditions for Example 2: Aggregates
Ex 2: Step 10. View the XQuery and Run the Query to Test it
Listing 9-6 XQuery for Example 2: Aggregates
{-- Generated by Data View Builder 1.0 --}
<customers>
	{
	for $AllOrders.customer_1 in document("AllOrders")/customers/customer
	let $srcval_2 :=
	               for $AllOrders.order_3 in $AllOrders.customer_1/orders/order
	               where ($#first_name of type xs:string  eq  $AllOrders.customer_1/first_name)
	                 and ($#last_name of type xs:string  eq  $AllOrders.customer_1/last_name)
	               return
	               $AllOrders.order_3/@date
	let $count_4 := xf:count($srcval_2)
	where ($#first_name of type xs:string  eq  $AllOrders.customer_1/first_name)
	  and ($#last_name of type xs:string  eq  $AllOrders.customer_1/last_name)
	return
	<customer>
		<first_name>{ xf:data($AllOrders.customer_1/first_name) }</first_name>
		<last_name>{ xf:data($AllOrders.customer_1/last_name) }</last_name>
		<amount>{ $count_4 }</amount>
	</customer>
	}
</customers>
Ex 2: Step 11. Verify the Result
Running this query with last_name set to "KAY_1" and first_name set to "JOHN_1" produces the following XML query result.
Listing 9-7 Result for Example 2: Aggregates
<customers>
  <customer>
    <first_name>JOHN_1</first_name>
    <last_name>KAY_1</last_name>
    <amount>2</amount>
  </customer>
</customers>

|

|

|