| Download Docs | Site Map | Glossary | |
|
|
|||
| bea.com | products | dev2dev | support | askBEA |
|
|
|
||||||||
| e-docs > Liquid Data for WebLogic > Getting Started > Getting Started with Liquid Data: A Basic Example |
|
Getting Started
|
Getting Started with Liquid Data: A Basic Example
This guide walks you through a simple example to illustrate the general process of configuring some data sources and constructing a query. This example shows how to build a query similar to the Order Query used in BEA Liquid Data for WebLogicTM Avitek Sample. Following through this process using our example query is an easy and fun way to get familiar with how to configure data sources, construct data views, and run generated queries in Liquid Data.
Note that this topic is meant to serve as an example only to familiarize you with the most common tasks of configuration and query building—it is not comprehensive or required. People with many different levels of experience are likely to work through this example. Feel free to browse this section and build your own first Liquid Data project.
For more advanced query examples, see the Query Cookbook in Building Queries and Data Views and the Samples readme files and project files that are installed with Liquid Data. For details on how to set up and manage Liquid Data and configure data sources, see the Liquid Data Administration Guide. For information on building queries and using the Data View Builder, see Building Queries and Data Views.
The following sections are included here:
Examples used in this chapter assume that the Liquid Data 1.1 installation is located at:
/bea_70SP2/weblogic700/liquiddata/samples/
where bea70SP2 is the location of the WebLogic 7.0 SP2 server and samples is the location of the Liquid Data 1.1 sample installation.
Step 1. Start the Samples Server
If this is your first time running the Liquid Data Samples server after installation, it is necessary to first populate the Samples database.
To populate the Liquid Data samples database under Windows choose the following menu option:
Start—> Programs—> BEA WebLogic Platform 7.0—> Liquid Data for WebLogic 1.1
  —>Liquid Data Samples —> First-Time Samples Configuration
To start the Liquid Data samples server under Windows choose the following menu option:
Start—>Programs —> BEA WebLogic Platform 7.0 —>
  Liquid Data for WebLogic 1.1 —> Liquid Data Samples —> Launch Samples Server
To populate the Liquid Data samples database under UNIX run the ldsample.sh shell command in the following domain:
/bea_70SP2/weblogic700/liquiddata/samples/config/ld_samples/command/ldsample.sh
To start the Liquid Data samples server under UNIX run the startWeblogic.sh shell command in the following domain:
/bea_70SP2/weblogic700/liquiddata/samples/config/ld_samples/startWeblogic.sh
Note: For more information on setting up and starting the Samples server, see Post-Installation Tasks in Installing Liquid Data. For more information on starting Liquid Data servers in the various preconfigured domains, see Starting and Stopping the Server in the Liquid Data Administration Guide.
Step 2. Start the WLS Administration Console
To start the WLS Administration Console for the Liquid Data Samples server running on your local machine, type the following URL in a Web browser address field:
http://localhost:7001/console
Login to the console by providing the following default username and password for the Samples server.
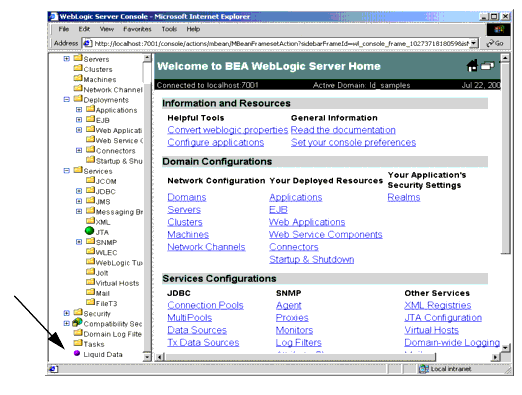
The Console Home Page is displayed. Note that Liquid Data is the bottom element in the left pane.
Figure 1-1 Samples WLS Administration Console
Note: For more information on using the Administration Console, see the Liquid Data Administration Guide.
Step 3. Configure Order Query Data Sources
This section describes how to configure the two supplied sample data sources used in the Order Query example:
Configure a Relational Database Data Source Description
Configuring a relational database Liquid Data source description consists of first creating a JDBC connection pool and JDBC data source, and then configuring the Liquid Data data source using the JDBC configuration you just created. Each of these tasks is described here:
Note: For detailed information on configuring Relational Database data sources in Liquid Data, see Configuring Access to Relational Databases in the Administration Guide.
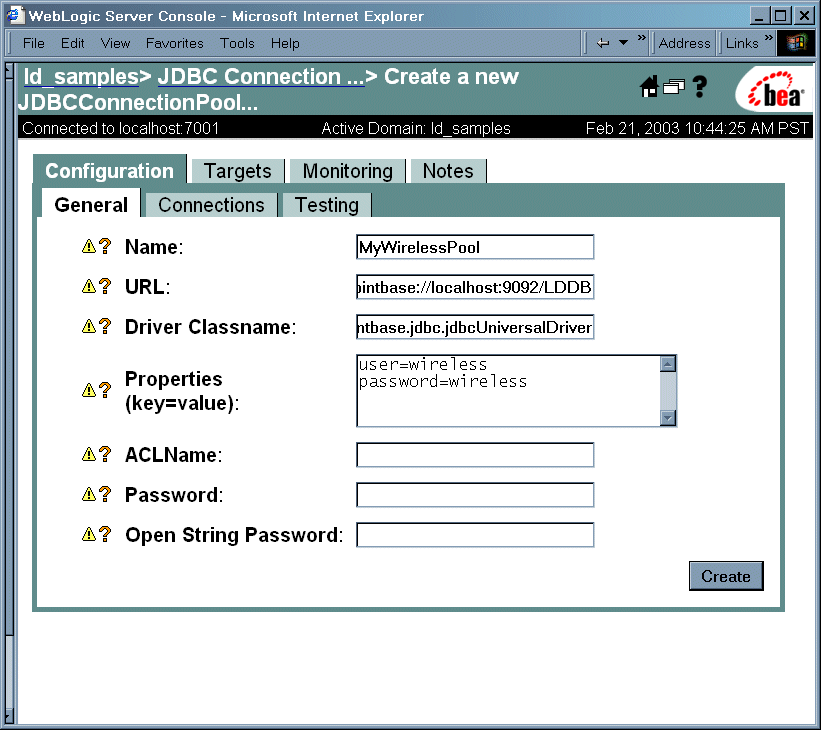
Create and Deploy the JDBC Connection Pool
Figure 1-2 JDBC Connection Pool General Configuration Tab
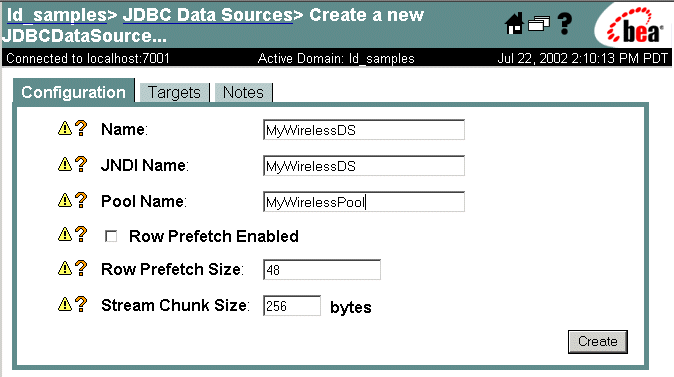
Create and Deploy the JDBC Data Source
Figure 1-3 JDBC Data Source General Configuration Tab
|
In this example the JDBC Data Source Name and JDBC JNDI Name are the same. The JNDI name will be used in the Liquid Data data source configuration (as described in Configure the Relational Database Data Source Description). |
|
|
The Pool Name must match the name of the Connection Pool created in Create and Deploy the JDBC Connection Pool. |
Configure the Relational Database Data Source Description
Now you are ready to add a description of your Relational Database data source to the Liquid Data Server registry. To do this:
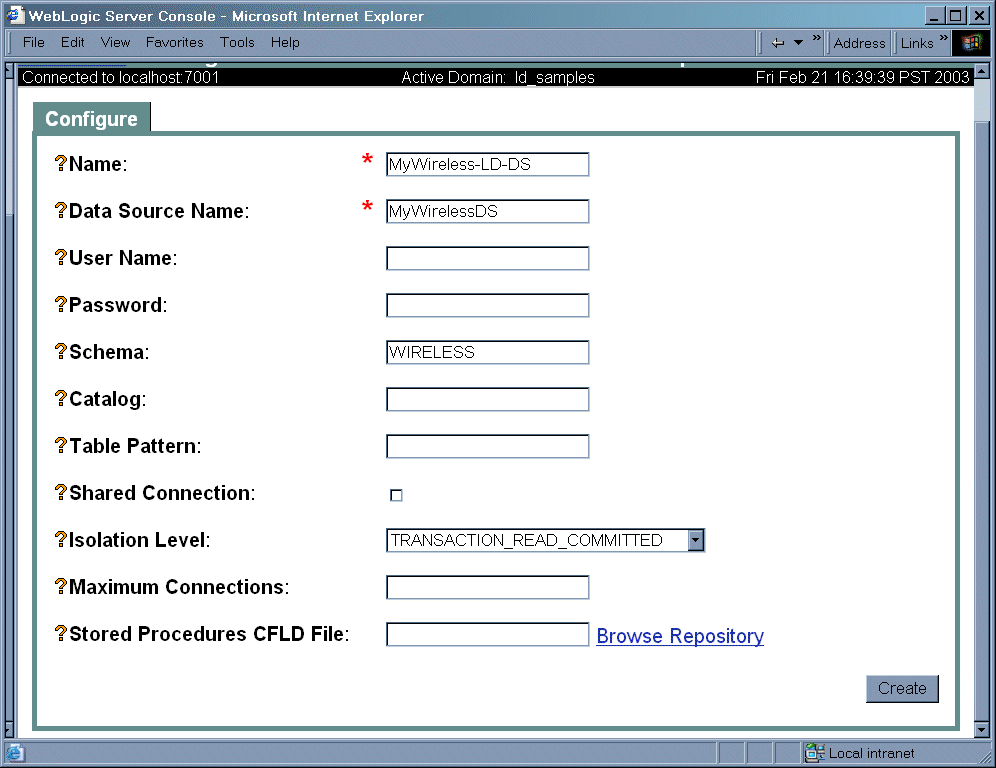
Figure 1-4 Liquid Data Relational Databases Configuration Tab on the Liquid Data Node
|
This is the logical name of the data source. It is a Liquid Data source description used to register the relational database data source with the Liquid Data server. You can choose any meaningful name. For this example, please use the suggested name. |
|
|
This is the data source name; it must match the JNDI name for the JDBC data source you created in Create and Deploy the JDBC Data Source. |
|
|
The schema name given here must match the name of a schema stored in your data source. In this case, we are using the WIRELESS schema provided in the Samples database. Note: The way in which you define schema varies depending on the type of database you are using. For more detailed information, see Configuring Access to Relational Databases in the Liquid Data Administration Guide. |
You should see the relational database you added displayed in the summary table.
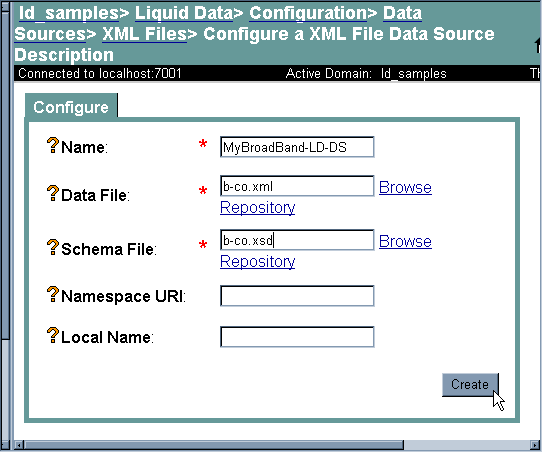
Configure an XML File Data Source Description
Configuring an XML File data source description in Liquid Data simply consists of describing it as a resource using the Liquid Data node in the WLS Administration Console:
Figure 1-5 XML Configuration Tab on the Liquid Data Node
You will see the file description you added displayed in the summary table.
Note: For detailed information on configuring XML data sources in Liquid Data, see Configuring Access to XML Files in the Liquid Data Administration Guide.
Step 4. Start the Data View Builder and Verify the Data Sources
Next, start the Windows-based Data View Builder. You can do this in two ways:
Start—>Programs—>BEA WebLogic Platform 7.0—>Liquid Data for WebLogic 1.1—>
  Launch Data View Builder
\bea_70SP2\weblogic700\liquiddata\DataViewBuilder\bin\DVBuilder.cmd
If you are not already connected to the Liquid Data Samples server enter the following address in the Server URI field on the Login window. (No username or password is needed. Leave those fields blank.)
t3://localhost:7001
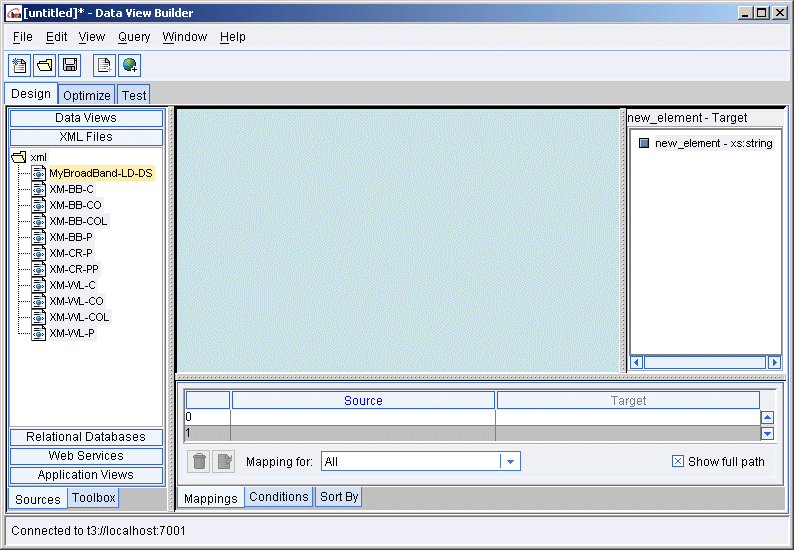
The Data View Builder workspace and tools are displayed. You can click on the buttons on the left Navigation panel to view the various types of data sources configured on the Liquid Data server to which your Data View Builder is connected. In this case, you are connected to the Samples server.
Figure 1-6 Initial the Data View Builder Workspace
The Data View Builder allows you to construct queries (and data views) by dragging and dropping elements or nodes in source and target schemas for the data sources with which you are working.
You can define source conditions by dragging and dropping elements among source schemas and using other Data View Builder tools such as constants and functions to express the query statement.
Then you drag and drop elements from your source schemas to the target schema to shape and define, or map, the structure of the query result.
The query you are about to build here is similar to the Order Query featured in the Liquid Data Avitek Sample. Given a customer with orders stored in two data sources ("Wireless" orders in a relational database and "Broadband" orders in an XML file), this query will return the order information for that customer.
To construct our sample order query, you need to do the following:
All of the tasks described in this section are accomplished using the Design tab in the Data View Builder. For more information on using the tools and features on the Design tab, see the Design tab discussion in Building Queries and Data Views.
Constructing the "Order Query" Demo... If you are looking at this documentation online, you can click the "Demo" button to view an animated demonstration of how to build the conditions and create the mappings described in this example. This demo previews the steps described in detail in the following sections.
Open the Relevant Data Source Schemas
To open the data sources you need to construct the data view:
Note: You can open multiple data source schemas and move them around on the workspace as needed.
Add a Target Schema from the Server Repository
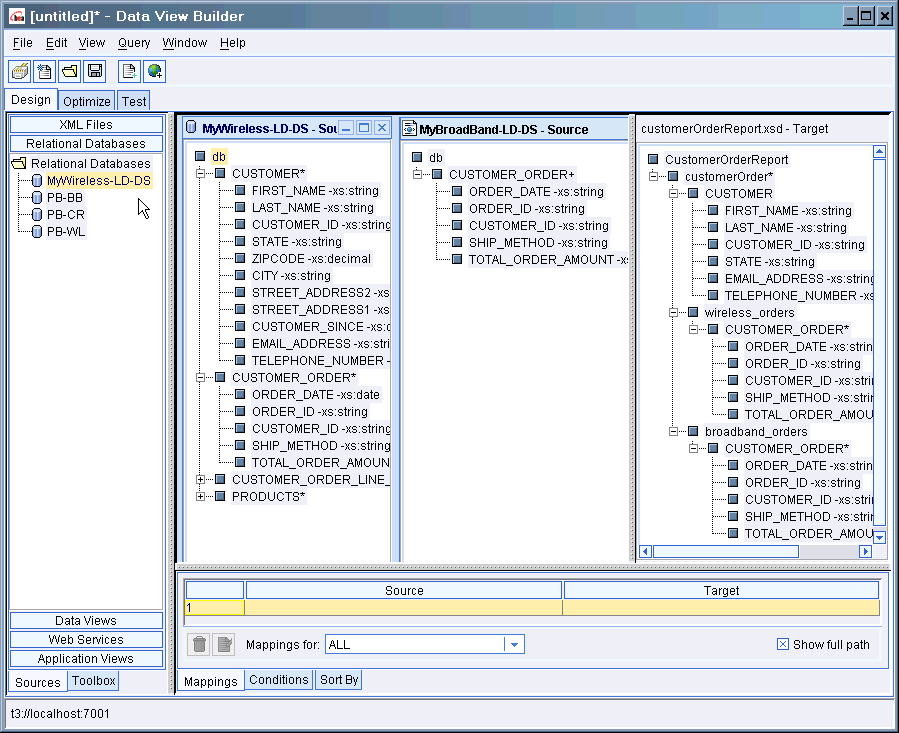
The target schema we will use for the Order Query is in a file called customerOrderReport.xsd which is available in the Samples server repository.
\opt\prod\bea_70SP2\weblogic700\liquiddata\samples\config\ld_samples\ldrepository\schemas
Note: You can open only one target schema at a time; it is always docked to the far right side of the workspace.
At this point, your Data View Builder workspace contains two data source schemas and a target schema, as shown in the following figure:
Figure 1-8 Data View Builder with Source and Target Schemas Workspace
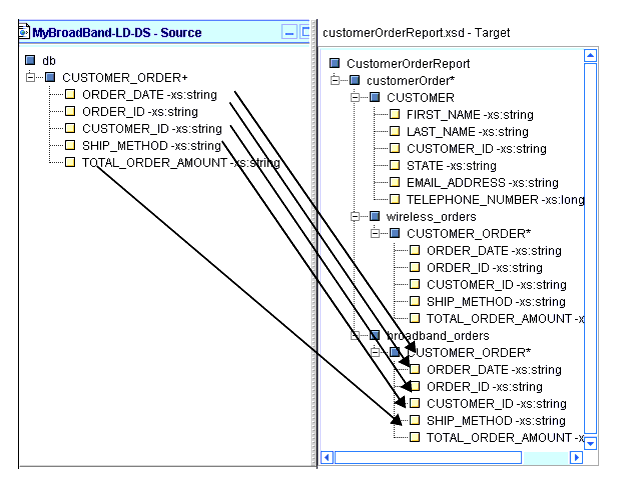
Project the Output by Mapping Source to Target Schema
Note: To expand the XML element trees in source and target schemas select the top element, right mouse-click to get the pop-up menu, and choose Expand or just double-click.
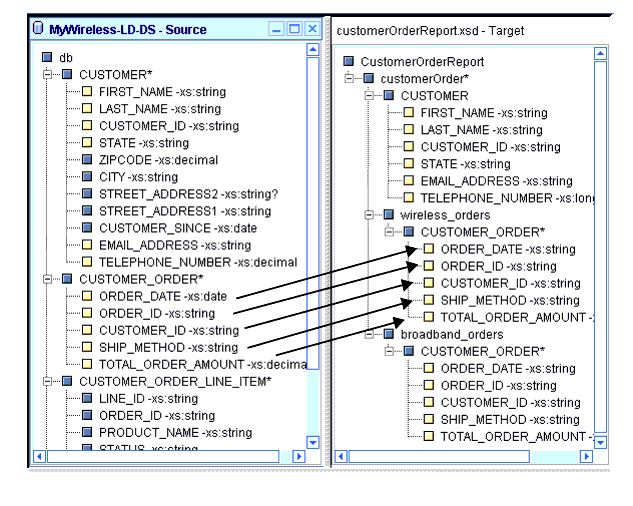
Figure 1-9 Mapping Wireless CUSTOMER_ORDER to Target Schema
Figure 1-10 Mapping Broadband CUSTOMER_ORDER to Target Schema
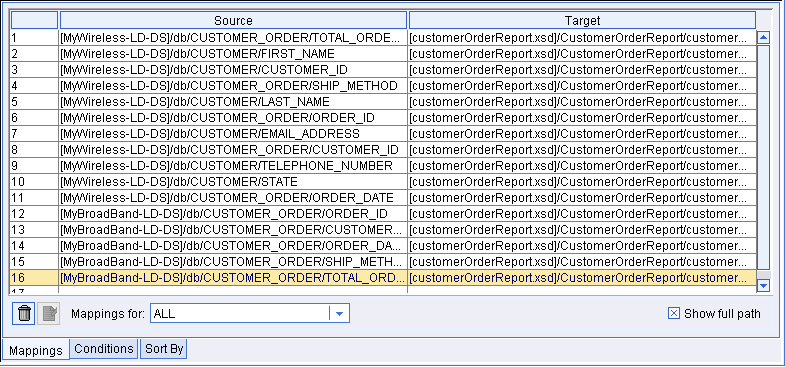
Note: As you drag and drop elements from source to target, the Mappings tab is automatically displayed in the lower part of the workspace. The mapped elements are highlighted in the schema windows and each mapping is recorded on the Mappings tab showing Source and Target details. If you need to delete a mapping, select it on the Mappings tab by clicking in the Mapping ID field to highlight the row in which the Source/Target mapping is shown and then click the Trashcan icon.
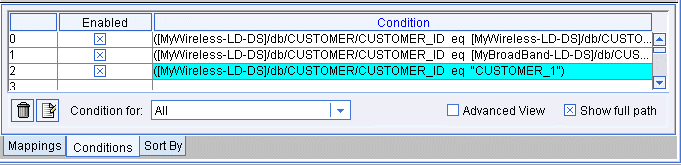
The final step is to define source conditions. This is the way in which you actually pose the "question" (query) or filter designed to get at the data in a particular way. In this example, we want to find out which customers (whose customer IDs match a given constant) have orders in both BroadBand and Wireless.
Create a Join Between the CUSTOMER_IDs in CUSTOMER and CUSTOMER_ORDER within Wireless
In the Wireless data source, drag and drop the sub-element CUSTOMER_ID (from CUSTOMER) to CUSTOMER_ID (subelement in CUSTOMER_ORDER) within the same data source schema window.
This creates a join between CUSTOMER and CUSTOMER_ORDER. The syntax of this join is displayed on the first row of the Conditions tab:
Note: As you drag and drop elements from source element to source element, the Conditions tab is automatically displayed in the lower part of the workspace. The mapped elements are highlighted in the schema windows and each source condition is recorded on the Conditions tab. If you need to delete a condition, highlight the row in which the condition appears and click the Trashcan icon.
Create a Join between Wireless CUSTOMER_ID and Broadband CUSTOMER_ID
Drag and drop the Wireless element CUSTOMER/CUSTOMER_ID onto the Broadband data source element CUSTOMER_ORDER/CUSTOMER_ID.
The syntax of this Join is displayed on the next row on the Conditions tab.
Note: If you ran the query at this point, you would get a query result showing all customers who have orders in both BroadBand and Wireless. In the next step, however, we refine the query a little further.
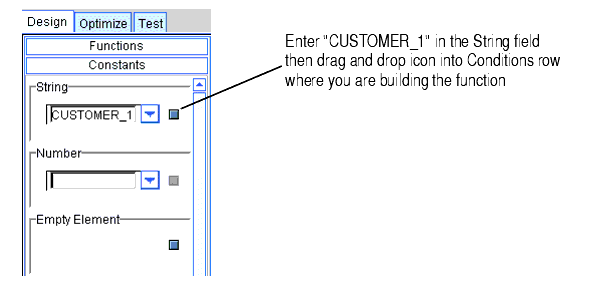
Use a Function to Retrieve a Customer ID Matching a Given Constant
You can use a function to create a filter that matches a given customer.
Figure 1-13 Using a String Constant in a Function
Note: Make sure that you have the left navigation panel expanded out far enough to the right to be able to see both icons to the right of the Constants fields.
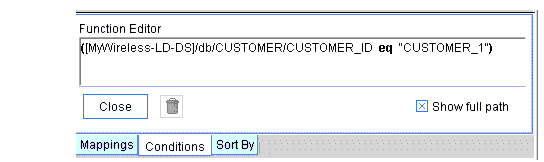
The syntax of this statement is displayed in the Functions Editor.
Figure 1-14 Equation for a Source Condition Shown in Functions Editor
You can close the Functions Editor by clicking the Close button.
You have set up all the source conditions as reflected on the Conditions tab.
Note: To see the full text of the source conditions statements, you may have to expand the Conditions area by clicking and dragging the left or right borders.
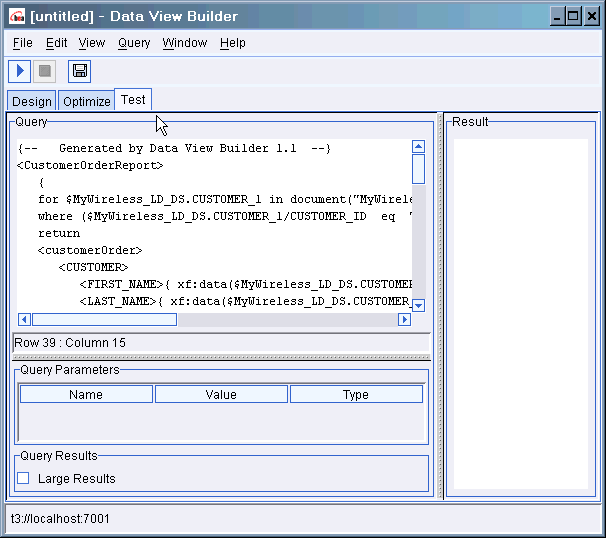
Step 6. View and Test the Query
Now you are ready to switch to the Test tab where you can look at the XQuery syntax of the generated query you just constructed, and then run the query to test it.
Click the Test tab at the top of the workspace.
Figure 1-16 Data View Builder Test Tab
Understanding the Generated XQuery
The Data View Builder has automatically generated the following XQuery for the query you constructed with drag-and-drop tools.
Listing 1-1 Generated XQuery for Getting Started Query
{--	Generated by Data View Builder 1.1	--}
<CustomerOrderReport>
	{
	for $MyWireless_LD_DS.CUSTOMER_1 in document("MyWireless-LD-DS")/db/CUSTOMER
	where ($MyWireless_LD_DS.CUSTOMER_1/CUSTOMER_ID  eq  "CUSTOMER_1")
	return
	<customerOrder>
		<CUSTOMER>
			<FIRST_NAME>{ xf:data($MyWireless_LD_DS.CUSTOMER_1/FIRST_NAME)
}</FIRST_NAME>
			<LAST_NAME>{ xf:data($MyWireless_LD_DS.CUSTOMER_1/LAST_NAME) }</LAST_NAME>
			<CUSTOMER_ID>{ xf:data($MyWireless_LD_DS.CUSTOMER_1/CUSTOMER_ID) }</CUSTOMER_ID>
			<STATE>{ xf:data($MyWireless_LD_DS.CUSTOMER_1/STATE) }</STATE>
			<EMAIL_ADDRESS>{ xf:data($MyWireless_LD_DS.CUSTOMER_1/EMAIL_ADDRESS) }</EMAIL_ADDRESS>
			<TELEPHONE_NUMBER>{ cast as xs:long(xf:data($MyWireless_LD_DS.CUSTOMER_1/TELEPHONE_NUMBER)) }</TELEPHONE_NUMBER>
		</CUSTOMER>
		<wireless_orders>
			{
			for $MyWireless_LD_DS.CUSTOMER_ORDER_2 in document("MyWireless-LD-DS")/db/CUSTOMER_ORDER
			where ($MyWireless_LD_DS.CUSTOMER_1/CUSTOMER_ID  eq  $MyWireless_LD_DS.CUSTOMER_ORDER_2/CUSTOMER_ID)
			return
			<CUSTOMER_ORDER>
				<ORDER_DATE>{ cast as xs:string(xf:data($MyWireless_LD_DS.CUSTOMER_ORDER_2/ORDER_DATE)) }</ORDER_DATE>
				<ORDER_ID>{ xf:data($MyWireless_LD_DS.CUSTOMER_ORDER_2/ORDER_ID) }</ORDER_ID>
				<CUSTOMER_ID>{ xf:data($MyWireless_LD_DS.CUSTOMER_ORDER_2/CUSTOMER_ID) }</CUSTOMER_ID>
				<SHIP_METHOD>{ xf:data($MyWireless_LD_DS.CUSTOMER_ORDER_2/SHIP_METHOD) }</SHIP_METHOD>
				<TOTAL_ORDER_AMOUNT>{ xf:data($MyWireless_LD_DS.CUSTOMER_ORDER_2/TOTAL_ORDER_AMOUNT) }</TOTAL_ORDER_AMOUNT>
			</CUSTOMER_ORDER>
			}
		</wireless_orders>
		<broadband_orders>
			{
			for $MyBroadBand_LD_DS.CUSTOMER_ORDER_3 in document("MyBroadBand-LD-DS")/db/CUSTOMER_ORDER
			where ($MyWireless_LD_DS.CUSTOMER_1/CUSTOMER_ID  eq  $MyBroadBand_LD_DS.CUSTOMER_ORDER_3/CUSTOMER_ID)
			return
			<CUSTOMER_ORDER>
				<ORDER_DATE>{ xf:data($MyBroadBand_LD_DS.CUSTOMER_ORDER_3/ORDER_DATE) }</ORDER_DATE>
				<ORDER_ID>{ xf:data($MyBroadBand_LD_DS.CUSTOMER_ORDER_3/ORDER_ID) }</ORDER_ID>
				<CUSTOMER_ID>{ xf:data($MyBroadBand_LD_DS.CUSTOMER_ORDER_3/CUSTOMER_ID) }</CUSTOMER_ID>
				<SHIP_METHOD>{ xf:data($MyBroadBand_LD_DS.CUSTOMER_ORDER_3/SHIP_METHOD) }</SHIP_METHOD>
				<TOTAL_ORDER_AMOUNT>{ cast as xs:decimal(xf:data($MyBroadBand_LD_DS.CUSTOMER_ORDER_3/TOTAL_ORDER_AMOUNT)) }</TOTAL_ORDER_AMOUNT>
			</CUSTOMER_ORDER>
			}
		</broadband_orders>
	</customerOrder>
	}
</CustomerOrderReport>
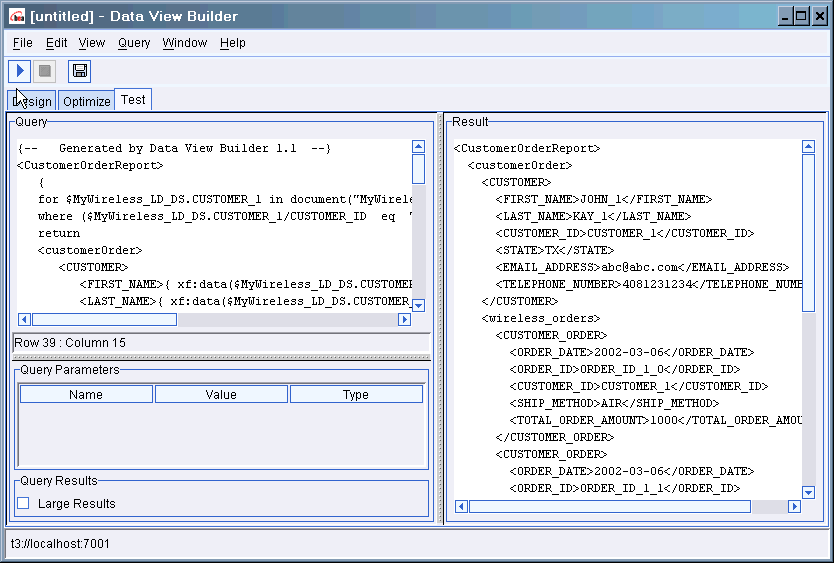
When you are ready to run the query, click the Run query button on the toolbar in the upper left.
The Liquid Data server process the query and the query result is displayed as shown in the following figure and code listing.
Figure 1-17 Query Result on Test Tab
Listing 1-2 XML for the Query Result
<CustomerOrderReport>
  <customerOrder>
    <CUSTOMER>
      <FIRST_NAME>JOHN_1</FIRST_NAME>
      <LAST_NAME>KAY_1</LAST_NAME>
      <CUSTOMER_ID>CUSTOMER_1</CUSTOMER_ID>
      <STATE>TX</STATE>
      <EMAIL_ADDRESS>abc@abc.com</EMAIL_ADDRESS>
      <TELEPHONE_NUMBER>4081231234</TELEPHONE_NUMBER>
    </CUSTOMER>
    <wireless_orders>
      <CUSTOMER_ORDER>
        <ORDER_DATE>2002-03-06</ORDER_DATE>
        <ORDER_ID>ORDER_ID_1_0</ORDER_ID>
        <CUSTOMER_ID>CUSTOMER_1</CUSTOMER_ID>
        <SHIP_METHOD>AIR</SHIP_METHOD>
        <TOTAL_ORDER_AMOUNT>1000</TOTAL_ORDER_AMOUNT>
      </CUSTOMER_ORDER>
      <CUSTOMER_ORDER>
        <ORDER_DATE>2002-03-06</ORDER_DATE>
        <ORDER_ID>ORDER_ID_1_1</ORDER_ID>
        <CUSTOMER_ID>CUSTOMER_1</CUSTOMER_ID>
        <SHIP_METHOD>AIR</SHIP_METHOD>
        <TOTAL_ORDER_AMOUNT>2000</TOTAL_ORDER_AMOUNT>
      </CUSTOMER_ORDER>
    </wireless_orders>
    <broadband_orders>
      <CUSTOMER_ORDER>
        <ORDER_DATE>2002-04-09</ORDER_DATE>
        <ORDER_ID>ORDER_ID_1_0</ORDER_ID>
        <CUSTOMER_ID>CUSTOMER_1</CUSTOMER_ID>
        <SHIP_METHOD>AIR</SHIP_METHOD>
        <TOTAL_ORDER_AMOUNT>1000.00</TOTAL_ORDER_AMOUNT>
      </CUSTOMER_ORDER>
      <CUSTOMER_ORDER>
        <ORDER_DATE>2002-04-09</ORDER_DATE>
        <ORDER_ID>ORDER_ID_1_1</ORDER_ID>
        <CUSTOMER_ID>CUSTOMER_1</CUSTOMER_ID>
        <SHIP_METHOD>AIR</SHIP_METHOD>
        <TOTAL_ORDER_AMOUNT>1500.00</TOTAL_ORDER_AMOUNT>
      </CUSTOMER_ORDER>
    </broadband_orders>
  </customerOrder>
</CustomerOrderReport>
Congratulations! You have successfully built and run a query using Liquid Data.
Note: To switch back to the Design mode, click the Design View tab on the toolbar.
Note: For more information on working with and saving projects, see Working with Projects in the Building Queries and Data Views.
For information on saving a query as a stored query, see Saving a Query also in Building Queries and Data Views.
Now that you are somewhat familiar with the basics of creating Liquid Data queries using the Data View Builder, you may want to review the following documents:

|

|

|