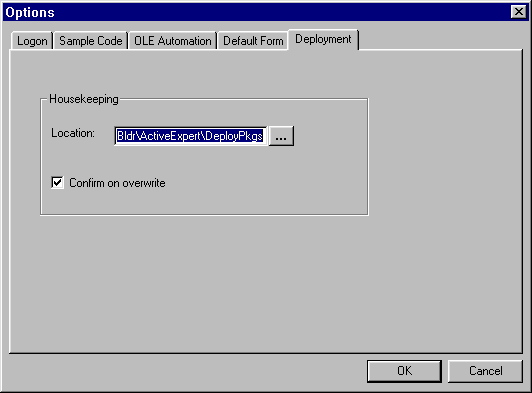
This brings up the default options window for Deployment.
The following table explains the options available on the Deployment options window.
Figure 3-14 Deployment Options

To deploy an application you have created with the Active Expert, you need to create a deployment package. A deployment package contains all the application data needed by Active Expert at run-time (such as type libraries and registration information). The deployment package is a self-registering ActiveX control with the file extension .dpy.
You can generate a deployment package on one or more modules to jump start run-time testing and deployment of your client application.
You can also set options to control how deployment packages get generated.
To set Deployment options:
This brings up the default options window for Deployment.
The following table explains the options available on the Deployment options window.
Figure 3-14 Deployment Options

To generate a deployment package on one or more modules:
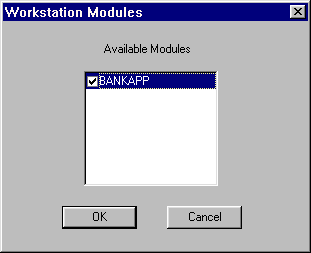
This brings up the Workstation Modules window that lists the modules available to be deployed. This window shows all registered modules and lets you select which ones you want to deploy. In Figure 3-15, only one module is showing because only one module was registered to the workstation.
Figure 3-15 Workstation Modules (for deployment)

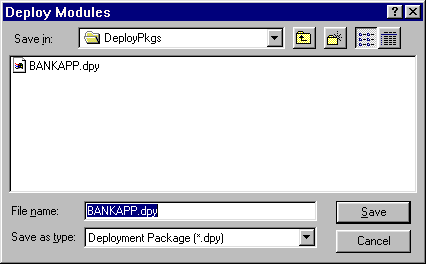
This brings up the Deploy Modules file window (a file browser) in which you can verify the file name and location where you want the deployment package saved. (The default location shown on the file browser is determined by how the Deployment options are set.)
In Figure 3-16, since only BANKAPP is chosen, the Deploy Modules window prompts you with the default name
Had more than one module been chosen, the File name field in the Deploy Modules window would have the value BANKAPP.dpy.
Figure 3-16 Deploy Modules

*.dpy.
This closes the window and creates the deployment package in the specified file and location.
(You can also click Cancel to cancel your changes and close the window.)
Note:
Another shortcut to deploy a single module is to select a module in the Workstation Objects window and choose Deploy from the popup menu on the module (right mouse click to get popup menu). In this case, only one module is deployed, and the File name field contains the selected module name.
See also help on the Deployment Options and Workstation Modules (for Deployment).
To deploy an Active Expert client, perform the following steps.
Ensure that the system on which you want to deploy your client application has the following software installed:
Ensure that TUXEDO and Contract Repository ( Make sure you have created the module deployment package ( In your Windows development environment (Visual Basic, PowerBuilder, or Visual C++), create the client executable.
In order for deployment of Active Expert applications to work automatically with the Visual Basic Application Setup Wizard, information about the deployment package must be provided to the appropriate setup wizard before it is run.
An entry must be added to the file This entry can be placed at the end of the file.
A For Visual Basic you can use the Setup Wizard. Follow the instructions and provide the requested input on the utility windows for setting up your client for distribution. When prompted by the setup windows, be sure to:
IREPSVR) servers needed by your client application are running and accessible by the client.
Have a Deployment Package Ready
.dpy file) in the Active Expert. (Refer to the section "Generating a Deployment Package.")
Create the Client Executable
Configure Files for Setup Utility (Visual Basic Only)
Visual Basic 4.0
swdepend.ini. This file appears in the Windows directory, but it may not be there unless the Setup Wizard has been run at least once. Assuming that the deployment package is called bank.dpy, the entry has the following format:
[BANK.DPY]
Register=$(DLLSelfRegister)
Dest=$(WinSysPath)
Uses1= Visual Basic 5.0
.dep file must be created with the same name as the deployment file, and placed in the same directory. For example, again assuming a deployment file of bank.dpy, create a file called bank.dep and place it in the same directory as bank.dpy. The format of bank.dep is as follows:
[Version]
Version = 1.0.0.0
[BANK.DPY]
Register=$(DLLSelfRegister)
Dest=$(WinSysPath)
Date=10/13/97
Time=16:34:11
Version=0.1.0.1
CABFilename=
CABDefaultURL=
CABINFFile=
CABRunFile=
Uses1=
Run the Setup/Install Utility
The setup utility creates a "setup" executable for your client application (along with some associated files needed to carry out the installation). At this point, you are ready to distribute the new client.
For PowerBuilder and Visual C++, you will need to run
Note:
If the deployment package was not added to the set of files to be distributed with your application, then you can manually register the Active Expert deployment information by running the Windows Load the setup executable and all associated files onto a Windows system where you want to install the Active Expert client. Make sure that the Contract Repository server ( Open the setup executable to start the installation process. Follow the instructions and provide the requested input on the windows to install your client application on the new machine.
regsvr32 after the package has been installed (for example, regsvr32 myapp.dpy).
regsvr32 utility. For example: regsvr32 DeploymentPackage.dpy
Load All Needed Files onto the Target System
IREPSVR) is running when the client application is being installed or when regsvr32 is run on the deployment package.
Run the Setup Executable to Install the New Client Application