Chapter 3 . Configuring the MessageQ Client

This chapter describes how to configure the MessageQ Client. Table 3-1 lists and describes the configuration options for the MessageQ Client.
Table 3-1 MessageQ Client Configuration Options

Option Description Required?

Default Server

Network transport, server host name, and endpoint definition

Yes

Failover

Network transport, server host name, and endpoint definition for the failover server

No

MRS

Settings for enabling the local store-and-forward (SAF) message journal and configuring the local journal files

No

Protocol

Select either the standard Request/Response protocol or the Minimum Packet Protocol.

No

Logging

Settings for logging error events, network statistics, and tracing messages to the Event Watcher or to a log file

No

Tracing

Settings to enable runtime trace information about the API calls, Client DLL activity, or Custom Control trace flags

No

Run the Client Configuration program to specify the MessageQ Client configuration settings. Configuration settings are stored in the dmq.ini file if it is found in the PATH, and in the Registry. The following methods allow users to determine whether they use dmq.ini or the Registry for their configuration settings:

Applications may dynamically configure dmq.ini at runtime using the Windows WritePrivateProfileString function.


Configuring the Server Connection

Configuring the connection to the MessageQ Client Library Server (CLS) consists of the following two items:

Default Server

The default server identifies the MessageQ server system for all connections to the message queuing bus. If automatic reconnection is enabled, applications that lose a connection to a server (or lose a connection to the CLS) try to reconnect when the network connection to the server is available. Client applications also reconnect in the event that the CLS or host server system is stopped and restarted. During an automatic reconnect event, the MessageQ Client attempts to connect only to the default server. Automatic reconnect does not attempt to use the failover server.

After a successful reconnect, the application is automatically attached to the message queuing bus and messaging operations can continue without interruption. All pending messages in the store-and-forward (SAF) journal are sent to the CLS before new operations can be performed. For example, when a pams_get_msg function call triggers the reconnect threshold and a successful automatic reconnect and attach operation completes, the SAF file is completely drained before the pams_get_msg function call returns.

The server configuration options shown in Figure 3-1 are described in Table 3-2.

Figure 3-1 Default Server Configuration Options

Table 3-2 Options to Configure the Default Server

Option Description

Network
Transport Type

The network-level transport used to send messages to the MessageQ CLS. Choices are either TCP/IP or DECnet.

Host name

The name of the host running the MessageQ CLS. The name must have a corresponding entry in the local hosts file or DECnet database.

Endpoint

The endpoint used by the MessageQ CLS. The endpoint identifies either the TCP/IP port number or the DECnet object name the CLS uses to listen for client connections. The same endpoint is used when configuring the MessageQ Client to locate the CLS.

For DECnet transport, the endpoint can range from 1 to 65535 inclusive. The endpoint value is concatenated with the prefix DMQCLS_ to create a unique DECnet object name (for example, DMQCLS_05000).

For TCP/IP transport, the endpoint ranges from 1024 to 65535 inclusive because port numbers less than 1024 are reserved.

Automatic
Reconnection

Two alternatives are available to enable automatic reconnection: first, attempt to reconnect after "message interval" operations are made; second, attempt to reconnect every "timer interval" seconds.

Only one of the reconnect methods may be used. If both configuration values are non-zero, the message interval is used. If both configuration values are 0, then automatic reconnection is not enabled.

Use message
interval

The number of message operations which occur before attempting to reconnect. If set to 0, automatic reconnect is not enabled. If the value of the message interval is greater than 0, then automatic failover will not be used.

The MessageQ Client attempts to reconnect to the server using the message interval option in the server configuration area as the threshold for making a new connection attempt. Setting the value of the message interval greater than 0 enables the automatic reconnect feature.

Any messaging operation call, such as pams_attach_q, pams_put_msg, or pams_get_msg, increments a count used to determine when to attempt another reconnect. When the number of operations attempted reaches the message interval threshold, a reconnect attempt is made. Windows applications can choose to use a higher reconnect value to stream pams_put_msg requests into the local journal for forwarding at a later time.

Use timer
interval

The time period, in seconds, between automatic reconnect attempts. If set to 0, automatic reconnect is not enabled. If the value of the timer interval is greater than 0, then automatic failover will not be used.

The MessageQ Client attempts to reconnect to the server after every timer interval. The reconnect attempts are made independent of the MessageQ calls made by the Client for Windows application.

When a connection to the CLS is available, the Client Library automatically issues a pams_attach_q operation using the parameters of the first pams_attach_q function for a primary queue (PQ) issued by the application.

Automatic Failover Server

If the primary (default) server is not available and automatic failover is enabled, the MessageQ Client provides the option of connecting to a failover CLS. By enabling automatic failover, a MessageQ Client will transparently try to attach to the failover server when the CLS on the primary server group is not available. Attempts to connect to the failover server are only made during a call to pams_attach_q. Failover is not used if automatic reconnect to the default server is enabled.

Using the failover capability requires additional planning and work in order for messages to be sent and received correctly. The message queues used by MessageQ Client applications are implemented by the MessageQ server group. The message queues, and any recoverable message journals, are located on the server system.

When connecting to the failover group, the queue address used by the MessageQ Client is likely to change (unless the MessageQ group started on the failover system has the same group ID as the primary server group). Recoverable messages sent to the client using the queue address of the primary server group are not delivered to the client when it reattaches to the failover server in a different MessageQ server group.

The simplest use of automatic failover is when the MessageQ Client attaches to a temporary queue and uses a request/response style of messaging. The client sends requests to one or more servers that send responses back to the queue address that sent the request. If failover occurs, the MessageQ Client is automatically reattached to a new temporary queue and request messages are sent and responses delivered to the new queue address. The application is unaware that a failover event occurred, except that any pending response is not received.

When clients attach to a specific permanent queue and receive recoverable messages sent to that queue address, they depend on the message queuing resources of that MessageQ group. Recoverable messages sent to the queue address while the client is not attached are saved on that system. If the client reconnects to the same queue name or number, but on a different (failover) MessageQ group, the recoverable messages on the MessageQ group where the default CLS is located are not delivered to the new queue address used by the MessageQ Client.

Automatic failover is not appropriate for all applications. The MessageQ server group and all disk-based queuing resources must also fail over to another system so that messages sent to the MessageQ Client are received after a failover transition. For example, the MessageQ server group can recover by restarting the MessageQ group on another node in an OpenVMS cluster.

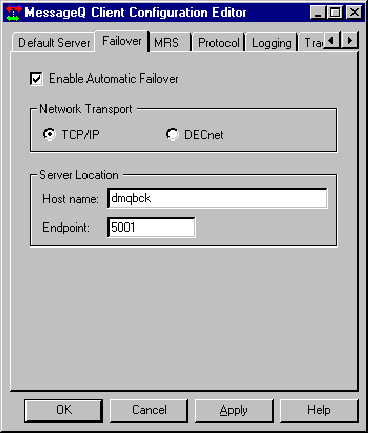
Figure 3-2 shows the automatic failover server configuration options.

Figure 3-2 Automatic Failover Server Configuration Options

Table 3-3 lists and describes the automatic failover server configuration options.
Table 3-3 Options to Configure the Automatic Failover Server

Option Description

Enable Automatic Failover

If checked, automatic failover is enabled.

The failover server is used when the default server is not available and automatic failover is enabled. The use message interval option (see Table 3-2) must be greater than 0.

Network Transport Type

The network-level transport used to send messages to the MessageQ CLS. Choices are either TCP/IP or DECnet.

Host name

The name of the host running the MessageQ CLS. The host name must have a corresponding entry in the local hosts file or DECnet database.

Endpoint

The endpoint used by the MessageQ Client and the MessageQ CLS. The endpoint identifies either the DECnet object name or the TCP/IP port number the MessageQ Client used to locate the CLS. The CLS uses the same endpoint to listen for client connections.

For DECnet transport, the endpoint can range from 1 to 65535 inclusive. The endpoint value is concatenated with the prefix DMQCLS_ to create a unique DECnet object name (for example, DMQCLS_05000).

For TCP/IP transport, the endpoint ranges from 1024 to 65535 inclusive. Port numbers less than 1024 are reserved.


Configuring Message Recovery Services

Message Recovery Services (MRS) are the MessageQ services that manage the automatic redelivery of critical messages. Messages that are sent using a recoverable delivery mode are written to the local store-and-forward (SAF) journal when the connection to the server system is not available.

The MessageQ Client ensures delivery of recoverable messages to the CLS on the MessageQ Server by providing a store-and-forward (SAF) journal (dmqsaf.jrn) to store recoverable messages when the connection to a CLS is not available. Local SAF journal processing is available when Message Recovery Services (MRS) are enabled in the MessageQ Client configuration. The location of the journal file can be set when configuring MRS.

If MRS is enabled, the message recovery journal is turned on when the client application first initiates an attach operation. If the CLS is not available at the time of an attach, the journal file is opened and the attach operation completes with return a status of PAMS__JOURNAL_ON.

When the journal is on, messages sent using the following reliable delivery modes are saved to the journal:

When the connection to the CLS is reestablished, all messages in the SAF journal are sent before new messages are processed. The SAF messages are transmitted in first-in/first-out (FIFO) order. When the connection to CLS is reestablished, a return status of PAMS__LINK_UP is used to indicate that journal processing is no longer active.

Messages are sent from the SAF when one of the following events occurs:

The MessageQ Client MRS configuration options allow the SAF journal to be configured as follows:

These options allow you to determine how disk resources are used for message journals. Journal files that grow indefinitely periodically allocate an extent of disk blocks as needed to store messages. When all messages are sent from the SAF and the journal is empty, the disk blocks used by the journal are freed and the journal file returns to its original size.

This section is optional if recoverable messaging is not used.

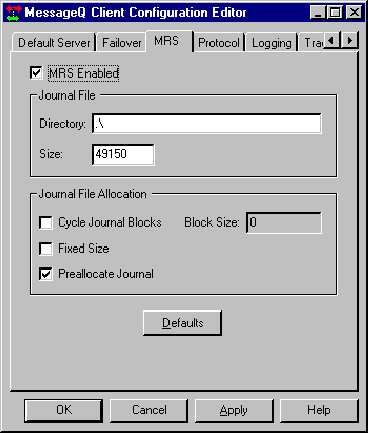
Figure 3-3 shows the MRS configuration options.

Figure 3-3 MRS Configuration Options

Table 3-4 describes the MRS configuration options.
Table 3-4 Options to Configure MRS

Option Description

MRS Enabled

When checked, MRS is enabled.

Journal File Path

Specifies the path where the MessageQ journal file, dmqsaf.jrn, is located. The default location is the current working directory.

Journal File Size

Initial size, in bytes, of the journal file

Cycle Journal Blocks

If enabled, the journal cycles (reuses) disk blocks when full and overwrites previous messages. The Cycle Journal Blocks option automatically sets the Fixed Size allocation option. When Cycle Journal Blocks is enabled, all read/write operations to the journal use fixed-size journal message blocks.

Fixed Size

Determines if the journal size is fixed or allowed to grow. If Cycle Journal Blocks is enabled, Fixed Size is also enabled.

Note: Journals that do not cycle and are not fixed can grow until the disk is full.

Preallocate Journal

If enabled, the journal file disk blocks are preallocated when the journal is initially opened.

Journal Message
Block Size

Defines the file I/O block size, in bytes. Used for journal read/write operations only when Cycle Journal Blocks is enabled. Because an 80-byte MRS message header is written to the journal for each user message, you must add 80 bytes to the largest user message when calculating the Journal Message Block Size.


Configuring Protocol

The Protocol options determine how the MessageQ Client DLL communicates with the CLS.

Figure 3-4 shows the Protocol configuration options.

Figure 3-4 Protocol Configuration Options

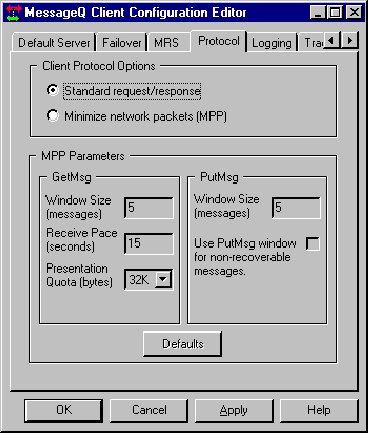
Table 3-5 describes the Protocol configuration options.
Table 3-5 Options to Configure Protocol

Option Description

Standard request/response

Uses an RPC style of communication that sends a network request message and receives a network response message for every API call. If checked, standard request/response protocol is used.

Minimum packet

Reduces the network activity by combining CLS responses to pams_put_msg operations and asynchronous pams_get_msg operations. If checked, minimum packet protocol is enabled.

There are significant differences between the standard request/response and Minimum network packets. Table 3-6 lists those differences to help you choose the protocol option that works best for your client implementation.
Table 3-6 Differences Between the Protocols

Network Behavior

Standard Request/Response

Minimum Packet

TCP/IP Keepalive probes

Keepalive probes are used to detect client or server failure

Keepalive probes are not used. Local time-outs are used to determine partner failure

Attach queue operations

Sends a connection request and response, followed by an attach request and response

Same as the standard request/response protocol

Get message operations

Involves a network poll by sending a request to the CLS and receiving a response

Only the first GetMsg call sends a request, all other GetMsg operations check the local presentation queue. CLS sends messages when they are available.

Put message operations

Sends one request and receives one response for each operation

Sends the request and receives a deferred response for all messages in the PutMsg window

Set Select filter in effect

Immediately for the next GetMsg operation

After messages available in the client's presentation queue are received, then the select filter takes effect. Filter does not apply to existing messages in the local presentation queue.

Locate Queue, Show Pending, and similar operations

Each API call uses one request and one response.

Same as the Standard request/response protocol

pams_cancel_get

Not supported

Requests CLS to stop sending messages until the next GetMsg operation

Detach and Exit operations

Each API call uses one request and one response

Sends the request to CLS, no response is returned

Standard Request/Response

No additional configuration is required to support the standard request/response protocol.

Minimum Packet Protocol

You can configure the Minimum Packet Protocol (MPP) to customize the way the Client DLL and CLS exchange messages. Adjust the MPP parameters to suit your application and the network environment in which your application will run.

Table 3-7 describes the Minimum Packet Protocol configuration options.

Note: MPP does not function under the Netmanage Chameleon TCP/IP product.
Table 3-7 Options to Configure Minimum Packet Protocol

Option Description

GetMsg Window Size

The number of outstanding messages the CLS reads from the queue and sends to the client before the client application dequeues the messages locally. Unread messages are kept in an in-memory queue on the Client system and non-recoverable messages may be lost if the client aborts or exits without reading them.

GetMsg Receive Pace

The rate, in seconds, that the CLS polls for available MessageQ messages. Receive Pace prevents the CLS from dequeuing and sending messages to the client faster than the application processing time or the network transmission speed. The minimum value is 1 second.

GetMsg Presentation Quota

The amount of global heap memory used for the local presentation queue for each client application. Set the presentation quota large enough to handle the largest application message size mutiplied by the GetMsg Window Size.

PutMsg Window Size

The number of messages the client sends to the CLS before requesting a response for the previous Window Size messages. Network link loss is detected by the client only when it requests a PutMsg Window Response.

Send non-recoverable messages using PutMsg Window

If checked, non-recoverable messages increment the PutMsg Window count and are acknowledged in the PutMsg Window.

If not checked, non-recoverable messages do not increment the PutMsg Window counter and are not acknowledged in the PutMsg Window response.

Note: TCP/IP keepalive messages can be turned off when using the Minimum Packet Protocol.


Configuring Logging

The MessageQ Client allows you to log error events and messages to the Event Watcher, as well as trace messages and write the output to a trace file. All files are located in the current working directory for the application.

Message logging allows you to obtain a complete history of the messaging activity of your application. Tracing messages to the Event Watcher is an effective way to monitor the run-time behavior of the application. For more information about the MessageQ Event Watcher, see the Event Watcher Utility topic in Chapter 4.

Figure 3-5 shows the Message Logging configuration options.

Figure 3-5 Message Logging Configuration Options

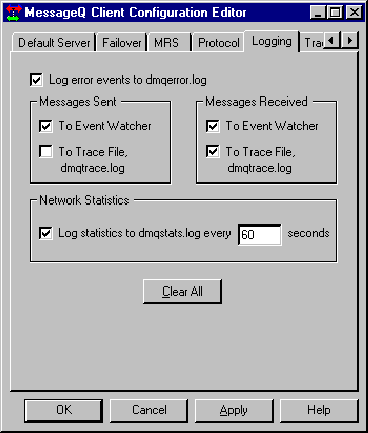
Table 3-8 describes the message logging and message tracing configuration options. Note that you must stop and restart your application and perform a pams_attach_q operation for any of the logging options to take effect.
Table 3-8 Options to Configure Message Logging

Option Description

Log Error Events

If enabled, logs error events to the file dmqerror.log. The default behavior is to log error events. If error event logging is enabled, connection errors to the CLS also log the full file path of the configuration file used at the time of the connection attempt. This can help identify problems due to multiple copies of the configuration file.

Messages Sent To Event Watcher

If enabled, sends a copy of MessageQ messages sent by the Windows application to the Event Watcher.

Messages Sent To Trace File

If enabled, sends a copy of MessageQ messages sent by the Windows application to the dmqtrace.log message log file.

Messages Received To Event Watcher

If enabled, sends a copy of MessageQ messages received by the Windows application to the Event Watcher.

Messages Received To Trace File

If enabled, sends a copy of MessageQ messages received by the Windows application to the dmqtrace.log message log file.

Network Statistics

The interval, in seconds, that network statistics are logged to the file dmqstats.log. The maximum is 32,767 seconds. Setting this value to 0 prevents network statistics from being logged.


Configuring Tracing

Tracing can be a useful debugging tool, because it allows you to observe MessageQ Client processing activity. The trace output may create large output files on your system, and should only be used to monitor specific application behavior. The trace output log files are located in the default working directory for the application.

Figure 3-6 shows the tracing configuration options.

Figure 3-6 Tracing Options

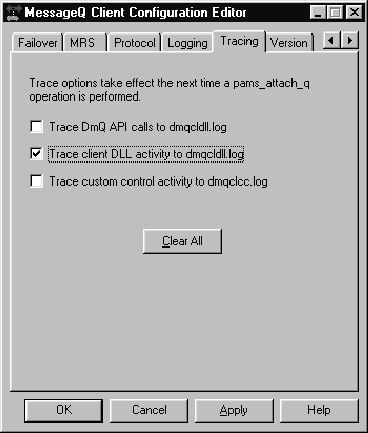
Table 3-9 describes the Tracing configuration options.
Table 3-9 Options to Configure Tracing

Option

Description

Trace PAMS API calls

If checked, logs the API calls to the file dmqcldll.log. The default is no tracing.

Trace client DLL activity

If checked, traces the internal client library activity to the file dmqcldll.log. The default is no tracing.

Trace Custom Control
activity

If checked, traces the internal custom control library activity to the file dmqclcc.log. The default is no tracing.


Determining MessageQ Version

To determine the version of the MessageQ Client DLL, open the configuration utility. The window shown in Figure 3-7 is displayed. Click on the tab marked Version.

Figure 3-7 Client DLL Version Number

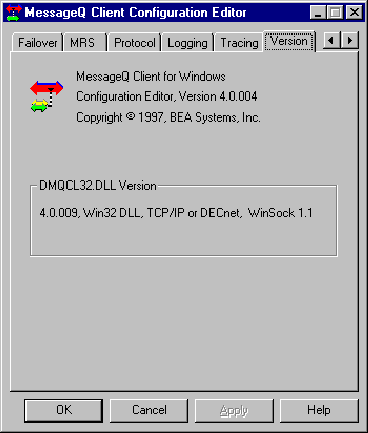
It is also possible to obtain DLL version information by displaying the file properties using Windows Explorer or File Manager.


MessageQ Utilities

In addition to the Configuration Editor, the MessageQ Client provides the utilities listed in Table 3-10 to assist in the configuration process.
Table 3-10 MessageQ Utilities

Utility Description

Security

Allows a MessageQ administrator to define a list of MessageQ Client nodes that can attach to CLS. The utility provides a convenient user interface to review, modify, and update the security table used by CLS on a remote server system.

Test

Useful for unit-testing applications under development, the Test Utility allows you to test various MessageQ message delivery options and send messages to any process connected to the MessageQ bus.


Configuring Security Using the CLS Security Utility

The MessageQ CLS Security Utility, dmqsecu.exe, allows a MessageQ administrator to define a list of MessageQ client systems that can attach to CLS. The utility provides a convenient user interface to review, modify, and update the security table used by CLS on a remote server system.

A CLS security template file, dmqclsec.txt, is installed on the MessageQ server system. This file must be manually edited to specify the client systems that can update the security file with the CLS Security Utility. For more information about the CLS Security template file, see the Client Library Server topics in the MessageQ Installation and Configuration Guide.

Run the CLS Security Utility to update or modify the CLS security file. Figure 3-8 shows the main window of the MessageQ CLS Security Utility.

The CLS Security Utility uses the MessageQ Client configuration settings to connect to a CLS. The security file is automatically retrieved when the CLS Security Utility is started. You can change the Default Server configuration to use the CLS Security Utility with multiple CLS servers in different MessageQ groups. The current CLS hostname, endpoint, and group ID are displayed in the status bar. If the CLS is not using a security file, the CLS Security Utility will display an "Error getting security file" message.

The CLS security table consists of a list of client nodes that are allowed to connect to CLS and attach to the MessageQ message queuing bus. The security table format allows a MessageQ administrator to restrict access by client nodes to specific CLS endpoints and message queues. The Client Node List is similar to the cross-group connection table in the MessageQ group configuration. Only client nodes with entries in the list are allowed to connect to CLS. All other connection requests are rejected.

The list of client nodes defined in the security table is displayed in a scrollable list on the main form. You can modify individual entries in the list by selecting (highlighting) an entry with one mouse click and selecting the Edit... command button, or by double-clicking on the entry. Table 3-11 shows the minimum server versions required for security file support.
Table 3-11 Minimum MessageQ Server Versions

MessageQ Minimum Version

MessageQ for UNIX

V3.1

MessageQ for Windows NT

V3.1

MessageQ for OpenVMS

V4.0

Figure 3-8 shows a typical CLS Security Utility Main Window.

Figure 3-8 CLS Security Utility Main Window

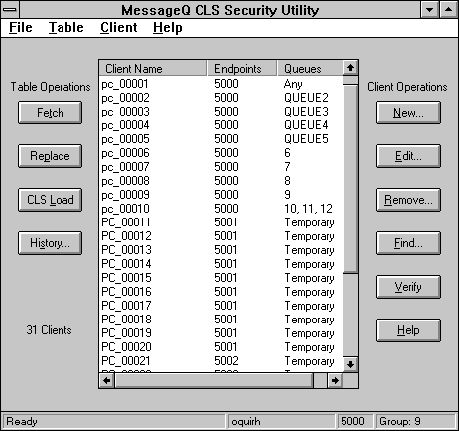
Table 3-12 lists the CLS Security Utility command buttons for the Client Operations.
Table 3-12 CLS Utility Command Buttons for Client

Button Description

New...

Create a new client entry to add to the security table.

Edit...

Edit the currently selected entry in the Client Node List.

Remove...

Remove the currently selected entry, or multiple selection entries, in the Client Node List.

Find...

Locate an entry in the Client Node List by searching for a string.

Verify

Perform a pams_locate_q operation on all queue names for all entries in the Client Node List to check that queue names are defined in the MessageQ Queue configuration.

Help

Online help

Table 3-13 lists the CLS Security Utility command buttons for the Table Operations:
Table 3-13 CLS Security Utility Command Buttons for Table Operations

Button Description

Fetch

Request a new copy of the security table from CLS and replace any current updates to the table.

Replace

Send an updated version of the security table to CLS to save any modifications. Replace is a restricted operation. Updates to the CLS security table do not take effect until CLS is restarted, or until the user requests CLS to dynamically reload the security table.

CLS Load

Request CLS to dynamically reload the security table. CLS Load is a restricted operation. Changes to the security table do not affect clients already connected to CLS and attached to a message queue.

History...

Display the modification history for the security table and provide a form for entering new modification comments.

Help

Online help

Only client nodes that are granted CLS_SECURITY_FILE access in the CLS security table are allowed to modify the contents of the CLS security file using the CLS Security Utility. CLS security file updates are not password-protected. The CLS security table cannot be saved to a local file. However, you can print the contents of the security table by using the File menu Print option. Changes to the security table that have not been saved with the Replace command are not printed.

For more information about the CLS Security File, see the Installation and Configuration Guide for your MessageQ server platform.

Adding or Editing a Client Entry

The Security Table Client Entry dialog displays information about the resources the client node can access. Figure 3-9 shows the options for editing and creating client entries.

Figure 3-9 Security Table Client Entry Options

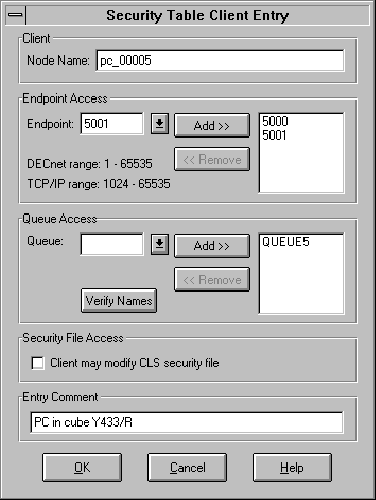
Table 3-14 describes the configuration options for security table client entries.
Table 3-14 Options to Configure Security Table Client Entries

Option Description

Client Node Name

The node name is usually the TCP/IP hostname or DECnet node name for the client. The node name may also be an IP Address (for example, 1.23.45.156) or an alias name as defined in the TCP/IP hosts table on the CLS server system.

Endpoint Access

The endpoint access is defined by a list of 0 or more endpoints that this client can use. The endpoint list may contain up to 10 different endpoints. An empty endpoint list defaults to allowing access to any endpoint with no restrictions. Endpoints are added or removed from the endpoint list (to the right) by using the corresponding command buttons.

Queue Access

The queue access identifies a list of 0 or more queues that this client can use. The queue list may contain up to 10 different queues. An empty queue list defaults to allowing access to any queue with no restrictions. Queues can be identified by queue names or queue numbers. Clients can also be restricted to allow access only to temporary queues by selecting Temporary from the pull-down list box.

Queues are added or removed from the queue list (to the right) by using the corresponding command buttons. The Verify Names button invokes a pams_locate_q operation for all the queue names in the queue list to check that they are defined in the MessageQ group configuration.

Security File Access

The security file access option is checked if the client node is granted access to replace and request a CLS reload of the CLS security file. Checking the box grants CLS_SECURITY_FILE access for the client node.

Entry Comment

The entry comment is an optional field to add information about the client node.

The client entry is added to the Client Node List on the main form when the OK button is selected. Changes to the security table do not become permanent until after the table is replaced. Changes to the security table do not become active until after a CLS load request, or the CLS server is restarted.

Maintaining Modification History

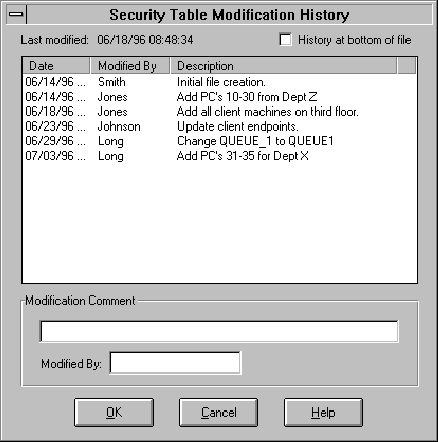
Modification history is a useful way to keep track of updates to the CLS security table. You can maintain the modification history for the CLS security table by using the Security Table Modification History dialog, as shown in Figure 3-10.

Figure 3-10 Security Table Modification History

Table 3-15 Options to Configure Security Table Modification History

Option Description

Last modified

Date and time the CLS Security Utility was last used to modify the CLS security file. The last modified time is set automatically when the security table is updated using the Replace option.

History at bottom of file

Check box that indicates how the modification history is written to the CLS security file. When the box is checked, the modification history is written to the file after all entries in the Client Node List. If the box is unchecked, the modification history is written at the beginning of the file before the Client Node List.

Modification Comment

Reasons for changes to the security table. Maximum field size of 80 characters.

Modified By

Author of the entry. Maximum field size of 10 characters.


Testing the Configuration Using the Test Utility

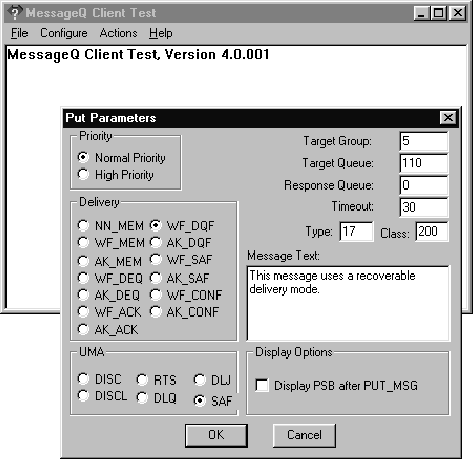
To test your newly configured MessageQ Client, run the MessageQ Client Test Utility for Windows (Figure 3-11).

The Test Utility allows you to interactively select the parameter options for individual calls to MessageQ. The program also allows you to test various MessageQ message delivery options and send messages to any process connected to the MessageQ bus. Use the Test Utility for unit-testing applications under development.

Figure 3-11 MessageQ Test Utility