The Web Application Services Toolkit is an extension to the Jolt 1.1 Java class library. The Toolkit allows the Jolt client class library to be used in a Web Server (such as Netscape Enterprise Server or Microsoft Active Server) to provide an interface between HTML clients or browsers, and a TUXEDO application.
A complete listing of all the examples used in this chapter are distributed with the Jolt Web Application Services Toolkit software. In this chapter, segments of code from these samples are used to illustrate the use of the Toolkit. The samples delivered with the software provide support four services: INQUIRY, WITHDRAWAL, DEPOSIT, and TRANSFER. This chapter explains the steps you can follow to use an HTML client interface to the TRANSFER service of the TUXEDO bankapp application. The TRANSFER service illustrates the use of parameters with multiple occurrences. This walkthrough explains the use of the TRANSFER service only.
Note: The walkthrough illustrates the use of the Web Application Services with Netscape Enterprise Server. If you are using the Microsoft IIS and VBScript, you need to use the corresponding Visual Basic methods.
To use the information in the following sections, you should be familiar with:
Note:
With Netscape Enterprise Server, the interface to Java classes is through LiveConnect and server-side JavaScript. Microsoft Internet Information Server uses Active Server Pages and VBScript as its primary interface.
Follow these steps to complete the Web Application Services walkthrough:
Overview
Review this checklist before starting the TRANSFER Request Walkthrough.
Note:
This checklist applies to Netscape Enterprise Server only.
Getting Started Checklist
Note:
There are several README files provided with this software. Make sure you are reading the correct file located in the directory <extract_directory>/JoltWAS_ns.
<extract_directory>/JoltWAS_ns/teller.
Note:
Edit the file, web_start.js to specify the correct hostname and port number for the Jolt Session Pool.
<extract_directory>/teller.
The TRANSFER Service in bankapp moves funds between two accounts. The service takes two account numbers, an input amount, and returns two balances-one for each account. In addition, the service returns an error message if there is an application or system error.
A TRANSFER is a WITHDRAWAL and a DEPOSIT executed as a single transaction. The transaction is created on the server, so the client does not need to create a transaction.
The client interface consists of an HTML page with a form used to enter the required data - account numbers and a dollar amount. This data is sent to the Web server as a "POST" request.
In the Web server, this request is processed using a server-side JavaScript program. This program extracts the input data fields from the request, formats them for use with the Jolt Web Application Services class library, and dispatches the request to the TRANSFER service in the bankapp application. The TRANSFER service returns the results of the transaction. These results are returned to the JavaScript program that merges them into a dynamically created HTML page. This page is returned to the client via the Web server infrastructure.
In the final part of this walkthrough, run the necessary HTML pages and server-side JavaScript logic to execute a TRANSFER.
This section explains what happens when you execute a TRANSFER request. Each step is not illustrated here, only those steps that are necessary.
Included are:
To start the walkthrough, use the browser on your client to connect to the Web server where the Jolt Web Application Services classes are installed. The first page to download is
Note:
The use of the port number is optional, depending on how your Web server is configured. In most cases, you are not required to add the ":port" in the URL.
Figure 3-1 is an example of the
The page, Initializing the Jolt Session Pool Manager
tellerForm.html. If the teller sample has been installed as described in step 6 of the "Getting Started Checklist," the URL for this page will be:
http://<web-server:port>/teller
tellerForm.html page.
Figure 3-1 tellerForm.html Example
tellerForm.html contains JavaScript functions required to initialize the Jolt Session Pool Manager. The initialization code is contained in a <SERVER>..</SERVER> block. This code tells the Web server to execute this block of code on the server, instead of sending it to the client.
Listing 3-1
tellerForm.html: Initialize the Jolt Session Pool Manager
<SERVER>
// Initialize the session manager and cache templates.
web_initSessionMgr(null);
web_cacheTemplates();
</SERVER>
The JavaScript function web_initSessionMgr() calls other JavaScript functions to establish a Jolt Session. The Jolt Session is established between the Jolt Web Application Services in the Web Server and the Jolt Servers that reside in your TUXEDO application. One of the functions called is web_start(). This function (in the file web_start.js) should have been edited as part of the teller application installation process in step 6 of the "Getting Started Checklist".
The function web_cacheTemplates() reads various HTML template files into a memory cache. This step is not required, but it improves performance.
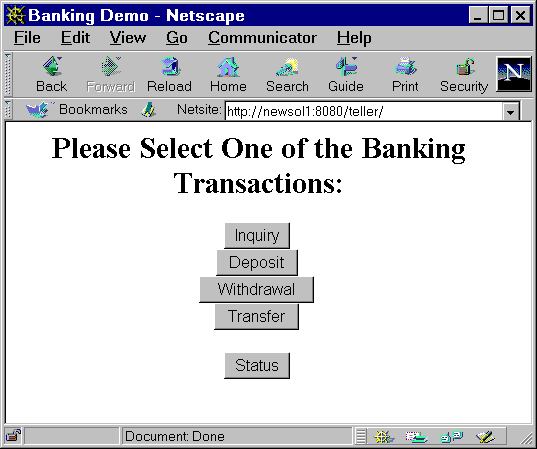
Listing 3-2 tellerForm.html: Allow the user to choose TRANSFER service
<INPUT TYPE="button" VALUE="Transfer"
onClick="window.location='transferForm.html'">
The HTML segment above displays a button labeled Transfer. When this button is selected, the browser loads the page transferForm.html. This page presents a form used to enter the data required by the TRANSFER service.
Figure 3-2 transferForm.html Example
![]()
The form in Figure 3-2 is generated by the page transferForm.html. This page presents you with a form that will be used for input. The page consists of three text fields (two account numbers and a dollar amount), and a button that, when pressed, will cause the TRANSFER service to be invoked.
The code segment in Listing 3-3 shows the key HTML elements for this page. The highlighted elements in Listing 3-3 correspond to the elements in Table 3-2.
Listing 3-3 transferForm.html: TRANSFER Form
<FORM NAME="teller" ACTION="tlr.html" METHOD="POST">
<TABLE>
<TR><TD ALIGN=RIGHT>From Account Number:</TD>
    <TD><INPUT TYPE="text" NAME="ACCOUNT_ID_0"></TD></TR>
<TR><TD ALIGN=RIGHT>To Account Number:</TD>
    <TD><INPUT TYPE="text" NAME="ACCOUNT_ID_1"></TD></TR>
<TR><TD ALIGN=RIGHT>Amount: $</TD>
    <TD><INPUT TYPE="text" NAME="SAMOUNT"></TD></TR>
</TABLE>
<INPUT TYPE="hidden" NAME="SVCNAME" VALUE="TRANSFER">
<INPUT TYPE="submit" VALUE="Transfer">
<INPUT TYPE="reset" VALUE="Clear">
</FORM>
The HTML form field names used in this example exactly match the TUXEDO field names expected by the TRANSFER service. This is not required, but doing so facilitates processing on the server because you do not have to map these inputs to TUXEDO field names. This is done by the Jolt Web Application Services classes.
The hidden field SVCNAME is assigned a value of TRANSFER. This field does not appear on the client form, but it is sent to the Web server as part of the request. The server-side JavaScript program retrieves the value of this field in order to determine which TUXEDO service is to be called (in this example, the service is TRANSFER).
Complete the fields From Account Number, To Account Number, and Amount. (Account numbers 10000 and 10001 are usually valid in bankapp). Press the "Transfer" button. The data entered on the form is sent to the Web server for processing by the program tlr.html as specified in the ACTION field of the form.
When the Web server receives the TRANSFER request, it runs the program tlr.html. Client requests are turned into a request object in the Web server. This request object has members containing all the data which was input into the form along with other form data, such as hidden fields, etc. The Web server makes the request object available to the program being invoked.
The program tlr.html contains only server-side JavaScript. The first action performed by this program verifies that the Jolt Session Pool Manager is initialized. The code example shown in Listing 3-4 performs the initialization check and returns an HTML error page if the pool is not initialized.
Listing 3-4 tlr.html: Verify the Jolt Session Pool Manager is Initialized
if (project.mgr == null) {
	write("<HTML><HEAD><TITLE>Error</TITLE></HEAD>"+
		"<BODY><CENTER><H2>"+
		"Session Manager is not initialized</H2>"+
		"<P>Make sure that you access the correct HTML"+
		"</CENTER></BODY></HTML>");
}
If the session pool is initialized, the program continues to process the request. The program locates a Session from the Session Pool Manager shown in Listing 3-5.
Listing 3-5 tlr.html: Locate a session
var session = project.mgr.getSessionPool(null);
Once a valid session is located, the program retrieves an HTML template that is used to return the results to the client. In this example, these templates were cached in the initialization section. The template retrieved is identified by the name of the service being invoked, request.SVCNAME shown in Listing 3-6.
Listing 3-6 tlr.html: Retrieve a Cached HTML Template
// Template
        var path = project.templatedir;
        var template = project.templates[request.SVCNAME];
        if (template == null)
                template = new Packages.bea.web.ns.Template();
Next, call the TUXEDO service. In this example, the input data from the request object is passed to the call() method of the session. The call() method accepts the request object as a parameter. The results of the call() are stored in the output object and an array, iodata.
Listing 3-7 tlr.html: Invoke the TUXEDO Service
var output = iodata[1] = session.call(request.SVCNAME, request);
After you invoke the TUXEDO service, the output object and the second element of the array iodata contain the results of the service call.
Note:
In this example, because the initial form specified field names match the TUXEDO service parameter names, the request object can be passed unchanged into the call() method. If these names do not match, manipulate the request object before invoking the call() method.
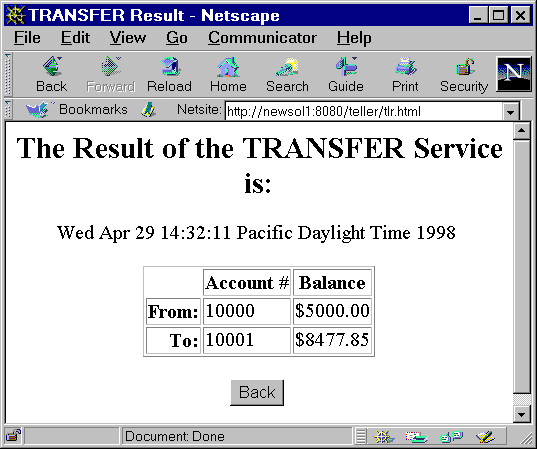
At this stage, no results have been returned to the client. The final step sends an HTML page containing the results of the service call back to the client. The HTML page consists of the template merged with the data returned by the service call shown in Listing 3-7.
The template file contains placeholders for variable (call specific) data. These placeholders are identified by the special tag <%=NAME %>. In the code example shown in Listing 3-8, use an index to indicate which occurrence of a parameter name is used. For example, ACCOUNT_ID[0] specifies the first occurrence of the field ACCOUNT_ID.
Listing 3-8 transfer.temp: Placeholders for TRANSFER Results
<TABLE BORDER=1>
<TR><TD></TD><TD ALIGN=CENTER><B>Account #</B></TD>
	<TD ALIGN=CENTER><B>Balance</B></TR>
<TR><TD ALIGN=RIGHT><B>From:</B></TD><TD><%=ACCOUNT_ID[0]%></TD>
	<TD><%=SBALANCE[0]%></TR>
<TR><TD ALIGN=RIGHT><B>To:</B></TD><TD><%=ACCOUNT_ID[1]%></TD>
	<TD><%=SBALANCE[1]%></TR>
</TABLE>
To substitute the placeholders in the template with the actual values of the data returned from the service call, use the eval() method of the Template class shown in Listing 3-9. This method matches placeholders in the template file with fields of the same name in the results data and replaces them accordingly. A check for valid results (output object) is done as shown in Listing 3-9. If there is no output object, an error template page is returned.
Listing 3-9 tlr.html: Template Processing
if (output == null)
	template.evalFile(path+"templates/nosession.temp", null);
else if (output.noError())
	template.eval(iodata);
Note: The array iodata contains both the input request and the results from the service call. This is useful if you want the results page to contain data that is part of the input.
When the template is processed, the resulting HTML is returned to the client as shown in Figure 3-3.
Figure 3-3 tlr.html Results Page