

|
|
|
|
|
|
Working with the Bulk Loader
The following sections describe how to work with the Bulk Loader:
Warning: When you use the Bulk Loader to modify the repository, these changes do not take effect until you reboot your WebLogic Collaborate system or you use the C-Hub Administration Console to make a change in a related area. Therefore, it is recommended that you do not use the Bulk Loader while the c-hub is up and running.
In addition to using the Bulk Loader, you can also use the C-Hub Administration Console to transfer data to and from the repository as described in Using the C-Hub Administration Console, which is Part II of this document.
Terminology
The term "data element" refers to an element in the repository and the term "XML element" refers to a term in an XML file. The term "attribute" refers to an attribute for an XML element. The term "value" can refer to the value for an attribute or the value for a data element. For example:
<message-def name="request.dtd">
    <message-part content-type="text/xml">
        <document-def-name>request.dtd</document-def-name>
    </message-part>
</message-def>
In these lines of code from a repository data file:
Importing Data into the Repository
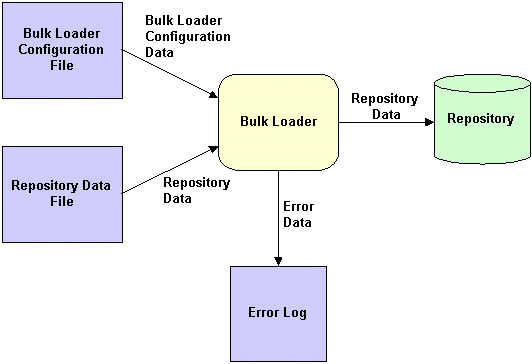
As the following figure shows, the Bulk Loader reads the Bulk Loader configuration file to transfer data from a repository data file, which is in XML, into the repository. If the Bulk Loader detects any errors during this procedure, it creates an error log.
Figure 3-1 Using the Bulk Loader to Import Repository Data
The following sections describe how to import repository data:
How the Bulk Loader Imports Data
The Bulk Loader uses the following logic to import data from a repository data file into the repository:
The following table lists the default values for special IMPLIED attributes.
Procedure for Importing Data into the Repository
To import data from a repository data file into the repository:
Warning: When you use the Bulk Loader to modify the repository, these changes do not take effect until you reboot your WebLogic Collaborate system or you use the C-Hub Administration Console to make a change in a related area. Therefore, it is recommended that you do not use the Bulk Loader while the c-hub is up and running.
In the Bulk Loader configuration file, include the load-processing-parameters XML element that instructs the Bulk Loader to import data from the repository data file into the repository. For information about creating the Bulk Loader configuration file, see Working with the Bulk Loader Configuration File.
For information about creating the repository data file, see Working with the Repository Data File.
UNIX: bulkloader.sh cfg_file
Windows: bulkloader cfg_file
In this command syntax, cfg_file is the pathname of the Bulk Loader configuration file that you created in Step 1. The Bulk Loader configuration file specifies the pathname of the repository data file that you created in Step 2. The Bulk Loader uses the same command for importing, exporting, and deleting. The Bulk Loader configuration file indicates which action to take.
While importing data, the Bulk Loader checks for errors as described in Checking Data.
Exporting Repository Data to a Repository Data File
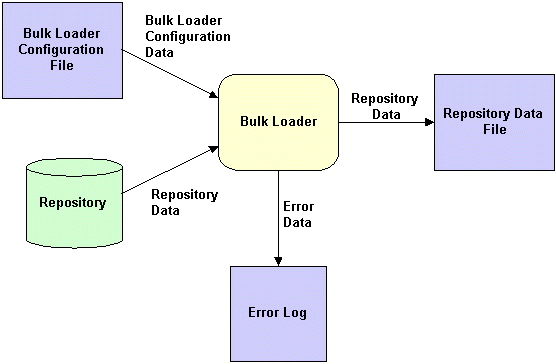
As the following figure shows, the Bulk Loader reads the Bulk Loader configuration file to transfer data from the repository to an XML repository data file. If the Bulk Loader detects any errors during this procedure, it creates an error log.
Figure 3-2 Using the Bulk Loader to Export Repository Data
The following sections describe how to export repository data:
Full and Partial Repository Exports
When you export data from the repository, you can export all the data or you can export a portion of the data:
By default, the Bulk Loader performs a full repository export. To perform a partial repository export, use the entities XML element in the Bulk Loader configuration file. The entities XML element specifies the data elements to export. The Bulk Loader uses the entities values to traverse the repository to the specified data elements.
For an example of a Bulk Loader configuration file that specifies a partial repository export, see Listing 3-5. For a complete description of the entities XML element, see BulkLoader.dtd, which is in the dtd subdirectory of your WebLogic Collaborate installation directory.
The following sections describe how to identify the data elements to export during a partial export:
Exporting a Specific Instance of a Data Element
You can identify a specific data element instance in the Bulk Loader configuration file. For example, to export a specific c-space, identify the name of the c-hub and the name of the c-space as shown in the following listing. This strategy applies to all types of data elements, including c-hubs.
Listing 3-1 Bulk Loader Configuration File for Exporting a Specific C-Space
<?xml version="1.0"?>
<!DOCTYPE bulkloader SYSTEM "BulkLoader.dtd">
<bulkloader>
    <unload-processing-parameters>
        <database-url>jdbc:weblogic:oracle:REPO</database-url>
        <database-driver>weblogic.jdbc.oci.Driver</database-driver>
        <database-user-id>scott</database-user-id>
        <database-password>tiger</database-password>
        <xml-file-name>ExportRepoData.xml</xml-file-name>
        <entities>
            <c-hub name="MainHub">
                <c-space name="PriceSpace">
                </c-space>
            </c-hub>
        </entities>
    </unload-processing-parameters>
</bulkloader>
Exporting All Instances of a Data Element
If you do not identify a specific data element in the Bulk Loader configuration file, the Bulk Loader exports all such data elements. For example, to export all c-spaces in a certain c-hub, identify the c-hub and do not identify the name of the c-space as shown in the following listing. This strategy applies to all types of data elements, including c-hubs.
Listing 3-2 Bulk Loader Configuration File for Exporting All C-Spaces in a C-Hub
<?xml version="1.0"?>
<!DOCTYPE bulkloader SYSTEM "BulkLoader.dtd">
<bulkloader>
    <unload-processing-parameters>
        <database-url>jdbc:weblogic:oracle:REPO</database-url>
        <database-driver>weblogic.jdbc.oci.Driver</database-driver>
        <database-user-id>scott</database-user-id>
        <database-password>tiger</database-password>
        <xml-file-name>ExportRepoData.xml</xml-file-name>
        <entities>
            <c-hub name="MainHub">
                <c-space/>
            </c-hub>
        </entities>
    </unload-processing-parameters>
</bulkloader>
Short and Long Repository Exports
When you export data from the repository, you can export to the short format or the long format:
By default, the Bulk Loader exports repository data in the short format. To specify the long format, set the format attribute in the unload-processing-parameters in the Bulk Loader configuration file to "long."
Because the long format includes internal repository data in addition to the values for the various objects, we recommend that you use the long format only for the following reasons:
For an example of a Bulk Loader configuration file that specifies a format value, see Listing 3-4. For a complete description of the format attribute, see BulkLoader.dtd, which is in the dtd subdirectory of your WebLogic Collaborate installation directory.
Procedure for Exporting Repository Data
To export data from the repository to a repository data file:
In the Bulk Loader configuration file, include the unload-processing-parameters XML element that instructs the Bulk Loader to export data from the repository to a repository data file. For information about creating the Bulk Loader configuration file, see Working with the Bulk Loader Configuration File.
UNIX: bulkloader.sh cfg_file
Windows: bulkloader cfg_file
In this command syntax, cfg_file is the pathname of the Bulk Loader configuration file that you created in Step 1. The Bulk Loader configuration file specifies the pathname of the repository data file into which the Bulk Loader exports the data. The Bulk Loader uses the same command for importing, exporting, and deleting. The Bulk Loader configuration file indicates which action to take.
While exporting data, the Bulk Loader checks for errors as described in Checking Data.
Deleting Repository Data
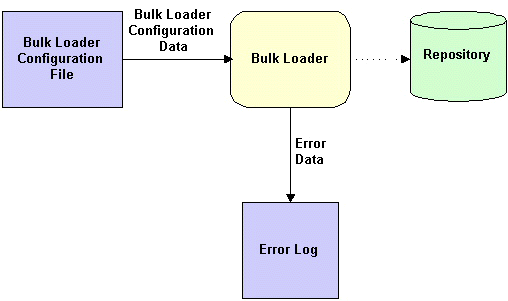
As the following figure shows, the Bulk Loader reads the Bulk Loader configuration file to delete data from the repository. The dotted line in the figure indicates that the Bulk Loader affects the repository, but does not send any data to it. If the Bulk Loader detects any errors during this procedure, it creates an error log.
Figure 3-3 Using the Bulk Loader to Delete Repository Data
To delete repository data:
Warning: When you use the Bulk Loader to modify the repository, these changes do not take effect until you reboot your WebLogic Collaborate system or you use the C-Hub Administration Console to make a change in a related area. Therefore, it is recommended that you do not use the Bulk Loader while the c-hub is up and running.
In the Bulk Loader configuration file, include the delete-processing-parameters XML element that instructs the Bulk Loader to delete data from the repository. For information about creating the Bulk Loader configuration file, see Working with the Bulk Loader Configuration File.
UNIX: bulkloader.sh cfg_file
Windows: bulkloader cfg_file
In this command syntax, cfg_file is the pathname of the Bulk Loader configuration file that you created in Step 2. The Bulk Loader uses the same command for importing, exporting, and deleting. The Bulk Loader configuration file indicates which action to take.
While deleting data, the Bulk Loader checks for errors as described in Checking Data.
Working with the Bulk Loader Configuration File
The Bulk Loader configuration file is an XML file that uses the BulkLoader.dtd file, which is in the dtd subdirectory of your WebLogic Collaborate installation directory.
To create a Bulk Loader configuration file:
The following sections provide example Bulk Loader configuration files for each type of Bulk Loader task:
Bulk Loader Configuration File for Importing Data
The following listing is an example Bulk Loader configuration file for importing data into the repository. In addition to specifying values that are required in any Bulk Loader configuration file (DTD, database URL, database driver, database user ID, database password), this example also specifies:
Listing 3-3 Bulk Loader Configuration File for Importing Data into the Repository
<?xml version="1.0"?>
<!DOCTYPE bulkloader SYSTEM "BulkLoader.dtd">
<bulkloader>
    <load-processing-parameters database-initialization="no"\
        transaction-level="all">
        <database-url>jdbc:weblogic:oracle:REPO</database-url>
        <database-driver>weblogic.jdbc.oci.Driver</database-driver>
        <database-user-id>scott</database-user-id>
        <database-password>tiger</database-password>
        <xml-file-name>ImportRepoData.xml</xml-file-name>
    </load-processing-parameters>
</bulkloader>
Bulk Loader Configuration File for Exporting Data
The following listing is an example Bulk Loader configuration file for exporting data from the repository. In addition to specifying values that are required in any Bulk Loader configuration file (DTD, database URL, database driver, database user ID, database password), this example also specifies:
Listing 3-4 Bulk Loader Configuration File for Performing a Full Export from the Repository
<?xml version="1.0"?>
<!DOCTYPE bulkloader SYSTEM "BulkLoader.dtd">
<bulkloader>
    <unload-processing-parameters format="long">
        <database-url>jdbc:weblogic:oracle:REPO</database-url>
        <database-driver>weblogic.jdbc.oci.Driver</database-driver>
        <database-user-id>scott</database-user-id>
        <database-password>tiger</database-password>
        <xml-file-name>ExportRepoData.xml</xml-file-name>
    </unload-processing-parameters>
</bulkloader>
The following listing is an example Bulk Loader configuration file for exporting a subscription from the repository. In addition to specifying values that are required in any Bulk Loader configuration file (DTD, database URL, database driver, database user ID, database password), this example also specifies:
Listing 3-5 Bulk Loader Configuration File for Performing a Partial Export from the Repository
<?xml version="1.0"?>
<!DOCTYPE bulkloader SYSTEM "BulkLoader.dtd">
<bulkloader>
    <unload-processing-parameters>
        <database-url>jdbc:weblogic:oracle:REPO</database-url>
        <database-driver>weblogic.jdbc.oci.Driver</database-driver>
        <database-user-id>scott</database-user-id>
        <database-password>tiger</database-password>
        <xml-file-name>ExportRepoData.xml</xml-file-name>
        <entities>
            <c-hub name="MainHub">
                <c-space name="PriceSpace">
                    <collaborator trading-partner-name="TPFailureReportAdmin">
                        <subscription
                            conversation-name="Conversation1"
                            conversation-version="1.1"
                            role-name="FailureReportAdmin">
                        </subscription>
                    </collaborator>
                </c-space>
            </c-hub>
        </entities>
    </unload-processing-parameters>
</bulkloader>
Bulk Loader Configuration File for Deleting Data
The following listing is an example Bulk Loader configuration file for deleting a subscription from the repository. In addition to specifying values that are required in any Bulk Loader configuration file (DTD, database URL, database driver, database user ID, database password), this example also specifies:
Listing 3-6 Bulk Loader Configuration File for Deleting Data from the Repository
<?xml version="1.0"?>
<!DOCTYPE bulkloader SYSTEM "BulkLoader.dtd">
<bulkloader>
    <delete-processing-parameters transaction-level="all">
        <database-url>jdbc:weblogic:oracle:REPO</database-url>
        <database-driver>weblogic.jdbc.oci.Driver</database-driver>
        <database-user-id>scott</database-user-id>
        <database-password>tiger</database-password>
        <entities>
            <c-hub name="MainHub">
                <c-space name="PriceSpace">
                    <collaborator trading-partner-name="Admin">
                        <subscription
                            conversation-name="Conversation1"
                            conversation-version="1.1"
                        </subscription>
                    </collaborator>
                </c-space>
            </c-hub>
        </entities>
    </delete-processing-parameters>
</bulkloader>
Working with the Repository Data File
The repository data file is an XML file that uses the WLCHub.dtd file, which is in the dtd subdirectory of your WebLogic Collaborate installation directory. To create a repository data file, create an XML file that specifies WLCHub.dtd as the DTD file. The following listing shows a repository data file that creates a new conversation and subscribes trading partners to the conversation.
Listing 3-7 Repository Data File for a New Conversation
<?xml version="1.0"?>
<!DOCTYPE c-hub SYSTEM "WLCHub.dtd">
<c-hub name="supplies-hub">

    <c-space name="supplies-space">
        <collaborator trading-partner-name="Partner1">
            <subscription
                conversation-name="Conversation1"
                conversation-version="1.0"
                role-name="buyer">
            </subscription>
        </collaborator>
        <collaborator trading-partner-name="Partner2">
            <subscription
                conversation-name="Conversation1"
                conversation-version="1.0"
                role-name="seller">
            </subscription>
        </collaborator>
    </c-space>

    <conversation-def
        name="Conversation1"
        version="1.0"
        default-durability="NONPERSISTENCE"
        default-conversation-timeout="0">
        <role name="buyer">
            <in-message message-def-name="reply.dtd"/>
            <out-message message-def-name="request.dtd"/>
        </role>
        <role name="seller">
            <in-message message-def-name="request.dtd"/>
            <out-message message-def-name="reply.dtd"/>
        </role>
    </conversation-def>

</c-hub>
Checking Data
The following sections describe how the Bulk Loader checks data:
Creating an Error Log
To keep track of errors, the Bulk Loader creates a file named wlc.log in the current working directory. If a wlc.log file already exists, the Bulk Loader renames the file to wlc.log.yyyy.mm.dd.hh.mi.ss. The following table describes this filename format.
|
Field |
Description |
|---|---|
|
yyyy |
Year |
|
mm |
Month in numeric format (between 01-12) |
|
dd |
Day in numeric format |
|
hh |
Hour (between 00 - 23) |
|
mi |
Minute |
|
ss |
Second |
Validating XML Files
Before processing any data, the Bulk Loader validates the XML files. The following table lists the files that the Bulk Loader validates for each type of Bulk Loader task.
To validate one of these types of XML files, the Bulk Loader checks it against the corresponding .dtd file. If the Bulk Loader detects an error in the XML file, it stops without processing the data.
Checking Data Integrity
After validating the XML files, the Bulk Loader checks the data integrity while it is processing the data. To check data integrity, the Bulk Loader verifies that the information in the XML files does not conflict with the information in the repository.
For example, if the Bulk Loader is adding a new data element to the repository and if the new data element references another data element, the Bulk Loader makes sure that the referenced data element exists in the repository or in the repository data file.
Checking Data Integrity During an Import or a Delete
For an import or a delete, you can set the transaction-level attribute in the Bulk Loader configuration file as shown in Listing 3-3. If you do not set the transaction-level, the Bulk Loader uses the default value. The Bulk Loader takes the following actions depending on the value of transaction-level:
If the Bulk Loader detects invalid data during a transaction, it rolls back the current transaction and then performs the next transaction (for the next high-level data element).
If the Bulk Loader detects invalid data for a c-hub data element at the c-hub level (such as a c-hub attribute), it rolls back all transactions that it performed for that c-hub and stops.
Checking Data Integrity During an Export
If the Bulk Loader detects invalid data in the Bulk Loader configuration file, it does not perform the export.

|

|

|
|
|
|
Copyright © 2001 BEA Systems, Inc. All rights reserved.
|