

|
|
|
|
|
|
Setting Up the C-Hub
The following sections describe how to set up a c-hub:
About the C-Hub Administration Console
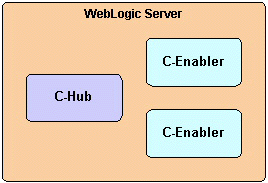
Many configuration tasks require changes to the config.xml file. The number of configuration changes that you need to make depends on whether or not the c-hub and c-enablers are colocated. The following figure shows a c-hub and c-enablers that are colocated, which means that they run on the same WebLogic Server instance.
Figure 2-1 C-Hub and C-Enablers That Are Colocated
The following figure shows a c-hub and c-enablers that are not colocated, which means that they run on different WebLogic Servers.
Figure 2-2 C-Hub and C-Enablers That Are Not Colocated
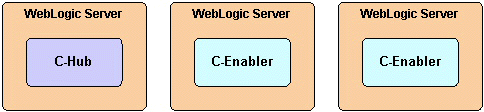
If the c-hub and c-enablers are colocated, they use the same configuration. If the c-hub and c-enablers are not colocated, they use different configurations—one for each WebLogic Server instance.
The config.xml files are in the following locations:
When you run the Verification example to verify the WebLogic Collaborate installation as described in the BEA WebLogic Collaborate Installation Guide, the example software sets up the config.xml file for your environment. For example, you might need to use the Weblogic Server Administration Console to:
This Setting Up the C-Hub section describes how to configure the c-hub. For information about configuring the c-enablers, see Configuring C-Enablers in the BEA WebLogic Collaborate C-Enabler Administration Guide. For information about configuring the Web Logic Server, see the BEA WebLogic Server Administration Guide.
Configuring the C-Hub Startup Class and Starting the C-Hub
There are two ways to start the c-hub, from the command line using startup scripts and from the C-Hub Administration Console.
Using the Command Line
To start the C-Hub from the command line, you must first use the WebLogic Server Administration Console and configure the C-Hub start-up class (com.bea.b2b.hub.Startup) to use the values shown in the following table.
|
Attribute |
Value |
|---|---|
|
Name |
WLCStartup |
|
Class Name |
com.bea.b2b.hub.Startup |
|
Arguments |
RecoveryMode=ON|OFF |
|
Abort Startup on Failure |
TRUE |
For more information on registering startup classes, see "Starting and Stopping WebLogic Servers" in the BEA WebLogic Server Administration Guide.
Using the C-Hub Administration Console
Start the c-hub using the C-Hub Administration Console. For complete information, see Starting the C-Hub in Getting Started with C-Hub Administration.
Configuring the Repository
The repository is a relational database that contains configuration information for c-hubs, c-spaces, trading partners, conversation definitions, document definitions, DTDs, XML documents, XML schemas, and message definitions. The c-hub uses a JDBC connection pool to access the repository.
For information about the supported database versions, see the BEA WebLogic Collaborate Release Notes.
To configure the repository, use the WebLogic Server Administration Console.
Note: All the WebLogic Collaborate components, such as the JMS queue, the repository, persistent storage, and administration, must use the same database and same JDBC connection pool.
When you ran the Verification example, as described in the BEA WebLogic Collaborate Installation Guide, the example software configured a JDBC connection pool for the database that you specified during the installation procedure. If you are using the same database, then you do not need to perform this step. However, to use a different database you need to reconfigure the JDBC connection pool.
The following table describes the database-dependent JDBC connection pool parameters.
The following listing shows the settings for a JDBC connection pool for a Cloudscape database as they would appear in the config.xml file. You enter these settings in the WebLogic Server Administration Console. For more information about using the WebLogic Server Administration Console, see "Overview of WebLogic Server Management" in the BEA WebLogic Server Administration Guide.
Listing 2-1 JDBC Connection Pool Configuration for Cloudscape
<!-- Cloudscape settings -->
        <JDBCConnectionPool
      CapacityIncrement="1"
      DriverName="COM.cloudscape.core.JDBCDriver"
      InitialCapacity="1"
      LoginDelaySeconds="1"
      MaxCapacity="10"
      Name="wlcPool"
      Properties="user=none;password=none"
      RefreshMinutes="0"
      ShrinkPeriodMinutes="15"
      ShrinkingEnabled="true"
      Targets="myserver"
      URL="jdbc:cloudscape:wlcdb"
    />
The following listing is an example of the configuration settings for a JDBC connection pool for an Oracle database entered using the WebLogic Server Administration Console.
Listing 2-2 JDBC Connection Pool Configuration for Oracle
 <!-- Oracle settings -->
        <JDBCConnectionPool
      CapacityIncrement="1"
      DriverName="oracle.jdbc.driver.OracleDriver"
      InitialCapacity="1"
      LoginDelaySeconds="1"
      MaxCapacity="10"
      Name="wlcPool"
      Properties="user=scott;password=tiger"
      RefreshMinutes="0"
      ShrinkPeriodMinutes="15"
      ShrinkingEnabled="true"
      Targets="myserver"
            URL="jdbc:oracle:thin:@fushigi.beasys.com:1521:fush816"
/>
The following listing shows the configuration settings for a JDBC connection pool for a SQL Server database. These settings are entered in the WebLogic Server Administration Console.
Listing 2-3 JDBC Connection Pool Configuration for SQL Server
<!-- SQL Server settings (MSSQL) -->
    <JDBCConnectionPool
      CapacityIncrement="1"
      DriverName="weblogic.jdbc.mssqlserver4.Driver"
      InitialCapacity="1"
      LoginDelaySeconds="1"
      MaxCapacity="10"
      Name="wlcPool"
      Properties="user=sa;password="
      RefreshMinutes="0"
      ShrinkPeriodMinutes="15"
      ShrinkingEnabled="true"
      Targets="myserver"
      URL="jdbc:weblogic:mssqlserver4"
    />
For example:
# ACL for JDBC Connection Pool
acl.reset.weblogic.jdbc.connectionPool.wlcPool=everyone
acl.reserve.weblogic.jdbc.connectionPool.wlcPool=everyone
acl.shrink.weblogic.jdbc.connectionPool.wlcPool=everyone
Set the JDBC data source (WLCHub.DS) to the name of the JDBC connection pool. For example:
<JDBCTxDataSource
    JNDIName="WLCHub.DS"
    Name="WLCHub.DS"
    PoolName="wlcPool"
    EnableTwoPhaseCommit="true"
    Targets="myserver"
/>
For more information about configuring a JDBC connection pool, see "Managing JDBC Connectivity" in the BEA WebLogic Server Administration Guide and "JDBC Administration through the Administration Console" in the Managing Transactions section of the BEA WebLogic Server Administration Guide.
Warning: After you modify the config.xml file, you must stop and restart WebLogic Collaborate to implement the changes.
Note: All the WebLogic Collaborate components, such as the JMS queue, the repository, persistent storage, and administration, must use the same database and same JDBC connection pool.
When you ran the Verification example, as described in the BEA WebLogic Collaborate Installation Guide, the example software set up the database. If you are using the same database, then you do not need to perform this step. However, to use a different database, you need to set it up.
The WebLogic Server installation includes the Oracle and Cloudscape JDBC drivers. Therefore, you do not need to install a JDBC driver if you are using either the Oracle or Cloudscape database. If you are using Microsoft SQL Server, download and install the WebLogic jDriver for SQL Server as described in Installing and Using WebLogic jDriver for MicroSoft SQL Server.
Warning: When you create the database, you delete any already-existing database.
Run the createDB.cmd (Windows) or createDB.sh (UNIX) file, which is located in the bin subdirectory of your WebLogic Collaborate installation directory. Use the following command syntax to specify your database:
createDB cloudscape|oracle|mssql
Warning: When you use the Bulk Loader to load data into the repository, you delete any already-existing data.
For information about the Bulk Loader, see Working with the Bulk Loader.
Configuring the Java Message Service Queue
Java Message Service (JMS) enables Java programs to exchange messages with other Java programs. WebLogic Collaborate uses the WebLogic Server implementation of the JMS queue. For more information about JMS, see "Managing JMS" in the BEA WebLogic Server Administration Guide. Even though the section describes how to create a database for JMS, you need only to create database tables.
Note: You do not need to perform most of the configuration tasks described in the "Configuring WebLogic JMS" section in the WebLogic Server documentation:
Configuring and Running the C-Hub Administration Console
To configure and run the C-Hub Administration Console:
The C-Hub Administration Console is a J2EE Web application. The file for the C-Hub Administration Console is hubadmin.war, which is located in the lib subdirectory of your WebLogic Collaborate installation directory. For more information, see "Deploying and Configuring Web Applications" in the BEA WebLogic Server Administration Guide.
The following shows the content of a completed configuration for a sample Console Web Application.
Listing 2-4 Code Sample for Console Web Application
        <Application
      Name="WLCHubAdmin"
      Path="<WLC_HOME>/lib">
      <WebAppComponent
        Name="WLCHubAdmin"
        ServletReloadCheckSecs="1"
        Targets="myserver"
        URI="hubadmin.war"
        WebServers="myserver"
      />
    </Application>
The following example shows how to specify the WLCAdmin ACL:
acl.hubconfig.WLCAdmin=admin
acl.hubmonitor.WLCAdmin=user2,user3
For more information about defining access control lists, see "Defining ACLs" in "Managing Security" in the BEA WebLogic Server Administration Guide.
In addition to the WLCAdmin ACL permissions, users who need to configure the c-hub must be allowed to reserve connections from the JDBC pool for the repository. In the previous example, the user admin must have this type of permission. For information about JDBC connection pool permissions, see Configuring the Repository.
Open a Web browser and go to the following URL:
http://host:port/WLCHubAdmin
In this URL, host:port specifies the location of the WebLogic Server that is hosting the c-hub.
For information about using the C-Hub Administration Console, see Using the C-Hub Administration Console, which is Part II in this document.
Sample C-Hub Sections in the config.xml File
The following listing shows c-hub sections from an example of the config.xml file.
Listing 2-5 Sample C-Hub Configuration Sections in the config.xml File
<StartupClass
    ClassName="com.bea.b2b.hub.Startup"
    Name="WLCStartup"
    Targets="myserver"
 />
 <JDBCTxDataSource
    JNDIName="WLCHub.DS"
    Name="WLCHub.DS"
    PoolName="wlcPool"
          EnableTwoPhaseCommit="true"
          Targets="myserver"
 />
   <Application
     Name="WLCHubAdmin"
     Path="d:/bea/WLC/lib"
   >
     <WebAppComponent
       Name="WLCHubAdmin"
       ServletReloadCheckSecs="1"
       Targets="myserver"
       URI="hubadmin.war"
     />
   </Application>
<JDBCConnectionPool
      CapacityIncrement="1"
      DriverName="oracle.jdbc.driver.OracleDriver"
      InitialCapacity="1"
      LoginDelaySeconds="1"
      MaxCapacity="10"
      Name="wlcPool"
      Properties="user=scott;password=tiger"
      RefreshMinutes="0"
      ShrinkPeriodMinutes="15"
      ShrinkingEnabled="true"
      Targets="myserver"
            URL="jdbc:oracle:thin:@fushigi.beasys.com:1521:fush816"
      />
   <JMSServer
     Name="WLCJMSServer"
     Targets="myserver"
   />

|

|

|
|
|
|
Copyright © 2001 BEA Systems, Inc. All rights reserved.
|