

|
|
|
|
|
|
Working with Tasks
The following sections explain how to work with WebLogic Process Integrator Worklist tasks:
Understanding Worklist Tasks
When a task in a workflow is first defined in WebLogic Process Integrator Studio, certain permissions are set for that task. These permissions determine what actions you can do with a particular task in the Worklist console. See BEA WebLogic Process Integrator Studio User Guide for more information.
There are three types of task permissions in Worklist:
Note: The first tab on the main window is the User ID tab, which contains tasks assigned to your user ID.
Users can belong to one or more roles. In this case, each role is represented by a tab to the right of the User ID tab on the main window. Tasks contained within a role can only be done by users who are members of that role. Any user who is a member of that role can take a task assigned to the role and execute it.
Changing Task Properties
To change task properties:
Figure 2-1 Task Properties Dialog Box

Executing a Task
You can only execute tasks that are pending and have been assigned to a user or a user in a role.
To execute a task:
The actual behavior during task execution is determined by the definition of the task at workflow design time. See BEA WebLogic Process Integrator Studio User Guide for more information.
Changing Task Status
You can change task status from pending to done or done to pending.
Changing Task Status to Done
To change task status from pending to done:
Changing task status to done sets the task completion date to the current date and executes the actions defined for the marked done event of the task. The ability to change task status to done is determined by the permissions set on the Task Properties dialog box. See Changing Task Properties for more information.
Changing Task Status to Pending
To change task status from done to pending:
Changing task status to pending clears the task completion date. This action does not affect a task that is not complete. The ability to change task status to pending is determined by the permissions set on the Task Properties dialog box. See Changing Task Properties for more information.
Reassigning a Task
You can only reassign a task if:
To reassign a task:
Figure 2-2 Reassign Task Dialog Box
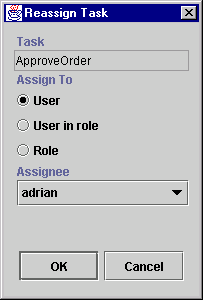
Reassignment to another user:
Reassignment to a user in a role to which the task is assigned:
Reassignment to a user in a role:

|

|

|
|
|
|
Copyright © 2001 BEA Systems, Inc. All rights reserved.
|