

|
The following sections provide instructions for applying patches to WebLogic SIP Server instances:
The WebLogic SIP Server container functionality is implemented using an Enterprise Application (EAR) named sipserver. To patch the sipserver implementation EAR, you add the patch JAR file to the domain directory and then use the InstallPatch utility to add the JAR the application.
InstallPatch automates the process of editing the sipserver MANIFEST class path, which defines the list of JAR files used by the application and their relative order. You can use InstallPatch to perform common patching operations such as:
Although it is possible to manually edit the MANIFEST class path in the sipserver application, BEA recommends using InstallPatch to avoid errors.
To set up your environment for the InstallPatch utility:
| Note: | Do not run the setAdminClientEnv script and InstallPatch utility from a shell that you previously used to start WebLogic SIP Server. |
cd BEA_HOME\user_projects\domains\mydomain
In the above command, BEA_HOME refers to the top-level BEA installation directory (for example, c:\bea).
WLSS_HOME\server\bin\setAdminClientEnv.cmd
where WLSS_HOME is the directory in which you installed WebLogic SIP Server (for example, c:\bea\wlss220).
The InstallPatch utility can run in either command-line or GUI mode. By default the utility runs in command-line mode. The syntax for using the utility in command-line mode is:
java com.bea.wcp.sip.tools.InstallPatch
[-mode (gui | cmdline)]
-action (prepend | append | set | view)
-patchfilename.jar[-patchfilename2.jar...]
[-help] [-verbose]
| Note: | All patch files must be located in the DOMAIN_DIR\sipserver\APP-INF\container directory, where DOMAIN_DIR is the top-level directory of the domain you are patching. |
When running the utility in GUI mode, all other options are ignored. To run the utility in GUI mode, use the command:
java com.bea.wcp.sip.tools.InstallPatch -mode gui
Table C-1 describes the arguments for the com.bea.wcp.sip.tools.InstallPatch utility.
|
|||
Specifies the filename of a patch file to apply. You can apply multiple patches by specifying multiple
-patch arguments. Multiple patches are applied in the order in which you specify them on the command line.
|
|||
The following examples assume an initial MANIFEST classpath of:
./wlss_sp.jar ./wlss.jar
To add a new patch JAR file to the beginning of the classpath:
java com.bea.wcp.sip.tools.InstallPatch -action prepend -patch CR567890_wlss220.jar
./CR567890_wlss220.jar ./wlss_sp.jar ./wlss.jar
To add multiple patch JAR files to the end of the classpath:
java com.bea.wcp.sip.tools.InstallPatch -action append -patch CR567891_wlss220.jar -patch CR567892_wlss220.jar
./CR567890_wlss220.jar ./wlss_sp.jar ./wlss.jar ./CR567891_wlss220.jar ./CR567892_wlss220.jar
To remove one or more patches, re-write the CLASSPATH using the set action, as in:
java com.bea.wcp.sip.tools.InstallPatch -action set -patch CR567890_wlss220.jar -patch wlss_sp.jar -patch wlss.jar -patch CR567891_wlss220.jar
./CR567890_wlss220.jar ./wlss_sp.jar ./wlss.jar ./CR567891_wlss220.jar
To view the current classpath, use the -action view option with the utility:
java com.bea.wcp.sip.tools.InstallPatch -action view
The current Manifest Class-Path is: ./CR567890_wlss220.jar ./wlss_sp.jar ./wlss.jar ./CR567891_wlss220.jar
Running the InstallPatch utility in GUI mode enables you to reorder or delete existing patch files from the MANIFEST classpath. You invoke the utility in GUI mode using the command:
java com.bea.wcp.sip.tools.InstallPatch -mode gui
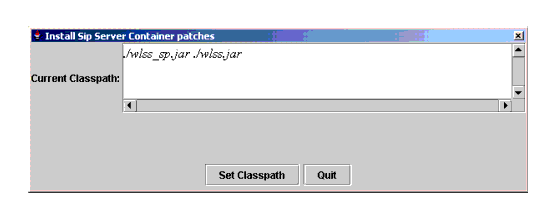
This yields a simple text editing window that shows the current classpath setting, as shown in Figure C-1.

To rearrange the order of JARs in the classpath, simply copy and paste the filenames in the desired order, keeping a space between multiple filenames. Click Set Classpath to persist the changes or Quit to exit without making changes.
| Note: | You can use GUI mode to add new patch JAR files to the existing classpath only if you first manually copy those files to the APP-INF\container subdirectory of the sipserver application. |
If you patched WebLogic SIP Server but the patch does not seem to take effect, you may have un-patched JAR files listed earlier in your CLASSPATH. This can happen if you run the setAdminClientEnv script and InstallPatch utility in a shell that you previously used to start WebLogic SIP Server. To avoid this problem, always run setAdminClientEnv and InstallPatch in a dedicated shell that was not used to start servers.
If you cannot apply a patch, verify that the patch JAR file exists in the APP-INF\container subdirectory of the sipserver application. You must manually copy patch JAR files to this directory before running InstallPatch.
Always verify the ordering of applied patches by using the -action command, or by running the utility in GUI mode. See Syntax for Invoking the InstallPatch Utility.


|