


|

|
|
|
|
Creating and Managing Rules
Rules Management forms a key part of the personalization process by prescribing custom content to fit individual user profiles. The business logic encompassed by these rules allows robust delivery of personalized content marketed specifically to each end-user type.
This topic includes the following sections:
What Is the Rules Manager?
WebLogic Personalization Server offers a robust personalization solution through a set of components that provide edit-time and run-time services for delivering personalized content to end-users while browsing a Web site. These personalization components use business rules to match users and groups with appropriate content. The logic encompassed by the rules forms a critical piece of the personalization process.
The Rules Management component of WebLogic Personalization Server provides editing, deploying, and run-time capabilities for providing personalized content based on externalized rules. This component includes two major parts: an edit-time tool with a graphical user interface (GUI) that allows developers to define classification and content selection rules, and a run-time service that matches users with content based on these rules.
Well-known Objects
The Rules Management component uses several well-known objects:
The Rules Engine functions with a set of rules operating on objects in working memory. This working memory is first populated with input from the calling objects, and contains the cached user profile bean, among other things. A representation of the user's profile exists in working memory before any rules are actually fired.
Rules can be executed only within a context. The context associates a rule set with a working memory. The context provides an interface to the Rules Engine that controls the relationship between the rule part of the application and the working memory.
This working memory is operated on by the production rules, which are contained in rule sets. The left-hand sides (LHS) of these rules are evaluated against the objects in the working memory. If the patterns on the LHS are matched, then the actions contained in the right-hand side (RHS) of the rules are performed. Some of these actions may assert new objects into the working memory. For example, if our Classifier rule tests for USER.age > 45, then we might assert a new Classifier object into working memory.
The production system is executed by performing the following operations:
Rules will continue to operate on the working memory until the conflict resolution set is zero (that is, no more rules can fire).
After the Rules Engine has halted, the rules service component returns a list of objects remaining in working memory. A likely scenario will have an object remaining of the type "Classification" or "ContentQuery."
The RulesServiceBean will then iterate over these remaining objects and filter first with the input object types (there are "Classifier" and "ContentQuery") and then optionally with the name of the rule that was requested to fire in the first place.
The resultant objects, if any, are then returned to the Advisor. As the Advisor expects to return a Boolean to the calling agent, the existence of an object determines the result of the advislet's request.
What Are Rule Sets?
The BEA WebLogic Personalization Server provides rule sets that comprise a set of classifier and content selector rules. These rule sets act as containers for rules that match personalized content with users.
A saved rule set generally contains a set of related rules. Rules within a rule set may refer to any properties. In general, you should not change or delete properties if a rule refers to it. Adding properties does not affect existing rules.
Note: In some cases, the Rules Engine will need to evaluate each rule in a rule set, so for the sake of performance, it is a good idea to keep each rule set small.
Classifier Rules
Classifier rules dynamically categorize users into groups (user segments) using simple boolean logic. A classifier rule determines if a user profile meets a set of conditions and places the user in a category based upon the result. Essentially, if the user profile meets the conditions, it is classified according to the classifier rule; if it does not meet the classification conditions, the user profile is not included in the classification group.
The following examples illustrate the logic involved in processing a classifier rule (note the implicit and between the rule phrases):
Classifier MiddleAgeMan
If User has the following characteristics:
    User.age > 35
    and User.age < 65
    and User.gender == "M" OR "male"
Classifier HighEarner
If User has the following characteristics:
    User.income > 100000
Classifier rules are the building blocks of more complicated rules. Content selector rules can use classifier rules as they select personalized content to match a user or group profile. (For more information, see Content Selector Rules.)
Use the <pz:div> JSP tag to include a classifier rule in a JSP page. (For more information, see <pz:div> in the chapter "JSP Tag Library Reference" in the WebLogic Personalization Server Developer's Guide.
Adding "and" conditions to a classifier rule
To add "and" conditions to a classifier rule:
Example:
The following example produces a rule that says:
"If the customer is a rock climber and lives in Denver, then show message about a sale at Mountain Sports."
The classifier rule would look like this:
USER.Customer Properties.CustomerType==Climber
and USER.Customer Properties.ContactAddressCity==Denver
The jsp page would look something like this:
<pz:div
ruleSet="jdbc://com.beasys.commerce.axiom.reasoning.rules.RuleSheetDefinitionHome/ShopperRules"
    rule="DenverClimber"
    id="classifier">
There's a sale going on at Mountain Sports this weekend!<br>
</pz:div>
Creating Classifier Rules Based on Request Properties
To create classifier rules based on request properties:
First, use the Administation Tool to create the request property.
or
Select an existing request property set to which you would like to add a property.
Next, create the rule that uses the request property
Follow the same steps for creating a classifier rule, but select the desired request property from the drop down list in step 2 of the wizard.
Example
The following example produces a rule that says, "If this person is middle-aged, display `Every vote counts. Get out and vote!'"
The rule: (Ruleset is called RequestAge, and rule is called middleage)
REQUEST.requestPropertySet.userAge>40
    and 	REQUEST.requestPropertySet.userAge<70
The jsp page:
<%@ taglib uri="pz.tld" prefix="pz" %>
<%-- Request properties should be set/get with
     HttpRequest.setAttribute()and HttpRequest.getAttribute() --%>
<% Long age = new Long(52);
request.setAttribute("age", age);%>
<pz:div
    ruleset="jdbc://com.beasys.commerce.axiom.reasoning.rules.
    RuleSheetDefinitionHome/RequestAge"
    rule="middleage" >
        Every vote counts. Get out and vote!<br>
</pz:div>
<%
    // Clean up the session in case you are testing this over and over request.removeAttribute("age");
%>
Content Selector Rules
Content selector rules construct queries on the fly and return content based on the user profile. This type of rule adds time and content components to the basic classifier rule and may use references to classifier rules to define it. It also produces dynamic queries at runtime to select content from a document collection.
The power of producing dynamic queries that match content with user profiles allows content selectors to deliver highly customized content to end-users. Since content selector rules can use queries to select content based on run-time parameters, they allow the system to match personalized content to user profiles.
Note: Although a profile may meet the criteria of a content selector rule, the rule may not return any content objects. Why? If no content matches the query's criteria, the query cannot return a content object.
Content selector rules contain three parts. Each part contains zero to many phrases. The generic description of each rule part includes:
Example:
In this example, we are creating a rule that says:
"If the user is a high income middle aged man with a net worth over a million (dollars), then show him all HTML documents that are less than 20,000 (characters) with an investment_ type that matches the user's investment type and investment_qualities that match the user's risk preference." (This requires that "investment_type" and "investment_qualities" are fields in the content metadata.)
The following example demonstrates the prototype for a content selector rule:
ContentSelector JanuaryStockQuotes (type: StockQuote)
If user has the following characteristics:
    Classifier MiddleAgeMan
    and Classifier HighEarner
    and User.net_worth > 1000000
And when:
    Now >= "Jan 01, 2001, 00:00:00 MST"
    and Now < " Feb 01, 2001, 00:00:00 MST"
Then select Content where:
    Content.size < 20000
    and Content.MIMEType LIKE "*html*"
    and Content.investment_type == User.investor_type;
    and ANY Content.investment_qualities == User.risk_preference
    and Content.creation_date > Now
Example:
The following example shows how to implement a content selector rule. We are creating a rule that says:
"Show rock climbers the climbing gear that corresponds to their climbing ability."
First, create the property set and the properties that the rule uses. The following table provides an example of the User Property Set "Climbers".
|
Property |
Value |
|---|---|
|
name |
Cindy Climber |
|
climber |
true |
|
ability |
moderate |
Next, create the rule set and rule for "Climbers". In this example, the rule set is "ClimberRules" and the rule name is "GearDisplay".
If User.Climbers.climber == true
Then select Content where:
Content.climberClassification == User.ability
Finally, we use the rule with JSP tags in the *.jsp page:
<%-- Info only -- %>
<um:getProperty propertySet="Climbers" propertyName="ability"
id="climberAbility" />
<um:getProperty propertySet="Climbers" propertyName="name"
id="climberName" />
<p> Climber <%=climberName%> climbs at a <%=climberAbility%> level.
<%-- Now display content geared towards their climbing ability --%>
<pz:contentselector id="stuff"
ruleset="jdbc://com.beasys.commerce.axiom.reasoning.rules.
RuleSheetDefinitionHome/ClimberRules"
rule="GearDisplay"
contenthome="com.beasys.commerce.axiom.document.DocumentManager"
max="-1" />
<es:forEachInArray id="product" array="<%=stuff%>"
type="com.beasys.commerce.axiom.content.Content">
<p>
  <ul>
  <li><cm:printProperty id="product" name="productName"
encode="html"
/>
  <li><cm:printProperty id="category" name="productCategory"
encode="html" />
  </ul>
</es:forEachInArray>
Note: Once you define a content selector rule and the content type it uses, you cannot change the content type.
Note: Use the <pz:contentSelector> JSP tag to include content selector rules in JSP pages. (See <pz:contentSelector> in the chapter "JSP Tag Library Reference" in the WebLogic Personalization Server Developer's Guide.)
Debugging Rule Sets
You might notice that a rule set you have used in the past begins functioning icorrectly. This behavior is probably due to a change in the property set with which the rule set has a relationship.
What Is the Relationship Between Property Sets and Rules?
Rules rely on property sets to provide the properties they use to evaluate user and group profiles. If a property is modified after a rule that uses it has been created, rules may contain dangling references to properties that no longer exist or that have been changed.
As much as possible, you should avoid modifying properties after defining rules that rely upon them. Since the property set defines the schema for the properties the rules act upon, any change to the properties the rules use will affect the schema and may alter the validity of the rules. In general, be careful when modifying or deleting existing properties.
Note: You can add properties without affecting existing rules.
Content Type and Content Selector Rules
Another problem can occur when you change a content's metadata types after creating a content selector rule based on that content type's metadata. Remember that the content selector rule relies upon metadata to locate content. If you change content metadata and a content selector rule references the previous metadata, the rule will not work correctly.
Using the Rules Management Administration Tool
The Rules Management Administration Tool is an edit-time tool that provides an HTML-based GUI for creating, editing, and deleting rule sets.

The run-time rules service uses rule sets to create personalized content for end-users. The rule sets created via the Rules Management Administration Tools interface produce output that is stored in the database and evaluated at runtime.
Note: You should already have defined at least one property set before creating rule sets. Property sets provide the template that defines the parameters that rules act upon at runtime.
Creating a Rule Set
To create a rule set:
Note: You must populate all fields that have a red star to their right before you can create the rule set.
Note: Clicking Back cancels the operation and returns you to the Rules Management Home page without creating a new rule set.
Opening a Rule Set
To open a rule set:
Editing Rule Set Properties
To edit rule set properties:
Saving a Rule Set
To save a rule set:
Note: This is the only time the rule set is saved, so ensure you click Finished before closing the rule set.
Deleting a Rule Set
To delete a rule set:
Note: You must click OK in the dialog box that appears to confirm the delete operation.
Navigating Between Rule Types
To navigate between rule types:
Finding a Rule
To find a rule:
Note: You can also scroll to the rule using the browser's scroll bar.
Creating a Classifier Rule
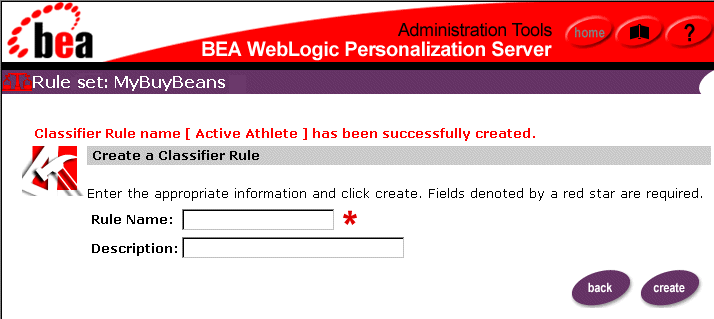
To create a classifier rule:
Note: Rule names cannot include spaces and punctuation.
Editing a Rule
To edit a rule:
Editing Rule Properties
To edit rule properties:
Adding an If User Phrase to a Rule
To add an If user phrase to a rule:
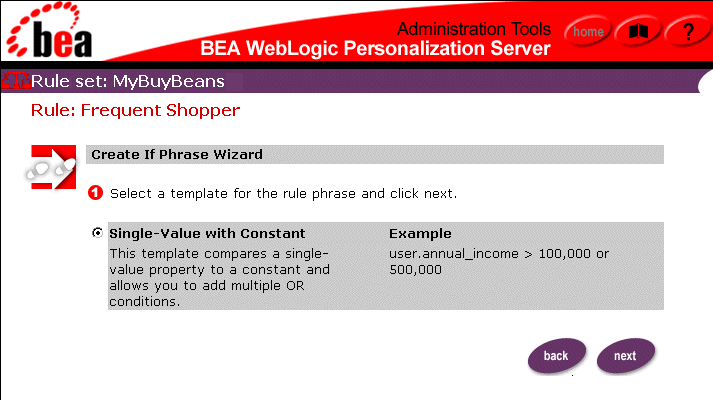
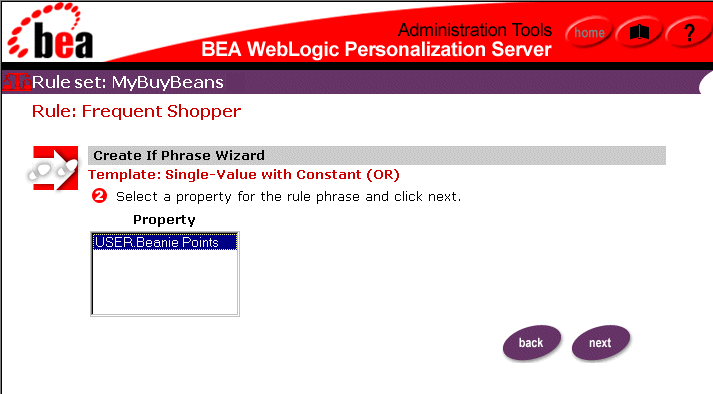
Note: Click Back in any wizard page to return to the preceding page in the Rules Management interface.
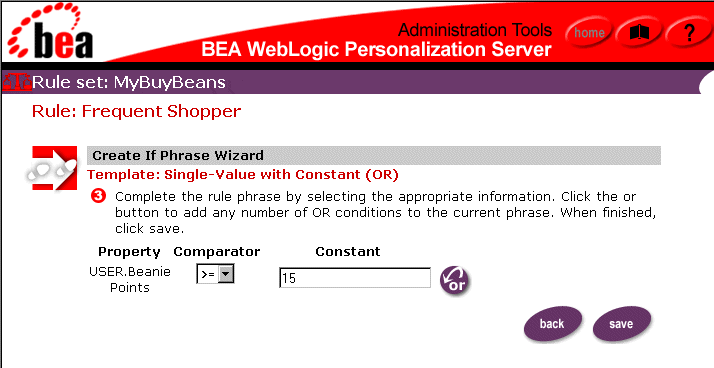
The following table shows the possible comparators for each property type:
|
String |
Boolean |
Integer |
Float |
Set |
|---|---|---|---|---|
|
== |
== |
== |
== |
contains |
|
!= |
!= |
!= |
!= |
|
|
> |
|
> |
> |
|
|
>= |
|
>= |
>= |
|
|
< |
|
< |
< |
|
|
<= |
|
<= |
<= |
|
Note: You can use "and" or "or" to connect expressions that contain comparators. These are the only conjunctions or disjunctions that are allowed in expressions that contain comparators.
![]() icon. The wizard page adds
another Comparator drop-down list box and Constant field to the phrase below
the current Comparator drop-down list box and Constant field.
icon. The wizard page adds
another Comparator drop-down list box and Constant field to the phrase below
the current Comparator drop-down list box and Constant field.
![]() icon again to add any number of conditions to the phrase.
icon again to add any number of conditions to the phrase.
Note: You can create "and" conditions by creating multiple phrases for the same rule.
Editing an If User Phrase
To edit an If user phrase:
Deleting a Rule Phrase
To delete a rule phrase:
 icon next to the phrase name. After you confirm
the delete process, the page refreshes and the new page does not show the phrase
you deleted.
Creating a Content Selector Rule
To create a content selector rule:
Note: Rule names cannot include spaces and punctuation.
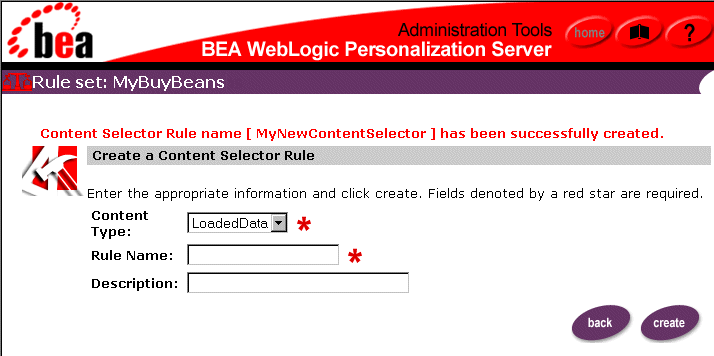
Adding an If User Classifier to a Content Selector Rule Phrase
To add an If user classifier to a Content selector rule phase:
Note: The * character allows you to perform a wildcard search. Using the * character alone returns a list of all classifier rules.
Adding an And When Phrase to a Content Selector Rule
To add an And When phrase to a Content selector rule:
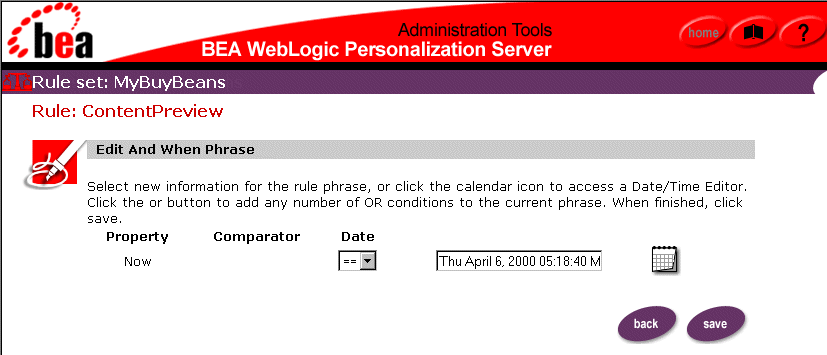
 icon to display the calendar, then select a date and time to
compare. Click Save within the calendar window.
Note: You cannot enter a date by typing into the date field. The field only accepts the date string in `MM/dd/yyyy HH:mm:ss z' format.
Adding a Then Display Content Phrase to a Content Selector Rule
To add a Then Display Content phrase to a Content selector rule:
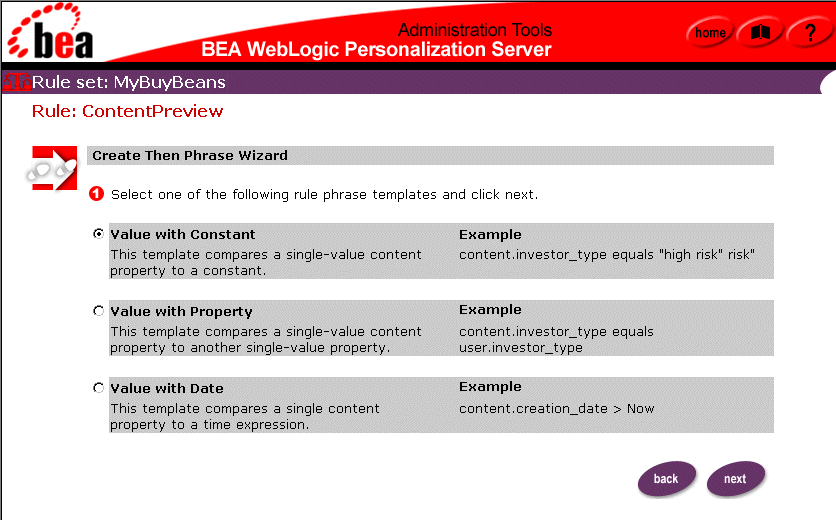
Note: The list receives its data from the metadata stored in the document management system.
Editing a Then Display Content Phrase
To edt a Then Display Content phrase:

|

|
|
|
|
Copyright © 2000 BEA Systems, Inc. All rights reserved.
|