

|
|
|
|
|
|
This chapter contains the following topics:
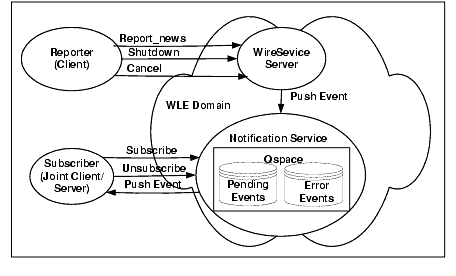
The Advance sample application simulates a newsroom environment in which a news reporter posts a story, a wire service posts the story as an event to the Notification Service, and a news subscriber consumes the story.
Two implementations of the Advanced sample application are provided: one in the Java programming language that uses the BEA Simple Events application programming interface (API), and another in C++ that uses the CosNotification Service API.
The Advanced sample application consists of the reporter, subscriber, and wire service applications that use the WLE Notification Service. The reporter application implements a client application. This application prompts the user to enter news articles and calls the WireService server using application specific IDL. The WireService server, in turn, posts the events. The subscriber implements a joint client/server application. This application acts as client when it subscribes and unsubscribes for events, and acts as a server when it receives events. To receive events, the Subscriber implements callback objects which are invoked by the Notification Service when an event needs to be delivered.
Note:
On UNIX systems, you cannot immediately restart the subscriber because the port takes some time (the actual time depends on the platform) to become available again. If you restart too soon, you will get a CORBA::OBJ_ADAPTER
exception. If this occurs, just wait and try again. On Solaris systems, the port can take up to 10 minutes to become available. To see if the port is still in use this command: "Restart -a | grep <
the port number>"
This sample demonstrates how to use the BEA Simple Events API, the CosNotification Service API, transient and persistent subscriptions, and data filtering.
This Advanced sample provides three executables (See Figure 6-1):
Overview
For this event, the domain name is a string and is preset by the application as "News". The type name is a string and defined by the Reporter application user at run time. It is set to the category of news (for example, "Sports"). Filterable data contains a name/value pair whose name is "Story" and whose value is a string that contains the body of the news story being posted.
For this event, the domain name is a string and is preset by the application as "NewsAdmin". The type name is a string and is preset by the application as "Shutdown". The filterable data is not used.
For this event, the domain name is a string and is preset by the application as "NewsAdmin". The type name is a string and is preset by the application as "Cancel". The filterable data is not used.
The Subscriber application, uses the structured event domain_name, type_name, and filterable_data fields to construct two subscriptions: 1) a news subscription that processes news stories and 2) a shutdown subscription that processes Cancel and Shutdown events. At run time, the Subscriber application establishes these two subscriptions with the Notification Service.
The Subscriber application uses the structured event domain_name, type_name, and filterable data fields to create a subscription to the Notification Service. The subscription defines the domain name as a fixed string with the content of "News". At run time, the Subscriber application queries the user for the "News Category" and "Keyword" and uses the inputs to define the type_name and data_filter fields in the subscription. Obviously, the users of both applications, the reporter and the subscriber, must collaborate on the "News Category" and "keyword" strings for the subscription to match an event, otherwise, no News events will be delivered to the subscriber. The subscription does not do any checking of the filterable_data field, but rather assumes that the body of the story will be a string, and that the story will be in the first Named/Value pair in the filterable_data field of a structured event.
The Subscriber application uses the structured event domain_name and type_name, fields to create a subscription to the Notification Service. The subscription defines the domain_name as a fixed string with the content of "NewsAdmin", the type_name as a string of either "Shutdown" or "Cancel". The filterable_data field is a empty string.
The Reporter application is responsible for implementing the user interface for reporting news as well as for producing Shutdown and Cancel events. Rather than use the Notification Service directly to post events, it calls methods on the Wire Service server.
The Wire Service uses the Notification Service to post three kinds of events:
The Notification Service, in turn, delivers the events to the subscribers.
The subscriber uses the Notification Service to create a persistent subscription to news events. The subscriber implements a persistent callback object (via the NewsConsumer_i
servant class), which is used to receive and process news events. When the subscriber subscribes, it gives the Notification Service a reference to this callback object. When a matching event occurs, the Notification Service invokes a push_structured_event
method on this callback object to push the event to the subscriber. This method prints out the event.
The subscriber also uses the Notification Service to create a transient subscription to Shutdown and Cancel events. The subscriber implements another callback object (via the ShutdownConsumer_i
servant class), which is used to receive and process these events.
Whenever the subscriber runs, it prompts the user for a name. The first time this user runs the subscriber program, the subscriber creates a persistent subscription to News events. To do this, the subscriber prompts the user for which kind of news stories to subscribe to and which port number the subscriber should run on. The subscriber runs on this port, subscribes, then writes the subscription id,
the filter id (if using the CosNotification API), and the port number to a file (the name of the file is <
user_name
>.pstore
). The next time the subscriber runs, the subscriber prompts the user for a name, opens up the file <
user_name
>.pstore
then reads the subscription id, filter id (if using the CosNotification API) and port number for this user from the file. This satisfies the requirement that the subscriber runs on the same port number each time because its news callback object's object reference is persistent.
The Subscriber creates a transient subscription to receive the Shutdown and Cancel events, therefore, the transient subscription is created and destroyed every time the subscriber is run and shutdown. This subscription id
is not written out to the file <
user_name
>.pstore
.
When the subscriber receives a Shutdown event, it destroys the shutdown/callback subscription but leaves the News subscription intact. If News events are posted after the subscriber is shut down and before it is restarted, then the notification service will either deliver the events when the subscriber is restarted, or will put the events on the error queue. (You can use the ntsadmin
utility to either delete these events from the error queue or retry delivering them).
Whether the event is redelivered or is put on the error queue depends on whether the subscriber restarts quickly enough. This depends on the retry parameters of the queue. See advanced.inc
(in the notification samples' common directory) for the values of the queue retry parameters.
News events have two parts: a category (for example, headline) and a story (a multiple-line text string). The Subscriber application prompts the user to input a news category. Next the subscriber subscribes to news events whose category matches this string. The Reporter application prompts the user for a news category and a story. Next the reporter (by invoking a method on the wire service) posts a corresponding news event. The event will only be delivered to subscribers who subscribed to that category of news.
Note:
The category is a string. The same string must be used by the Reporter user and the Subscriber user. There are no fixed categories in this sample. Therefore both users, the reporter user and the subscriber user, must type the same string when prompted for a category (including case and white space).
This sample also uses data filtering. When a user first runs the Subscriber, the user will be prompted for a "keyword." Events whose category matches and whose story contains the keyword will be delivered to the subscriber. For example, if the user enters a keyword of "none," data filtering will not be used (thus the user will receive all events for the chosen news category). If the user enters a keyword "smith", it translates to "Story %% '.*smith.*'"
. This keyword specifies that the subscription only accepts events that have a "Story" field that contains a string, and that the field starts with any number of characters, has a literal string "smith", and then ends with any number of characters.
To run this sample, you need to run at least one Reporter and at least one Subscriber; however, you may run multiple Reporters and multiple Subscribers. Events posted by any Reporter will be delivered to all matching Subscribers (based on category).
Also, be sure to start any subscribers before posting events. Events posted before the subscribers are started will not be delivered.
To build and run the Introductory sample application, you must perform these steps:
Building and Running the Advanced Sample Application
Note: The "JAVA_HOME" environment variable is required for Java applications only.
These steps are described in detail in the following sections.
Before you build and run the Introductory sample application, you need to ensure that the TUXDIR environment variable is set on your system. In most cases, this environment variable is set as part of the installation procedure. However, you need to check the environment variables to ensure they reflect correct information.
Table 6-1 lists the environment variables required to run the Callback sample application.
To verify that the information for the environment variables defined during installation is correct, perform the following steps:
Microsoft Windows NT
The Control Panel appears.
The System Properties window appears.
The Environment page appears.
UNIX
ksh prompt>printenv TUXDIR
ksh prompt>printenv JAVA_HOME
To change the settings, perform the following steps:
Microsoft Windows NT
UNIX
ksh prompt>export TUXDIR= directorypath
ksh prompt>export JAVA_HOME= directorypath
You need to copy the files for the Advanced sample application into a work directory on your local machine.
Note: The application directory and the common directory must be copied to the same parent directory.
The files for the Advanced sample application are located in the following directories:
Microsoft Windows NT
For the C++ Advanced sample: drive:\wledir
\samples\corba\notification\advanced_cos_cxx
drive:\wledir
\samples\corba\notification\common
For the Java Advanced sample: drive:\wledir
\samples\corba\notification\advanced_simple_java
drive:\wledir
\samples\corba\notification\common
UNIX
For the C++ Advanced sample: /usr/local/wledir
/samples/corba/notification/advanced_cos_cxx
/usr/local/wledir
/samples/corba/notification/common
For the Java Advanced sample: /usr/local/wledir
/samples/corba/notification/advanced_simple_java
/usr/local/wledir
/samples/corba/notification/common
You use the files listed in Table 6-2 and Table 6-4 to build and run the Java Advanced sample application, which is implemented using the BEA Simple Events API. You use the files listed in Table 6-3 and Table 6-4 to build and run the C++ Advanced sample application, which is implemented using the CosNotification API.
File |
Description |
|---|---|
|
Common makefile used by the makefile.nt
and the makefile.mk
files.
|
|
You use the files listed in Table 6-3 and Table 6-4 to build and run the Advanced sample application.
File |
Description |
|---|---|
|
Common makefile used by the makefile.nt
and the makefile.mk
files.
|
|
Table 6-4 lists other files that the Advanced sample uses. With the exception of the IDL files, the files are located in the Notification common directory.
During the installation of the WLE software, the sample application files are marked read-only. Before you can edit or build the files in the Advanced sample application, you need to change the protection attribute of the files you copied into your work directory, as follows:
Microsoft Windows NT
Changing the Protection Attribute on the Files for the Advanced Sample Application
UNIX
On the UNIX operating system platform, you also need to change the permission of setenv.ksh to give execute permission to the file, as follows:
ksh prompt>chmod +x setenv.ksh
To set up the environment, enter the following command:
Microsoft Windows NT
prompt>.\setenv.com
UNIX
prompt>. ./setenv.ksh
You use the make command to run makefiles , which are provided for Microsoft Windows NT and UNIX, to build the sample application. For Microsoft Windows NT, use nmake . For UNIX, use make .
The makefile automates the following steps:
Before executing the makefile , you need to check the following:
To build the Advanced sample application, enter the make
command as follows:
Microsoft Windows NT
nmake -f makefile.nt
UNIX
make -f makefile.mk
To start the Advanced application, enter the following commands:
Starting the Advanced Sample Application
prompt>tmboot -y
This command starts the following server processes:
A BEA TUXEDO system-provided, event broker server that is used by the Notification Service.
A WLE Notification Service server that processes requests for subscriptions and event postings.
A WLE Notification Service server that forwards events to subscribers that have transient subscriptions. This server is required for transient subscriptions.
A WLE Notification Service server that forwards persistent events to subscribers that have persistent subscriptions. This server is required for persistent subscriptions.
The message queue manager is a BEA TUXEDO system provided server that enqueues and dequeues messages on behalf of programs calling tpenqueue(3) and tpdequeue(3), respectively. This server is required for persistent subscriptions.
The message forwarding server is a BEA TUXEDO system provided server that forwards messages that have been stored using tpenqueue(3c) for later processing. This server is required for persistent subscriptions.
A server specifically built for the Advanced application that receives events from the Reporter application and post them to the Notification Service. This receive and server posts three types of events: News, Shutdown, and Cancel.
The IIOP Server Listener/Handler process.
For C++: prompt>is_subscriber
For Java on Microsoft Windows NT: prompt>java %IC_SUBSCRIBER%
For Java on UNIX: prompt>java $IC_SUBSCRIBER
To start another Subscriber, open another window, change (cd ) to your work directory, set the environment variables (by running setenv.cmd or setenv.ksh ), and enter the start command that is appropriate for your platform.
For C++: prompt>is_reporter
For Java on Microsoft Windows NT: prompt>java %IC_REPORTER%
For Java on UNIX: prompt>java $IC_REPORTER
To start another Reporter, open another window, change (cd ) to your work directory, set the environment variables (by running setenv.cmd or setenv.ksh ), and enter the start command that is appropriate for your platform.
To use the Advanced sample application, you must use the Subscriber application to subscribe to an event and the Reporter application to post an event. Be sure to subscribe before you post each event; otherwise, events will be lost.
Perform these steps:
Name?
(Enter a name (without spaces).)
Port (e.g. 2463)
(Enter the port number that this subscriber should run on.)
Category (or all)
(Enter the category of news you want or "all".)
Keyword (or none)
(Enter a keyword that you want all delivered stories to
contain.)
Note: If the Subscriber application is shutdown by a Shutdown event from the Reporter application (Shutdown events do not cancel persistent subscriptions), on subsequent startups of the Subscriber application, you will only be prompted for your name. The Subscriber application retrieves the remaining information from the <user_name>.pstore file. This guarantees that the same port number is used, which is required for persistent subscriptions.
If the Subscriber application is shutdown by a Cancel event from the Reporter application (Cancel events cancel all subscriptions including persistent subscriptions), on subsequent startups of the Subscriber application, you will be prompted for your name, port number, category, and keyword.
Similarly, you may type in a string for a keyword. There is no fixed list of keywords either so when you run the reporter and enter the story, make sure that the story contains the same string; otherwise, the story will not be delivered to your subscription.
The first time the subscribe application is run for your user name, category (or all), and keyword (optional), it creates a news subscription. On subsequent runs, the subscriber reuses this subscription. In all cases, the Subscribe application prints "Ready" when it is ready to receive events.
The Subscriber application creates a subscription then prints "Ready" when it is ready to receive events.
Note: You should always use the Subscriber application to subscribe to events before you use the Reporter application to post events; otherwise, events will be lost. This is because even though the Subscriber application creates a persistent subscription to News events, that subscription is not created until the Subscriber application is start.
Note: You can start multiple subscribers by starting another window and repeating this procedure.
Perform these steps:
(r) Report news
(s) Shutdown subscribers
(c) Cancel Subscribers
(e) Exit
Option?
Category?
After you enter the news category, the following prompt is displayed:
Enter story (terminate with '.')
Subscribers whose category and keyword (if specified) matches the category and a keyword in this story will receive and print out the story.
Note: You can use the ntsadmin retryerrevents command to move events from the error queue back to the pending queue.
Note: You can start multiple reporters by opening another window and repeating this procedure. Any news story reported by any reporter will be delivered to all matching subscribers. Make sure you have exited all reporters before shutting down the system.
Make sure the Reporter and Subscriber processes have stopped and perform these steps:
prompt>tmshutdown -y
Microsoft Windows NT
prompt>nmake -f makefile.nt clean
UNIX
prompt>make -f makefile.mk clean

|
|
|
Copyright © 1999 BEA Systems, Inc. All rights reserved.
|