

| Download Docs | Site Map | Glossary | |
|
|
|||
| bea.com | products | dev2dev | support | askBEA |
 |
 |
|
|||||||
| e-docs > WebLogic Platform > WebLogic Integration > B2B Topics > Creating Workflows > Sending and Receiving Business Messages |
|
Creating Workflows
|
Sending and Receiving Business Messages
The following sections describe how to send and receive business messages in a collaborative workflow:
Notes: If you are implementing conversations and workflows based on the RosettaNet protocol, see Implementing RosettaNet for B2B Integration for instructions. These instructions are based on the RosettaNet 1.1 and 2.0 protocols.
The XOCP business protocol, which is supported by the B2B functionality described in this document, is deprecated as of this release of WebLogic Integration. For information about the business protocol that is replacing XOCP, see the BEA WebLogic Integration Release Notes.
Defining the Workflow to Send Business Messages
After you create a business message in the WebLogic Integration Studio by using the Compose Business Message or Manipulate Business Message action, you send the business message using the Send Business Message action. This section explains how to define a Send Business Message action in a collaborative workflow so it sends a business message to a trading partner.
To define a Send Business Message action:
Figure 5-1 Add Action Dialog Box
Figure 5-2 Add Action Dialog Box with Integration Actions
Which portion of the Send Business Message dialog box is displayed depends on the protocol with which the workflow template was configured. The following sections explain how to specify the contents of this dialog box for each of the protocols supported in the B2B integration plug-in.
Sending Business Messages Using the XOCP 1.1 Protocol (Deprecated)
When you select the Send Business Message action in the Actions dialog box for a workflow template configured with the XOCP 1.1 protocol, the following dialog box is displayed.
Figure 5-3 Send Business Message Dialog Box for XOCP Messages
The Send Business Message dialog box displays the following tabs: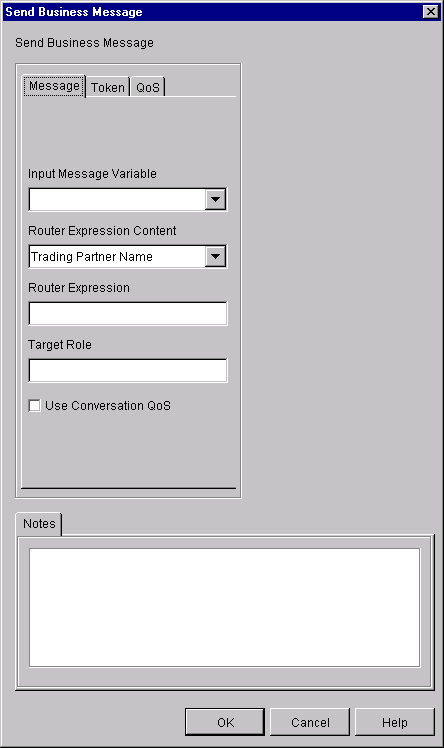
Complete the following fields in the Send Business Message dialog box.
Assigning Message Token Information to Workflow Variables When a business message is sent by the B2B messaging service, a message token is returned as a Java object at the programming level. The message token provides information about the message, such as the message ID, conversation ID, send success/failure, the delivery status, and the number of recipient destinations after final selection (router and filter evaluations) by the B2B engine. Applications call the getVariable method to get access to this variable. This variable can be defined as an output variable that gets processed after the workflow ends. A message token is represented by the com.bea.b2b.protocol.messaging.MessageToken class, which is described in the BEA WebLogic Integration Javadoc. You can configure collaborative workflows to get access to the message token by assigning the token and its associated information to workflow variables. At run time, values are assigned to the workflow instance variables after the Send Business Message action has completed. To assign a message token and related information to workflow variables:
Figure 5-4 Token Tab
Defining the Quality of Service for Message Delivery for a Send Business Message Action (Deprecated)
The Quality of Service (QoS) is a set of attributes that are defined for reliable business message publishing that uses the XOCP protocol. In the Studio, you can define the QoS at the following levels:
To define QoS at the Send Business Message level:
Note: The definitions specified here apply to this Send Message action only, not to all send actions within this conversation.
Sending RosettaNet Business Messages
As of Release 7.0 of WebLogic Integration, all business messages are transmitted asynchronously. Sending business messages asynchronously offers performance benefits: After a task node that sends a business message has completed execution, workflow processing can immediately pass to the next node, if desired. It is not necessary to suspend the execution of the workflow while awaiting the business message return status.
To design a workflow that sends a business message asychronously, you must define the following:
If you have RosettaNet-based workflows created with earlier versions of WebLogic Integration, you must modify the way in which they send business messages. For complete details about migrating existing RosettaNet-based workflows to the current release of WebLogic Integration, see BEA WebLogic Integration Migration Guide.
For complete details about creating workflows based on the RosettaNet protocols, including instructions for sending business messages, see Implementing RosettaNet for B2B Integration.
The following sections explain how to send business messages in workflows configured with the RosettaNet 1.1 and 2.0 protocols:
Specifying the Send Business Message Action Using the RosettaNet 2.0 Protocol
In the task node that sends a business message in a workflow template configured with the RosettaNet 2.0 protocol, select the Send Business Message action in the Actions dialog box. The following dialog box is displayed.
Figure 5-6 Send Business Message Dialog Box for RosettaNet 2.0 Messages
Complete the following fields in the Send Business Message dialog box.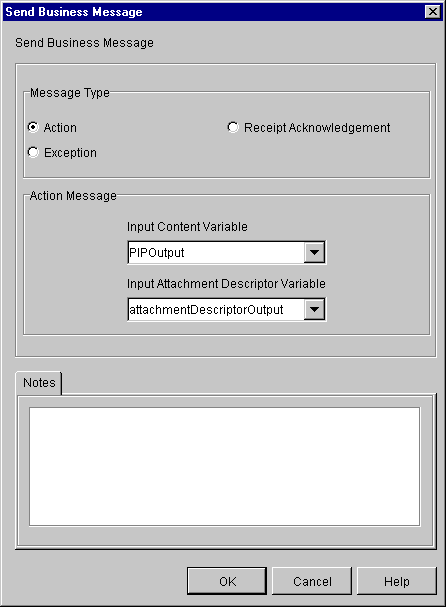
For more information about sending RosettaNet 2.0 messages, see Implementing RosettaNet for B2B Integration. Specifying the Send Business Message Action Using the RosettaNet 1.1 Protocol In the task node that sends a business message in a workflow template configured with the RosettaNet 1.1 protocol, select the Send Business Message action in the Actions dialog box. The following dialog box is displayed. Figure 5-7 Send Business Message Dialog Box for RosettaNet 1.1 Messages
Complete the following fields in the Send Business Message dialog box.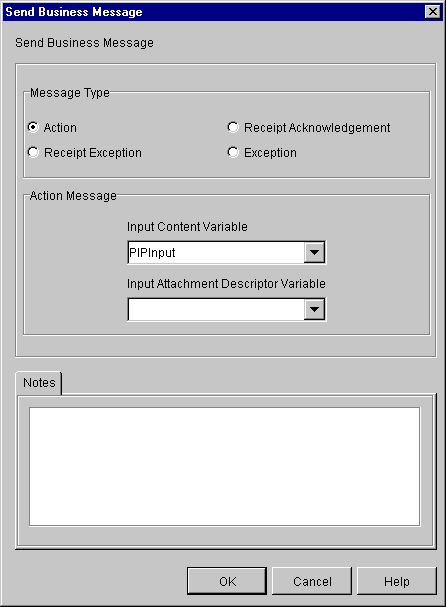
For more information about RosettaNet 1.1 messages, including a few examples, see Implementing RosettaNet for B2B Integration. Defining a Task Node that Specifies the HTTP Status Event Timeout Value To define a task node that specifies a timeout value for receiving an HTTP status event, complete the following steps:
Figure 5-9 Add Actions Dialog Box
Figure 5-10 Set Task Due Date Dialog Box
Figure 5-11 Overdue Actions Tab
Figure 5-12 Mark Task as Done
Figure 5-13 Mark Task as Done Dialog Box
Defining an Event Node to Receive an HTTP Status Event
To create an event node that receives an HTTP staus event, complete the following steps:
Figure 5-14 Event Properties Dialog Box
Connecting the Nodes Associated with the Send Business Message Task
After defining the nodes associated with the send business message task, you must connect them. The Studio provides two means to connect nodes in a workflow:
The following figure shows an example of how four nodes (T5, T8, C1 and E1) are associated with an asynchronous Send Business Message task in a RosettaNet-based workflow.
Figure 5-15 Send Business Message Workflow
After you define and connect the nodes associated with a Send Business Message task, you typically pass execution from the task node that specifies a timeout value to a decision node. The decision node typically evaluates the HTTP status, and then determines the flow of execution as appropriate.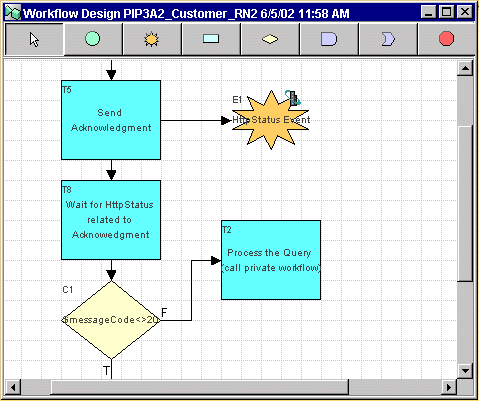
Defining the Workflow to Receive Business Messages
A workflow can receive a business message in the following circumstances:
The following sections describe procedures for setting up your workflow to receive business messages for each of the protocols supported in the B2B integration plug-in.
Defining Business Message Receive Events
If a workflow waits to receive a business message, such as a reply to a request or a subsequent (not an initial) request, you must define a Business Message Receive event. This event is triggered at run time when the appropriate business message is received in the conversation.
To define a Business Message Receive event:
Figure 5-16 Event Properties Dialog Box
The display of the Event Properties dialog box is refreshed. Which contents are displayed depends upon the protocol with which the workflow template has been configured. The following sections explain how to define the Receive Business Event for each of the protocols supported by the B2B integration plug-in.
Defining a Business Message Receive Event for the XOCP 1.1 Protocol (Deprecated)
If the workflow template is configured with the XOCP 1.1 protocol, when you select the Conversation event type, the following Event Properties dialog box is refreshed with the following contents.
Figure 5-17 Event Properties Dialog Box for Defining a Receive XOCP Message Event
To configure a Business Message Receive event for an XOCP message, select values for the following fields in the Event Properties dialog box.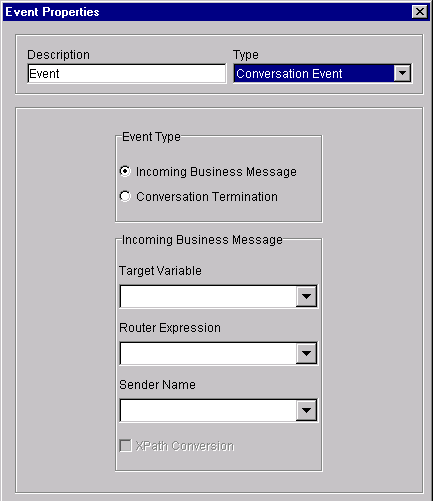
At run time, when the business message is received, the event is triggered and the target variable is set to the business message that was just received. If a router variable is specified, it contains an XPath expression that can be used to reply to the sender. For more information, see Defining the Workflow to Send Business Messages. Defining a Business Message Receive Event for the RosettaNet 2.0 Protocol If the workflow template is configured with the RosettaNet 2.0 protocol, the display of the Event Properties dialog box is refreshed with the following contents when you choose the Conversation event type. Figure 5-18 Event Properties Dialog Box for Defining a Receive RosettaNet 2.0 Message Event
To configure a Business Message Receive event for a RosettaNet 2.0 message, select values for the following fields in the Event Properties dialog box.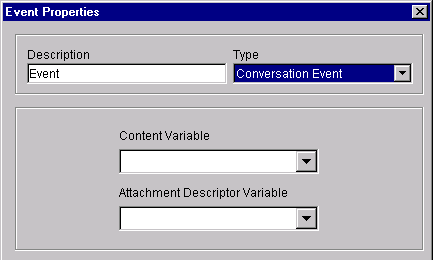
At run time, when the business message is received, the event is triggered and the target variables are set to the business message that was just received. For more information about defining a business message receive event for workflow templates configured with the RosettaNet 2.0 protocol, including examples, see Implementing RosettaNet for B2B Integration. Defining a Business Message Receive Event for the RosettaNet 1.1 Protocol If the workflow template is configured with the RosettaNet 1.1 protocol, when you select the Conversation event type, the display of the Event Properties dialog box is refreshed with the following contents. Figure 5-19 Event Properties Dialog Box for Defining a Receive RosettaNet 1.1 Message Event
To configure a Business Message Receive event for a RosettaNet 1.1 message, select the name of a target workflow variable of type XML in which to store the RosettaNet 1.1 XML business document content. At run time, when the business message is received, the event is triggered and the target variables are set to the business message that was just received. For more information about defining a business message receive event for workflow templates configured with the RosettaNet 1.1 protocol, including examples, see Implementing RosettaNet for B2B Integration.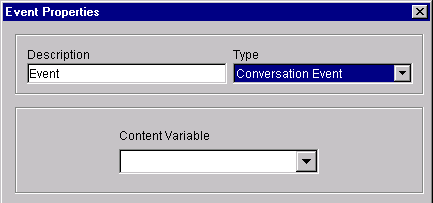

|

|

|