bea.com | products | dev2dev | support | askBEA
 Download Docs   Site Map   Glossary 
Search

Best Practices in Designing BPM Workflows

 Previous Next Contents Index View as PDF  

Best Practices in Designing BPM Workflows

The BEA WebLogic Integration Studio provides the design environment for you to design and monitor business process workflows. If you have created Studio workflows or are planning to use the Integration Studio as your workflow management system, you may want to design your workflows with some best practices in mind. The following sections provide some guidelines for constructing workflows to provide for an easier transition to future product releases:


Why Follow Best Practices?

The current WebLogic Integration Studio implementation allows the construction of unstructured workflows. Both best practices in the workflow management industry and the emerging, but young, workflow standards encourage the use of structured workflow design. Future versions of the WebLogic Integration Studio will require the use of structured workflows, in particular to support workflow standards as they mature and become ready for use. This document describes structured workflow patterns for use in the WebLogic Integration Studio today. Following these guidelines will lead to better designed workflows for easier migration to a structured workflow paradigm.

Note: These guidelines are NOT intended to suggest how you should implement your business logic.

Design for Your Business Processes

Workflows definitions encapsulate complex business processes, policies and procedures. Given their complexity, the best practice guidelines are provided in the context of common workflow patterns. For certain concepts, we provide the desired implementation of that concept, together with a list of things that should be avoided.

The provided workflow patterns and programming suggestions should not be taken as the only way to implement the corresponding concepts. They are intentionally simplified to readily convey the general design principle or to clearly point out models or workflow patterns that might not be optimal for automated migration. Clearly, your business may require different implementations or design variations for some of these concepts and your workflow designs will probably be more complex than the patterns presented as examples in this document.

Use the suggested implementations in this guide as a way to evaluate and to estimate how much you want to optimize your workflow designs. Remember that blindly following the guidelines suggested here is not suggested as it may result in incorrect workflows that do not reflect your own business processes.

Designing Workflows with WebLogic Integration Studio

The desired best practices are defined in the context of designing workflows with the WebLogic Integration Design Studio component of WebLogic Platform release 7.0. For complete information about designing workflows using the WebLogic Integration Studio, refer to the following topics:


Suggested Workflow Designs for Commonly Used Workflow Patterns

The following sections describe suggested patterns for constructing workflows. These guidelines are designed to provide some good approches to common workflow problems. Common patterns for business processes that are likely to be found in many workflows include:

The following sections describes these patterns and gives the suggested implementation of these workflows in detail.
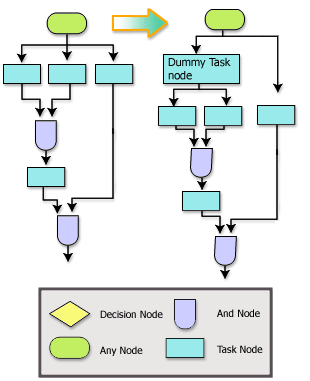
Parallel Execution

The Parallel Execution pattern represents a case in which all the parallel paths coming out of a workflow node will execute in parallel and rendezvous at an And node where the parallelism ends. Follow these guidelines to implement this workflow pattern properly.

  1. All parallel paths coming out of a node should merge at the same And node. Parallel paths originating from different nodes cannot merge at the same And node. In other words, a parallel execution region must have a single point of entry and exit. These paths can be arbitrarily complex provided that the constructs on these paths also have a single point of entry and a single point of exit. Figure  1 illustrates the Parallel Execution workflow pattern.

    Note: In BPM, parallel paths are not executed concurrently. The same thread executes each path, progresses through one until it stops, then switches to a new path and works along that path until either all paths can no longer progress or all are ready for the And node. The choice of the starting path varies.

    Figure - 1 Implementing the Parallel Execution pattern
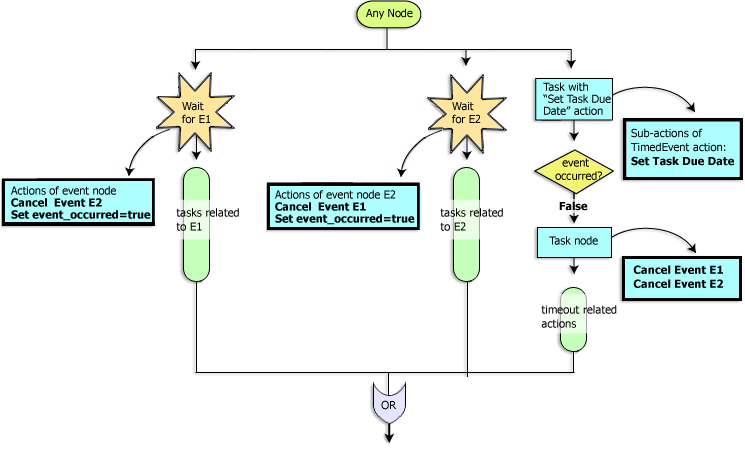


  2. If a subset of the parallel paths need to merge at a different And node, have them originate from a dummy Task node which simply marks itself as done. This will effectively create nested parallelism and make sure that the parallel execution paths have a single entry and exit points.

    Figure  2 shows how a workflow with multiple task nodes with multiple entry points might be changed using a dummy Task node to ensure parallel execution paths have single entry points and merge to a single And node.

    Figure - 2 Use single entry and exit points for nested parallelism


  3. Paths cannot vanish. A path vanishes if it reaches a node that does not have a successor. In order to fix this, simply add a line so that the path transitions directly to the And node. The diagram on the left in Figure  3 illustrates a workflow with a vanishing path. The diagram on the right in Figure  3 illustrates how the workflow should be implemented.

    Note: Paths cannot vanish, except as suggested for the workflow described in the section, Event with Timeout.

    Figure - 3 Use one entry and exit point and have no vanishing paths


Choice of Events

The Choice of Events pattern represents a case in which all the parallel paths coming out of a node wait for certain events to occur and the first event to occur determines which path will execute. (See Figure  4). Only one of parallel paths will ever execute depending on which event has occurred first. (All other paths are suppressed and will not fire). In order to guarantee mutual exclusion of the execution paths use the Cancel Event action as described in the following guidelines.

Figure - 4 Implementing the Choice of Events pattern


Use the following steps to properly implement the Choice of Events workflow pattern:
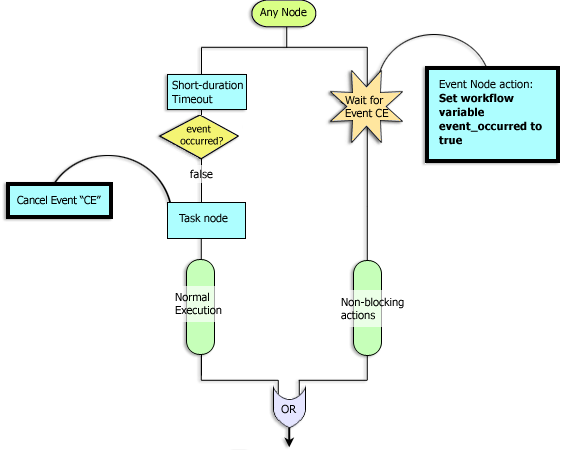
  1. All parallel paths coming out of a node should start with an Event node. Figure  4 illustrates three parallel paths exiting Any Node and each path starting with the three Event nodes. You can have as many nodes as needed provided they all start with an Event node.

  2. Establish mutual exclusion using a Cancel Event action. The action list defined for each Event node should contain one Cancel Event action for each sibling Event node.

    Note: Two nodes are siblings if they have the same parent.

    1. The Cancel Event actions should not cancel any other event node outside of the event siblings in this workflow pattern. These actions ensure that only one of these parallel paths can execute. You can define these Cancel Event actions in the Actions tab of the Event Node.

    2. Include the Cancel Event actions even if the events are guaranteed to be mutually exclusive. This will enable the migration tool to more readily migrate this workflow pattern.

  3. Put Cancel Event actions before all other actions that are declared in the Actions tab of the Event node. Preferably, place any actions other than the Cancel Event actions in a Task node that is placed after the Event node.

  4. All the parallel paths should converge to the same Or node. Figure  4 shows all parallel paths converging to the same Or node.

  5. The execution paths can contain arbitrarily complex constructs (such as sub-parallelism, nested Choice of Events pattern, and loops).

Event with Timeout

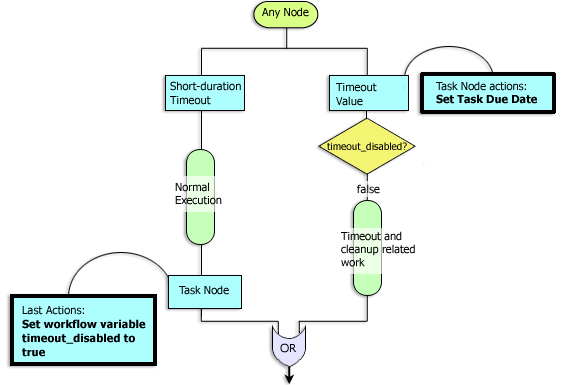
The Event with Timeout pattern represents a case where a set of mutually exclusive events are required to occur within a certain time frame or before a deadline. The first event that occurs before the timeout will run to completion, and other paths will be suppressed, including the timeout path. If, however, no events occur before the timeout, the timeout path is executed. Any event that occurs after the timeout will not trigger its corresponding execution path. Although the timeout logic can be implemented using either a Timed Event action or a Set Task Due Date action, the use of Set Task Due Date is recommended as it results in a cleaner, and easier-to-understand implementation. Figure  5 shows the proper implementation of this workflow pattern. For a description of best practices using Timed Event actions, see Event with Timeout.

Use the following guidelines to properly implement the Event with Timeout workflow pattern:

  1. Start all but one path with an Event node.Each Event node should set a variable indicating that some event has happened. Figure  5 illustrates two Event nodes, E1 and E2.

  2. Use a Task node, (refered to here as the Timeout Task node), to start the only other path. Use a Decision node following the Timeout Task node to test the value of the variable set by the Event node. In Figure  5, this Decision node is labeled "event occurred". Guidelines for using the Timeout Task node are as follows:

    1. The only action in the activated-list of the Timeout Task Node should be a Set Task Due Date. It must set the due date for the Timeout Task node. The Timeout Task node should not contain any action in its Executed- or Done-list.

    2. The last sub-action, (the timeout action),—>should mark the Timeout Task node as done. See the right branch of Figure  5 for an example of this usage. Use the Mark Task as Done action so that the execution continues from the Timeout Task node after the timeout is triggered. There should not be any other sub-action.

  3. The execution paths must converge to the same Or node.

  4. Check whether the timeout has indeed occurred: The path starting with the Timeout Task node will start execution when the due date has arrived, regardless of whether the an event has already occurred. If an event has indeed occurred, execution along the timeout path should stop. You accomplish this stop by inserting a Decision node after the Timeout Task node. The Decision node should test the value of a variable that is set by the events. If the variable is set, it indicates that an event has already happened. In that case, have the corresponding branch of the Decision node vanish, simply by not specifying the next node for that branch. The false branch of the Decision node should transition into the next node. (See the branch after the "event occured" Decision node in Figure  5.)

  5. Cancel other events when the timeout has occurred: Place Cancel Event actions on the timeout path, to cancel the events so that they will not trigger. Ideally, you should place these actions at a Task node immediately after the Decision node. Figure  5 illustrates this implementation with two Cancel Events, E1 and E2, occurring after the Decision node.

    Figure - 5 Implementing the Event with Timeout pattern


Cancellation via Event

The Cancellation via Event pattern represents a case in which an execution path is cancelled by an event (e.g., the arrival of a message that cancels an order that has been placed previously.) Two variations are possible depending on whether the execution path can be cancelled in the middle of its execution:

  1. All-or-nothing: The cancellation event prevents the execution path from executing if it has not started already. If the execution path has already started execution, the cancellation event will not have an effect, and the execution path will run to completion.

  2. Interrupt-based: The cancellation event will be effective throughout the execution of the path that is subject to cancellation. In other words, the execution path can be stopped in the middle if a cancellation event has been received. Depending on your business logic, it may be necessary to do some cleanup in order to reverse (i.e., undo) the portion of the work that has been performed prior to receiving the cancellation event.

You should decide which one of these two variations more closely reflects your business logic and implement it as suggested in the following guidelines. The first approach—>All-or-nothing—>is simpler to implement as there is no need for a cleanup work to undo the partially completed work. The second one, Interrupt-based, is more powerful, and may be the only choice if the execution path that is subject to cancellation runs for a long time.

All-or-Nothing Variation

Figure  6 shows the suggested implementation for the Cancellation via Event workflow pattern, in which the path that is subject to cancellation runs only if the cancellation event has not been received by the time it has started execution. Follow the steps given below to implement this variation properly.

Figure - 6 Implementing the Cancel via Event pattern: All-or-Nothing variation


  1. The cancellation path should start with an Event node that waits for the cancellation event (referred to as CE).

  2. To allow the Event node to register properly, and trigger it immediately if a cancellation message has been received, the normal execution path should start with a Task node that blocks (i.e., enters quiescent state) for a short duration. Entering the quiescent state, will make sure that the Event node is registered. If a cancellation event has been received it will trigger the Event node that waits for it.

  3. Add an action in the Event node that sets a variable. The value of this variable will be inspected by the normal execution path, immediately after the quiescent state is exited, in order to determine whether to continue along the normal execution path or not.

  4. Add a Decision node after the Timeout node that tests the value of the variable mentioned in Step 3. If the variable is set, have the true branch of the Decision node simply vanish, by not defining the "next" node for that branch. Have the false branch, transition into the node that starts the normal execution. Figure  6 illustrates this guideline with a false branch occuring after the event occured Decision node.

  5. Once the normal execution path starts executing, the Event node must be prevented from subsequently firing. Disable the Event node by adding a Cancel Event action that cancels the cancellation event. This action should be positioned as the first action after the Decision node. Figure  6 illustrates a Task node and its associated Cancel Event (CE) action after the Decision node.

  6. Both paths must converge to an Or node.

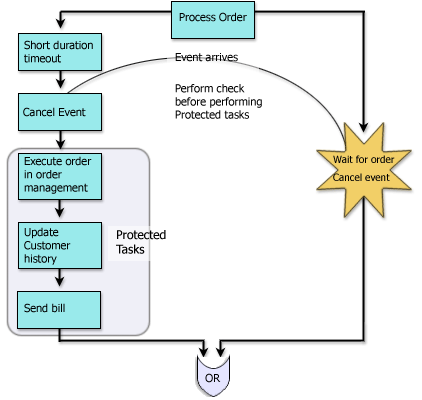
The All-or-Nothing variaton on a Cancel via Event is a pattern designed to check whether an event occured before proceeding to perform certain critical tasks. A simple example of this pattern can be seen in an order processing workflow (See Figure  7). The tasks in an order processing workflow might be as follows:

  1. Check customer status

  2. Perform order status

  3. Check on validity of order

    Note: At any point prior to the next step, the order can be cancelled. As shown in Figure  7, a Cancel Event node can be inserted prior to the set of protected tasks that handle the execution of the submitted order.

  4. Tell the order management system to execute the order.

    Figure - 7 Implementing the All-or-Nothing variation in Order Processing


Interrupt-based Variation

Figure  8 shows the suggested implementation for the Interrupt-based variation.The implementation of this variation, however, requires a greater level of coordination between the normal execution path that is subject to cancellation, and the cancellation path, so that the cleanup logic is implemented correctly.

In general, the cancellation path should perform the necessary cleanup logic.The cleanup logic might be different depending upon how far the normal execution path was able to progress. Detecting the amount of progress on the normal execution path can be done by setting certain variables in the normal execution path and then inspecting them on the cancellation path when the cancellation event occurs.Similarly, the normal execution path may need to detect that the cancellation path has been activated and perform certain cleanup actions that are not done by the cancellation path. It is up to you to implement the proper coordination in order to ensure that the resulting workflow reflects your business process accurately. We suggest you do the cleanup on one path.

Figure  8 shows only the skeleton implementation of the Interrupt-based Variation. Details of the cancellation/cleanup logic are not included.

Figure - 8 Implementing the Cancel via Event pattern: Interrupt-based variation


The following general steps demonstrate how to implement this workflow pattern properly.
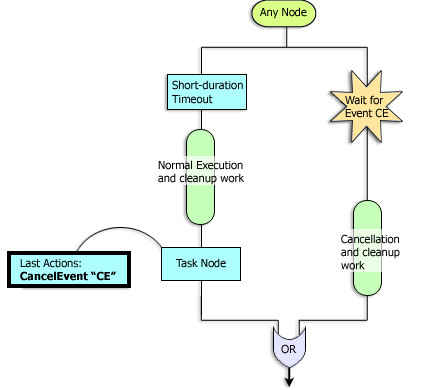
  1. The cancellation path should start with an Event node that waits for the cancellation event (referred to as CE).

  2. As in the All-or-Nothing Variation, start the normal execution path with a Task node that blocks for a short duration,. This enables the Event node to register properly.

  3. The last action of the normal execution path should disable the Event node by canceling the cancellation event (CE) through use of a Cancel Event action. This will prevent the Event node from firing once the normal execution path completes its execution and reaches the Or node. In Figure  8, this is accomplished by using a Task node at the end of the branch for completing the Event node.

  4. Both paths must converge to an Or node.Keep in mind that a cancellation event/message can activate the Event node only when the normal execution path enters a quiescent state rather than at an arbitrary point. This simplifies the cleanup logic since there usually are only a few points where the normal execution path enters quiescent state. This means there will be few combinations of "undo/cleanup" work.

Execution Timeout

The Execution Timeout pattern is similar to the Cancellation via Event pattern in that a timeout, rather than an event, will cause the cancellation of execution along a path. Figure  9 shows the suggested implementation for this workflow pattern.

The Execution Timeout pattern may require a certain level of coordination between the normal execution path and the timeout path, in case the timeout is triggered. Moreover, complex cleanup logic may be required. (See the Cancellation via Event section for a related discussion.) It is up to you to implement the necessary workflow actions for cleanup. This section only gives the skeleton implementation of this workflow pattern.

Follow these steps when implementing the Execution Timeout pattern.

  1. The timeout path must start with a Task node that contains the timeout action. Although timeout can be implemented using both the Timed Event action and Set Task Due Date action, we recommend using the Set Task Due Date action, as this results in cleaner code. Both the normal execution path and the timeout path can be arbitrarily complex, provided that the constructs contained in these paths have a single point of entry and exit.

  2. Both paths must converge to an Or node.

  3. The timeout path must be disabled once the normal execution path has finished its execution (i.e., reached the Or node). In order to do this, set a variable at the end of the normal execution path, and place a Decision node after the Timeout node that checks the value of this variable. In Figure  9, a Boolean variable named "timeout_disabled" is set to true at the end of the execution path, and this value is subsequently checked by the Decision node. The timeout path proceeds if the timeout path is not disabled.

    Figure - 9 Implementing the Execution Timeout pattern


Using Actions With Workflow Patterns

Table  1 lists actions that are associated with the workflow patterns presented in prior sections of this document. To optimize your workflows for automated migration, follow the guidelines in Table  1 when using these particular actions in your workflows:

Note: Do not define any action (such as Start Workflow) other than Set Task as Done in the callback action list for asynchronous actions.

Table 1 Guidelines for Using Workflow Actions

Action

Usage

Cancel Event

Use this action only for establishing mutual exclusion when implementing Choice of Events, Event with Timeout, or Cancellation via Event patterns.

Mark Task as Done

Use this action only for marking "self" as done or when implementing Event with Timeout pattern.

Unmark Task Done

Avoid using this action.

Set Task Due Date

Use this action only when implementing the timeout logic in the Event with Timeout pattern or Execution Timeout pattern.

Execute Task

Use this action only to auto-execute self.

Or Join

Use Or Join only when implementing the workflow patterns mentioned previously, or for joining multiple Start nodes.

And Join

Use And Join only when implementing the Parallel Execution pattern.


Using Task Nodes

The WebLogic Integration Studio Task nodes can contain an arbitrary number of actions in their Created, Activated, Executed, and Marked Done lists. You define these lists in the Task Properties dialog of the WebLogic Integration Studio. For detail information about the Task Properties dialog, see Using the WebLogic Integration Studio.

In general, there are two kinds of tasks:

Table 2 Kinds of Tasks

Tasks

Usage

User Tasks

Those tasks that are assigned to a user.User tasks block until they are explicitly executed by a user or a role.

Automated Tasks

Tasks that do not require user intervention. Automated Tasks typically execute a set of actions without the user intervention and cause the execution to proceed to the next node by marking themselves as Done.


Guidelines for User Tasks

Use of the following guidelines when implementing user tasks:

  1. Place pre-assignment tasks in the Activated list. The last action in the activated list must be one of three task assignment actions. These three actions are:

    1. Assign Task to User

    2. Assign Task to Role

    3. Assign Task Using Routing Condition

  2. Place post-assignment tasks in the Executed list. These actions are executed when the user explicitly executes the task. The last action in the Executed list must be a Mark Task as Done action, so that the task is marked done.

  3. Place actions that are related to the task (such as the Set Task Comment and Set Task Due Date) just before the "Assign Task..." action.

Guidelines for Automated Tasks

Use of the following guidelines when implementing automated tasks:

  1. All actions must be placed in the Activated list.

  2. Do not place any actions in the Executed list.

  3. The last action in the Activated list must mark the task as done using the Mark Task as Done action.


Exception Handling

Future versions of WebLogic Integration will use structured exception handling. To provide for an easier transition to future WebLogic Integration product releases, you should consider the following suggestions when setting exception handlers:

  1. When setting an exception handler in the middle of a workflow, set it back to the default exception handler at the earliest node such that the setting- and unsetting- nodes define a proper block with no paths in and out of the block. The following figure, Figure  10, illustrates this type of exception handler block. In general, try to reduce the scope in which the exception handler is active.

  2. Do not change and/or set the exception handler in the timeout path when using the Event with Timeout pattern or the Execution Timeout pattern.

  3. Do not change the exception handler in the exception path when using the Cancellation via Event pattern.

    Figure - 10 Example of an Exception Handler Block


Guidelines for Using the Studio Plug-ins

The WebLogic Integration Studio features support for plug-ins to extend the functionality of selected workflow components. Although plug-ins will continue to work, whenever possible you should use EJBs over customized plug-ins to optimize your workflows for automated migration. See Programming BPM Plug-Ins for WebLogic Integration.


Back to Top Previous Next