bea.com | products | dev2dev | support | askBEA
 Download Docs   Site Map   Glossary 
Search

BPM - Workshop Interoperability Sample

 Previous Next Contents Index View as PDF  

Running the Sample (Deprecated: 7.0 SP7)


Setting Up the Sample

This section tells you how to run the BEA WebLogic Integration BPM WebLogic Workshop Interoperability Sample.

Requirements

Note: Before running this sample, you must have installed WebLogic Platform SP2 using the Typical Installation option. A custom install does not install the Platform Domain, which is used by the Sample. For more information, see Installing WebLogic Platform at http://download.oracle.com/docs/cd/E13196_01/platform/docs70/install/index.html.

The sample requires a basic knowledge of WebLogic Integration and WebLogic Workshop. You should be familiar with the following concepts:

For more information, see the WebLogic Workshop documentation at http://download.oracle.com/docs/cd/E13226_01/workshop/docs70/index.html and Learning to Use BPM with WebLogic Integration at http://download.oracle.com/docs/cd/E13214_01/wli/docs70/bpmtutor/index.htm

How to set Up the Sample

To set up the sample, complete the following steps:

Step: 1 Run the Domain Configuration Wizard

Note: If you have already created the WLW_BPM domain, go to Step 2: Configure WebLogic Server.

  1. Start the Domain Configuration Wizard by choosing Start—>Programs—>BEA WebLogic Platform 7.0—>Domain Configuration Wizard.

  2. After the Configuration Wizard is running, select the Platform Domain template, as shown in Figure  2-1.

    Figure 2-1 BEA Configuration Wizard


  3. In the Name field, enter "WLW_BPM", and then click Next.

  4. In the Choose Server Type window, select Single Server, and then click Next.

  5. In the Choose Domain Location window, specify the following directory for the WLW_BPM domain, and then click Next:
    BEA_HOME\user_projects\

    This will create the BEA_HOME\user_projects\WLW_BPM directory.

  6. In the Configure Standalone/Administrative Server window, chose the default values, as shown in Figure  2-2, and then click Next.

    Figure 2-2 Configure Standalone/Administrative Server


  7. In the Create Administrative User window (Figure  2-3), enter a username and password, and then click Next.

    Figure 2-3 Create Administrative User


  8. In the Configure Database Mail Session window, enter an email address and host, and then click Next.

    Note: The workflows in the sample do not send email. However, you must provide this information to proceed.

  9. Windows only. In the Create Start Menu Entry For Server window, select the radio button of your choice, and then click Next. If you are unsure, select No.

    Figure 2-4 Create Start Menu Entry for Server


  10. In the Confirmation Summary window (Figure  2-5), click Create. The domain is created.

    Figure 2-5 Confirmation Summary


  11. In the Configuration Wizard Complete window (Figure  2-6), make sure the End Configuration radio button is selected, and then click Done.

    Figure 2-6 Configuration Wizard Complete


Step 2: Configure WebLogic Server

  1. Start WebLogic Server by running:
    BEA_HOME\user_projects\WLW_BPM\startWebLogic.cmd

    The server begins booting and the Pointbase database is created. (Database creation only occurs the first time you start the server in the new domain.)

  2. After the database is created, the command line asks for your username and password. Enter the username and password you created in the Domain Configuration Wizard.

  3. Later in the booting process, when the command line asks if you want to create credit card encryption/decryption keys, type "y".

    You should wait until you see a line containing <Server started in RUNNING mode> before moving on to the next step.

    Note: If you previously created the JMS Response Queue, go to Step 3: Set Up WebLogic Integration Studio.

  4. After the command line indicates that the server is running, create the JMS Response Queue, as follows:

    1. Open a browser and enter the following URL:
      http://localhost:7501/console

      The WebLogic Server Administration console opens.


    2. Enter the username and password you created in the Domain Configuration Wizard, and then click Sign In. The WebLogic Server Home page is displayed, as shown in Figure  2-7.

      Figure 2-7 WebLogic Server Administration Console


    3. In the left pane, open the WLW_BPM—>Services—>JMS—>Servers node.

    4. Click WLIJMSServer. The WLIJMSServer page is displayed, as shown in Figure  2-8.

      Figure 2-8 WLIJMSServer


    5. Click Configure Destinations. The JMS Destinations page is displayed.

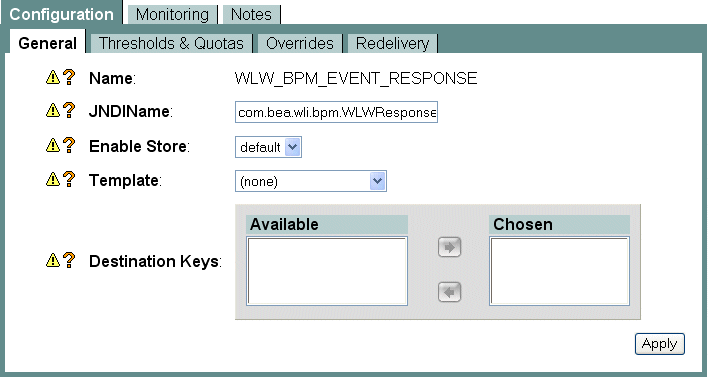
    6. Click Configure a new JMSQueue. The Create a new JMSQueue page is displayed, as shown in Figure  2-9.

      Figure 2-9 Create a New JMSQueue


    7. In the Name field, enter "WLW_BPM_EVENT_RESPONSE".

    8. In the JNDI name field, enter "com.bea.wli.bpm.WLWResponseQueue".

    9. Click Create. The new destination appears in the tree under the Servers\WLIJMSSERVER\Destinations directory.

Step 3: Set Up WebLogic Integration Studio

  1. Start the Studio by choosing Start—>Programs—>BEA WebLogic Platform 7.0—>WebLogic Integration 7.0—>Studio.

  2. Login to the Studio using these parameters: (See Figure  2-10.)

    Note: Be certain your port number is the same one you chose in the Domain Wizard.

    Figure 2-10 Figure 4-1: Logon to WebLogic Integration Studio


  3. Create an Organization named BPMWLW:

    Note: If the you have already created BPMWLW organization from running the either the SOAP-HTTP or XML-HTTP sample, delete all the template definitions before proceeding on to the next step. To delete template definitions, in the Organization tree, right-click each of the template definitions and choose Delete from the pop-up menu and go to step 4.

    1. From the Studio menu, choose Configuration—>Organizations. The Define Organizations window opens.

    2. Click Add and create an organization named "BPMWLW".

    3. After the Define Organization window appears, select BPMWLW organization, and then click Close.

  4. In the Studio, select BPMWLW from the Organization drop-list.

  5. Import the BPM_WLW workflows:

    1. From the Studio menu, choose Tools—>Import Package.

    2. If setting up the SOAP over HTTP sample, import the bpmwlwsoaphttp.jar from the BEA_HOME/weblogic700/samples/integration/samples/BPM-WLW/workflows directory.

      If setting up the XML over HTTP sample, import the bpmwlwxmlhttp.jar file from the BEA_HOME/weblogic700/samples/integration/samples/BPM-WLW/workflows directory.

      In the preceding instructions, BEA_HOME represents the WebLogic Platform home directory.

    3. In the Import: Select Components to Import window, make sure all the components are selected and that the Activate workflows after import check box is checked, and then select Import.

    Note: If a message appears asking if you want to overwrite existing template definitions and event keys, click Yes to All. This ensures that template definitions from an earlier run of the samples is overwritten by the new one.

    Figure 2-11 Select Components to Import


    1. In the Import Summary window, click Close. The templates are now available in the Organization tree.

Step 4: Set up WebLogic Workshop

  1. Unzip the sample jar files as follows:

    1. SOAP over HTTP sample - Unzip the BEA_HOME\weblogic700\samples\integration\samples\BPM-WLW\lib\wlw_bpm_soap.jar file to the BEA_HOME\user_projects\WLW_BPM\applications directory.

      This creates the wlw_bpm_soap directory, which contains the BPM2WLW.jws and WLW2BPM.jws files.

    2. XML over HTTP sample - Unzip the BEA_HOME\weblogic700\samples\integration\samples\BPM-WLW\lib\wlw_bpm_xml.jar file to the BEA_HOME\user_projects\WLW_BPM\applications directory.

      This creates the wlw_bpm_xml directory, which contains the BPM2WLW.jws and WLW2BPM.jws files.

  2. Start WebLogic Workshop by choosing Start—>Programs—>BEA WebLogic Platform 7.0—>WebLogic Workshop—>WebLogic Workshop. The Workshop window is displayed.

    Note: If you have already run a sample, Workshop will automatically start the project and server. From the File menu, select Close Project. Go to step 5.

  3. From the Workshop menu, choose Tools—>Preferences—>Paths and set the following.

    1. Set the Config directory to "BEA_HOME\user_projects".

    2. Set the other parameters as follows:

    1. Click OK.

      Figure 2-12 Setting the Path information


  4. Click OK. The Preferences window closes.

  5. From the Workshop menu, choose File—>Open Project.

  6. In the Open Project window, select wlw_bpm_soap or wlw_bpm_xml project, and then click Open.

Step 5: Launch Web Services

  1. Launch the Send PO Web service (BPM2WLW.jws):

    1. In the Workshop Project Tree, open the bpm2wlw folder.

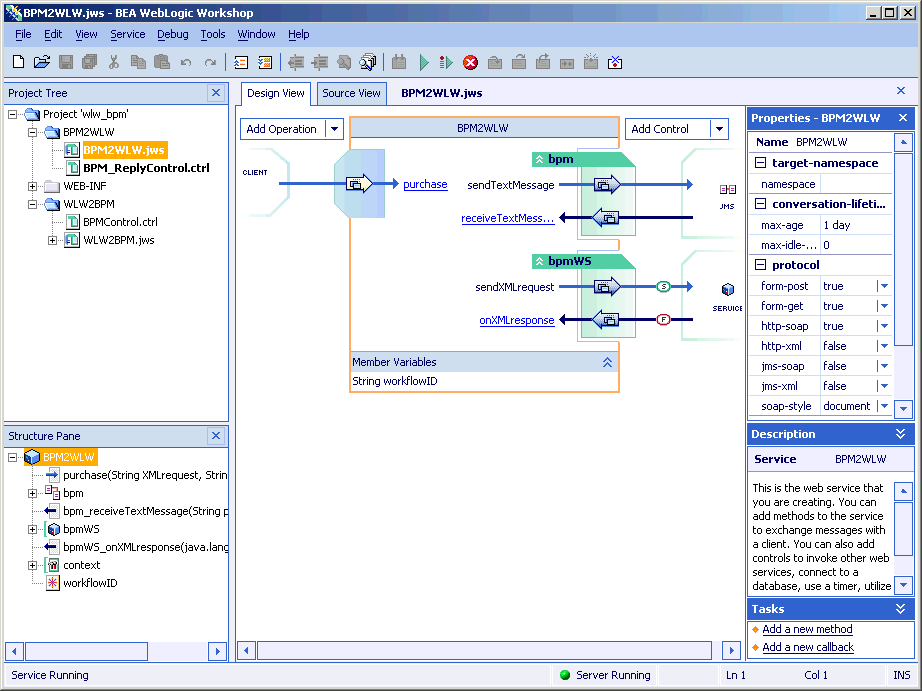
    2. Double-click the BPM2WLW.jws node. The Send PO Web service appears in the right pane, as shown in Figure  2-13 (SOAP over HTTP) or Figure  2-14 (XML over HTTP).

      Figure 2-13 Send PO Web Service—SOAP Over HTTP


      Figure 2-14 Send PO Web Service—XML Over HTTP


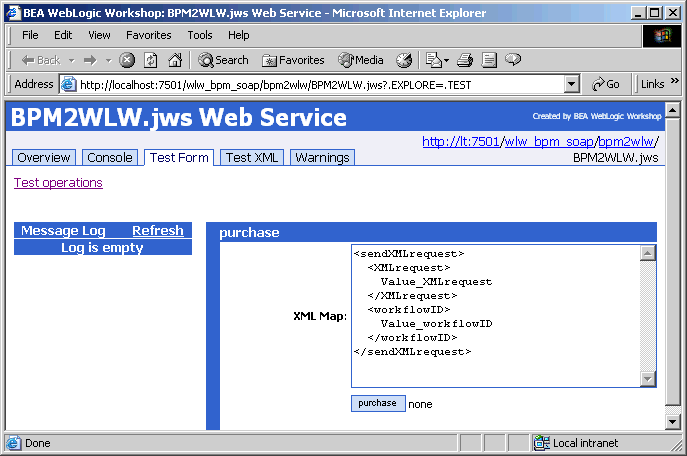
    3. From the Debug menu, select Start. The lower-left corner of Workshop displays the Build Started message. After the build is complete, the message changes to Service Running. Next a browser window opens to the Test Form for the Send PO Web service (BPM2WLW.jws), as shown in Figure  2-15 (SOAP over HTTP) or Figure  2-16 (XML over HTTP).

      Figure 2-15 Send PO Web Service—SOAP over HTTP
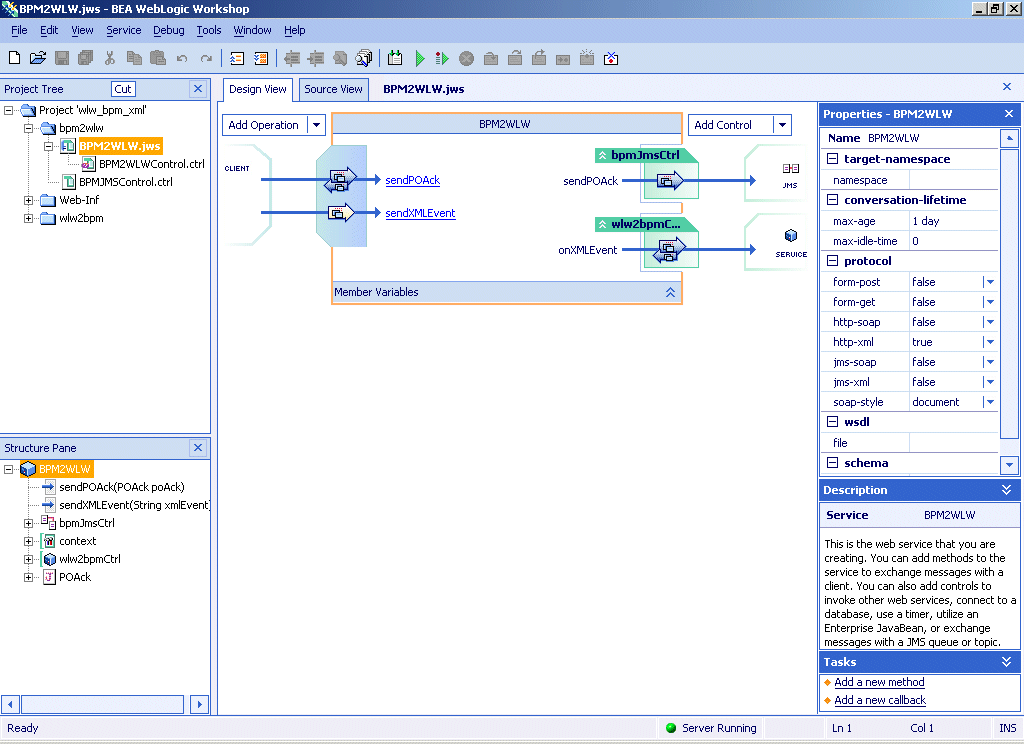


      Figure 2-16 Send PO Web Service—XML over HTTP


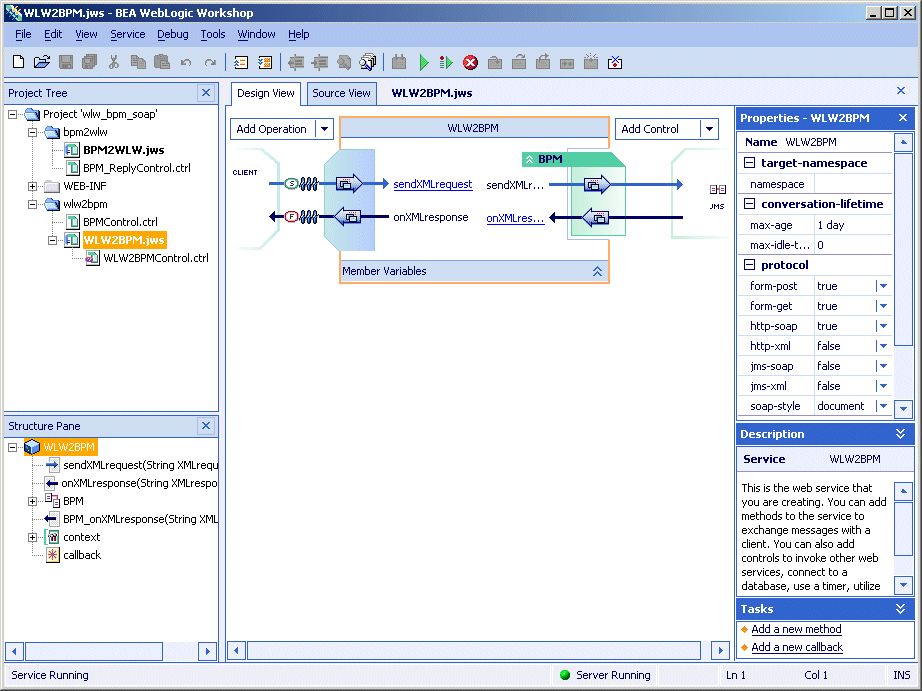
    4. In the Workshop Project Tree, open the wlw2bpm folder, and double-click the WLW2BPM.jws node. The Process PO Web service appears in the right pane, as shown in Figure  2-17 (SOAP over HTTP) or Figure  2-18 (XML over HTTP).

    Note: If the Process PO Web service (WLW2BPM.jws) is not already running, go to the Debug menu and select Start. The lower-left corner of Workshop displays a Build Started message. After the build is complete, the message changes to "Service Running." Next a browser window opens to the Test Form for the Process PO Web service, as shown in Figure  2-19 (SOAP over HTTP) or Figure  2-20 (XML over HTTP).

    Figure 2-17 Process PO Web Service—SOAP Over HTTP


    Figure 2-18 Process PO Web Service—XML Over HTTP


    1. To view the Test Form for the Process PO Web service (WLW2BPM.jws), enter the following URLs in your browser:

Note: For more information about WebLogic Workshop, see the following in the WebLogic Workshop online help:

Step 6: Set Up the WebLogic Integration Swing Worklist

  1. Start the Swing Worklist client by running:
    BEA_HOME\weblogic700\integration\bin\worklist_swing.cmd

  2. Log on to the Worklist with the following parameters:

    The Worklist opens with the following message: "Your worklist contains no pending tasks."

  3. Close the message by clicking OK.

    This completes the setup of the sample.

  4. Go to BPM-Workshop Interoperability Process, to complete the demonstration of the sample.


Back to Top Previous Next